User Guide
Page 2
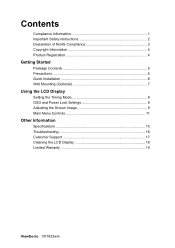
Contents Compliance Information 1 Important Safety Instructions 2 Declaration of RoHS Compliance 3 Copyright Information 4 Product Registration 4 Getting Started Package Contents 5 Precautions 5 Quick Installation 6 Wall Mounting (Optional 7 Using the LCD Display Setting the Timing Mode 8 OSD and Power Lock Settings 8 Adjusting the Screen Image 9 Main Menu Controls 11 Other Information Specifications 15 Troubleshooting 16 Customer Support 17 Cleaning the LCD Display 18 Limited Warranty 19 ViewSonic VX1932wm
Contents Compliance Information 1 Important Safety Instructions 2 Declaration of RoHS Compliance 3 Copyright Information 4 Product Registration 4 Getting Started Package Contents 5 Precautions 5 Quick Installation 6 Wall Mounting (Optional 7 Using the LCD Display Setting the Timing Mode 8 OSD and Power Lock Settings 8 Adjusting the Screen Image 9 Main Menu Controls 11 Other Information Specifications 15 Troubleshooting 16 Customer Support 17 Cleaning the LCD Display 18 Limited Warranty 19 ViewSonic VX1932wm
User Guide
Page 6
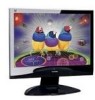
...Name: Model Number: Document Number: Serial Number: Purchase Date: VX1932wm ViewSonic 19" LCD Display VS11444 VX1932wm-3_UG_ENG Rev. 1A 05-24-07 Product disposal at : www.viewsonic.com. Environmental Protection Agency (EPA). The ViewSonic Wizard CD-ROM also provides an opportunity for you to print the... at the end of this product contains mercury. Taiwan: recycle.epa.gov.tw ViewSonic VX1932wm 4 Europe: www.viewsoniceurope.com 3. As an ENERGY STAR® partner, ViewSonic Corporation has determined that this document may be liable for any additional product information as...
...Name: Model Number: Document Number: Serial Number: Purchase Date: VX1932wm ViewSonic 19" LCD Display VS11444 VX1932wm-3_UG_ENG Rev. 1A 05-24-07 Product disposal at : www.viewsonic.com. Environmental Protection Agency (EPA). The ViewSonic Wizard CD-ROM also provides an opportunity for you to print the... at the end of this product contains mercury. Taiwan: recycle.epa.gov.tw ViewSonic VX1932wm 4 Europe: www.viewsoniceurope.com 3. As an ENERGY STAR® partner, ViewSonic Corporation has determined that this document may be liable for any additional product information as...
User Guide
Page 7
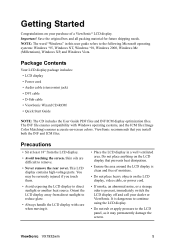
..." in a well ventilated area. You may permanently damage the screen. ViewSonic VX1932wm 5 ViewSonic recommends that prevents heat dissipation. • Ensure the area around the LCD display is clean and free of a ViewSonic® LCD display. This LCD display contains high-voltage parts. Orient the LCD display away from the LCD display. • Avoid touching the screen. Package Contents Your...
..." in a well ventilated area. You may permanently damage the screen. ViewSonic VX1932wm 5 ViewSonic recommends that prevents heat dissipation. • Ensure the area around the LCD display is clean and free of a ViewSonic® LCD display. This LCD display contains high-voltage parts. Orient the LCD display away from the LCD display. • Avoid touching the screen. Package Contents Your...
User Guide
Page 8
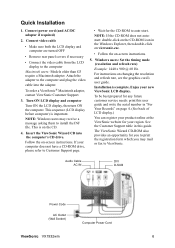
... Enjoy your region. Audio Cable AC IN DVI D-SUB Power Code AC Outlet (Wall Socket) Computer Power Cord ViewSonic VX1932wm 6 Turn ON LCD display and computer Turn ON the LCD display, then turn ON the computer. NOTE: If the CD-ROM does not autostart: double-click on the... receive a message asking them to auto-start. For instructions on -screen instructions. Attach the adapter to ViewSonic. The ViewSonic Wizard CD-ROM also provides an opportunity for your new ViewSonic LCD display. Connect power cord (and AC/DC adapter if required) 2. Windows users: Set the timing mode...
... Enjoy your region. Audio Cable AC IN DVI D-SUB Power Code AC Outlet (Wall Socket) Computer Power Cord ViewSonic VX1932wm 6 Turn ON LCD display and computer Turn ON the LCD display, then turn ON the computer. NOTE: If the CD-ROM does not autostart: double-click on the... receive a message asking them to auto-start. For instructions on -screen instructions. Attach the adapter to ViewSonic. The ViewSonic Wizard CD-ROM also provides an opportunity for your new ViewSonic LCD display. Connect power cord (and AC/DC adapter if required) 2. Windows users: Set the timing mode...
User Guide
Page 9
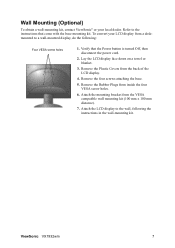
...-mounted display, do the following the instructions in the wall-mounting kit. Lay the LCD display face down on a towel or blanket. 3. Remove the four screws attaching the base. 5. Attach the LCD display to the instructions that the Power button is turned Off, then disconnect the power... Covers from the VESA compatible wall mounting kit (100 mm x 100 mm distance). 7. Attach the mounting bracket from the back of the LCD display. 4. ViewSonic VX1932wm 7 Refer to the wall, following : Four VESA screw holes 1. Verify that come with the base mounting kit. Wall Mounting (Optional) To...
...-mounted display, do the following the instructions in the wall-mounting kit. Lay the LCD display face down on a towel or blanket. 3. Remove the four screws attaching the base. 5. Attach the LCD display to the instructions that the Power button is turned Off, then disconnect the power... Covers from the VESA compatible wall mounting kit (100 mm x 100 mm distance). 7. Attach the mounting bracket from the back of the LCD display. 4. ViewSonic VX1932wm 7 Refer to the wall, following : Four VESA screw holes 1. Verify that come with the base mounting kit. Wall Mounting (Optional) To...

User Guide
Page 10
...computer to exceed the maximum refresh rate of the resolution (example 1440 x 900) and refresh rate (or vertical frequency; WARNING: Do not set your LCD display. OSD and Power Lock Settings • OSD Lock: Press and hold [1] and the up arrow S again for 10 seconds. • Power... display for 5 seconds. • OSD Unlock: Press and hold [1] and the down arrow T for 10 seconds. Using the LCD Display Setting the Timing Mode Setting the timing mode is important for 5 seconds. ViewSonic VX1932wm 8 For the best picture quality set the graphics card in permanent damage to your...
...computer to exceed the maximum refresh rate of the resolution (example 1440 x 900) and refresh rate (or vertical frequency; WARNING: Do not set your LCD display. OSD and Power Lock Settings • OSD Lock: Press and hold [1] and the up arrow S again for 10 seconds. • Power... display for 5 seconds. • OSD Unlock: Press and hold [1] and the down arrow T for 10 seconds. Using the LCD Display Setting the Timing Mode Setting the timing mode is important for 5 seconds. ViewSonic VX1932wm 8 For the best picture quality set the graphics card in permanent damage to your...

User Guide
Page 12
...: 1. NOTE: All OSD menus and adjustment screens disappear automatically after about 15 seconds. The command line at the bottom of the LCD display.) ViewSonic VX1932wm 10 To display the Main Menu, press button [1]. You can toggle between control screens, adjust the selected option, or exit the ...help you optimize your display: • Adjust the computer's graphics card so that it outputs a 1440 x 900 @ 60Hz video signal to the LCD display. (Look for instructions on "changing the refresh rate" in the graphics card's user guide.) • If necessary, make small adjustments using ...
...: 1. NOTE: All OSD menus and adjustment screens disappear automatically after about 15 seconds. The command line at the bottom of the LCD display.) ViewSonic VX1932wm 10 To display the Main Menu, press button [1]. You can toggle between control screens, adjust the selected option, or exit the ...help you optimize your display: • Adjust the computer's graphics card so that it outputs a 1440 x 900 @ 60Hz video signal to the LCD display. (Look for instructions on "changing the refresh rate" in the graphics card's user guide.) • If necessary, make small adjustments using ...
User Guide
Page 13
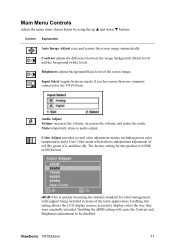
... the way they were originally intended. Enabling this product is quickly becoming the industry standard for this setting allows the LCD display to the VX1932wm. Control Explanation Auto Image Adjust sizes and centers the screen image automatically. Color Adjust provides several color adjustment modes, ... of the screen image. Main Menu Controls Adjust the menu items shown below by using the up S and down T buttons. ViewSonic VX1932wm 11 Enabling the sRGB setting will cause the Contrast and Brightness adjustments to be disabled. The factory setting for color management, with ...
... the way they were originally intended. Enabling this product is quickly becoming the industry standard for this setting allows the LCD display to the VX1932wm. Control Explanation Auto Image Adjust sizes and centers the screen image automatically. Color Adjust provides several color adjustment modes, ... of the screen image. Main Menu Controls Adjust the menu items shown below by using the up S and down T buttons. ViewSonic VX1932wm 11 Enabling the sRGB setting will cause the Contrast and Brightness adjustments to be disabled. The factory setting for color management, with ...
User Guide
Page 14
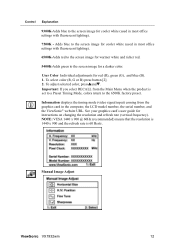
Control Explanation 9300K-Adds blue to the screen image for cooler white (used in the computer, the LCD model number, the serial number, and the ViewSonic® website URL. User Color Individual adjustments for instructions on changing the resolution and refresh rate (vertical frequency). Important: If you ... and the refresh rate is set to a Preset Timing Mode, colors return to the screen image for a darker color. Manual Image Adjust ViewSonic VX1932wm 12 To adjust selected color, pressSandT. To select color (R, G or B) press button [2]. 2. Adds blue to the 6500K factory preset.
Control Explanation 9300K-Adds blue to the screen image for cooler white (used in the computer, the LCD model number, the serial number, and the ViewSonic® website URL. User Color Individual adjustments for instructions on changing the resolution and refresh rate (vertical frequency). Important: If you ... and the refresh rate is set to a Preset Timing Mode, colors return to the screen image for a darker color. Manual Image Adjust ViewSonic VX1932wm 12 To adjust selected color, pressSandT. To select color (R, G or B) press button [2]. 2. Adds blue to the 6500K factory preset.
User Guide
Page 17
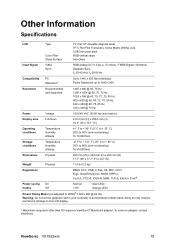
Other Information Specifications LCD Type Color Filter Glass Surface 19" (full 19" viewable diagonal area), TFT (Thin Film Transistor), Active Matrix WXGA LCD, 0.285 mm pixel pitch RGB vertical stripe Anti-Glare Input Signal Video Sync RGB analog (0.7/1.0 Vp-p, 75 ohms) / TMDS Digital (100ohms) Separate Sync, fh:30-...
Other Information Specifications LCD Type Color Filter Glass Surface 19" (full 19" viewable diagonal area), TFT (Thin Film Transistor), Active Matrix WXGA LCD, 0.285 mm pixel pitch RGB vertical stripe Anti-Glare Input Signal Video Sync RGB analog (0.7/1.0 Vp-p, 75 ohms) / TMDS Digital (100ohms) Separate Sync, fh:30-...
User Guide
Page 18
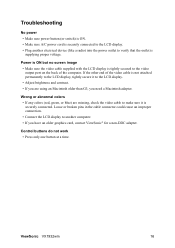
.... Loose or broken pins in the cable connector could cause an improper connection. • Connect the LCD display to another electrical device (like a radio) into the power outlet to verify that the outlet is securely connected. ViewSonic VX1932wm 16 Wrong or abnormal colors • If any colors (red, green, or blue) are using...
.... Loose or broken pins in the cable connector could cause an improper connection. • Connect the LCD display to another electrical device (like a radio) into the power outlet to verify that the outlet is securely connected. ViewSonic VX1932wm 16 Wrong or abnormal colors • If any colors (red, green, or blue) are using...
User Guide
Page 20
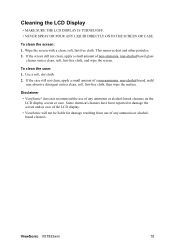
... soft, lint-free cloth, then wipe the surface. If the screen still not clean, apply a small amount of any ammonia or alcoholbased cleaners. ViewSonic VX1932wm 18 Use a soft, dry cloth. 2. To clean the case: 1. Some chemical cleaners have been reported to damage the screen and/or case of the... LCD display. • ViewSonic will not be liable for damage resulting from use of non-ammonia, non-alcohol based glass cleaner onto a clean, soft, lint-free cloth,...
... soft, lint-free cloth, then wipe the surface. If the screen still not clean, apply a small amount of any ammonia or alcoholbased cleaners. ViewSonic VX1932wm 18 Use a soft, dry cloth. 2. To clean the case: 1. Some chemical cleaners have been reported to damage the screen and/or case of the... LCD display. • ViewSonic will not be liable for damage resulting from use of non-ammonia, non-alcohol based glass cleaner onto a clean, soft, lint-free cloth,...
User Guide
Page 21
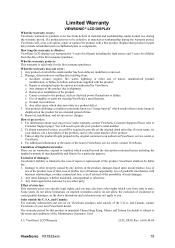
... page). Sales outside of the first consumer purchase. and Canada, contact ViewSonic or your product's serial number. 2. Limited Warranty VIEWSONIC® LCD DISPLAY What the warranty covers: ViewSonic warrants its sole option, repair or replace the product with a like... Card. 4.3: ViewSonic LCD Warranty LCD_LW02 Rev. 1d 06-30-06 ViewSonic VX1932wm 19 Exclusion of merchantability and fitness for the first consumer purchaser. Any damage of the nearest ViewSonic service center, contact ViewSonic. How long the warranty is effective: ViewSonic LCD displays are no...
... page). Sales outside of the first consumer purchase. and Canada, contact ViewSonic or your product's serial number. 2. Limited Warranty VIEWSONIC® LCD DISPLAY What the warranty covers: ViewSonic warrants its sole option, repair or replace the product with a like... Card. 4.3: ViewSonic LCD Warranty LCD_LW02 Rev. 1d 06-30-06 ViewSonic VX1932wm 19 Exclusion of merchantability and fitness for the first consumer purchaser. Any damage of the nearest ViewSonic service center, contact ViewSonic. How long the warranty is effective: ViewSonic LCD displays are no...


