User Manual
Page 2
Contents Product Registration 2 For Your Records 2 Getting Started Package Contents 3 Precautions 3 Quick Installation 4 Landscape/Portrait Modes 5 To Raise and Lower the display 5 Installation of Wall Mount (Optional 6 Using the ViewPanel Setting the Timing Mode 7 OSD Lock Mode 7 Adjusting the Screen Image 8 Other Information Specifications 13 Troubleshooting 14 Customer Support 15 Cleaning the ViewPanel 16 Limited Warranty 17 Appendix Safety Guidelines 18 Compliance Information 19 CE Conformity 19 08/01/02 A ViewSonic VP201m/VP201mb 1
Contents Product Registration 2 For Your Records 2 Getting Started Package Contents 3 Precautions 3 Quick Installation 4 Landscape/Portrait Modes 5 To Raise and Lower the display 5 Installation of Wall Mount (Optional 6 Using the ViewPanel Setting the Timing Mode 7 OSD Lock Mode 7 Adjusting the Screen Image 8 Other Information Specifications 13 Troubleshooting 14 Customer Support 15 Cleaning the ViewPanel 16 Limited Warranty 17 Appendix Safety Guidelines 18 Compliance Information 19 CE Conformity 19 08/01/02 A ViewSonic VP201m/VP201mb 1
User Manual
Page 4
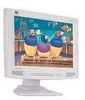
..., and the ICM file (Integrated Color Management) assures accurate on-screen colors. It is clean and free of a VP201m/VP201mb color ViewPanel®. ViewSonic VP201m/VP201mb 3 power cord • Schuko power cord • Quick Start Guide • ViewSonic Wizard CD-ROM (including user guide PDF file and INF/ICM display optimization files). (Note: Perfect PortraitTM software on...
..., and the ICM file (Integrated Color Management) assures accurate on-screen colors. It is clean and free of a VP201m/VP201mb color ViewPanel®. ViewSonic VP201m/VP201mb 3 power cord • Schuko power cord • Quick Start Guide • ViewSonic Wizard CD-ROM (including user guide PDF file and INF/ICM display optimization files). (Note: Perfect PortraitTM software on...
User Manual
Page 5
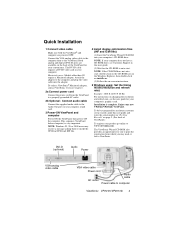
...ROM also provides an opportunity for your convenience. NOTE: If your new VP201m/VP201mb ViewPanel. NOTE: Windows 95, 98 or 2000 users may mail or fax to computer ViewSonic VP201m/VP201mb 4 This sequence (ViewPanel before computer) is complete. DVI-D (optional) Audio Power VGA analog ...video cable VGA video cable Power cord Audio cable AC outlet Power cable to ViewSonic. Connect the VGA analog video cable...
...ROM also provides an opportunity for your convenience. NOTE: If your new VP201m/VP201mb ViewPanel. NOTE: Windows 95, 98 or 2000 users may mail or fax to computer ViewSonic VP201m/VP201mb 4 This sequence (ViewPanel before computer) is complete. DVI-D (optional) Audio Power VGA analog ...video cable VGA video cable Power cord Audio cable AC outlet Power cable to ViewSonic. Connect the VGA analog video cable...
User Manual
Page 6
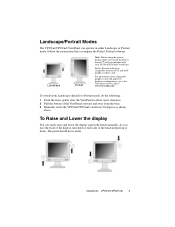
... of the display, take hold of each side of the ViewPanel outward and away from the base. 3 Manually rotate the VP201m/VP201mb clockwise 90 degrees as shown above. ViewSonic VP201m/VP201mb 5 For information about compatible graphics cards and approved hardware configurations, go to the ViewSonic website, http:// www.viewsonic.com To switch from Landscape (default) to Portrait mode...
... of the display, take hold of each side of the ViewPanel outward and away from the base. 3 Manually rotate the VP201m/VP201mb clockwise 90 degrees as shown above. ViewSonic VP201m/VP201mb 5 For information about compatible graphics cards and approved hardware configurations, go to the ViewSonic website, http:// www.viewsonic.com To switch from Landscape (default) to Portrait mode...
User Manual
Page 7
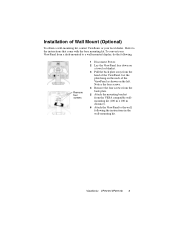
...away from the VESA compatible wallmounting kit (100 m x 100 m distance). 6 Attach the ViewPanel to the wall, following : Remove four screws 1 Disconnect Power. 2 Lay the ViewPanel face down on the left. ViewSonic VP201m/VP201mb 6 Notice the four screws. 4 Remove the four screws from the back plate. 5 Attach ...the mounting bracket from the head of the ViewPanel. Let the plate hang on the neck of Wall ...
...away from the VESA compatible wallmounting kit (100 m x 100 m distance). 6 Attach the ViewPanel to the wall, following : Remove four screws 1 Disconnect Power. 2 Lay the ViewPanel face down on the left. ViewSonic VP201m/VP201mb 6 Notice the four screws. 4 Remove the four screws from the back plate. 5 Attach ...the mounting bracket from the head of the ViewPanel. Let the plate hang on the neck of Wall ...
User Manual
Page 8
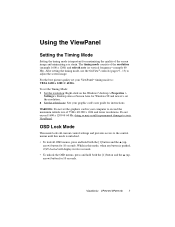
... press and hold both the [1] button and the L (up- ViewSonic VP201m/VP201mb 7 arrow) button for maximizing the quality of the resolution (example 1600 x 1200) and refresh rate (or vertical frequency--example 60 Hz). Using the ViewPanel Setting the Timing Mode Setting the timing mode is important for 10 ...on the Windows® desktop > Properties > Settings > Desktop Area or Screen Area for 10 seconds. For the best picture quality set your ViewPanel. Do not exceed 1600 x 1200 @ 60 Hz; While in your graphic card's user guide for instructions. The timing mode consists of the ...
... press and hold both the [1] button and the L (up- ViewSonic VP201m/VP201mb 7 arrow) button for maximizing the quality of the resolution (example 1600 x 1200) and refresh rate (or vertical frequency--example 60 Hz). Using the ViewPanel Setting the Timing Mode Setting the timing mode is important for 10 ...on the Windows® desktop > Properties > Settings > Desktop Area or Screen Area for 10 seconds. For the best picture quality set your ViewPanel. Do not exceed 1600 x 1200 @ 60 Hz; While in your graphic card's user guide for instructions. The timing mode consists of the ...
User Manual
Page 10
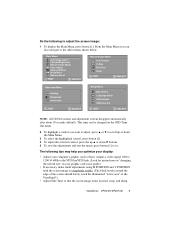
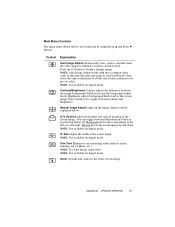
...Adjust Color Adjust Advanced Menu Setup Menu Memory Recall NOTE: All OnView menus and adjustment screens disappear automatically after about 10 seconds (default). ViewSonic VP201m/VP201mb 9 From the Main Menu you can be changed on "changing the refresh rate" in your computer's graphic card so that it ...screen image is completely visible. (The black border around the edge of the screen should barely touch the illuminated "active area" of the ViewPanel®.) • Adjust Fine Tune so that the screen image looks focused, crisp, and sharp. The following to adjust the screen image...
...Adjust Color Adjust Advanced Menu Setup Menu Memory Recall NOTE: All OnView menus and adjustment screens disappear automatically after about 10 seconds (default). ViewSonic VP201m/VP201mb 9 From the Main Menu you can be changed on "changing the refresh rate" in your computer's graphic card so that it ...screen image is completely visible. (The black border around the edge of the screen should barely touch the illuminated "active area" of the ViewPanel®.) • Adjust Fine Tune so that the screen image looks focused, crisp, and sharp. The following to adjust the screen image...
User Manual
Page 11
...menu items shown below . NOTE: Auto Image Adjust works with most common video cards. If this function does not work on your ViewPanel®, then lower the video refresh rate to 60 Hz and set value. Press button [2] to its pre-set the resolution to ...NOTE: Not available for digital mode. Position adjusts horizontal and vertical position of the screen image. NOTE: Not available for digital mode. ViewSonic VP201m/VP201mb 10 Vertical moves the screen image up the Image Adjust controls explained below can toggle between the image background (black level) and the foreground...
...menu items shown below . NOTE: Auto Image Adjust works with most common video cards. If this function does not work on your ViewPanel®, then lower the video refresh rate to 60 Hz and set value. Press button [2] to its pre-set the resolution to ...NOTE: Not available for digital mode. Position adjusts horizontal and vertical position of the screen image. NOTE: Not available for digital mode. ViewSonic VP201m/VP201mb 10 Vertical moves the screen image up the Image Adjust controls explained below can toggle between the image background (black level) and the foreground...
User Manual
Page 14
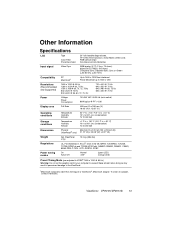
Other Information Specifications LCD Type Color Filter Protective shield 20" full viewable diagonal area, TFT (Thin Film Transistor), Active Matrix UXGA LCD, RGB vertical stripe Anti-Glare and Anti-Reflective Input signal Video Sync RGB analog (0.7/1.0 Vp-p, 75 ohms), digital DVI...536 mm (H) x 510 mm (W) x 238 mm (D) (ViewPanel® only) 21.10" (H) x 20.08" (W) x 9.37" (D) Weight Net (ViewPanel only) 13.0 kg (28.6 lbs) Regulations UL, FCC-B, ENERGY STAR®, CSA, IC-B, CE, MPRII, TUV/ERGO, TUV/GS, TCO99 (VP201m) and TCO95 (VP201mb), NEMKO, SEMKO, DEMKO, FIMKO, BSMI, PSB, C-TICK,...
Other Information Specifications LCD Type Color Filter Protective shield 20" full viewable diagonal area, TFT (Thin Film Transistor), Active Matrix UXGA LCD, RGB vertical stripe Anti-Glare and Anti-Reflective Input signal Video Sync RGB analog (0.7/1.0 Vp-p, 75 ohms), digital DVI...536 mm (H) x 510 mm (W) x 238 mm (D) (ViewPanel® only) 21.10" (H) x 20.08" (W) x 9.37" (D) Weight Net (ViewPanel only) 13.0 kg (28.6 lbs) Regulations UL, FCC-B, ENERGY STAR®, CSA, IC-B, CE, MPRII, TUV/ERGO, TUV/GS, TCO99 (VP201m) and TCO95 (VP201mb), NEMKO, SEMKO, DEMKO, FIMKO, BSMI, PSB, C-TICK,...
User Manual
Page 15
...blue) are missing, check the video cable to make sure it to the ViewPanel. • Adjust brightness and contrast. • If you are using an Macintosh older than G3, you have an older graphics card, contact ViewSonic ® for a non-DDC adapter. Troubleshooting No power • Make sure... is securely connected to the DC power supply and the power supply is firmly connected to the ViewPanel®. • Plug another computer. • If you need a Macintosh adapter. ViewSonic VP201m/VP201mb 14 If the other end of the video cable is not attached permanently to the video output ...
...blue) are missing, check the video cable to make sure it to the ViewPanel. • Adjust brightness and contrast. • If you are using an Macintosh older than G3, you have an older graphics card, contact ViewSonic ® for a non-DDC adapter. Troubleshooting No power • Make sure... is securely connected to the DC power supply and the power supply is firmly connected to the ViewPanel®. • Plug another computer. • If you need a Macintosh adapter. ViewSonic VP201m/VP201mb 14 If the other end of the video cable is not attached permanently to the video output ...

User Manual
Page 17
... from use of any ammonia or alcohol-based cleaners on the ViewPanel screen or case. Cleaning the ViewPanel • MAKE SURE THE VIEWPANEL® IS TURNED OFF. • NEVER SPRAY OR POUR ANY LIQUID DIRECTLY ONTO THE SCREEN OR CASE. ViewSonic VP201m/VP201mb 16 Disclaimer ViewSonic® does not recommend the use of any ammonia or alcohol...
... from use of any ammonia or alcohol-based cleaners on the ViewPanel screen or case. Cleaning the ViewPanel • MAKE SURE THE VIEWPANEL® IS TURNED OFF. • NEVER SPRAY OR POUR ANY LIQUID DIRECTLY ONTO THE SCREEN OR CASE. ViewSonic VP201m/VP201mb 16 Disclaimer ViewSonic® does not recommend the use of any ammonia or alcohol...
User Manual
Page 18
... your address, (d) a description of the problem, and (e) the serial number of the first consumer purchase. ViewSonic LCD Warranty (V2.0) Release Date: 10-15-1999 ViewSonic VP201m/VP201mb 17 Who the warranty protects: This warranty is effective: ViewSonic LCD ViewPanels are warranted for three (3) years for all labor from defects in material or workmanship during the warranty period. b. To...
... your address, (d) a description of the problem, and (e) the serial number of the first consumer purchase. ViewSonic LCD Warranty (V2.0) Release Date: 10-15-1999 ViewSonic VP201m/VP201mb 17 Who the warranty protects: This warranty is effective: ViewSonic LCD ViewPanels are warranted for three (3) years for all labor from defects in material or workmanship during the warranty period. b. To...
