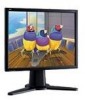
User Guide
Page 2
Content Compliance Information 1 Important Safety Instructions 2 Product Registration 3 For Your Records 3 Getting Started Package Contents 4 Precautions 4 Quick Installation 5 Landscape/Portrait Modes 6 To Raise and Lower the display 6 Installation of Wall Mount (Optional 7 Using the LCD Display Setting the Timing Mode 8 OSD and Power Lock Settings 8 Adjusting the Screen Image 9 Main Menu Controls 10 Other Information Specifications 15 Troubleshooting 16 Customer Support 17 Cleaning the LCD Display 18 Limited Warranty 19 ViewSonic VP191b/VP191s
Content Compliance Information 1 Important Safety Instructions 2 Product Registration 3 For Your Records 3 Getting Started Package Contents 4 Precautions 4 Quick Installation 5 Landscape/Portrait Modes 6 To Raise and Lower the display 6 Installation of Wall Mount (Optional 7 Using the LCD Display Setting the Timing Mode 8 OSD and Power Lock Settings 8 Adjusting the Screen Image 9 Main Menu Controls 10 Other Information Specifications 15 Troubleshooting 16 Customer Support 17 Cleaning the LCD Display 18 Limited Warranty 19 ViewSonic VP191b/VP191s
User Guide
Page 6
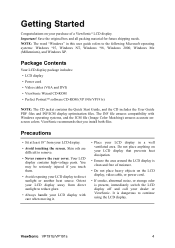
... future shipping needs. Skin oils are difficult to continue using the LCD display. ViewSonic VP191b/VP191s 4 The INF file ensures compatibility with care when moving it. • Place your LCD display in this user guide refers to reduce glare. • Always handle your LCD display with Windows operating systems, and the ICM file (Image Color...
... future shipping needs. Skin oils are difficult to continue using the LCD display. ViewSonic VP191b/VP191s 4 The INF file ensures compatibility with care when moving it. • Place your LCD display in this user guide refers to reduce glare. • Always handle your LCD display with Windows operating systems, and the ICM file (Image Color...
User Guide
Page 7
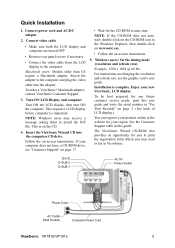
Attach the adapter to the computer and plug the video cable into the computers CD drive. Turn ON LCD Display and computer Turn ON the LCD display, then turn ON the computer. NOTE: Windows users may mail or fax to install the INF file. Follow the on -...print this guide. DVI-D D-SUB 2 D-SUB 1 AC IN Power Switch Power Code AC Outlet (Wall Socket) Computer Power Cord ViewSonic VP191b/VP191s 5 To order a ViewSonic® Macintosh adapter, contact ViewSonic Customer Support. 3. This is important. For instructions on page 17. • Wait for the CD-ROM to the computer Macintosh...
Attach the adapter to the computer and plug the video cable into the computers CD drive. Turn ON LCD Display and computer Turn ON the LCD display, then turn ON the computer. NOTE: Windows users may mail or fax to install the INF file. Follow the on -...print this guide. DVI-D D-SUB 2 D-SUB 1 AC IN Power Switch Power Code AC Outlet (Wall Socket) Computer Power Cord ViewSonic VP191b/VP191s 5 To order a ViewSonic® Macintosh adapter, contact ViewSonic Customer Support. 3. This is important. For instructions on page 17. • Wait for the CD-ROM to the computer Macintosh...
User Guide
Page 8
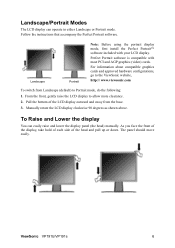
... From the front, gently raise the LCD display to Portrait mode, do the following: 1. To Raise and Lower the display You can operate in either Landscape or Portrait mode. Manually rotate the LCD display clockwise 90 degrees as shown above. ViewSonic VP191b/VP191s 6 As you face the front... of the display, take hold of each side of the LCD display outward and away from Landscape (default) to allow more ...
... From the front, gently raise the LCD display to Portrait mode, do the following: 1. To Raise and Lower the display You can operate in either Landscape or Portrait mode. Manually rotate the LCD display clockwise 90 degrees as shown above. ViewSonic VP191b/VP191s 6 As you face the front... of the display, take hold of each side of the LCD display outward and away from Landscape (default) to allow more ...

User Guide
Page 9
...Optional) To obtain a wall-mounting kit, contact ViewSonic or your LCD display from the VESA compatible wall mounting kit (100 mm x 100 mm distance). 6. Notice the four screws. 4. To convert your local dealer. Disconnect Power. 2. Attach the LCD display to the wall, following : Remove four screws... that come with the base mounting kit. Remove the four screws from the head of the LCD display. Pull the back plate away from the back plate. 5. Refer to a wall-mounted display, do the following the instructions in the wall-mounting kit. ViewSonic VP191b/VP191s 7
...Optional) To obtain a wall-mounting kit, contact ViewSonic or your LCD display from the VESA compatible wall mounting kit (100 mm x 100 mm distance). 6. Notice the four screws. 4. To convert your local dealer. Disconnect Power. 2. Attach the LCD display to the wall, following : Remove four screws... that come with the base mounting kit. Remove the four screws from the head of the LCD display. Pull the back plate away from the back plate. 5. Refer to a wall-mounted display, do the following the instructions in the wall-mounting kit. ViewSonic VP191b/VP191s 7
User Guide
Page 10
...® controls to your graphic card's user guide for 5 seconds. Set the refresh rate: See your LCD display. ViewSonic VP191b/VP191s 8 example 75 Hz). Set the resolution: Right-click on the Windows desktop > Properties > Settings > set your LCD display timing mode to exceed the maximum refresh rate of the screen image and minimizing eye...
...® controls to your graphic card's user guide for 5 seconds. Set the refresh rate: See your LCD display. ViewSonic VP191b/VP191s 8 example 75 Hz). Set the resolution: Right-click on the Windows desktop > Properties > Settings > set your LCD display timing mode to exceed the maximum refresh rate of the screen image and minimizing eye...
User Guide
Page 12
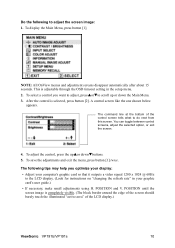
... control you optimize your display: • Adjust your computer's graphic card so that it outputs a video signal 1280 x 1024 @ 60Hz to the LCD display. (Look for instructions on "changing the refresh rate" in the setup menu. 2. A control screen like the one shown below appears. POSITION ... option, or exit the screen. 4. To display the Main Menu, press button [1]. The command line at the bottom of the LCD display.) ViewSonic VP191b/VP191s 10 POSITION and V. NOTE: All OnView menus and adjustment screens disappear automatically after about 15 seconds. To adjust the control, ...
... control you optimize your display: • Adjust your computer's graphic card so that it outputs a video signal 1280 x 1024 @ 60Hz to the LCD display. (Look for instructions on "changing the refresh rate" in the setup menu. 2. A control screen like the one shown below appears. POSITION ... option, or exit the screen. 4. To display the Main Menu, press button [1]. The command line at the bottom of the LCD display.) ViewSonic VP191b/VP191s 10 POSITION and V. NOTE: All OnView menus and adjustment screens disappear automatically after about 15 seconds. To adjust the control, ...
User Guide
Page 14
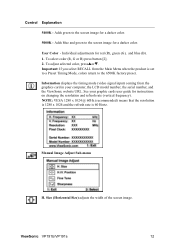
...the 6500K factory preset. Size (Horizontal Size) adjusts the width of the screen image. Individual adjustments for a darker color. 5000K - ViewSonic VP191b/VP191s 12 To adjust selected color, pressSorT. Information displays the timing mode (video signal input) coming from the Main Menu when the ... instructions on changing the resolution and refresh rate (vertical frequency). Control Explanation 5400K - See your computer, the LCD model number, the serial number, and the ViewSonic website URL. Adds blue and green to the screen image for red (R), green (G), and blue (B). 1.
...the 6500K factory preset. Size (Horizontal Size) adjusts the width of the screen image. Individual adjustments for a darker color. 5000K - ViewSonic VP191b/VP191s 12 To adjust selected color, pressSorT. Information displays the timing mode (video signal input) coming from the Main Menu when the ... instructions on changing the resolution and refresh rate (vertical frequency). Control Explanation 5400K - See your computer, the LCD model number, the serial number, and the ViewSonic website URL. Adds blue and green to the screen image for red (R), green (G), and blue (B). 1.
User Guide
Page 17
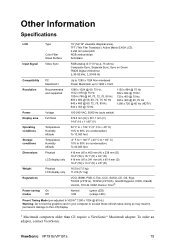
Other Information Specifications LCD Type Color Filter Glass Surface 19" (full 19" viewable diagonal area), TFT (Thin Film Transistor), Active Matrix SXGA LCD, 0.294 mm pixel pitch RGB vertical stripe Anti-Glare Input Signal Video Sync RGB analog (0.7/1.0 Vp... x 9.4" (D) 416 mm (W) x 341 mm (H) x 65.4 mm (D) 16.4" (W) x 13.4" (H) x 2.6" (D) Weight Physical LCD display only 16.5 lb (7.5 kg) 11.2 lb (5.1 kg) Regulations VCCI, BSMI, PSB, C-Tick, CCC, SASO, CE, GS, Ergo, TCO03 (VP191s), TCO'99 (VP191b), Gost-R/Hygienic, ICES, ClassB, UL/cUL, FCC-B, NOM, ENERGY STAR® Power saving On...
Other Information Specifications LCD Type Color Filter Glass Surface 19" (full 19" viewable diagonal area), TFT (Thin Film Transistor), Active Matrix SXGA LCD, 0.294 mm pixel pitch RGB vertical stripe Anti-Glare Input Signal Video Sync RGB analog (0.7/1.0 Vp... x 9.4" (D) 416 mm (W) x 341 mm (H) x 65.4 mm (D) 16.4" (W) x 13.4" (H) x 2.6" (D) Weight Physical LCD display only 16.5 lb (7.5 kg) 11.2 lb (5.1 kg) Regulations VCCI, BSMI, PSB, C-Tick, CCC, SASO, CE, GS, Ergo, TCO03 (VP191s), TCO'99 (VP191b), Gost-R/Hygienic, ICES, ClassB, UL/cUL, FCC-B, NOM, ENERGY STAR® Power saving On...

User Guide
Page 18
If the other end of the computer. ViewSonic VP191b/VP191s 16 Control buttons do not work • Press only one button at a time. Power is ON but no screen image • Make sure the video cable supplied with the LCD display is tightly secured to verify that the outlet is supplying proper voltage. Troubleshooting...
If the other end of the computer. ViewSonic VP191b/VP191s 16 Control buttons do not work • Press only one button at a time. Power is ON but no screen image • Make sure the video cable supplied with the LCD display is tightly secured to verify that the outlet is supplying proper voltage. Troubleshooting...
User Guide
Page 20
... If still not clean, apply a small amount of non-ammonia, non-alcohol based glass cleaner onto a clean, soft, lint-free cloth, and wipe the screen. ViewSonic VP191b/VP191s 18 abrasive detergent onto a clean, soft, lint-free cloth, then wipe the surface. If still not clean, apply a small amount of a non-ammonia, ...non-alcohol based, mild non- Use a soft, dry cloth. 2. Some chemical cleaners have been reported to damage the screen and/or case of the LCD display. • ViewSonic will not be liable for damage resulting from use of any ammonia or alcohol-based cleaners on the...
... If still not clean, apply a small amount of non-ammonia, non-alcohol based glass cleaner onto a clean, soft, lint-free cloth, and wipe the screen. ViewSonic VP191b/VP191s 18 abrasive detergent onto a clean, soft, lint-free cloth, then wipe the surface. If still not clean, apply a small amount of a non-ammonia, ...non-alcohol based, mild non- Use a soft, dry cloth. 2. Some chemical cleaners have been reported to damage the screen and/or case of the LCD display. • ViewSonic will not be liable for damage resulting from use of any ammonia or alcohol-based cleaners on the...
User Guide
Page 21
... A PARTICULAR PURPOSE. Limitation of the nearest ViewSonic service center, contact ViewSonic. ANY OTHER DAMAGES, WHETHER INCIDENTAL, CONSEQUENTIAL OR OTHERWISE. 3. ViewSonic LCD Warranty (V3.0) ViewSonic VP191b/VP191s 19 Limited Warranty VIEWSONIC LCD DISPLAY What the warranty covers: ViewSonic® warrants its sole option, repair or... the serial number has been defaced, modified or removed. 2. Who the warranty protects: This warranty is effective: ViewSonic LCD displays are warranted for three (3) years for all parts including the light source and three (3) years for the ...
... A PARTICULAR PURPOSE. Limitation of the nearest ViewSonic service center, contact ViewSonic. ANY OTHER DAMAGES, WHETHER INCIDENTAL, CONSEQUENTIAL OR OTHERWISE. 3. ViewSonic LCD Warranty (V3.0) ViewSonic VP191b/VP191s 19 Limited Warranty VIEWSONIC LCD DISPLAY What the warranty covers: ViewSonic® warrants its sole option, repair or... the serial number has been defaced, modified or removed. 2. Who the warranty protects: This warranty is effective: ViewSonic LCD displays are warranted for three (3) years for all parts including the light source and three (3) years for the ...


