
User Guide
Page 3
... some external devices, which do not support hot-plugging-in. 17. Notebook PC has vents to the rating label on the floppy disks. 6. DO NOT throw notebook PC in a car. 7. DO NOT insert anything into notebook PC. DO NOT press or touch the LCD Screen. INPUT RATING: Refer to disperse heat. Use only the Battery Packs approved by an incorrect type. Important Safety Instructions 1. DO...
... some external devices, which do not support hot-plugging-in. 17. Notebook PC has vents to the rating label on the floppy disks. 6. DO NOT throw notebook PC in a car. 7. DO NOT insert anything into notebook PC. DO NOT press or touch the LCD Screen. INPUT RATING: Refer to disperse heat. Use only the Battery Packs approved by an incorrect type. Important Safety Instructions 1. DO...
User Guide
Page 6
... 1 Introducing Your Notebook...4 1.1 Front Side ...5 1.1.1 MIC ...6 1.1.2 Camera...6 1.1.3 Power Buttons ...6 1.1.4 Wireless (Blue) Bluetooth (Blue) Led 6 1.1.5 Power (Blue) Led...6 1.1.6 Battery (Blue/Amber) Led 6 1.1.7 HDD (Blue) Led ...6 1.1.8 Number Lock (Blue) Led 6 1.1.9 Caps Lock (Blue) Led ...6 1.1.10 Program DJ (Blue) Led...7 1.1.11 WOW Audio Button...7 1.1.12 WOW Video Button ...7 1.2 Right Side ...8 1.2.1 Headphone ...8 1.2.2 Microphone...8 1.2.3 USB 2.0 ...9 1.2.4 ODD (Green) ...9 1.3 Left Side...10 1.3.1 Kensington Lock ...10 1.3.2 DC-in ...11 1.3.3 CRT ...11 1.3.4 HDMI ...11...
... 1 Introducing Your Notebook...4 1.1 Front Side ...5 1.1.1 MIC ...6 1.1.2 Camera...6 1.1.3 Power Buttons ...6 1.1.4 Wireless (Blue) Bluetooth (Blue) Led 6 1.1.5 Power (Blue) Led...6 1.1.6 Battery (Blue/Amber) Led 6 1.1.7 HDD (Blue) Led ...6 1.1.8 Number Lock (Blue) Led 6 1.1.9 Caps Lock (Blue) Led ...6 1.1.10 Program DJ (Blue) Led...7 1.1.11 WOW Audio Button...7 1.1.12 WOW Video Button ...7 1.2 Right Side ...8 1.2.1 Headphone ...8 1.2.2 Microphone...8 1.2.3 USB 2.0 ...9 1.2.4 ODD (Green) ...9 1.3 Left Side...10 1.3.1 Kensington Lock ...10 1.3.2 DC-in ...11 1.3.3 CRT ...11 1.3.4 HDMI ...11...
User Guide
Page 7
2.1.3 Power Options Properties 16 2.1.3.1 Select a power plan 17 2.1.3.2 Power buttons and password protection 17 2.1.3.3 Create a power plan 18 2.1.4 Speed Step ...18 2.2 Battery ...20 2.2.1 Battery Performance ...20 2.2.2 Checking the Battery Charge 20 2.2.3 Power Meter ...21 2.2.4 Low-Battery Warning ...21 2.2.5 Charging the Battery ...21 2.2.6 Low-Battery Warning ...22 2.2.7 Removing the Battery...22 2.2.8 Installing a Battery ...22 2.2.9 Storing a Battery ...22 2.2.10 Working With Extra Battery Packs 23 2.2.11 Maximizing Battery Life 23 Chapter 3 The BIOS Setup Program ...24 3.1 ...
2.1.3 Power Options Properties 16 2.1.3.1 Select a power plan 17 2.1.3.2 Power buttons and password protection 17 2.1.3.3 Create a power plan 18 2.1.4 Speed Step ...18 2.2 Battery ...20 2.2.1 Battery Performance ...20 2.2.2 Checking the Battery Charge 20 2.2.3 Power Meter ...21 2.2.4 Low-Battery Warning ...21 2.2.5 Charging the Battery ...21 2.2.6 Low-Battery Warning ...22 2.2.7 Removing the Battery...22 2.2.8 Installing a Battery ...22 2.2.9 Storing a Battery ...22 2.2.10 Working With Extra Battery Packs 23 2.2.11 Maximizing Battery Life 23 Chapter 3 The BIOS Setup Program ...24 3.1 ...
User Guide
Page 8
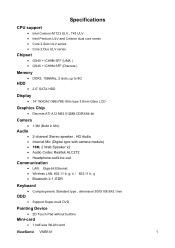
... , HD Audio • Internal Mic (Digital type with camera module) • 18Φ, 2 Watt Speaker x2 • Audio Codec Realtek ALC272 • Headphone-out/Line-out Communication • LAN: Giga-bit Ethernet • Wireless LAN, 802.11 b, g, n / 802.11 b, g • Bluetooth 2.1 ,EDR Keyboard • Compal generic Standard type , dimension 300X108.9X5.1mm ODD • Support Super-multi DVD Pointing Device • 2D Touch Pad without buttons Mini-card •...
... , HD Audio • Internal Mic (Digital type with camera module) • 18Φ, 2 Watt Speaker x2 • Audio Codec Realtek ALC272 • Headphone-out/Line-out Communication • LAN: Giga-bit Ethernet • Wireless LAN, 802.11 b, g, n / 802.11 b, g • Bluetooth 2.1 ,EDR Keyboard • Compal generic Standard type , dimension 300X108.9X5.1mm ODD • Support Super-multi DVD Pointing Device • 2D Touch Pad without buttons Mini-card •...

User Guide
Page 9
... jack • USB 2.0 x 2 ports, E-SATA+USB x1 • HDMI • One VGA port, 15 pins • RJ-45 jack x 1 • 3-in-1 Flash Card Reader(SD/MMC/MS) x 1 • Kensington lock x 1 System Status Indicators (UI spec) LED indicator: • Power Button (Blue) • Caps Lock(Blue) • Num Lock(Blue) • Wireless Status Wireless (Blue) Bluetooth (Blue) • Power (Blue) • Battery (Blue / Amber) • HDD (Blue) Control buttons • Power On/ Off button Killer Switch • YES, for WLAN/Bluetooth AC Adapter...
... jack • USB 2.0 x 2 ports, E-SATA+USB x1 • HDMI • One VGA port, 15 pins • RJ-45 jack x 1 • 3-in-1 Flash Card Reader(SD/MMC/MS) x 1 • Kensington lock x 1 System Status Indicators (UI spec) LED indicator: • Power Button (Blue) • Caps Lock(Blue) • Num Lock(Blue) • Wireless Status Wireless (Blue) Bluetooth (Blue) • Power (Blue) • Battery (Blue / Amber) • HDD (Blue) Control buttons • Power On/ Off button Killer Switch • YES, for WLAN/Bluetooth AC Adapter...

User Guide
Page 10
Software • Phoenix BIOS • Flash ROM 1MB • Support multi-boot • Suspend to RAM (S3)/Disk (S4) • Support SMBIOS 2.4 ,PCI2.2 • DMI utility for BIOS serial number configurable/asset tag • Support PXE • Wake on LAN from S3 • Wake on LAN from S4 in AC mode OS • Windows Vista Premium (32bits) • Windows 7 32 bits (TBD by marketing) Security • Kensington lock Application SW Optional, Compal proprietary •...
Software • Phoenix BIOS • Flash ROM 1MB • Support multi-boot • Suspend to RAM (S3)/Disk (S4) • Support SMBIOS 2.4 ,PCI2.2 • DMI utility for BIOS serial number configurable/asset tag • Support PXE • Wake on LAN from S3 • Wake on LAN from S4 in AC mode OS • Windows Vista Premium (32bits) • Windows 7 32 bits (TBD by marketing) Security • Kensington lock Application SW Optional, Compal proprietary •...
User Guide
Page 13
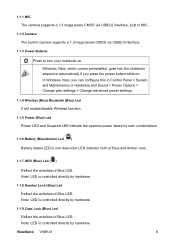
... configure this in camera supports a 1.3 mega pixels CMOS via USB2.0 interface. 1.1.3 Power Buttons Press to turn your notebook on . 1.1.1 MIC The camera supports a 1.3 mega pixels CMOS via USB2.0 interface, built in MIC. 1.1.2 Camera The built-in Control Panel > System and Maintenance or Hardware and Sound > Power Options > Change plan settings > Change advanced power settings. 1.1.4 Wireless (Blue) Bluetooth (Blue) Led It will enable/disable Wireless function. 1.1.5 Power (Blue) Led Power LED and Suspend LED indicate the systems power states by hardware. 1.1.8 Number Lock (Blue) Led...
... configure this in camera supports a 1.3 mega pixels CMOS via USB2.0 interface. 1.1.3 Power Buttons Press to turn your notebook on . 1.1.1 MIC The camera supports a 1.3 mega pixels CMOS via USB2.0 interface, built in MIC. 1.1.2 Camera The built-in Control Panel > System and Maintenance or Hardware and Sound > Power Options > Change plan settings > Change advanced power settings. 1.1.4 Wireless (Blue) Bluetooth (Blue) Led It will enable/disable Wireless function. 1.1.5 Power (Blue) Led Power LED and Suspend LED indicate the systems power states by hardware. 1.1.8 Number Lock (Blue) Led...

User Guide
Page 18
... port to connect an e-SATA or USB device, such as Radio Frequency (RF) coaxial cable, composite video, S-Video, SCART, component video, D-Terminal, and VGA. 1.3.5 RJ-45 The RJ-45 network jack allows you use a compatible cable or correctly connect the cable to the computer. While the AC adapter works with electrical outlets worldwide, power connectors and power strips vary by country. Ensure you to connect your notebook to your computer. 1.3.4 HDMI...
... port to connect an e-SATA or USB device, such as Radio Frequency (RF) coaxial cable, composite video, S-Video, SCART, component video, D-Terminal, and VGA. 1.3.5 RJ-45 The RJ-45 network jack allows you use a compatible cable or correctly connect the cable to the computer. While the AC adapter works with electrical outlets worldwide, power connectors and power strips vary by country. Ensure you to connect your notebook to your computer. 1.3.4 HDMI...
User Guide
Page 22
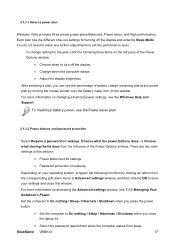
..., place it in your notebook may be accessed via Start > Control Panel > System and Maintenance > Power Options. When Sleep Mode is charged. In Sleep Mode, if your notebook loses power from the battery packs. ViewSonic VNB141 15 The Advanced settings can configure it through the Power Options program in power management. Your notebook comes with built-in the Control Panel, to sleep, hibernate, and wake according to the same operating state it was before entering sleep. You can be lost...
..., place it in your notebook may be accessed via Start > Control Panel > System and Maintenance > Power Options. When Sleep Mode is charged. In Sleep Mode, if your notebook loses power from the battery packs. ViewSonic VNB141 15 The Advanced settings can configure it through the Power Options program in power management. Your notebook comes with built-in the Control Panel, to sleep, hibernate, and wake according to the same operating state it was before entering sleep. You can be lost...
User Guide
Page 23
To enter Sleep Mode in the Power Options window. To exit Sleep Mode, please press the Power Button. Depending on Sleep Mode, see 2.1 Turning Your Notebook On and Off 2.1.3 Power Options Properties To access the Windows Power Options window: Start > Control Panel > System and Maintenance > Power Options ViewSonic VNB141 16 The settings can be accessed via Power Options: Advanced settings window. You cannot exit Sleep Mode by using any key or the Touch Pad. Your notebook will return to enter Sleep Mode, as you set the Power Management Options in before entering Hibernate ...
To enter Sleep Mode in the Power Options window. To exit Sleep Mode, please press the Power Button. Depending on Sleep Mode, see 2.1 Turning Your Notebook On and Off 2.1.3 Power Options Properties To access the Windows Power Options window: Start > Control Panel > System and Maintenance > Power Options ViewSonic VNB141 16 The settings can be accessed via Power Options: Advanced settings window. You cannot exit Sleep Mode by using any key or the Touch Pad. Your notebook will return to enter Sleep Mode, as you set the Power Management Options in before entering Hibernate ...
User Guide
Page 24
You do not need to make any further adjustments to Do nothing / Sleep / Hibernate / Shutdown when you press the power button. • Set the computer to set the performance level. ViewSonic VNB141 17 For more information on changing advanced power settings, see the percentage of battery charge remaining and active power plan by clicking an option from sleep. For more information on accessing the Advanced settings window, see 7.1.1 Managing Your Notebook's Power. Set the computer to...
You do not need to make any further adjustments to Do nothing / Sleep / Hibernate / Shutdown when you press the power button. • Set the computer to set the performance level. ViewSonic VNB141 17 For more information on changing advanced power settings, see the percentage of battery charge remaining and active power plan by clicking an option from sleep. For more information on accessing the Advanced settings window, see 7.1.1 Managing Your Notebook's Power. Set the computer to...

User Guide
Page 27
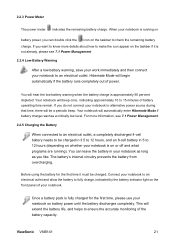
... the Battery Charge Battery Status Indicator behavior Charging Flashes blue Fully Charged Solid blue Critical Low Amber > approximately 3 minutes left; For more details on purchasing compatible batteries, please contact your local waste disposal or environmental agency for advice on the different operating conditions. The Power Management Options can be set to do so may last less time if you use is low. Contact your notebook...
... the Battery Charge Battery Status Indicator behavior Charging Flashes blue Fully Charged Solid blue Critical Low Amber > approximately 3 minutes left; For more details on purchasing compatible batteries, please contact your local waste disposal or environmental agency for advice on the different operating conditions. The Power Management Options can be set to do so may last less time if you use is low. Contact your notebook...
User Guide
Page 28
... battery needs to be charged. When your notebook to an electrical outlet. This will automatically enter Hibernate Mode if battery charge reaches a critically low level. 2.2.3 Power Meter The power meter indicates the remaining battery charge. Once a battery pack is approximately 90 percent depleted. Before using the battery for the first time, please use your notebook. Connect your notebook to an electrical outlet and allow the battery to ensure the accurate monitoring of...
... battery needs to be charged. When your notebook to an electrical outlet. This will automatically enter Hibernate Mode if battery charge reaches a critically low level. 2.2.3 Power Meter The power meter indicates the remaining battery charge. Once a battery pack is approximately 90 percent depleted. Before using the battery for the first time, please use your notebook. Connect your notebook to an electrical outlet and allow the battery to ensure the accurate monitoring of...
User Guide
Page 29
.... The battery indicator will also light amber if the battery is bad and needs replacing. 2.2.6 Low-Battery Warning After a low-battery warning, save your work immediately and then connect your notebook to the right (Unlock position). Your notebook will light amber. Fully charge the battery before using your notebook again. If this situation occurs, the battery indicator will automatically enter Hibernate Mode if battery charge reaches a critically low level. Remove the battery. 2.2.8 Installing a Battery Slide the battery into place...
.... The battery indicator will also light amber if the battery is bad and needs replacing. 2.2.6 Low-Battery Warning After a low-battery warning, save your work immediately and then connect your notebook to the right (Unlock position). Your notebook will light amber. Fully charge the battery before using your notebook again. If this situation occurs, the battery indicator will automatically enter Hibernate Mode if battery charge reaches a critically low level. Remove the battery. 2.2.8 Installing a Battery Slide the battery into place...
User Guide
Page 32
... all the available options, and second, to -use your new settings. Via easy-to make changes to the system configuration and tailor the operation of the optional settings among the different submenus follows. A ROM-based configuration utility displays the system's configuration status and provides you to make settings appropriate for all Setup options. However, eventually you through the Setup program by the factory technicians. ViewSonic VNB141 25 This chapter guides you may want...
... all the available options, and second, to -use your new settings. Via easy-to make changes to the system configuration and tailor the operation of the optional settings among the different submenus follows. A ROM-based configuration utility displays the system's configuration status and provides you to make settings appropriate for all Setup options. However, eventually you through the Setup program by the factory technicians. ViewSonic VNB141 25 This chapter guides you may want...

User Guide
Page 33
... or need to correct the problem. This message will then be prompted to prevent any errors or invalid settings and prompt you accidentally configure a setting, use the Setup program, at some time in this chapter. A warning message may want to redefine the communication ports to run the BIOS Setup program. ƒ You have set SATA Controller Mode. Even if you are divided into 2 parts as...
... or need to correct the problem. This message will then be prompted to prevent any errors or invalid settings and prompt you accidentally configure a setting, use the Setup program, at some time in this chapter. A warning message may want to redefine the communication ports to run the BIOS Setup program. ƒ You have set SATA Controller Mode. Even if you are divided into 2 parts as...
User Guide
Page 34
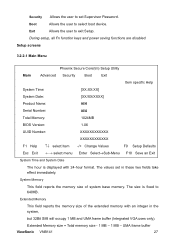
... buffer (Integrated VGA uses only). Setup screens 3.2.2.1 Main Menu Phoenix Secure Core(tm) Setup Utility Main Advanced Security Boot Exit Item specific Help System Time: [XX:XX:XX] System Date: [XX/XX/XXXX] Product Name: N/A Serial Number: N/A Total Memory: 1024MB BIOS Version: 1.06 UUID Number: XXXXXXXXXXXX XXXXXXXXXXXX F1 Help ↑↓ select Item -/+ Change Values F9 Setup Defaults Esc Exit ←→ select menu Enter Select→Sub...
... buffer (Integrated VGA uses only). Setup screens 3.2.2.1 Main Menu Phoenix Secure Core(tm) Setup Utility Main Advanced Security Boot Exit Item specific Help System Time: [XX:XX:XX] System Date: [XX/XX/XXXX] Product Name: N/A Serial Number: N/A Total Memory: 1024MB BIOS Version: 1.06 UUID Number: XXXXXXXXXXXX XXXXXXXXXXXX F1 Help ↑↓ select Item -/+ Change Values F9 Setup Defaults Esc Exit ←→ select menu Enter Select→Sub...
User Guide
Page 35
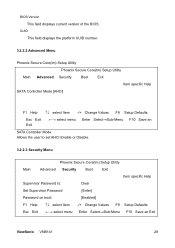
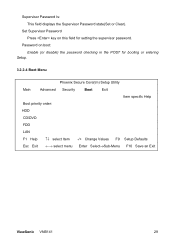
... SATA Controller Mode Allows the user to set AHCI Enable or Disable. 3.2.2.3 Security Menu Phoenix Secure Core(tm) Setup Utility Main Advanced Security Boot Exit Item specific Help Supervisor Password Is: Clear Set Supervisor Password [Enter] Password on boot: [Enabled] F1 Help ↑↓ select Item -/+ Change Values F9 Setup Defaults Esc Exit ←→ select menu Enter Select→Sub-Menu F10 Save an Exit ViewSonic VNB141 28 BIOS Version This field displays current version of the BIOS.
... SATA Controller Mode Allows the user to set AHCI Enable or Disable. 3.2.2.3 Security Menu Phoenix Secure Core(tm) Setup Utility Main Advanced Security Boot Exit Item specific Help Supervisor Password Is: Clear Set Supervisor Password [Enter] Password on boot: [Enabled] F1 Help ↑↓ select Item -/+ Change Values F9 Setup Defaults Esc Exit ←→ select menu Enter Select→Sub-Menu F10 Save an Exit ViewSonic VNB141 28 BIOS Version This field displays current version of the BIOS.
User Guide
Page 36
... Password Is: This field displays the Supervisor Password state(Set or Clear). Set Supervisor Password Press key on boot: Enable (or disable) the password checking in the POST for setting the supervisor password. Password on this field for booting or entering Setup. 3.2.2.4 Boot Menu Phoenix Secure Core(tm) Setup Utility Main Advanced Security Boot Exit Item specific Help Boot priority order: HDD CD/DVD FDD LAN F1 Help ↑↓ select Item -/+ Change Values F9 Setup Defaults Esc Exit ←→ select menu Enter...
... Password Is: This field displays the Supervisor Password state(Set or Clear). Set Supervisor Password Press key on boot: Enable (or disable) the password checking in the POST for setting the supervisor password. Password on this field for booting or entering Setup. 3.2.2.4 Boot Menu Phoenix Secure Core(tm) Setup Utility Main Advanced Security Boot Exit Item specific Help Boot priority order: HDD CD/DVD FDD LAN F1 Help ↑↓ select Item -/+ Change Values F9 Setup Defaults Esc Exit ←→ select menu Enter...
User Guide
Page 39
... product for the third-party software included with the product. Removal or installation of supplies or parts not meeting ViewSonic's specifications. Use of the product. For information about receiving service under warranty, contact ViewSonic Customer Support (Please refer to an authorized ViewSonic service center or ViewSonic. 4. You will , at its products to follow instructions supplied with the product or installed by the balance of any...
... product for the third-party software included with the product. Removal or installation of supplies or parts not meeting ViewSonic's specifications. Use of the product. For information about receiving service under warranty, contact ViewSonic Customer Support (Please refer to an authorized ViewSonic service center or ViewSonic. 4. You will , at its products to follow instructions supplied with the product or installed by the balance of any...
