User Guide
Page 2
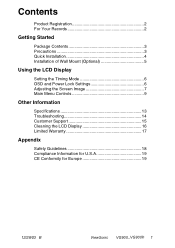
Contents Product Registration 2 For Your Records 2 Getting Started Package Contents 3 Precautions 3 Quick Installation 4 Installation of Wall Mount (Optional 5 Using the LCD Display Setting the Timing Mode 6 OSD and Power Lock Settings 6 Adjusting the Screen Image 7 Main Menu Controls 9 Other Information Specifications 13 Troubleshooting 14 Customer Support 15 Cleaning the LCD Display 16 Limited Warranty 17 Appendix Safety Guidelines 18 Compliance Information for U.S.A 19 CE Conformity for Europe 19 12/29/03 B ViewSonic VG900_VG900b 1
Contents Product Registration 2 For Your Records 2 Getting Started Package Contents 3 Precautions 3 Quick Installation 4 Installation of Wall Mount (Optional 5 Using the LCD Display Setting the Timing Mode 6 OSD and Power Lock Settings 6 Adjusting the Screen Image 7 Main Menu Controls 9 Other Information Specifications 13 Troubleshooting 14 Customer Support 15 Cleaning the LCD Display 16 Limited Warranty 17 Appendix Safety Guidelines 18 Compliance Information for U.S.A 19 CE Conformity for Europe 19 12/29/03 B ViewSonic VG900_VG900b 1
User Guide
Page 4
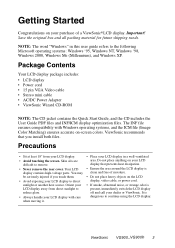
...file (Image Color Matching) ensures accurate on-screen colors. NOTE: The word "Windows" in a well-ventilated area. ViewSonic VG900_VG900b 3 Package Contents Your LCD display package includes: • LCD display • Power cord • 15 pin VGA Video cable • Stereo mini cable • AC/DC ...moving it. • Place your dealer or ViewSonic. Your LCD display contains high-voltage parts. It is present, immediately switch the LCD display off and call your LCD display in this user guide refers to continue using the LCD display. Important! Save the original box and ...
...file (Image Color Matching) ensures accurate on-screen colors. NOTE: The word "Windows" in a well-ventilated area. ViewSonic VG900_VG900b 3 Package Contents Your LCD display package includes: • LCD display • Power cord • 15 pin VGA Video cable • Stereo mini cable • AC/DC ...moving it. • Place your dealer or ViewSonic. Your LCD display contains high-voltage parts. It is present, immediately switch the LCD display off and call your LCD display in this user guide refers to continue using the LCD display. Important! Save the original box and ...
User Guide
Page 5
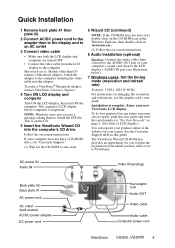
...(See back of your new ViewSonic, LCD display. NOTE: Windows users may mail or fax to the LCD display's AUDIO IN port (see the graphic card's user guide. This sequence (LCD display before computer) is complete. Enjoy your computer's sound card, then to ViewSonic. To be best prepared for...the serial number in the Windows Explorer, then double-click on viewsonic.exe. (2) Follow the on-screen instructions. 6 Audio Installation (optional) Speakers: Connect the audio cable (limecolored) to the AUDIO OUT port of LCD display.) You can register your product online at the website for...
...(See back of your new ViewSonic, LCD display. NOTE: Windows users may mail or fax to the LCD display's AUDIO IN port (see the graphic card's user guide. This sequence (LCD display before computer) is complete. Enjoy your computer's sound card, then to ViewSonic. To be best prepared for...the serial number in the Windows Explorer, then double-click on viewsonic.exe. (2) Follow the on-screen instructions. 6 Audio Installation (optional) Speakers: Connect the audio cable (limecolored) to the AUDIO OUT port of LCD display.) You can register your product online at the website for...

User Guide
Page 6
... wall mount on the back as shown on a towel or blanket. Installation of Wall Mount (Optional) To obtain a wall-mounting kit, contact ViewSonic or your LCD display from a desk-mounted to a wall-mounted display, do the following the instructions in the wall-mounting kit. Notice the four screw holes ...for wall mount 1 Disconnect Power. 2 Lay the LCD display face down on the left. 3 Attach the mounting bracket from the VESA compatible wallmounting kit (100 mm x 100 mm distance). 4 Attach the...
... wall mount on the back as shown on a towel or blanket. Installation of Wall Mount (Optional) To obtain a wall-mounting kit, contact ViewSonic or your LCD display from a desk-mounted to a wall-mounted display, do the following the instructions in the wall-mounting kit. Notice the four screw holes ...for wall mount 1 Disconnect Power. 2 Lay the LCD display face down on the left. 3 Attach the mounting bracket from the VESA compatible wallmounting kit (100 mm x 100 mm distance). 4 Attach the...
User Guide
Page 7
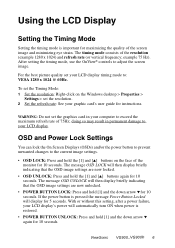
... graphic card's user guide for instructions. The message OSD LOCK will display for 10 seconds. ViewSonic VG900_VG900b 6 For the best picture quality set the graphics card in permanent damage to your LCD display timing mode to the current image settings. • OSD LOCK: Press and hold [1]... seconds. After setting the timing mode, use the OnView® controls to exceed the maximum refresh rate of the monitor for 10 seconds. WARNING: Do not set your LCD display. The message OSD UNLOCK will automatically turn ON when power is restored. • POWER BUTTON UNLOCK: Press ...
... graphic card's user guide for instructions. The message OSD LOCK will display for 10 seconds. ViewSonic VG900_VG900b 6 For the best picture quality set the graphics card in permanent damage to your LCD display timing mode to the current image settings. • OSD LOCK: Press and hold [1]... seconds. After setting the timing mode, use the OnView® controls to exceed the maximum refresh rate of the monitor for 10 seconds. WARNING: Do not set your LCD display. The message OSD UNLOCK will automatically turn ON when power is restored. • POWER BUTTON UNLOCK: Press ...
User Guide
Page 9
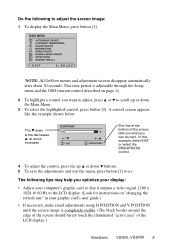
...following tips may help you want to adjust, press ▲ or ▼ to scroll up arrow increases The line at the bottom of the LCD display.) ViewSonic VG900_VG900b 8 The ▼ down arrow decreases, ▲ up or down ▼ buttons. 5 To save the adjustments and exit the menu, ...outputs a video signal 1280 x 1024 @ 60 Hz to adjust the screen image: 1 To display the Main Menu, press button [1]. The following to the LCD display. (Look for instructions on page 11. 2 To highlight a control you optimize your display: • Adjust your graphic card's user guide.) •...
...following tips may help you want to adjust, press ▲ or ▼ to scroll up arrow increases The line at the bottom of the LCD display.) ViewSonic VG900_VG900b 8 The ▼ down arrow decreases, ▲ up or down ▼ buttons. 5 To save the adjustments and exit the menu, ...outputs a video signal 1280 x 1024 @ 60 Hz to adjust the screen image: 1 To display the Main Menu, press button [1]. The following to the LCD display. (Look for instructions on page 11. 2 To highlight a control you optimize your display: • Adjust your graphic card's user guide.) •...
User Guide
Page 10
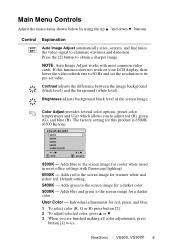
... signal to the screen image for cooler white (used in most office settings with most common video cards. Adds red to eliminate waviness and distortion. ViewSonic VG900_VG900b 9 Press the [2] button to its pre-set value. If this product is 6500K (6500 Kelvin). 9300K - The factory setting for a darker color. NOTE: ... G or B) press button [2]. 2 To adjust selected color, press ▲ or ▼. 3 When you to the screen image for this function does not work on your LCD display, then lower the video refresh rate to 60 Hz and set the resolution to obtain a sharper image.
... signal to the screen image for cooler white (used in most office settings with most common video cards. Adds red to eliminate waviness and distortion. ViewSonic VG900_VG900b 9 Press the [2] button to its pre-set value. If this product is 6500K (6500 Kelvin). 9300K - The factory setting for a darker color. NOTE: ... G or B) press button [2]. 2 To adjust selected color, press ▲ or ▼. 3 When you to the screen image for this function does not work on your LCD display, then lower the video refresh rate to 60 Hz and set the resolution to obtain a sharper image.
User Guide
Page 11
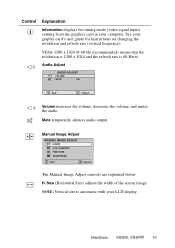
... 1280 x 1024 @ 60 Hz (recommended) means that the resolution is 1280 x 1024 and the refresh rate is automatic with your LCD display. Mute temporarily silences audio output. Size (Horizontal Size) adjusts the width of the screen image. NOTE: Vertical size is 60 ...volume, decreases the volume, and mutes the audio. See your computer. Manual Image Adjust The Manual Image Adjust controls are explained below: H. ViewSonic VG900_VG900b 10 Control Explanation Information displays the timing mode (video signal input) coming from the graphics card in your graphic card's user guide for...
... 1280 x 1024 @ 60 Hz (recommended) means that the resolution is 1280 x 1024 and the refresh rate is automatic with your LCD display. Mute temporarily silences audio output. Size (Horizontal Size) adjusts the width of the screen image. NOTE: Vertical size is 60 ...volume, decreases the volume, and mutes the audio. See your computer. Manual Image Adjust The Manual Image Adjust controls are explained below: H. ViewSonic VG900_VG900b 10 Control Explanation Information displays the timing mode (video signal input) coming from the graphics card in your graphic card's user guide for...
User Guide
Page 14
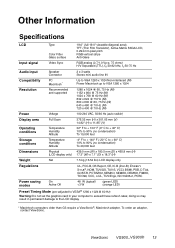
Other Information Specifications LCD Type Color Filter Glass surface 19.0" (full 19.0" viewable diagonal area), TFT (Thin Film Transistor), Active Matrix SXGA LCD, 0.294 mm pixel pitch RGB vertical stripe Anti-Glare Input signal Video Sync RGB analog (0.7/1.0 Vp-p, 75 ohms) H/V...% to 90% (no condensation) To 40,000 feet Dimensions Physical 439.0 mm (W) x 180.5 mm (D) x 465.8 mm (H) (LCD display only) 17.3" (W) x 7.1" (D) x 18.3" (H) Weight Net 7.5 kg (16.54 lbs) LCD display only Regulations UL, FCC-B, CB Report, CE, IC-B (Doc-B), ENERGY STAR®, NOM, TUV/GS, TUV-S, VCCI, BSMI,...
Other Information Specifications LCD Type Color Filter Glass surface 19.0" (full 19.0" viewable diagonal area), TFT (Thin Film Transistor), Active Matrix SXGA LCD, 0.294 mm pixel pitch RGB vertical stripe Anti-Glare Input signal Video Sync RGB analog (0.7/1.0 Vp-p, 75 ohms) H/V...% to 90% (no condensation) To 40,000 feet Dimensions Physical 439.0 mm (W) x 180.5 mm (D) x 465.8 mm (H) (LCD display only) 17.3" (W) x 7.1" (D) x 18.3" (H) Weight Net 7.5 kg (16.54 lbs) LCD display only Regulations UL, FCC-B, CB Report, CE, IC-B (Doc-B), ENERGY STAR®, NOM, TUV/GS, TUV-S, VCCI, BSMI,...
User Guide
Page 15
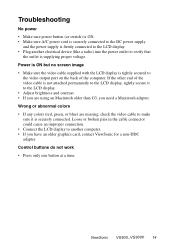
...blue) are missing, check the video cable to make sure it to the LCD display. • Adjust brightness and contrast. • If you are using an Macintosh older than G3, you have an older graphics card, contact ViewSonic for a non-DDC adapter. Loose or broken pins in the cable connector ...could cause an improper connection. • Connect the LCD display to the LCD display, tightly secure it is securely connected. If the other end of ...
...blue) are missing, check the video cable to make sure it to the LCD display. • Adjust brightness and contrast. • If you are using an Macintosh older than G3, you have an older graphics card, contact ViewSonic for a non-DDC adapter. Loose or broken pins in the cable connector ...could cause an improper connection. • Connect the LCD display to the LCD display, tightly secure it is securely connected. If the other end of ...
User Guide
Page 17
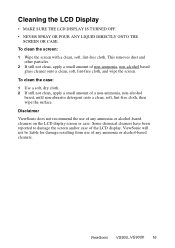
...a soft, dry cloth. 2 If still not clean, apply a small amount of the LCD display. Disclaimer ViewSonic does not recommend the use of any ammonia or alcohol-based cleaners on the LCD display screen or case. ViewSonic VG900_VG900b 16 This removes dust and other particles. 2 If still not clean, apply a ...small amount of any ammonia or alcohol-based cleaners. Cleaning the LCD Display • MAKE SURE THE LCD DISPLAY IS TURNED OFF. • NEVER SPRAY OR POUR ANY LIQUID DIRECTLY ONTO THE SCREEN OR CASE. ViewSonic will not be liable for damage resulting from use of non-ammonia,...
...a soft, dry cloth. 2 If still not clean, apply a small amount of the LCD display. Disclaimer ViewSonic does not recommend the use of any ammonia or alcohol-based cleaners on the LCD display screen or case. ViewSonic VG900_VG900b 16 This removes dust and other particles. 2 If still not clean, apply a ...small amount of any ammonia or alcohol-based cleaners. Cleaning the LCD Display • MAKE SURE THE LCD DISPLAY IS TURNED OFF. • NEVER SPRAY OR POUR ANY LIQUID DIRECTLY ONTO THE SCREEN OR CASE. ViewSonic will not be liable for damage resulting from use of non-ammonia,...
User Guide
Page 18
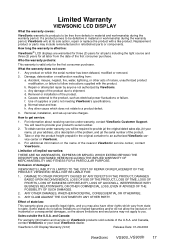
...may not apply to you. Some states do not allow limitations on which does not relate to shipment. ViewSonic LCD Display Warranty (V3.0) Release Date: 01-29-2002 ViewSonic VG900_VG900b 17 Replacement product or parts may also have other cause which the serial number has been defaced, ..., at its products to state. ANY CLAIM AGAINST THE CUSTOMER BY ANY OTHER PARTY. Who the warranty protects: This warranty is effective: ViewSonic® LCD displays are warranted for three (3) years for all parts including the light source and three (3) years for the first consumer purchaser. Use...
...may not apply to you. Some states do not allow limitations on which does not relate to shipment. ViewSonic LCD Display Warranty (V3.0) Release Date: 01-29-2002 ViewSonic VG900_VG900b 17 Replacement product or parts may also have other cause which the serial number has been defaced, ..., at its products to state. ANY CLAIM AGAINST THE CUSTOMER BY ANY OTHER PARTY. Who the warranty protects: This warranty is effective: ViewSonic® LCD displays are warranted for three (3) years for all parts including the light source and three (3) years for the first consumer purchaser. Use...


