User Guide
Page 4
... the screen. Save the original box and all packing material for future shipping needs. ViewSonic VG900_VG900b 3 The INF file ensures compatibility with care when moving it. • Place your LCD display in this user guide refers to continue using the LCD display. Precautions • Sit at least 18" from direct sunlight to remove. •...
... the screen. Save the original box and all packing material for future shipping needs. ViewSonic VG900_VG900b 3 The INF file ensures compatibility with care when moving it. • Place your LCD display in this user guide refers to continue using the LCD display. Precautions • Sit at least 18" from direct sunlight to remove. •...
User Guide
Page 5
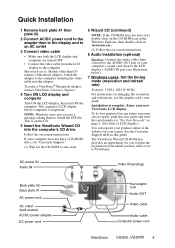
... Connect the video cable from the LCD display to the computer and plug the video cable into the computer's CD drive. See the Customer Support table in this user guide and write the serial number in the Windows Explorer, then double-click on viewsonic.exe. (2) Follow the on changing ... a Macintosh adapter. This sequence (LCD display before computer) is complete. To be best prepared for you to print the registration form which you may receive a message asking them to the LCD display's AUDIO IN port (see the graphic card's user guide. The ViewSonic Wizard CD-ROM also provides an ...
... Connect the video cable from the LCD display to the computer and plug the video cable into the computer's CD drive. See the Customer Support table in this user guide and write the serial number in the Windows Explorer, then double-click on viewsonic.exe. (2) Follow the on changing ... a Macintosh adapter. This sequence (LCD display before computer) is complete. To be best prepared for you to print the registration form which you may receive a message asking them to the LCD display's AUDIO IN port (see the graphic card's user guide. The ViewSonic Wizard CD-ROM also provides an ...
User Guide
Page 7
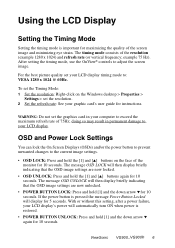
... 75 Hz). For the best picture quality set your graphic card's user guide for instructions. With or without this setting, after a power failure, your LCD display's power will automatically turn ON when power is pressed the message Power... POWER BUTTON LOCK: Press and hold the [1] and [▲] buttons again for 10 seconds. ViewSonic VG900_VG900b 6 To set the Timing Mode: 1 Set the resolution: Right-click on the face of 75Hz; doing ...: Do not set the resolution. 2 Set the refresh rate: See your LCD display timing mode to exceed the maximum refresh rate of the monitor for 10 seconds.
... 75 Hz). For the best picture quality set your graphic card's user guide for instructions. With or without this setting, after a power failure, your LCD display's power will automatically turn ON when power is pressed the message Power... POWER BUTTON LOCK: Press and hold the [1] and [▲] buttons again for 10 seconds. ViewSonic VG900_VG900b 6 To set the Timing Mode: 1 Set the resolution: Right-click on the face of 75Hz; doing ...: Do not set the resolution. 2 Set the refresh rate: See your LCD display timing mode to exceed the maximum refresh rate of the monitor for 10 seconds.
User Guide
Page 9
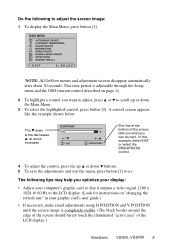
...the highlighted control, press button [2]. The ▼ down arrow decreases, ▲ up arrow increases The line at the bottom of the LCD display.) ViewSonic VG900_VG900b 8 This time period is completely visible. (The black border around the edge of the screen should barely touch the illuminated "active... appears like the example shown below. Do the following tips may help you optimize your display: • Adjust your graphic card's user guide.) • If necessary, make small adjustments using H POSITION and V POSITION until the screen image is adjustable through the Setup menu and...
...the highlighted control, press button [2]. The ▼ down arrow decreases, ▲ up arrow increases The line at the bottom of the LCD display.) ViewSonic VG900_VG900b 8 This time period is completely visible. (The black border around the edge of the screen should barely touch the illuminated "active... appears like the example shown below. Do the following tips may help you optimize your display: • Adjust your graphic card's user guide.) • If necessary, make small adjustments using H POSITION and V POSITION until the screen image is adjustable through the Setup menu and...
User Guide
Page 11
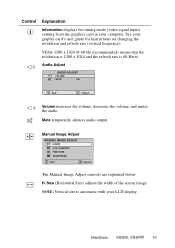
... below: H. Control Explanation Information displays the timing mode (video signal input) coming from the graphics card in your graphic card's user guide for instructions on changing the resolution and refresh rate (vertical frequency). Mute temporarily silences audio output. Size (Horizontal Size) adjusts the width...x 1024 @ 60 Hz (recommended) means that the resolution is 1280 x 1024 and the refresh rate is automatic with your LCD display. Audio Adjust AUDIO ADJUST VOLUME MUTE ON 1 : Exit 2 : Select Volume increases the volume, decreases the volume, and mutes the audio...
... below: H. Control Explanation Information displays the timing mode (video signal input) coming from the graphics card in your graphic card's user guide for instructions on changing the resolution and refresh rate (vertical frequency). Mute temporarily silences audio output. Size (Horizontal Size) adjusts the width...x 1024 @ 60 Hz (recommended) means that the resolution is 1280 x 1024 and the refresh rate is automatic with your LCD display. Audio Adjust AUDIO ADJUST VOLUME MUTE ON 1 : Exit 2 : Select Volume increases the volume, decreases the volume, and mutes the audio...
User Guide
Page 13
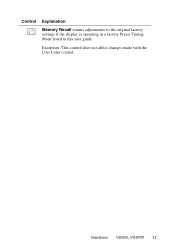
Control Explanation Memory Recall returns adjustments to the original factory settings if the display is operating in a factory Preset Timing Mode listed in this user guide. ViewSonic VG900_VG900b 12 Exception: This control does not affect changes made with the User Color control.
Control Explanation Memory Recall returns adjustments to the original factory settings if the display is operating in a factory Preset Timing Mode listed in this user guide. ViewSonic VG900_VG900b 12 Exception: This control does not affect changes made with the User Color control.
