
PS501W User Guide English
Page 1
Warranty information contained in this User Guide to obtain important information on our web site at http:// box in a safe manner, as well as registering your product in the upper right corner of our website. PS500X/PS501X/PS600X/PS501W/ PS600W DLP Projector User Guide IMPORTANT: Please read this User Guide will describe your limited coverage from ViewSonic Corporation, which is also found on installing and using your product for future service. VS17258/VS17259/VS17260/VS17261 VS17262 "Antes de operar su equipo lea cu idadosamente las instrucciones en este manual" Model No.
Warranty information contained in this User Guide to obtain important information on our web site at http:// box in a safe manner, as well as registering your product in the upper right corner of our website. PS500X/PS501X/PS600X/PS501W/ PS600W DLP Projector User Guide IMPORTANT: Please read this User Guide will describe your limited coverage from ViewSonic Corporation, which is also found on installing and using your product for future service. VS17258/VS17259/VS17260/VS17261 VS17262 "Antes de operar su equipo lea cu idadosamente las instrucciones en este manual" Model No.

PS501W User Guide English
Page 5
... being part of VESA. Product Name: Model Number: Document Number: Serial Number: Purchase Date: For Your Records PS500X/PS501X/PS600X/PS501W/PS600W ViewSonic DLP Projector VS17258/VS17259/VS17260/VS17261/VS17262 PS500X/PS501X/PS600X/PS501W/PS600W _UG_ENG Rev. 1A 12-26-17 Product disposal at end of Microsoft Corporation in this document may change without...
... being part of VESA. Product Name: Model Number: Document Number: Serial Number: Purchase Date: For Your Records PS500X/PS501X/PS600X/PS501W/PS600W ViewSonic DLP Projector VS17258/VS17259/VS17260/VS17261/VS17262 PS500X/PS501X/PS600X/PS501W/PS600W _UG_ENG Rev. 1A 12-26-17 Product disposal at end of Microsoft Corporation in this document may change without...
PS501W User Guide English
Page 6
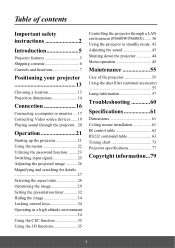
...14 Connection 16 Connecting a computer or monitor .... 17 Connecting Video source devices ...... 18 Playing sound through the projector .. 20 Operation 21 Starting up the projector 21 Using the menus 22 Utilizing the password function ......... 23 Switching input signal 25 Adjusting the projected image ... the 3D functions 35 Controlling the projector through a LAN environment (PS600W/PS600X)....... 36 Using the projector in standby mode. 43 Adjusting the sound 43 Shutting down the projector 44 Menu operation 45 Maintenance 55 Care of the projector 55 Using the dust filter (optional...
...14 Connection 16 Connecting a computer or monitor .... 17 Connecting Video source devices ...... 18 Playing sound through the projector .. 20 Operation 21 Starting up the projector 21 Using the menus 22 Utilizing the password function ......... 23 Switching input signal 25 Adjusting the projected image ... the 3D functions 35 Controlling the projector through a LAN environment (PS600W/PS600X)....... 36 Using the projector in standby mode. 43 Adjusting the sound 43 Shutting down the projector 44 Menu operation 45 Maintenance 55 Care of the projector 55 Using the dust filter (optional...

PS501W User Guide English
Page 7
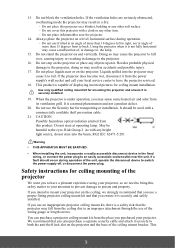
...use of this manual and marked on the product. Safety Instructions 1. Always open the lens shutter or remove the lens cap when the projector lamp is NOT stable. In some countries, the line voltage is on rare occasions. 9. To temporarily turn off the lamp, press BLANK... up. - Never replace the lamp assembly or any of the following environments. - Refer servicing only to qualified service personnel. 4. Allow at the projector lens during operation. Locations where the altitudes are dangerous high voltages inside of a car with an ambient temperature above 40°C / 104°F ...
...use of this manual and marked on the product. Safety Instructions 1. Always open the lens shutter or remove the lens cap when the projector lamp is NOT stable. In some countries, the line voltage is on rare occasions. 9. To temporarily turn off the lamp, press BLANK... up. - Never replace the lamp assembly or any of the following environments. - Refer servicing only to qualified service personnel. 4. Allow at the projector lens during operation. Locations where the altitudes are dangerous high voltages inside of a car with an ambient temperature above 40°C / 104°F ...
PS501W User Guide English
Page 8
...only qualified ceiling mount kit for transporting or installation. It is under operation, you ensure it . Risk Group 2. If you use an inappropriate projector ceiling mount kit, there is a safety risk that you may fall over, causing injury or resulting in the fixed wiring, or connect the ... wet, disconnect it is capable of displaying inverted pictures for ceiling mounting of more than 15 degrees front to have a pleasant experience using your projector, so we strongly recommend that you purchased your attention to prevent damage to , the lamp. 15. Do not use of , or damage...
...only qualified ceiling mount kit for transporting or installation. It is under operation, you ensure it . Risk Group 2. If you use an inappropriate projector ceiling mount kit, there is a safety risk that you may fall over, causing injury or resulting in the fixed wiring, or connect the ... wet, disconnect it is capable of displaying inverted pictures for ceiling mounting of more than 15 degrees front to have a pleasant experience using your projector, so we strongly recommend that you purchased your attention to prevent damage to , the lamp. 15. Do not use of , or damage...

PS501W User Guide English
Page 9
will perform the secondary role of restraining the projector should its attachment to the mounting bracket become loose. 4
will perform the secondary role of restraining the projector should its attachment to the mounting bracket become loose. 4

PS501W User Guide English
Page 10
...CEC (Consumer Electronics Control) function allows synchronized power ON/ OFF operation between the projector and a CEC-compatible DVD player device connected to the HDMI input of the projector The apparent brightness of the projected image will decline over time and may not... when no input signal can be available on surfaces of projector status from a remote computer • Supports 3D display • Color Management allowing color adjustments to your projector. Introduction Projector features The projector integrates high-performance optical engine projection and a user-friendly design...
...CEC (Consumer Electronics Control) function allows synchronized power ON/ OFF operation between the projector and a CEC-compatible DVD player device connected to the HDMI input of the projector The apparent brightness of the projected image will decline over time and may not... when no input signal can be available on surfaces of projector status from a remote computer • Supports 3D display • Color Management allowing color adjustments to your projector. Introduction Projector features The projector integrates high-performance optical engine projection and a user-friendly design...
PS501W User Guide English
Page 11
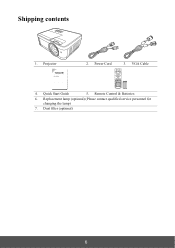
Remote Control & Batteries 6. Replacement lamp (optional) (Please contact qualified service personnel for changing the lamp) 7. VGA Cable 4. Projector 2. Dust filter (optional) 6 Shipping contents 1. Power Cord 3. Quick Start Guide 5.
Remote Control & Batteries 6. Replacement lamp (optional) (Please contact qualified service personnel for changing the lamp) 7. VGA Cable 4. Projector 2. Dust filter (optional) 6 Shipping contents 1. Power Cord 3. Quick Start Guide 5.
PS501W User Guide English
Page 12
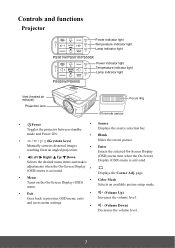
... (OSD) menu item when the On-Screen Display (OSD) menu is activated. • Displays the Corner Adj. Controls and functions Projector Power indicator light Temperature indicator light Lamp indicator light PS501W/PS501X/PS500X Power indicator light Temperature indicator light Lamp indicator light PS600W/PS600X Vent (heated air exhaust) Projection lens Focus ring...
... (OSD) menu item when the On-Screen Display (OSD) menu is activated. • Displays the Corner Adj. Controls and functions Projector Power indicator light Temperature indicator light Lamp indicator light PS501W/PS501X/PS500X Power indicator light Temperature indicator light Lamp indicator light PS600W/PS600X Vent (heated air exhaust) Projection lens Focus ring...
PS501W User Guide English
Page 14
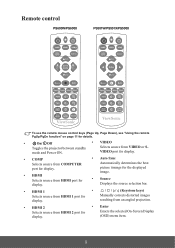
...Displays the source selection bar. • HDMI 1 • / / / (Keystone keys) Selects source from VIDEO or S- Remote control PS600W/PS600X PS501W/PS501X/PS500X To use the remote mouse control keys (Page Up, Page Down), see "Using the remote PgUp/PgDn function" on page 11 for details.... • On/ Off • VIDEO Toggles the projector between standby Selects source from HDMI 1 port for Manually corrects distorted images display. resulting from an angled projection. • HDMI 2 • ...
...Displays the source selection bar. • HDMI 1 • / / / (Keystone keys) Selects source from VIDEO or S- Remote control PS600W/PS600X PS501W/PS501X/PS500X To use the remote mouse control keys (Page Up, Page Down), see "Using the remote PgUp/PgDn function" on page 11 for details.... • On/ Off • VIDEO Toggles the projector between standby Selects source from HDMI 1 port for Manually corrects distorted images display. resulting from an angled projection. • HDMI 2 • ...
PS501W User Guide English
Page 15
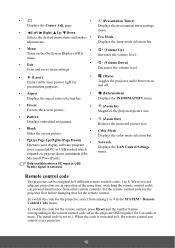
...; • (Presentation Timer) Displays the Corner Adj. Remote control code The projector can control every projector. 10 Set the remote control code for the projector first before changing that for the projector, select from other remote controls. When the code is switched to 8, the...initial code is selected. Only available when a PC input or USB Reader signal is set in the projector OSD together for presentation purposes. • (Mute) Toggles the projector audio between on and off. • Aspect Displays the aspect ratio selection bar. • (...
...; • (Presentation Timer) Displays the Corner Adj. Remote control code The projector can control every projector. 10 Set the remote control code for the projector first before changing that for the projector, select from other remote controls. When the code is switched to 8, the...initial code is selected. Only available when a PC input or USB Reader signal is set in the projector OSD together for presentation purposes. • (Mute) Toggles the projector audio between on and off. • Aspect Displays the aspect ratio selection bar. • (...
PS501W User Guide English
Page 16
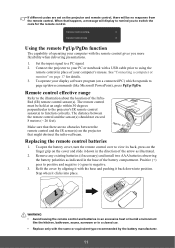
... should not exceed 8 meters (~ 26 feet). Make sure that there are set on the projector and remote control, there will display to remind you more flexibility when delivering presentations. 1. Connect the projector to your computer's mouse. Remote control effective range Refer to a PC signal. 2. Approx.... remote control. The distance between the remote control and the IR sensor(s) on the projector that happens, a message will be held at an angle within 30 degrees perpendicular to the projector's IR remote control sensor(s) to negative. 3. Stop when it back down into place...
... should not exceed 8 meters (~ 26 feet). Make sure that there are set on the projector and remote control, there will display to remind you more flexibility when delivering presentations. 1. Connect the projector to your computer's mouse. Remote control effective range Refer to a PC signal. 2. Approx.... remote control. The distance between the remote control and the IR sensor(s) on the projector that happens, a message will be held at an angle within 30 degrees perpendicular to the projector's IR remote control sensor(s) to negative. 3. Stop when it back down into place...

PS501W User Guide English
Page 18
...a suitable power outlet, as well as the location and distance between the projector and the rest of the screen. Set Front Ceiling in the SYSTEM > Projector Position menu after you turn the projector on. 4. Rear Table Select this installation location. Set Rear Table in ... preference will dictate which installation location you turn the projector on. 2. Your projector is required. Purchase the projector ceiling mount kit from the ceiling behind the screen. Rear Ceiling Select this location with the projector suspended upside-down from the ceiling in one of the...
...a suitable power outlet, as well as the location and distance between the projector and the rest of the screen. Set Front Ceiling in the SYSTEM > Projector Position menu after you turn the projector on. 4. Rear Table Select this installation location. Set Rear Table in ... preference will dictate which installation location you turn the projector on. 2. Your projector is required. Purchase the projector ceiling mount kit from the ceiling behind the screen. Rear Ceiling Select this location with the projector suspended upside-down from the ceiling in one of the...
PS501W User Guide English
Page 19
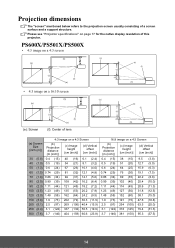
Please see "Projector specifications" on page 77 for the native display resolution of lens (a) (e) (f) (c) (d) (b) (a) Screen Size [inch (m)] 30 (0.8) 40 (1.0) 50 (1.3) 60 (1.5) 70 ...97) 269 (106) 40.4 (15.9) 3.1 (122) 337 (132) 50.5 (19.9) 3.7 (146) 404 (159) 60.6 (23.8) 16:9 image on a 16:10 screen (a) (e): Screen (b) (d) (c) (f) (e) (f): Center of this projector. PS600X/PS501X/PS500X • 4:3 image on a 4:3 screen (b) (a) (d) (c) (f) (e) (a) (c) (d) (e) (f) (b) • 4:3 image on a 4:3 Screen (b) Projection distance [m (inch)] (c) Image height [cm (inch)] (d) Vertical...
Please see "Projector specifications" on page 77 for the native display resolution of lens (a) (e) (f) (c) (d) (b) (a) Screen Size [inch (m)] 30 (0.8) 40 (1.0) 50 (1.3) 60 (1.5) 70 ...97) 269 (106) 40.4 (15.9) 3.1 (122) 337 (132) 50.5 (19.9) 3.7 (146) 404 (159) 60.6 (23.8) 16:9 image on a 16:10 screen (a) (e): Screen (b) (d) (c) (f) (e) (f): Center of this projector. PS600X/PS501X/PS500X • 4:3 image on a 4:3 screen (b) (a) (d) (c) (f) (e) (a) (c) (d) (e) (f) (b) • 4:3 image on a 4:3 Screen (b) Projection distance [m (inch)] (c) Image height [cm (inch)] (d) Vertical...
PS501W User Guide English
Page 20
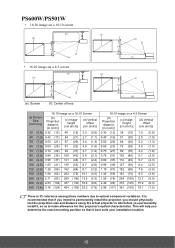
It is 3% tolerance among these numbers due to make allowance for this projector's optical characteristics. PS600W/PS501W • 16:10 image on a 16:10 screen (b) (a) (d) (c) (f) (e) • 16:10 image on a 4:3 screen (b) (a) (d) (e): Screen (c) (f) (e) (f): Center of lens (a) (e) (f) (c) (d) (b) (a) (e) (f) (c) ... determine the exact mounting position so that if you intend to permanently install the projector, you should physically test the projection size and distance using the actual projector in situ before you permanently install it best suits your installation location. 15
It is 3% tolerance among these numbers due to make allowance for this projector's optical characteristics. PS600W/PS501W • 16:10 image on a 16:10 screen (b) (a) (d) (c) (f) (e) • 16:10 image on a 4:3 screen (b) (a) (d) (e): Screen (c) (f) (e) (f): Center of lens (a) (e) (f) (c) (d) (b) (a) (e) (f) (c) ... determine the exact mounting position so that if you intend to permanently install the projector, you should physically test the projection size and distance using the actual projector in situ before you permanently install it best suits your installation location. 15
PS501W User Guide English
Page 21
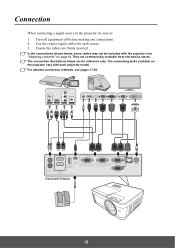
... signal cables for reference only. The connecting jacks available on page 6). In the connections shown below are for each projector model. For detailed connection methods, see "Shipping contents" on the projector vary with the projector (see pages 17-20. Turn all equipment off before making any connections. 2. They are firmly inserted. Ensure the... available from electronics stores. PS600W/PS600X 16 The connection illustrations below , some cables may not be sure to: 1. Connection When connecting a signal source to the projector, be included with each source. 3.
... signal cables for reference only. The connecting jacks available on page 6). In the connections shown below are for each projector model. For detailed connection methods, see "Shipping contents" on the projector vary with the projector (see pages 17-20. Turn all equipment off before making any connections. 2. They are firmly inserted. Ensure the... available from electronics stores. PS600W/PS600X 16 The connection illustrations below , some cables may not be sure to: 1. Connection When connecting a signal source to the projector, be included with each source. 3.
PS501W User Guide English
Page 22
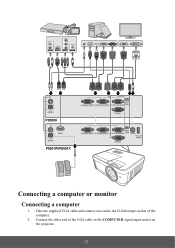
Connect the other end of the computer. 2. PS500X PS501W/PS501X Connecting a computer or monitor Connecting a computer 1. Take the supplied VGA cable and connect one end to the D-Sub output socket of the VGA cable to the COMPUTER signal input socket on the projector. 17
Connect the other end of the computer. 2. PS500X PS501W/PS501X Connecting a computer or monitor Connecting a computer 1. Take the supplied VGA cable and connect one end to the D-Sub output socket of the VGA cable to the COMPUTER signal input socket on the projector. 17
PS501W User Guide English
Page 23
...of the video monitor. 3. Many notebooks do not turn on page 11 for details. Refer to your notebook's documentation to find your projector to various Video source devices that provide any one of the following the instructions below : Best video quality The best available video connection method... on the notebook. If you wish to be your source device is HDMI. See "Connecting an HDMI device" on page 17. 2. Connect the projector to a computer as on the screen, you can connect your notebook's key combination. Connecting a monitor If you want to (composite) video. Connect...
...of the video monitor. 3. Many notebooks do not turn on page 11 for details. Refer to your notebook's documentation to find your projector to various Video source devices that provide any one of the following the instructions below : Best video quality The best available video connection method... on the notebook. If you wish to be your source device is HDMI. See "Connecting an HDMI device" on page 17. 2. Connect the projector to a computer as on the screen, you can connect your notebook's key combination. Connecting a monitor If you want to (composite) video. Connect...
PS501W User Guide English
Page 24
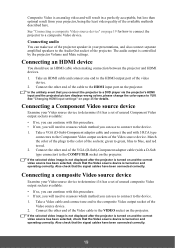
... operating correctly. See "Changing HDMI input settings" on page 19 for details. If the selected video image is not displayed after the projector is turned on and the correct video source has been selected, check that the signal cables have been connected correctly. Connect the other ...end of the Video cable to the VIDEO socket on the projector. Connecting audio You can continue with 3 RCA type connectors to the Component Video output sockets of the Video source device. Connecting an ...
... operating correctly. See "Changing HDMI input settings" on page 19 for details. If the selected video image is not displayed after the projector is turned on and the correct video source has been selected, check that the signal cables have been connected correctly. Connect the other ...end of the Video cable to the VIDEO socket on the projector. Connecting audio You can continue with 3 RCA type connectors to the Component Video output sockets of the Video source device. Connecting an ...

PS501W User Guide English
Page 25
You need only connect to the AUDIO OUT socket of the projector. 20 See "Connecting Video source devices" on page 18 for use of the projector speaker in your presentations, and also connect separate amplified speakers to this device using a composite Video connection if Component Video input is unavailable for details. Playing sound through the projector You can make use .
You need only connect to the AUDIO OUT socket of the projector. 20 See "Connecting Video source devices" on page 18 for use of the projector speaker in your presentations, and also connect separate amplified speakers to this device using a composite Video connection if Component Video input is unavailable for details. Playing sound through the projector You can make use .


