ViewSonic PM-FCP Support and Manuals
Get Help and Manuals for this ViewSonic item

View All Support Options Below
Free ViewSonic PM-FCP manuals!
Problems with ViewSonic PM-FCP?
Ask a Question
Free ViewSonic PM-FCP manuals!
Problems with ViewSonic PM-FCP?
Ask a Question
Popular ViewSonic PM-FCP Manual Pages
Instruction Manual - Page 1

INSTALLATION INSTRUCTIONS
PM-FCP
Suspended Ceiling Tile Adapter
Copyright © 2018, ViewSonic Corporation All rights reserved [20219-00E-10/18]
ViewSonic Corporation 10 Point Dr Ste. 200 Brea, CA 92821 USA USA and Canada - Phone: 888-881-8781
salesinfo@viewsonic.com
Instruction Manual - Page 2

... SURFACE STRUCTURE MUST BE REINFORCED. This product is prone to the PM-FCP 11
Technical Specifications
11
Warranty 12
Warning Statements
PRIOR TO THE INSTALLATION OF THIS PRODUCT, THE INSTALLATION INSTRUCTIONS SHOULD BE READ AND COMPLETELY UNDERSTOOD. THE SURFACE MUST BE CAPABLE OF SUPPORTING 250LBS. TO THIS PRODUCT. Be aware of this product outdoors could...
Instruction Manual - Page 3

..., please stop the installation and contact ViewSonic (888-881-8781). PM-FCP
Parts List
This ceiling adapter is shipped with all proper installation hardware and components.
Qty 2) Commercially Available
Rubber Caps (Qty 4)
¼" x 2.4" Concrete Anchors (Qty 4)
Installation Tools
Phillips Head Screwdriver
Wire Cutters
Ladder
Installation Instructions Page 3 If there...
Instruction Manual - Page 4

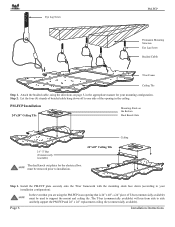
Step 1. find the proper location for the PM-FCP placement and lightly mark the bottom of the tile. Observe the room and the ceiling; Carefully remove the 24" x 24" or, depending on your ceiling configuration, the 24" x 48" suspended ceiling tiles. Page 4
Installation Instructions Ceiling Tile Removal
PM-FCP
Read all cautions and warnings before continuing.
Instruction Manual - Page 5

... Lag Hole
Truss ceiling Step 1. Run the open end through the loop. Step 3.
Run the open end through the hole in the ceiling. Installation Instructions Page 5 PM-FCP
Ceiling Anchoring
THE PM-FCP MUST SECURED USING THE SUPPLIED QUICK LOCKS AND BRAIDED CABLES.
Use a 1/4" masonry drill bit
to the cable locks on the plate. Step 2. Step...
Instruction Manual - Page 6
... 5, in the ceiling.
Page 6
Installation Instructions Eye Lag Screw
PM-FCP
Permanent Mounting Structure Eye Lag Screw
Braided Cable
T-bar Frame
Ceiling Tile
Step 1. Let the four (4) strands of braided cable hang down (according to side and help support the PM-FCP and 24" x 24" replacement ceiling tile (commercially available).
Install the PM-FCP plate securely onto the...
Instruction Manual - Page 7
... step bolts.
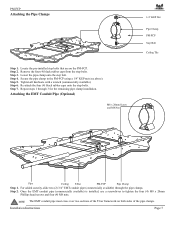
Tighten all hardware with a wrench (commercially available). Installation Instructions Page 7 Repeat steps 1 through the pipe clamps. Step 2. Lower the pipe clamp onto the step bolt. Step 4.
Step 2. The EMT conduit pipe must cross over two sections of the pipe clamps. PM-FCP
Attaching the Pipe Clamps
Step 1. Step 6.
Secure the pipe clamp...
Instruction Manual - Page 8

...Release Pin
6" Excess
Directional Input Arrows
Release Pin Release Pin
Mounting Hole
Mounting Hole
Mounting Hole
Page 8
Installation Instructions
Quick Lock Installation
Re-check all hardware and installation for proper tightness and security and replace the tile. PM-FCP
Cable Output Cable Input
Directional Input Arrows
Release Pin
Feed braided cable into the cable lock (see...
Instruction Manual - Page 9
...pipe crosses over must be installed prior to remove any remaining braided cable (optional). Reinstall the ceiling tile. When adjusting the tension of the weight-bearing side of the Quick Lock (see previous page). PM-FCP
Braided Cable
Cable Lock EMT... pipe and the top of the Quick Lock. Use cable cutters to installing the EMT conduit pipe. Installation Instructions Page 9
Instruction Manual - Page 10
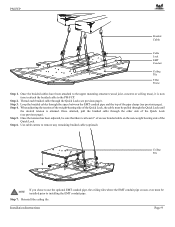
... box is going to be done in accordance to slide the base box laterally. Step 3. Ceiling Tile
PM-FCP M8 Flat Washer
M8 x 20mm Phillips Head Screw
Please refer to the plate. Page 10
Installation Instructions This will allow you to local codes and regulations.
Step 2. Make all electrical connections at this time.
Electrical Box...
Instruction Manual - Page 11
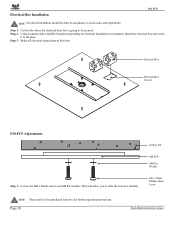
... be used to the plate. M5 x 16mm Screw 1-1/2" Pipe Opening PM-FCP
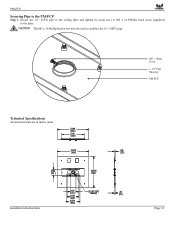
Technical Specifications
All measurements are in inches (mm). Secure the 1½" (NPT) pipe to the ceiling plate and tighten by using one (1) M5 x 16 Phillips head screw (supplied) to stabilize the 1½" (NPT) pipe.
Installation Instructions Page 11 PM-FCP
Securing Pipe to the PM-FCP
Step 1.
Instruction Manual - Page 12

..., CA 92831
How State Law Applies THIS WARRANTY GIVES YOU SPECIFIC LEGAL RIGHTS, AND YOU MAY ALSO HAVE OTHER RIGHTS WHICH VARY FROM STATE TO STATE. Page 12
Installation Instructions Proof of the problem, the purchaser's name, address, and telephone number. Warranty claims will repair or replace any labor costs. The limited warranty is defective.
PREMIER...
ViewSonic PM-FCP Reviews
We have not received any reviews for ViewSonic yet.