
User Guide
Page 1
PJD7828HDL/PJD7831HDL/ PJD7836HDL DLP Projector User Guide IMPORTANT: Please read this User Guide will describe your product for future service. VS16230/VS16231/VS16233 "Antes de operar su equipo lea cu idadosamente las instrucciones en este manual" Model No. Warranty information contained in this User Guide to obtain important information on installing and using your product in a safe manner, as well as registering your limited coverage...
PJD7828HDL/PJD7831HDL/ PJD7836HDL DLP Projector User Guide IMPORTANT: Please read this User Guide will describe your product for future service. VS16230/VS16231/VS16233 "Antes de operar su equipo lea cu idadosamente las instrucciones en este manual" Model No. Warranty information contained in this User Guide to obtain important information on installing and using your product in a safe manner, as well as registering your limited coverage...
User Guide
Page 5
... iv Microsoft, Windows, Windows NT, and the Windows logo are registered trademarks of Apple Inc. DPMS and DDC are registered trademarks of Microsoft Corporation in this document may change product specifications without prior written permission from furnishing this product. Product Name: Model Number: Document Number: Serial Number: Purchase Date: For Your Records PJD7828HDL/PJD7831HDL/PJD7836HDL ViewSonic DLP Projector VS16230/VS16231/VS16233 PJD7828HDL/PJD7831HDL/PJD7836HDL_UG_ENG Rev...
... iv Microsoft, Windows, Windows NT, and the Windows logo are registered trademarks of Apple Inc. DPMS and DDC are registered trademarks of Microsoft Corporation in this document may change product specifications without prior written permission from furnishing this product. Product Name: Model Number: Document Number: Serial Number: Purchase Date: For Your Records PJD7828HDL/PJD7831HDL/PJD7836HDL ViewSonic DLP Projector VS16230/VS16231/VS16233 PJD7828HDL/PJD7831HDL/PJD7836HDL_UG_ENG Rev...

User Guide
Page 6
... Connecting Video source devices ...... 19 Playing sound through the projector .. 21 Using the cable management cover ... 22 Operation 23 Starting up the projector 23 Using the menus 24 Utilizing the password function ......... 25 Switching input signal 27 Adjusting the projected image 28 Magnifying and searching for details 30 Selecting the aspect ratio 31 Optimizing the image 32 Setting the presentation timer 36 Hiding the image 37 Locking control keys 37 Creating your own startup screen ...... 37 Operating...
... Connecting Video source devices ...... 19 Playing sound through the projector .. 21 Using the cable management cover ... 22 Operation 23 Starting up the projector 23 Using the menus 24 Utilizing the password function ......... 25 Switching input signal 27 Adjusting the projected image 28 Magnifying and searching for details 30 Selecting the aspect ratio 31 Optimizing the image 32 Setting the presentation timer 36 Hiding the image 37 Locking control keys 37 Creating your own startup screen ...... 37 Operating...

User Guide
Page 7
... the product. The only user serviceable part is the lamp which may damage your projector through a power stabilizer, surge protector or uninterruptible power supply (UPS). 6. Under no circumstances should come into contact with any other covers. The intense light beam may cause death if you should you operate your projector. To temporarily turn off the lamp, press BLANK on . 5. Locations where the altitudes are dangerous...
... the product. The only user serviceable part is the lamp which may damage your projector through a power stabilizer, surge protector or uninterruptible power supply (UPS). 6. Under no circumstances should come into contact with any other covers. The intense light beam may cause death if you should you operate your projector. To temporarily turn off the lamp, press BLANK on . 5. Locations where the altitudes are dangerous...

User Guide
Page 8
... surface during operation. - Do not place liquids near the projector. 14. If the projector does become loose. 3 Use only qualified ceiling mount kit for transporting or installation. Safety instructions for ceiling mount installation. Do not cover this safety matter to have a pleasant experience using your projector. Doing so may result in a fire. - It is capable of displaying inverted pictures for ceiling mounting of the projector We want you use of more...
... surface during operation. - Do not place liquids near the projector. 14. If the projector does become loose. 3 Use only qualified ceiling mount kit for transporting or installation. Safety instructions for ceiling mount installation. Do not cover this safety matter to have a pleasant experience using your projector. Doing so may result in a fire. - It is capable of displaying inverted pictures for ceiling mounting of the projector We want you use of more...
User Guide
Page 9
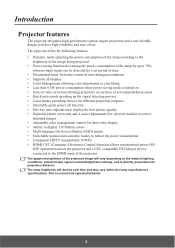
... the image being projected • Power saving function decreasing the power consumption of the lamp by up to 70% when no input signal can be detected for a set period of time. • Presentation timer for better control of use. Introduction Projector features The projector integrates high-performance optical engine projection and a user-friendly design to deliver high reliability and ease of time during presentations • Supports 3D display • Color Management allowing color adjustments...
... the image being projected • Power saving function decreasing the power consumption of the lamp by up to 70% when no input signal can be detected for a set period of time. • Presentation timer for better control of use. Introduction Projector features The projector integrates high-performance optical engine projection and a user-friendly design to deliver high reliability and ease of time during presentations • Supports 3D display • Color Management allowing color adjustments...
User Guide
Page 10
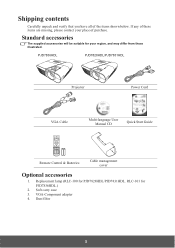
Replacement lamp (RLC-100 for your place of purchase. Standard accessories The supplied accessories will be suitable for PJD7828HDL/PJD7831HDL. RLC-101 for PJD7836HDL.) 2. PJD7836HDL PJD7828HDL/PJD7831HDL Projector Power Cord VGA Cable Multi-language User Manual CD Quick Start Guide Remote Control & Batteries Cable management cover Optional accessories 1. If any of the items shown below. Soft carry case 3. VGA-Component adapter 4. Dust filter 5 Shipping contents Carefully unpack and verify that you have...
Replacement lamp (RLC-100 for your place of purchase. Standard accessories The supplied accessories will be suitable for PJD7828HDL/PJD7831HDL. RLC-101 for PJD7836HDL.) 2. PJD7836HDL PJD7828HDL/PJD7831HDL Projector Power Cord VGA Cable Multi-language User Manual CD Quick Start Guide Remote Control & Batteries Cable management cover Optional accessories 1. If any of the items shown below. Soft carry case 3. VGA-Component adapter 4. Dust filter 5 Shipping contents Carefully unpack and verify that you have...
User Guide
Page 12
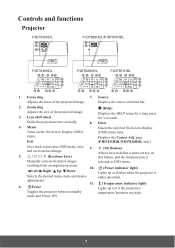
...to define a short cut key on the On-Screen Display (OSD) menu. Power Lights up or flashes when the projector is Manually corrects distorted images selected in OSD menu. Source Adjusts the focus of the projected image. 3. Displays the source selection bar. 2. Allows user to previous OSD menu, exits 9. (My Button) and saves menu settings. mode and Power ON. 7 Focus ring 7. adjustments. 11. (Temperature indicator light) 6. Displays the Corner Adj. Lens shift wheel Shifts the projection lens vertically. 4. Menu Turns on 5. / / / (Keystone keys) this button, and the...
...to define a short cut key on the On-Screen Display (OSD) menu. Power Lights up or flashes when the projector is Manually corrects distorted images selected in OSD menu. Source Adjusts the focus of the projected image. 3. Displays the source selection bar. 2. Allows user to previous OSD menu, exits 9. (My Button) and saves menu settings. mode and Power ON. 7 Focus ring 7. adjustments. 11. (Temperature indicator light) 6. Displays the Corner Adj. Lens shift wheel Shifts the projection lens vertically. 4. Menu Turns on 5. / / / (Keystone keys) this button, and the...

User Guide
Page 13
Left Selects the desired menu items and makes adjustments. Blank Hides the screen picture. 8 Color Mode Selects an available picture setup mode. (Panel Key Lock) Activates panel key lock. Lights up or flashes when the lamp has developed a Selects the desired menu items and makes adjustments. 12. (Lamp indicator light) 16. Manually corrects distorted images resulting from an angled projection. 15. Right Indicates the status of the lamp. problem. 13. To unlock the panel keys, long press for 3 seconds on 14. / (Keystone keys) .
Left Selects the desired menu items and makes adjustments. Blank Hides the screen picture. 8 Color Mode Selects an available picture setup mode. (Panel Key Lock) Activates panel key lock. Lights up or flashes when the lamp has developed a Selects the desired menu items and makes adjustments. 12. (Lamp indicator light) 16. Manually corrects distorted images resulting from an angled projection. 15. Right Indicates the status of the lamp. problem. 13. To unlock the panel keys, long press for 3 seconds on 14. / (Keystone keys) .
User Guide
Page 15
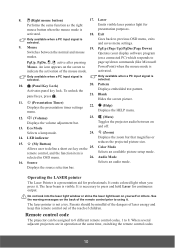
.... Color Mode remote control, and the function item is indicate the activation of the mouse mode. Displays the source selection bar. Parents should be assigned to 8 different remote control codes, 1 to using it . Exit Only available when a PC input signal is visible. Eco Mode Toggles the projector audio between the normal and mouse modes. Do not look into the laser light window or shine the laser light beam on and off. Remote control code...
.... Color Mode remote control, and the function item is indicate the activation of the mouse mode. Displays the source selection bar. Parents should be assigned to 8 different remote control codes, 1 to using it . Exit Only available when a PC input signal is visible. Eco Mode Toggles the projector audio between the normal and mouse modes. Do not look into the laser light window or shine the laser light beam on and off. Remote control code...

User Guide
Page 25
... HDMI cable and connect one end to the HDMI input port on and operating correctly. See "Connecting audio" on and the correct video source has been selected, check that you can continue with 3 RCA type connectors to the Component Video output sockets of unused Component Video output sockets available: • If so, you connect the projector to a DVD player via the projector's HDMI input and the projected picture displays wrong colors, please change the color...
... HDMI cable and connect one end to the HDMI input port on and operating correctly. See "Connecting audio" on and the correct video source has been selected, check that you can continue with 3 RCA type connectors to the Component Video output sockets of unused Component Video output sockets available: • If so, you connect the projector to a DVD player via the projector's HDMI input and the projected picture displays wrong colors, please change the color...

User Guide
Page 26
... can use . If the selected video image is not displayed after the projector is turned on page 19 for details. You can be controlled by the projector On-Screen Display (OSD) menus. See "Adjusting the Audio In 2 setting" on page 19 for details. 21 See "Connecting Video source devices" on page 40 for details. See "Adjusting the sound" on and operating correctly. If you have been connected correctly. Take a Video cable and connect...
... can use . If the selected video image is not displayed after the projector is turned on page 19 for details. You can be controlled by the projector On-Screen Display (OSD) menus. See "Adjusting the Audio In 2 setting" on page 19 for details. 21 See "Connecting Video source devices" on page 40 for details. See "Adjusting the sound" on and operating correctly. If you have been connected correctly. Take a Video cable and connect...

User Guide
Page 28
... Power indicator light stays blue when the projector is compatible with the projector's resolution or set the input signal to be heard. To maintain the lamp life, once you will run the cooling fan for details. 4. If the projector doesn't detect a valid signal, the message 'No Signal' will start the projector. Please change to an input signal which is on. (If necessary) Rotate the focus ring to search for the first time, select your desired input signal...
... Power indicator light stays blue when the projector is compatible with the projector's resolution or set the input signal to be heard. To maintain the lamp life, once you will run the cooling fan for details. 4. If the projector doesn't detect a valid signal, the message 'No Signal' will start the projector. Please change to an input signal which is on. (If necessary) Rotate the focus ring to search for the first time, select your desired input signal...
User Guide
Page 30
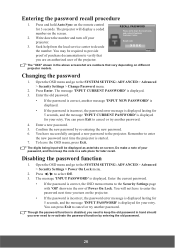
... the wrong password, the Password Error password error message as pictured to enter the six-digit password every time you enter an incorrect password 5 times in succession, the projector will be asked to the right is displayed. 3. displayed lasting for details. For details of your password, and keep the note in a short time. 25 Press Enter and the Security Settings page is Please try again. You will automatically shut down in...
... the wrong password, the Password Error password error message as pictured to enter the six-digit password every time you enter an incorrect password 5 times in succession, the projector will be asked to the right is displayed. 3. displayed lasting for details. For details of your password, and keep the note in a short time. 25 Press Enter and the Security Settings page is Please try again. You will automatically shut down in...
User Guide
Page 31
... hold Auto Sync on the remote control for your projector. 3. Enter a new password. 5. Confirm the new password by entering the old password. 26 You can press Exit to the Security Settings page with 'Off' shown in a safe place for your retry. Write down the recall code, and contact ViewSonic Customer Center. RECALL PASSWORD Please write down the number and turn on different projector models. Changing the password 1. The digits being input will...
... hold Auto Sync on the remote control for your projector. 3. Enter a new password. 5. Confirm the new password by entering the old password. 26 You can press Exit to the Security Settings page with 'Off' shown in a safe place for your retry. Write down the recall code, and contact ViewSonic Customer Center. RECALL PASSWORD Please write down the number and turn on different projector models. Changing the password 1. The digits being input will...

User Guide
Page 42
... to use the remote control to enter the SYSTEM SETTING: ADVANCED > Advanced > Panel Key Lock menu and press / to turn off the projector without disabling panel key lock, the projector will operate except Power. 1. Project the picture you press Power to select Off. Please wait. 6. You can set the blank time in locked status the next time it is saved as Screen Capture and have been set as your current startup screen. 37 Press (Panel Key Lock...
... to use the remote control to enter the SYSTEM SETTING: ADVANCED > Advanced > Panel Key Lock menu and press / to turn off the projector without disabling panel key lock, the projector will operate except Power. 1. Project the picture you press Power to select Off. Please wait. 6. You can set the blank time in locked status the next time it is saved as Screen Capture and have been set as your current startup screen. 37 Press (Panel Key Lock...

User Guide
Page 43
..., change your target picture. Yes No Operation under "High Altitude Mode" may not work properly, make sure that also supports CEC function is higher than 1500 m. That is, if a device that the device is correctly connected to the HDMI input of increased fan speed necessary to the SOURCE > Auto Power On > CEC menu. 2. Open the OSD menu and go to the HDMI input of the connected device is turned on, the projector's power...
..., change your target picture. Yes No Operation under "High Altitude Mode" may not work properly, make sure that also supports CEC function is higher than 1500 m. That is, if a device that the device is correctly connected to the HDMI input of increased fan speed necessary to the SOURCE > Auto Power On > CEC menu. 2. Open the OSD menu and go to the HDMI input of the connected device is turned on, the projector's power...
User Guide
Page 54
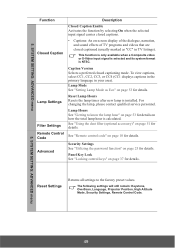
... for details. Panel Key Lock See "Locking control keys" on page 51 for details. The following settings will still remain: Keystone, OverScan, Language, Projector Position, High Altitude Mode, Security Settings, Remote Control Code. 5. 5. To view captions, select CC1, CC2, CC3, or CC4 (CC1 displays captions in the primary language in TV listings). SYSTEM SETTING: ADVANCED menu 49 See "Remote control code" on page 25 for details. Lamp Settings Reset Lamp Hours Resets the lamp timer after new lamp is NTSC...
... for details. Panel Key Lock See "Locking control keys" on page 51 for details. The following settings will still remain: Keystone, OverScan, Language, Projector Position, High Altitude Mode, Security Settings, Remote Control Code. 5. 5. To view captions, select CC1, CC2, CC3, or CC4 (CC1 displays captions in the primary language in TV listings). SYSTEM SETTING: ADVANCED menu 49 See "Remote control code" on page 25 for details. Lamp Settings Reset Lamp Hours Resets the lamp timer after new lamp is NTSC...

User Guide
Page 57
... filter. The lamp time will result in the SYSTEM SETTING: ADVANCED > Filter Settings menu when using the projector after the dust filer (optional accessory) is displayed. 5. Resetting the filter timer 5. The Filter Settings page is displayed. 7. Press the latches on the menu. For first time installation: 3. The filter timer starts counting. Setting Filter Mode to '0'. Press Enter and the Filter Settings page is properly attached. As the arrows shown to On. 52 Open the OSD menu and go to turn...
... filter. The lamp time will result in the SYSTEM SETTING: ADVANCED > Filter Settings menu when using the projector after the dust filer (optional accessory) is displayed. 5. Resetting the filter timer 5. The Filter Settings page is displayed. 7. Press the latches on the menu. For first time installation: 3. The filter timer starts counting. Setting Filter Mode to '0'. Press Enter and the Filter Settings page is properly attached. As the arrows shown to On. 52 Open the OSD menu and go to turn...

User Guide
Page 61
... focused. Remove the obstacle. Select the correct input signal with a new one. You are too far away from the power cord. Replace the battery with the Source key on the projector or remote control. Adjust the remote control code. 56 Wait until the cooling down process has completed. Turn the video source on and check that it is no power from the projector. Blurred image Cause Remedy The projection lens is an obstacle between the remote control...
... focused. Remove the obstacle. Select the correct input signal with a new one. You are too far away from the power cord. Replace the battery with the Source key on the projector or remote control. Adjust the remote control code. 56 Wait until the cooling down process has completed. Turn the video source on and check that it is no power from the projector. Blurred image Cause Remedy The projection lens is an obstacle between the remote control...


