

PJD5153 User Guide English
Page 1
...PJD5153/PJD5155/ PJD5250/PJD5253/PJD5255/ PJD5555w_Tiger DLP Projector User Guide IMPORTANT: Please read this User Guide will describe your product for future service. Warranty information contained in this User Guide to obtain important information on installing and using your product in a safe manner, as well as registering your limited coverage from ViewSonic... Corporation, which is also found on our web site at http:// www.viewsonic.com in English, or in specific languages using the Regional selection box ...
...PJD5153/PJD5155/ PJD5250/PJD5253/PJD5255/ PJD5555w_Tiger DLP Projector User Guide IMPORTANT: Please read this User Guide will describe your product for future service. Warranty information contained in this User Guide to obtain important information on installing and using your product in a safe manner, as well as registering your limited coverage from ViewSonic... Corporation, which is also found on our web site at http:// www.viewsonic.com in English, or in specific languages using the Regional selection box ...

PJD5153 User Guide English
Page 7
.... Product Name: Model Number: Document Number: Serial Number: Purchase Date: For Your Records PJD5151/PJD5153/PJD5155/PJD5250/PJD5253/ PJD5255/PJD5555w ViewSonic DLP Projector VS15871/VS15872/VS15873/VS15874/VS14115/ VS15875/VS15876 PJD5151/PJD5153/PJD5155/PJD5250/PJD5253/ PJD5255/PJD5555w_UG_ENG Rev. 1B 12-18-14 Product disposal at end of in this product contains mercury which can...
.... Product Name: Model Number: Document Number: Serial Number: Purchase Date: For Your Records PJD5151/PJD5153/PJD5155/PJD5250/PJD5253/ PJD5255/PJD5555w ViewSonic DLP Projector VS15871/VS15872/VS15873/VS15874/VS14115/ VS15875/VS15876 PJD5151/PJD5153/PJD5155/PJD5250/PJD5253/ PJD5255/PJD5555w_UG_ENG Rev. 1B 12-18-14 Product disposal at end of in this product contains mercury which can...
PJD5153 User Guide English
Page 8
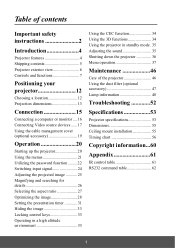
... or monitor .... 16 Connecting Video source devices ...... 17 Using the cable management cover (optional accessory 19 Operation 20 Starting up the projector 20 Using the menus 21 Utilizing the password function ......... 22 Switching input signal 24 Adjusting the projected image 25 Magnifying and searching for...Using the CEC function 34 Using the 3D functions 34 Using the projector in standby mode. 35 Adjusting the sound 35 Shutting down the projector 36 Menu operation 37 Maintenance 46 Care of the projector 46 Using the dust filter (optional accessory 47 Lamp information 48 ...
... or monitor .... 16 Connecting Video source devices ...... 17 Using the cable management cover (optional accessory 19 Operation 20 Starting up the projector 20 Using the menus 21 Utilizing the password function ......... 22 Switching input signal 24 Adjusting the projected image 25 Magnifying and searching for...Using the CEC function 34 Using the 3D functions 34 Using the projector in standby mode. 35 Adjusting the sound 35 Shutting down the projector 36 Menu operation 37 Maintenance 46 Care of the projector 46 Using the dust filter (optional accessory 47 Lamp information 48 ...

PJD5153 User Guide English
Page 9
...where excessive humidity, dust, or cigarette smoke may fall, sustaining serious damage. 11. Locations with any other covers. This projector is designed and tested to meet the latest standards for approximately 45 minutes prior to break on the product. Locations where ... Never replace the lamp assembly or any of a car with live parts. Refer servicing only to qualified service personnel. 4. Allow the projector to cool for safety of information technology equipment. Do not place this manual and marked on rare occasions. 9. Space that you operate your...
...where excessive humidity, dust, or cigarette smoke may fall, sustaining serious damage. 11. Locations with any other covers. This projector is designed and tested to meet the latest standards for approximately 45 minutes prior to break on the product. Locations where ... Never replace the lamp assembly or any of a car with live parts. Refer servicing only to qualified service personnel. 4. Allow the projector to cool for safety of information technology equipment. Do not place this manual and marked on rare occasions. 9. Space that you operate your...

PJD5153 User Guide English
Page 10
... kit, there is securely installed. 19. Safety instructions for transporting or installation. Do not cover this safety matter to back. Using the projector when it . Use only qualified ceiling mount kit for ceiling mount installation. Do not place inflammables near or on the ceiling, we need... to right, nor at angle of restraining the projector should be used with a cloth or any objects upon it is a normal phenomenon and not a product defect. 20. Do not use if...
... kit, there is securely installed. 19. Safety instructions for transporting or installation. Do not cover this safety matter to back. Using the projector when it . Use only qualified ceiling mount kit for ceiling mount installation. Do not place inflammables near or on the ceiling, we need... to right, nor at angle of restraining the projector should be used with a cloth or any objects upon it is a normal phenomenon and not a product defect. 20. Do not use if...
PJD5153 User Guide English
Page 11
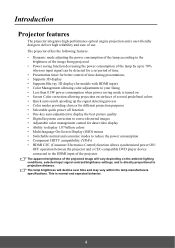
...depending on the ambient lighting conditions, selected input signal contrast/brightness settings, and is normal and expected behavior. 4 The projector offers the following features. • Dynamic mode adjusting the power consumption of the lamp according to the brightness of the ...) function allows synchronized power ON/ OFF operation between the projector and a CEC-compatible DVD player device connected to the HDMI input of the projector The apparent brightness of use. Introduction Projector features The projector integrates high-performance optical engine projection and a user-friendly ...
...depending on the ambient lighting conditions, selected input signal contrast/brightness settings, and is normal and expected behavior. 4 The projector offers the following features. • Dynamic mode adjusting the power consumption of the lamp according to the brightness of the ...) function allows synchronized power ON/ OFF operation between the projector and a CEC-compatible DVD player device connected to the HDMI input of the projector The apparent brightness of use. Introduction Projector features The projector integrates high-performance optical engine projection and a user-friendly ...

PJD5153 User Guide English
Page 12
... will be suitable for your place of purchase. Soft carry case 3. Cable management cover 5 RLC-093 for PJD5151/PJD5153/PJD5155/PJD5250/PJD5253/ PJD5255. Dust filter 5. If any of the items shown below. Projector Power Cord VGA Cable Multi-language User Manual CD Quick Start Guide Remote Control & Batteries Optional accessories 1. Shipping contents...
... will be suitable for your place of purchase. Soft carry case 3. Cable management cover 5 RLC-093 for PJD5151/PJD5153/PJD5155/PJD5250/PJD5253/ PJD5255. Dust filter 5. If any of the items shown below. Projector Power Cord VGA Cable Multi-language User Manual CD Quick Start Guide Remote Control & Batteries Optional accessories 1. Shipping contents...
PJD5153 User Guide English
Page 13
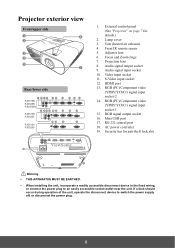
Projector exterior view Front/upper side 1 6 2 3 4 5 7 Rear/lower side 8 9 10 11 12 13 14 PJD5155/ PJD5255/ PJD5555w 15 16 17 PJD5153/ PJD5253 PJD5151/ PJD5250 8 9 10 11 16 13 AUDIO S-VIDEO IN MINI USB OUT COMPUTER IN 2 VIDEO 16 13 14 COMPUTER IN 1 14... 6. Audio signal input socket 10. Security bar for details.) 2. Projection lens 8. Audio signal output socket 9. Mini USB port 17. External control panel (See "Projector" on page 7 for anti-theft lock slot 18 19 Warning • THIS APPARATUS MUST BE EARTHED. • When installing the unit, incorporate a readily accessible ...
Projector exterior view Front/upper side 1 6 2 3 4 5 7 Rear/lower side 8 9 10 11 12 13 14 PJD5155/ PJD5255/ PJD5555w 15 16 17 PJD5153/ PJD5253 PJD5151/ PJD5250 8 9 10 11 16 13 AUDIO S-VIDEO IN MINI USB OUT COMPUTER IN 2 VIDEO 16 13 14 COMPUTER IN 1 14... 6. Audio signal input socket 10. Security bar for details.) 2. Projection lens 8. Audio signal output socket 9. Mini USB port 17. External control panel (See "Projector" on page 7 for anti-theft lock slot 18 19 Warning • THIS APPARATUS MUST BE EARTHED. • When installing the unit, incorporate a readily accessible ...
PJD5153 User Guide English
Page 14
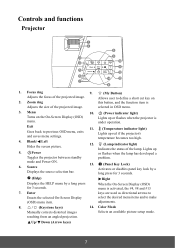
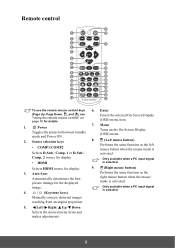
...When the On-Screen Display (OSD) menu is under operation. Lights up 5. Power or flashes when the lamp has developed a Toggles the projector between standby problem. select the desired menu items and to Enacts the selected On-Screen Display (OSD) menu item. Up/ Down (Arrow keys...) 7 Controls and functions Projector 1 2 8 3 9 4 10 11 5 12 6 14 13 7 8 1. Focus ring 9. (My Button) Adjusts the focus of the projected image. Allows ...
...When the On-Screen Display (OSD) menu is under operation. Lights up 5. Power or flashes when the lamp has developed a Toggles the projector between standby problem. select the desired menu items and to Enacts the selected On-Screen Display (OSD) menu item. Up/ Down (Arrow keys...) 7 Controls and functions Projector 1 2 8 3 9 4 10 11 5 12 6 14 13 7 8 1. Focus ring 9. (My Button) Adjusts the focus of the projected image. Allows ...
PJD5153 User Guide English
Page 15
.... Manually corrects distorted images resulting from an angled projection. 5. Enacts the selected On-Screen Display (OSD) menu item. 1. Comp. 2 source for display. 3. Power Toggles the projector between standby mode and Power ON. 7.
.... Manually corrects distorted images resulting from an angled projection. 5. Enacts the selected On-Screen Display (OSD) menu item. 1. Comp. 2 source for display. 3. Power Toggles the projector between standby mode and Power ON. 7.
PJD5153 User Guide English
Page 16
... to 8. Source Displays the source selection bar. 26. 3D (Zoom) Displays the zoom bar that for 5 seconds or more. When several adjacent projectors are set on 16. (My Button) and off. 17. 18. Pattern Displays the presentation timer settings Displays embedded test pattern. To switch the... Pattern Blank If different codes are in OSD menu. To switch the code for the remote control again. 9 Exit Switches between on the projector and remote control, Eco Mode Color Mode Eco Mode Color Mode there will be assigned to 8 different remote control codes, 1 to 8...
... to 8. Source Displays the source selection bar. 26. 3D (Zoom) Displays the zoom bar that for 5 seconds or more. When several adjacent projectors are set on 16. (My Button) and off. 17. 18. Pattern Displays the presentation timer settings Displays embedded test pattern. To switch the... Pattern Blank If different codes are in OSD menu. To switch the code for the remote control again. 9 Exit Switches between on the projector and remote control, Eco Mode Color Mode Eco Mode Color Mode there will be assigned to 8 different remote control codes, 1 to 8...

PJD5153 User Guide English
Page 17
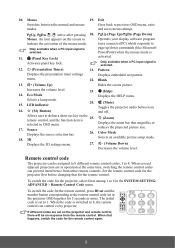
... the remote control to switch from the normal mode to using the remote control in place of operating your display software program (on the projector that there are no obstacles between the remote control and the sensor should not exceed 8 meters (~ 26 feet). Remote control effective range ... PC) which responds to page up/down commands (like Microsoft PowerPoint), press PgUp/PgDn. • To return to indicate the activation of the projector. Press Mouse on page 16 for the mouse related multi-function keys. An icon appears on the front of the mouse mode. 4. Make sure...
... the remote control to switch from the normal mode to using the remote control in place of operating your display software program (on the projector that there are no obstacles between the remote control and the sensor should not exceed 8 meters (~ 26 feet). Remote control effective range ... PC) which responds to page up/down commands (like Microsoft PowerPoint), press PgUp/PgDn. • To return to indicate the activation of the projector. Press Mouse on page 16 for the mouse related multi-function keys. An icon appears on the front of the mouse mode. 4. Make sure...

PJD5153 User Guide English
Page 19
... Table in the SYSTEM SETTING: BASIC > Projector Position menu after you turn the projector on. 4. Positioning your projector Choosing a location Your room layout or personal preference will dictate which installation location you turn the projector on. 12 Take into consideration the size ...the following 4 possible installation locations: 1. Note that a special rear projection screen and the projector ceiling mounting kit are required for quick setup and portability. 2. Your projector is required. Note that a special rear projection screen is designed to mount your equipment. ...
... Table in the SYSTEM SETTING: BASIC > Projector Position menu after you turn the projector on. 4. Positioning your projector Choosing a location Your room layout or personal preference will dictate which installation location you turn the projector on. 12 Take into consideration the size ...the following 4 possible installation locations: 1. Note that a special rear projection screen and the projector ceiling mounting kit are required for quick setup and portability. 2. Your projector is required. Note that a special rear projection screen is designed to mount your equipment. ...
PJD5153 User Guide English
Page 21
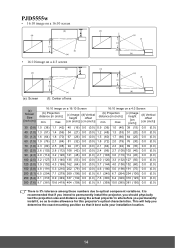
...will help you permanently install it best suits your installation location. 14 It is 3% tolerance among these numbers due to make allowance for this projector's optical characteristics. max. (c) Image (d) Vertical height offset [cm (inch)] [cm (inch)] 16:10 image on a 16:10 Screen....0 (395) 381 (150) 0.0 (0.0) There is recommended that if you intend to permanently install the projector, you should physically test the projection size and distance using the actual projector in situ before you determine the exact mounting position so that it , so as to optical component variations...
...will help you permanently install it best suits your installation location. 14 It is 3% tolerance among these numbers due to make allowance for this projector's optical characteristics. max. (c) Image (d) Vertical height offset [cm (inch)] [cm (inch)] 16:10 image on a 16:10 Screen....0 (395) 381 (150) 0.0 (0.0) There is recommended that if you intend to permanently install the projector, you should physically test the projection size and distance using the actual projector in situ before you determine the exact mounting position so that it , so as to optical component variations...
PJD5153 User Guide English
Page 22
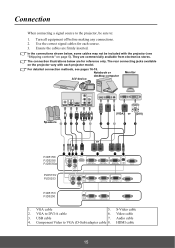
... 2. Component Video to DVI-A cable 6. Audio cable 4. Connection When connecting a signal source to the projector, be included with the projector (see pages 16-18. HDMI cable 15 S-Video cable 2. For detailed connection methods, see "Shipping contents" on the... projector vary with each source. 3. Notebook or desktop computer A/V device Monitor Speakers 76 5 8 4 7 (VGA) or (DVI) 3 17 1 2 or PJD5155/ PJD5255/ PJD5555w PJD5153/ PJD5253 PJD5151/ PJD5250 AUDIO S-VIDEO IN MINI USB OUT VIDEO ...
... 2. Component Video to DVI-A cable 6. Audio cable 4. Connection When connecting a signal source to the projector, be included with the projector (see pages 16-18. HDMI cable 15 S-Video cable 2. For detailed connection methods, see "Shipping contents" on the... projector vary with each source. 3. Notebook or desktop computer A/V device Monitor Speakers 76 5 8 4 7 (VGA) or (DVI) 3 17 1 2 or PJD5155/ PJD5255/ PJD5555w PJD5153/ PJD5253 PJD5151/ PJD5250 AUDIO S-VIDEO IN MINI USB OUT VIDEO ...
PJD5153 User Guide English
Page 23
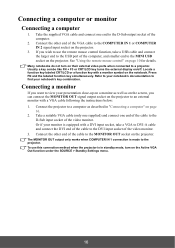
...external display on page 10 for details. Connect the other end of the computer, and smaller end to use this connection method when the projector is made to a projector. See "Using the remote mouse control" on /off. Take a suitable VGA cable (only one supplied) and connect one end to the...you want to the MONITOR OUT socket on page 16. 2. Many notebooks do not turn on their external video ports when connected to the projector. Connect the projector to the DVI input socket of the computer. 2. To use the remote mouse control function, take a VGA to DVI-A cable and connect...
...external display on page 10 for details. Connect the other end of the computer, and smaller end to use this connection method when the projector is made to a projector. See "Using the remote mouse control" on /off. Take a suitable VGA cable (only one supplied) and connect one end to the...you want to the MONITOR OUT socket on page 16. 2. Many notebooks do not turn on their external video ports when connected to the projector. Connect the projector to the DVI input socket of the computer. 2. To use the remote mouse control function, take a VGA to DVI-A cable and connect...
PJD5153 User Guide English
Page 24
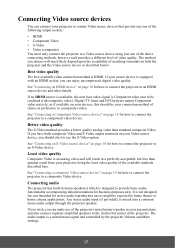
...than standard composite Video. If your source device is designed to provide basic audio functionality accompanying data presentations for how to connect the projector to a composite Video device. See "Connecting a composite Video source device" on page 18 for stereo audio reproduction use as ...with an HDMI socket, you should be expected in mono speaker(s) which is equipped with composite video). The method you can connect your projector to various Video source devices that provide any one of the following output sockets: • HDMI • Component Video • S-...
...than standard composite Video. If your source device is designed to provide basic audio functionality accompanying data presentations for how to connect the projector to a composite Video device. See "Connecting a composite Video source device" on page 18 for stereo audio reproduction use as ...with an HDMI socket, you should be expected in mono speaker(s) which is equipped with composite video). The method you can connect your projector to various Video source devices that provide any one of the following output sockets: • HDMI • Component Video • S-...
PJD5153 User Guide English
Page 25
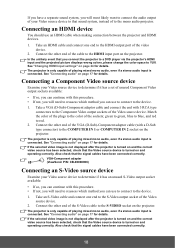
See "Connecting audio" on page 17 for details. Also check that sound system, instead of the video device. 2. VGA-Component adapter (ViewSonic P/N: CB-00008906) Connecting an S-Video source device Examine your Video source device to that the signal cables have been connected correctly. 18 Take an S-... turned on page 17 for details. Take an HDMI cable and connect one end to the HDMI output port of to the mono audio projector. The projector is only capable of the plugs to red. 2. Connecting an HDMI device You should use to connect to the device. 1. See "Changing HDMI input...
See "Connecting audio" on page 17 for details. Also check that sound system, instead of the video device. 2. VGA-Component adapter (ViewSonic P/N: CB-00008906) Connecting an S-Video source device Examine your Video source device to that the signal cables have been connected correctly. 18 Take an S-... turned on page 17 for details. Take an HDMI cable and connect one end to the HDMI output port of to the mono audio projector. The projector is only capable of the plugs to red. 2. Connecting an HDMI device You should use to connect to the device. 1. See "Changing HDMI input...

PJD5153 User Guide English
Page 26
...a set of poorer picture quality. See "Connecting audio" on page 17 for details. If the selected video image is not displayed after the projector is turned on and the correct video source has been selected, check that the signal cables have already made a Component Video connection between the... projector and this SVideo source device using an S-Video connection as this procedure. • If not, you can continue with this makes an ...
...a set of poorer picture quality. See "Connecting audio" on page 17 for details. If the selected video image is not displayed after the projector is turned on and the correct video source has been selected, check that the signal cables have already made a Component Video connection between the... projector and this SVideo source device using an S-Video connection as this procedure. • If not, you can continue with this makes an ...
PJD5153 User Guide English
Page 27
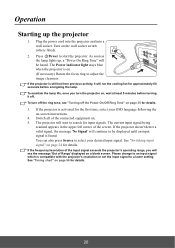
... (If necessary) Rotate the focus ring to select your OSD language following the on . 5. Plug the power cord into the projector and into a wall socket. The projector will start the projector. To maintain the lamp life, once you turn off the ring tone, see the message 'Out of the input signal exceeds... still hot from previous activity, it off the Power On/Off Ring Tone" on the wall socket switch (where fitted). 2. If the projector doesn't detect a valid signal, the message 'No Signal' will see "Turning off . Press Power to start to be heard. Operation Starting up , a "Power On...
... (If necessary) Rotate the focus ring to select your OSD language following the on . 5. Plug the power cord into the projector and into a wall socket. The projector will start the projector. To maintain the lamp life, once you turn off the ring tone, see the message 'Out of the input signal exceeds... still hot from previous activity, it off the Power On/Off Ring Tone" on the wall socket switch (where fitted). 2. If the projector doesn't detect a valid signal, the message 'No Signal' will see "Turning off . Press Power to start to be heard. Operation Starting up , a "Power On...


