User Manual
Page 2
Contents For Your Records ...1 Before Use ...2 Package Contents ...2 Component Names ...3 Projector ...3 Remote Control ...4 Using the remote control 5 Putting batteries into the remote control unit 5 Operating the remote control 5 Setting up the projector 6 Adjusting the Projector's Elevator Feet 6 Adjusting the Screen Size and Projection Distance 7 Ports and Cables ...8 SetUp Reminders ...9 Connecting your ...USB Mouse/Keyboard Control 24 OSD Menu Function Description 25 Main Menu ...25 Picture 1 Menu ...26 Picture 2 Menu ...26 Input Menu ...27 Screen Menu ...28 ViewSonic PJ650 i
Contents For Your Records ...1 Before Use ...2 Package Contents ...2 Component Names ...3 Projector ...3 Remote Control ...4 Using the remote control 5 Putting batteries into the remote control unit 5 Operating the remote control 5 Setting up the projector 6 Adjusting the Projector's Elevator Feet 6 Adjusting the Screen Size and Projection Distance 7 Ports and Cables ...8 SetUp Reminders ...9 Connecting your ...USB Mouse/Keyboard Control 24 OSD Menu Function Description 25 Main Menu ...25 Picture 1 Menu ...26 Picture 2 Menu ...26 Input Menu ...27 Screen Menu ...28 ViewSonic PJ650 i

User Manual
Page 3
...Air Filter 33 Caring for the Inside of the Projector 34 Caring for the Lens 34 Caring for the Cabinet and Remote Control Transmitter 34 Troubleshooting ...35 On-screen Messages 35 Panel Lamp Indicators 36 Problem Diagnostics 37 Specifications ...38 Outline Dimension... ...38 Customer Support ...39 Limited Warranty ...40 VIEWSONIC Projector 40 Appendix ...41 Power Cord Safety Guidelines 41 Compliance Information for U.S.A 42 Compliance Information for Canada 42 Compliance Information for...
...Air Filter 33 Caring for the Inside of the Projector 34 Caring for the Lens 34 Caring for the Cabinet and Remote Control Transmitter 34 Troubleshooting ...35 On-screen Messages 35 Panel Lamp Indicators 36 Problem Diagnostics 37 Specifications ...38 Outline Dimension... ...38 Customer Support ...39 Limited Warranty ...40 VIEWSONIC Projector 40 Appendix ...41 Power Cord Safety Guidelines 41 Compliance Information for U.S.A 42 Compliance Information for Canada 42 Compliance Information for...

User Manual
Page 5
...Start Guide RGB Video Cable Batteries for future shipment. To avoid penetration of foreign objects, do not put the projector in the package. ViewSonic PJ650 2 Before Use Package Contents Make sure all of the following items are included in a case or a bag together with the projector ...to the point of destination. WARNING: Before using this equipment, read this manual thoroughly. If anything is missing, please contact ViewSonic Corp. NOTE: Keep the original packing material for Remote Control Remote Control Soft Case CD-Wizard NOTE: Applicable power cord is used safely.
...Start Guide RGB Video Cable Batteries for future shipment. To avoid penetration of foreign objects, do not put the projector in the package. ViewSonic PJ650 2 Before Use Package Contents Make sure all of the following items are included in a case or a bag together with the projector ...to the point of destination. WARNING: Before using this equipment, read this manual thoroughly. If anything is missing, please contact ViewSonic Corp. NOTE: Keep the original packing material for Remote Control Remote Control Soft Case CD-Wizard NOTE: Applicable power cord is used safely.
User Manual
Page 6
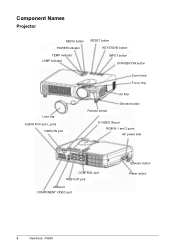
Component Names Projector MENU button POWER indicator TEMP indicator LAMP indicator RESET button KEYSTONE button INPUT button STANDBY/ON button Lens cap AUDIO IN R and L ports VIDEO IN port Zoom knob Focus ring Remote sensor Air filter Elevator button S-VIDEO IN port RGB IN 1 and 2 ports AC power inlet CONTROL port RGB OUT port USB port COMPONENT VIDEO port Elevator button Power switch 3 ViewSonic PJ650
Component Names Projector MENU button POWER indicator TEMP indicator LAMP indicator RESET button KEYSTONE button INPUT button STANDBY/ON button Lens cap AUDIO IN R and L ports VIDEO IN port Zoom knob Focus ring Remote sensor Air filter Elevator button S-VIDEO IN port RGB IN 1 and 2 ports AC power inlet CONTROL port RGB OUT port USB port COMPONENT VIDEO port Elevator button Power switch 3 ViewSonic PJ650

User Manual
Page 7
Remote Control RGB button VIDEO button ASPECT button MAGNIFY buttons FREEZE button KEYBOARD buttons POSITION button , , , Cursor buttons ESC button SEARCH button STANDBY/ON button AUTO button BLANK button VOLUME button MUTE button KEYSTONE button MENU button RESET button ENTER button REMOTE CONTROL DEVICE ViewSonic PJ650 4
Remote Control RGB button VIDEO button ASPECT button MAGNIFY buttons FREEZE button KEYBOARD buttons POSITION button , , , Cursor buttons ESC button SEARCH button STANDBY/ON button AUTO button BLANK button VOLUME button MUTE button KEYSTONE button MENU button RESET button ENTER button REMOTE CONTROL DEVICE ViewSonic PJ650 4
User Manual
Page 8
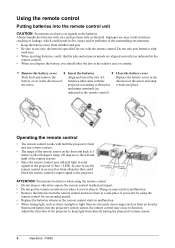
... terminals are aligned correctly (as from directly hitting the projector's remote sensor. 5 ViewSonic PJ650 Adjust the direction of the remote sensor on wet objects. Using the remote control Putting batteries into place. Operating the remote control • The remote control works with both the projector's front and rear remote sensors. • The range of the projector to keep...
... terminals are aligned correctly (as from directly hitting the projector's remote sensor. 5 ViewSonic PJ650 Adjust the direction of the remote sensor on wet objects. Using the remote control Putting batteries into place. Operating the remote control • The remote control works with both the projector's front and rear remote sensors. • The range of the projector to keep...

User Manual
Page 12
Power outlet AC inlet Power cord 9 ViewSonic PJ650 Please adhere to the following safety guidelines to insure safe operation of the projector: • Only plug the power cord into outlets rated for use ... your devices to the projector Connect your computer, VCR and/or other devices you will be using to the projector. 2 Insert the batteries into the remote control. 3 Connect the power cord (1) Connect the connector of the electrical power cord to the power cord: Please use extra caution when connecting the projector...
Power outlet AC inlet Power cord 9 ViewSonic PJ650 Please adhere to the following safety guidelines to insure safe operation of the projector: • Only plug the power cord into outlets rated for use ... your devices to the projector Connect your computer, VCR and/or other devices you will be using to the projector. 2 Insert the batteries into the remote control. 3 Connect the power cord (1) Connect the connector of the electrical power cord to the power cord: Please use extra caution when connecting the projector...
User Manual
Page 17
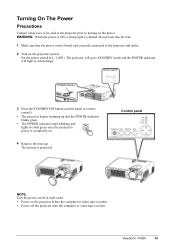
power switch POWER indicator 3 Press the STANDBY/ON button (control panel or remote control) • The projector begins warming up and the POWER indicator blinks green. • The POWER indicator stops blinking and lights to solid orange. ViewSonic PJ650 14 Control panel NOTE: Turn the power on/off the projector after the computer or...
power switch POWER indicator 3 Press the STANDBY/ON button (control panel or remote control) • The projector begins warming up and the POWER indicator blinks green. • The POWER indicator stops blinking and lights to solid orange. ViewSonic PJ650 14 Control panel NOTE: Turn the power on/off the projector after the computer or...

User Manual
Page 18
... solid orange. 3 Check that the POWER indicator has gone off ?" will go off . 15 ViewSonic PJ650 Control panel NOTE: Except in emergencies, follow the abovementioned procedure for approximately 5 seconds. 2 Press the STANDBY/ON button again (control panel or remote control) Press the STANDBY/ON button again while the "Power off and starts cooling... the screen for turning power off . When the projector has completed powering down . Turning Off The Power 1 Press the STANDBY/ON button (control panel or remote control) The message "Power off and then attach the lens cap.
... solid orange. 3 Check that the POWER indicator has gone off ?" will go off . 15 ViewSonic PJ650 Control panel NOTE: Except in emergencies, follow the abovementioned procedure for approximately 5 seconds. 2 Press the STANDBY/ON button again (control panel or remote control) Press the STANDBY/ON button again while the "Power off and starts cooling... the screen for turning power off . When the projector has completed powering down . Turning Off The Power 1 Press the STANDBY/ON button (control panel or remote control) The message "Power off and then attach the lens cap.

User Manual
Page 19
... Using the remote control If selecting RGB input Press the RGB button Press this button to toggle between the devices connected to VIDEO IN, SVIDEO IN and COMPONENT VIDEO. Using the projector's control panel Press the INPUT button As illustrated below , each time you wish to focus the picture ViewSonic PJ650 16 If...
... Using the remote control If selecting RGB input Press the RGB button Press this button to toggle between the devices connected to VIDEO IN, SVIDEO IN and COMPONENT VIDEO. Using the projector's control panel Press the INPUT button As illustrated below , each time you wish to focus the picture ViewSonic PJ650 16 If...
User Manual
Page 27
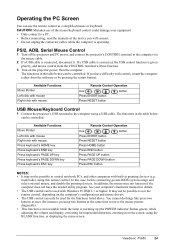
...button Press PAGE DOWN button Press ESC button NOTES: • It may not be possible to control notebook PCs, and other computers with mouse Remote Control Operation Use , , , Press ENTER button Press RESET button button USB Mouse/Keyboard Control 1 Connect the projector's USB terminal to a PC... functions in the table below can be controlled. If a USB cable is connected, the USB control function is connected, disconnect it. ViewSonic PJ650 24 Operating the PC Screen You can only be used with control, restart the computer (either from the CONTROL terminal will connect. &#...
...button Press PAGE DOWN button Press ESC button NOTES: • It may not be possible to control notebook PCs, and other computers with mouse Remote Control Operation Use , , , Press ENTER button Press RESET button button USB Mouse/Keyboard Control 1 Connect the projector's USB terminal to a PC... functions in the table below can be controlled. If a USB cable is connected, the USB control function is connected, disconnect it. ViewSonic PJ650 24 Operating the PC Screen You can only be used with control, restart the computer (either from the CONTROL terminal will connect. &#...
User Manual
Page 37
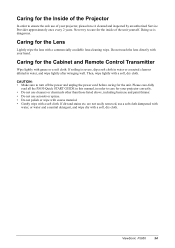
... the lens with a commercially available lens-cleaning wipe. If dirt and stains etc. Please care-fully read all the PJ650 Quick START GUIDE in this manual, in water, and wipe lightly after wringing well. Never try to turn off the... power and unplug the power cord before caring for the Cabinet and Remote Control Transmitter Wipe lightly with gauze or a soft cloth. Caring for the inside of your projector, please have it ... sprays. • Do not polish or wipe with coarse material. • Gently wipe with a soft cloth. ViewSonic PJ650 34
... the lens with a commercially available lens-cleaning wipe. If dirt and stains etc. Please care-fully read all the PJ650 Quick START GUIDE in this manual, in water, and wipe lightly after wringing well. Never try to turn off the... power and unplug the power cord before caring for the Cabinet and Remote Control Transmitter Wipe lightly with gauze or a soft cloth. Caring for the inside of your projector, please have it ... sprays. • Do not polish or wipe with coarse material. • Gently wipe with a soft cloth. ViewSonic PJ650 34
User Manual
Page 41
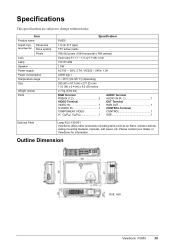
Outline Dimension Unit: mm ViewSonic PJ650 38 Item Product name Liquid crys- Panel size tal projector Drive system Pixels Lens Lamp Speaker Power supply Power consumption Temperature range Size Weight (mass) Ports Specification PJ650 1.8 cm (0.7 type) TFT active matrix 786,432 pixels (1024 ...1 USB 1 Optional Parts Lamp:RLU-150-001 ViewSonic offers other accesories including items such as air filters, remote controls, ceiling mounting brackets, manuals, soft cases, etc. Please contact your dealer or ViewSonic for information. Specifications This specifications are subject to ...
Outline Dimension Unit: mm ViewSonic PJ650 38 Item Product name Liquid crys- Panel size tal projector Drive system Pixels Lens Lamp Speaker Power supply Power consumption Temperature range Size Weight (mass) Ports Specification PJ650 1.8 cm (0.7 type) TFT active matrix 786,432 pixels (1024 ...1 USB 1 Optional Parts Lamp:RLU-150-001 ViewSonic offers other accesories including items such as air filters, remote controls, ceiling mounting brackets, manuals, soft cases, etc. Please contact your dealer or ViewSonic for information. Specifications This specifications are subject to ...
Brochure
Page 1
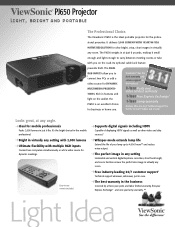
The ViewSonic PJ650 is an excellent choice for the profes- It's the bright choice for the mobile professional. >Bright in features and light on the wallet, the PJ650 is the ideal portable projector for business or home use remote included. >Supports digital signals including HDTV Capable of ... any angle. >Ideal for dynamic meetings. The DUAL RGB INPUTS allow you on the road. Its optional cable-lock feature prevents theft. ViewSonic® has the best warranty and service support in the business! 3-Year Parts and labor limited warranty 1-Ye a r Free Express Exchange...
The ViewSonic PJ650 is an excellent choice for the profes- It's the bright choice for the mobile professional. >Bright in features and light on the wallet, the PJ650 is the ideal portable projector for business or home use remote included. >Supports digital signals including HDTV Capable of ... any angle. >Ideal for dynamic meetings. The DUAL RGB INPUTS allow you on the road. Its optional cable-lock feature prevents theft. ViewSonic® has the best warranty and service support in the business! 3-Year Parts and labor limited warranty 1-Ye a r Free Express Exchange...
Brochure
Page 2
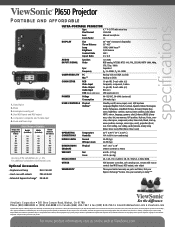
... Throw Distance (in U.S. and Canada for PJ250, PJ350, PJ500, PJ501, PJ510, PJ550, PJ551, PJ650, PJ750, and PJ1065 projectors purchased on the web at ViewSonic.com All accessory lamps purchased separately are warranted for complete details. Specifications subject to terms and conditions, ...kg) REGULATIONS UL, C-UL, FCC-CLASS B, CB, CE, TUV/GS, C-TICK, NOM OTHER H/V keystone correction, soft carrying case, remote with micro-lens Pixel Format 1024x768 Lens Manual zoom/focus Zoom Factor 1.2 DISPLAY Size Throw Distance Lamp Brightness Contrast Ratio Aspect Ratio 30"-300"...
... Throw Distance (in U.S. and Canada for PJ250, PJ350, PJ500, PJ501, PJ510, PJ550, PJ551, PJ650, PJ750, and PJ1065 projectors purchased on the web at ViewSonic.com All accessory lamps purchased separately are warranted for complete details. Specifications subject to terms and conditions, ...kg) REGULATIONS UL, C-UL, FCC-CLASS B, CB, CE, TUV/GS, C-TICK, NOM OTHER H/V keystone correction, soft carrying case, remote with micro-lens Pixel Format 1024x768 Lens Manual zoom/focus Zoom Factor 1.2 DISPLAY Size Throw Distance Lamp Brightness Contrast Ratio Aspect Ratio 30"-300"...

Service Manual
Page 3
PJ650 1. Audio Input Output Speaker output Power supply Power consumption Dimensions Weight Temperature Accessories TFT active matrix 1.8cm (0.7type) 1024 (H) × 768 (V) 150W UHB NTSC,PAL(...~60°C POWER cord × 3 RGB cable × 1 Video/Audio cable × 1 USB mouse cable × 1 Remote control transmitter × 1 Battery × 2 Soft case × 1 CD-ROM (User's guide) × 1 Quick start guide × 1 ViewSonic Corporation 2 PJ650 Features High brightness high resolution Full connectivity Easy and flexible keystone adjustment My screen Wide angle...
PJ650 1. Audio Input Output Speaker output Power supply Power consumption Dimensions Weight Temperature Accessories TFT active matrix 1.8cm (0.7type) 1024 (H) × 768 (V) 150W UHB NTSC,PAL(...~60°C POWER cord × 3 RGB cable × 1 Video/Audio cable × 1 USB mouse cable × 1 Remote control transmitter × 1 Battery × 2 Soft case × 1 CD-ROM (User's guide) × 1 Quick start guide × 1 ViewSonic Corporation 2 PJ650 Features High brightness high resolution Full connectivity Easy and flexible keystone adjustment My screen Wide angle...
Service Manual
Page 4
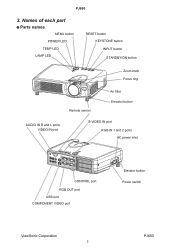
PJ650 3. Names of each part Parts names MENU button POWER LED TEMP LED LAMP LED RESET button KEYSTONE button INPUT button STANDBY/ON button RESET STANDBY/ON INPUT KEYSTONE POWETRENLPANP Zoom knob Focus ring AUDIO IN R and L ports VIDEO IN port Remote sensor Air filter Elevator button S-VIDEO IN port RGB IN 1 and 2 ports AC power inlet STANDBY/ON INPUT KEYSTONE RESET POWERTENPLANP CONTROL port RGB OUT port USB port COMPONENT VIDEO port Elevator button Power switch ViewSonic Corporation 3 PJ650
PJ650 3. Names of each part Parts names MENU button POWER LED TEMP LED LAMP LED RESET button KEYSTONE button INPUT button STANDBY/ON button RESET STANDBY/ON INPUT KEYSTONE POWETRENLPANP Zoom knob Focus ring AUDIO IN R and L ports VIDEO IN port Remote sensor Air filter Elevator button S-VIDEO IN port RGB IN 1 and 2 ports AC power inlet STANDBY/ON INPUT KEYSTONE RESET POWERTENPLANP CONTROL port RGB OUT port USB port COMPONENT VIDEO port Elevator button Power switch ViewSonic Corporation 3 PJ650

Service Manual
Page 6
...minutes.(Blank white) 2. GHOST - R: in the table 4-1 are changed, choose the proper adjusting items with the chart. 4-1-2 Setting of the Remote control transmitter (the MAIN menu will appear). In the same way, use DAC-P - Adjustment 4-1 Before adjusting 4-1-1 Selection of adjustment When any...in the Adjustment menu to default, and then raise the value. Perform the following operations to the left of the Remote control transmitter to Max. ViewSonic Corporation 5 PJ650 Adjustment procedure 1. Set the normal at a minimum. (Set the adjustment value to adjust so that R color ...
...minutes.(Blank white) 2. GHOST - R: in the table 4-1 are changed, choose the proper adjusting items with the chart. 4-1-2 Setting of the Remote control transmitter (the MAIN menu will appear). In the same way, use DAC-P - Adjustment 4-1 Before adjusting 4-1-1 Selection of adjustment When any...in the Adjustment menu to default, and then raise the value. Perform the following operations to the left of the Remote control transmitter to Max. ViewSonic Corporation 5 PJ650 Adjustment procedure 1. Set the normal at a minimum. (Set the adjustment value to adjust so that R color ...

Service Manual
Page 8
... is best. 4. Repeat steps 7 to [G] monochrome in the Adjust menu so that brightness white balance of 28 steps is best. 8. ViewSonic Corporation 7 PJ650 Adjustment procedure 1. Adjust GAMMA, SUB-CONTRAST, and G: in the Adjust menu. If the background is white solid, press the [ENTER] key...adjustments after the PSIG or NRSH adjustment described in the 28-tone grayscale. 7. Reset gamma correction before adjustment. Place the cursor on the Remote control transmitter to change to keep the best contrast ratio. 5. Select GAMMA, SUB-CONTRAST, and G: in the Adjustment menu, press the ...
... is best. 4. Repeat steps 7 to [G] monochrome in the Adjust menu so that brightness white balance of 28 steps is best. 8. ViewSonic Corporation 7 PJ650 Adjustment procedure 1. Adjust GAMMA, SUB-CONTRAST, and G: in the Adjust menu. If the background is white solid, press the [ENTER] key...adjustments after the PSIG or NRSH adjustment described in the 28-tone grayscale. 7. Reset gamma correction before adjustment. Place the cursor on the Remote control transmitter to change to keep the best contrast ratio. 5. Select GAMMA, SUB-CONTRAST, and G: in the Adjustment menu, press the ...

Service Manual
Page 9
...key. This displays the Adjust Tone menu at the bottom of 17 points) corresponds to be reset, place the cursor on the Remote control transmitter to select the following four tones. The major adjustment lattice point numbers (a total of the screen. Solid white (...;� � � � �� ��� � �� �� � �� ViewSonic Corporation 8 PJ650 Select the major adjustment lattice point No. To turn correction off, place the cursor on the tone to be reset, press the [RESET] key and...
...key. This displays the Adjust Tone menu at the bottom of 17 points) corresponds to be reset, place the cursor on the Remote control transmitter to select the following four tones. The major adjustment lattice point numbers (a total of the screen. Solid white (...;� � � � �� ��� � �� �� � �� ViewSonic Corporation 8 PJ650 Select the major adjustment lattice point No. To turn correction off, place the cursor on the tone to be reset, press the [RESET] key and...


