User Manual
Page 2
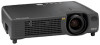
... USB Mouse/Keyboard Control 24 OSD Menu Function Description 25 Main Menu ...25 Picture 1 Menu ...26 Picture 2 Menu ...26 Input Menu ...27 Screen Menu ...28 ViewSonic PJ650 i
... USB Mouse/Keyboard Control 24 OSD Menu Function Description 25 Main Menu ...25 Picture 1 Menu ...26 Picture 2 Menu ...26 Input Menu ...27 Screen Menu ...28 ViewSonic PJ650 i

User Manual
Page 3
... 34 Troubleshooting ...35 On-screen Messages 35 Panel Lamp Indicators 36 Problem Diagnostics 37 Specifications ...38 Outline Dimension ...38 Customer Support ...39 Limited Warranty ...40 VIEWSONIC Projector 40 Appendix ...41 Power Cord Safety Guidelines 41 Compliance Information for U.S.A 42 Compliance Information for Canada 42 Compliance Information for European Countries 42 User...
... 34 Troubleshooting ...35 On-screen Messages 35 Panel Lamp Indicators 36 Problem Diagnostics 37 Specifications ...38 Outline Dimension ...38 Customer Support ...39 Limited Warranty ...40 VIEWSONIC Projector 40 Appendix ...41 Power Cord Safety Guidelines 41 Compliance Information for U.S.A 42 Compliance Information for Canada 42 Compliance Information for European Countries 42 User...
User Manual
Page 4
.... Electronic Warranty Registration To meet your projector's warranty on the Internet at: http://www.viewsonic.com For Your Records Product Name: Model Number: Document Number: Serial Number: Purchase Date: ViewSonic PJ650 VPROJ27747-1W A-CD-PJ650-1 1 ViewSonic PJ650 Microsoft, Windows, Windows NT, and the Windows logo are registered trademarks of Microsoft Corporation in this material, or the...
.... Electronic Warranty Registration To meet your projector's warranty on the Internet at: http://www.viewsonic.com For Your Records Product Name: Model Number: Document Number: Serial Number: Purchase Date: ViewSonic PJ650 VPROJ27747-1W A-CD-PJ650-1 1 ViewSonic PJ650 Microsoft, Windows, Windows NT, and the Windows logo are registered trademarks of Microsoft Corporation in this material, or the...

User Manual
Page 5
... the package. Always ensure that the equipment is missing, please contact ViewSonic Corp. Before Use Package Contents Make sure all of destination. Projector Power Cord Video/Audio Cable USB mouse cable Quick Start Guide RGB Video Cable Batteries for future shipment. ViewSonic PJ650 2 If anything is used safely. WARNING: Before using this equipment...
... the package. Always ensure that the equipment is missing, please contact ViewSonic Corp. Before Use Package Contents Make sure all of destination. Projector Power Cord Video/Audio Cable USB mouse cable Quick Start Guide RGB Video Cable Batteries for future shipment. ViewSonic PJ650 2 If anything is used safely. WARNING: Before using this equipment...
User Manual
Page 6
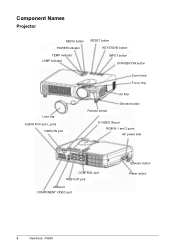
Component Names Projector MENU button POWER indicator TEMP indicator LAMP indicator RESET button KEYSTONE button INPUT button STANDBY/ON button Lens cap AUDIO IN R and L ports VIDEO IN port Zoom knob Focus ring Remote sensor Air filter Elevator button S-VIDEO IN port RGB IN 1 and 2 ports AC power inlet CONTROL port RGB OUT port USB port COMPONENT VIDEO port Elevator button Power switch 3 ViewSonic PJ650
Component Names Projector MENU button POWER indicator TEMP indicator LAMP indicator RESET button KEYSTONE button INPUT button STANDBY/ON button Lens cap AUDIO IN R and L ports VIDEO IN port Zoom knob Focus ring Remote sensor Air filter Elevator button S-VIDEO IN port RGB IN 1 and 2 ports AC power inlet CONTROL port RGB OUT port USB port COMPONENT VIDEO port Elevator button Power switch 3 ViewSonic PJ650

User Manual
Page 7
Remote Control RGB button VIDEO button ASPECT button MAGNIFY buttons FREEZE button KEYBOARD buttons POSITION button , , , Cursor buttons ESC button SEARCH button STANDBY/ON button AUTO button BLANK button VOLUME button MUTE button KEYSTONE button MENU button RESET button ENTER button REMOTE CONTROL DEVICE ViewSonic PJ650 4
Remote Control RGB button VIDEO button ASPECT button MAGNIFY buttons FREEZE button KEYBOARD buttons POSITION button , , , Cursor buttons ESC button SEARCH button STANDBY/ON button AUTO button BLANK button VOLUME button MUTE button KEYSTONE button MENU button RESET button ENTER button REMOTE CONTROL DEVICE ViewSonic PJ650 4
User Manual
Page 8
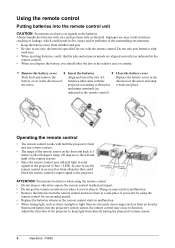
... control • The remote control works with the direction of batteries (that could result in an area free from directly hitting the projector's remote sensor. 5 ViewSonic PJ650 Doing so may cease to use may result in battery cracking or leakage, which could block the remote control's output signal to the left and...
... control • The remote control works with the direction of batteries (that could result in an area free from directly hitting the projector's remote sensor. 5 ViewSonic PJ650 Doing so may cease to use may result in battery cracking or leakage, which could block the remote control's output signal to the left and...

User Manual
Page 9
.... To prevent damaging the projector and injuring yourself, ALWAYS HOLD THE PROJECTOR whenever using the elevator buttons to adjust the angle of the accompanying manual "PJ650 Quick START GUIDE" and this manual. • If you press the elevator buttons without holding the projector, the projector might crash down, overturn, smash your... feet. The adjustment range of the projector by twisting the elevator feet by hand. Setting up the projector CAUTION • Install the projector in malfunction. ViewSonic PJ650 6
.... To prevent damaging the projector and injuring yourself, ALWAYS HOLD THE PROJECTOR whenever using the elevator buttons to adjust the angle of the accompanying manual "PJ650 Quick START GUIDE" and this manual. • If you press the elevator buttons without holding the projector, the projector might crash down, overturn, smash your... feet. The adjustment range of the projector by twisting the elevator feet by hand. Setting up the projector CAUTION • Install the projector in malfunction. ViewSonic PJ650 6

User Manual
Page 10
... (69) 32 (82) 38 (96) 43 (110) 49 (124) 54 (137) 65 (165) 81 (206) 108 (275) 135 (343) 162 (412) Lens center Side view 7 ViewSonic PJ650 Adjusting the Screen Size and Projection Distance Refer to the illustrations and tables below to the top of the screen (±10%).
... (69) 32 (82) 38 (96) 43 (110) 49 (124) 54 (137) 65 (165) 81 (206) 108 (275) 135 (343) 162 (412) Lens center Side view 7 ViewSonic PJ650 Adjusting the Screen Size and Projection Distance Refer to the illustrations and tables below to the top of the screen (±10%).

User Manual
Page 11
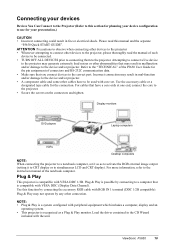
... serial mouse cable Optional RS-232C cable Optional S-video cable with VESA DDC 1/2B. Please take advantage of computers. and-Play does not function correctly. ViewSonic PJ650 8 Use this table to determine which cables to the RGB IN 1 port (DDC 1/2B compatible). Plug-and-Play can be achieved by connecting the accessory...
... serial mouse cable Optional RS-232C cable Optional S-video cable with VESA DDC 1/2B. Please take advantage of computers. and-Play does not function correctly. ViewSonic PJ650 8 Use this table to determine which cables to the RGB IN 1 port (DDC 1/2B compatible). Plug-and-Play can be achieved by connecting the accessory...

User Manual
Page 12
Power outlet AC inlet Power cord 9 ViewSonic PJ650 Please adhere to the following safety guidelines to the AC inlet of the projector: • Only plug the power cord into outlets rated for use ...
Power outlet AC inlet Power cord 9 ViewSonic PJ650 Please adhere to the following safety guidelines to the AC inlet of the projector: • Only plug the power cord into outlets rated for use ...
User Manual
Page 13
... OFF ALL DEVICES prior to connecting them to the projector. Load the driver contained in fire or electrical shock. Refer to the "TECHNICAL" of the PJ650 User Guide for the pin assignment of the notebook computer. Plug & Play may result in mal-function and/or damage to the device and/or... to connect a live device to the projector may result in malfunction and/or damage to the projector, please thoroughly read this manual and the separate "PJ650 Quick START GUIDE". ViewSonic PJ650 10
... OFF ALL DEVICES prior to connecting them to the projector. Load the driver contained in fire or electrical shock. Refer to the "TECHNICAL" of the PJ650 User Guide for the pin assignment of the notebook computer. Plug & Play may result in mal-function and/or damage to the device and/or... to connect a live device to the projector may result in malfunction and/or damage to the projector, please thoroughly read this manual and the separate "PJ650 Quick START GUIDE". ViewSonic PJ650 10

User Manual
Page 14
... simultaneous LCD and CRT display). Connecting to a Computer ATTENTION: Whenever attempting to connect a laptop computer to the projector, be possible with this is necessary. 11 ViewSonic PJ650 Laptop computer Desktop computer NOTE: • Some computers may not be sure to activate the laptop's RGB external image output (set the laptop to CRT...
... simultaneous LCD and CRT display). Connecting to a Computer ATTENTION: Whenever attempting to connect a laptop computer to the projector, be possible with this is necessary. 11 ViewSonic PJ650 Laptop computer Desktop computer NOTE: • Some computers may not be sure to activate the laptop's RGB external image output (set the laptop to CRT...

User Manual
Page 15
Connecting to a DVD Player or VCR ViewSonic PJ650 12
Connecting to a DVD Player or VCR ViewSonic PJ650 12

User Manual
Page 16
RGB OUT RGB cable Connecting to a Display Monitor Display monitor RGB IN 13 ViewSonic PJ650
RGB OUT RGB cable Connecting to a Display Monitor Display monitor RGB IN 13 ViewSonic PJ650
User Manual
Page 17
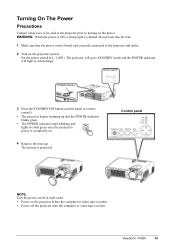
... on . 4 Remove the lens cap The picture is emitted. The projector will go to STANDBY mode and the POWER indicator will light to solid orange. ViewSonic PJ650 14 Control panel NOTE: Turn the power on/off the projector after the computer or video tape recorder. Turning On The Power Precautions Connect all...
... on . 4 Remove the lens cap The picture is emitted. The projector will go to STANDBY mode and the POWER indicator will light to solid orange. ViewSonic PJ650 14 Control panel NOTE: Turn the power on/off the projector after the computer or video tape recorder. Turning On The Power Precautions Connect all...

User Manual
Page 18
... lights to [O] (OFF). Turning Off The Power 1 Press the STANDBY/ON button (control panel or remote control) The message "Power off ?" will go off . 15 ViewSonic PJ650 message is blinking orange has no effect.) The system goes into STANDBY mode, after cooling down , the POWER indicator will appear on the screen for...
... lights to [O] (OFF). Turning Off The Power 1 Press the STANDBY/ON button (control panel or remote control) The message "Power off ?" will go off . 15 ViewSonic PJ650 message is blinking orange has no effect.) The system goes into STANDBY mode, after cooling down , the POWER indicator will appear on the screen for...

User Manual
Page 19
... the signal you press the VIDEO button, the projector switches between RGB IN 1 and 2. As illustrated below, each time you wish to focus the picture ViewSonic PJ650 16 Select the signal you press the RGB button, the projector switches between VIDEO IN, S-VIDEO IN and COMPONENT VIDEO. Selecting an Input Signal Using...
... the signal you press the VIDEO button, the projector switches between RGB IN 1 and 2. As illustrated below, each time you wish to focus the picture ViewSonic PJ650 16 Select the signal you press the RGB button, the projector switches between VIDEO IN, S-VIDEO IN and COMPONENT VIDEO. Selecting an Input Signal Using...

User Manual
Page 20
Press the VOLUME button to restore the sound. 17 ViewSonic PJ650 Adjusting the Volume 1 Press the VOLUME button As illustrated on the right, a dialog box will appear on the screen to aid you in adjusting the ...
Press the VOLUME button to restore the sound. 17 ViewSonic PJ650 Adjusting the Volume 1 Press the VOLUME button As illustrated on the right, a dialog box will appear on the screen to aid you in adjusting the ...

User Manual
Page 21
Adjusting the Image Position 1 Press the POSITION button As illustrated on the screen to aid you in adjusting the position. 2 Use the , , , buttons to adjust the position When you don't do anything, the dialog box will appear on the right, a dialog box will automatically disappear after a few seconds.) This function is only available for RGB IN 1/2 input. ViewSonic PJ650 18 Press the POSITION button again to close the dialog box and complete this operation. (Even if you want to initialize the position, press the RESET button during adjustment.
Adjusting the Image Position 1 Press the POSITION button As illustrated on the screen to aid you in adjusting the position. 2 Use the , , , buttons to adjust the position When you don't do anything, the dialog box will appear on the right, a dialog box will automatically disappear after a few seconds.) This function is only available for RGB IN 1/2 input. ViewSonic PJ650 18 Press the POSITION button again to close the dialog box and complete this operation. (Even if you want to initialize the position, press the RESET button during adjustment.

