User Manual
Page 2
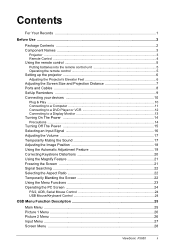
... Control ...4 Using the remote control 5 Putting batteries into the remote control unit 5 Operating the remote control 5 Setting up the projector 6 Adjusting the Projector's Elevator Feet 6 Adjusting the Screen Size and Projection Distance 7 Ports and Cables ...8 SetUp Reminders ...9 Connecting your devices 10 Plug & Play ...10 Connecting to a Computer 11 ... USB Mouse/Keyboard Control 24 OSD Menu Function Description 25 Main Menu ...25 Picture 1 Menu ...26 Picture 2 Menu ...26 Input Menu ...27 Screen Menu ...28 ViewSonic PJ650 i
... Control ...4 Using the remote control 5 Putting batteries into the remote control unit 5 Operating the remote control 5 Setting up the projector 6 Adjusting the Projector's Elevator Feet 6 Adjusting the Screen Size and Projection Distance 7 Ports and Cables ...8 SetUp Reminders ...9 Connecting your devices 10 Plug & Play ...10 Connecting to a Computer 11 ... USB Mouse/Keyboard Control 24 OSD Menu Function Description 25 Main Menu ...25 Picture 1 Menu ...26 Picture 2 Menu ...26 Input Menu ...27 Screen Menu ...28 ViewSonic PJ650 i

User Manual
Page 3
...Lamp ...31 Lamp Life ...32 Replacing the Lamp 32 Caring for the Air Filter 33 Caring for the Inside of the Projector 34 Caring for the Lens 34 Caring for the Cabinet and Remote Control Transmitter 34 Troubleshooting ...35 On-screen Messages 35 ... Specifications ...38 Outline Dimension ...38 Customer Support ...39 Limited Warranty ...40 VIEWSONIC Projector 40 Appendix ...41 Power Cord Safety Guidelines 41 Compliance Information for U.S.A 42 Compliance Information for Canada 42 Compliance Information for European Countries 42 User Information for all Countries 42 ii ViewSonic PJ650
...Lamp ...31 Lamp Life ...32 Replacing the Lamp 32 Caring for the Air Filter 33 Caring for the Inside of the Projector 34 Caring for the Lens 34 Caring for the Cabinet and Remote Control Transmitter 34 Troubleshooting ...35 On-screen Messages 35 ... Specifications ...38 Outline Dimension ...38 Customer Support ...39 Limited Warranty ...40 VIEWSONIC Projector 40 Appendix ...41 Power Cord Safety Guidelines 41 Compliance Information for U.S.A 42 Compliance Information for Canada 42 Compliance Information for European Countries 42 User Information for all Countries 42 ii ViewSonic PJ650
User Manual
Page 4
... liable for any additional product information as it becomes available, please register your projector's warranty on the Internet at: http://www.viewsonic.com For Your Records Product Name: Model Number: Document Number: Serial Number: Purchase Date: ViewSonic PJ650 VPROJ27747-1W A-CD-PJ650-1 1 ViewSonic PJ650 Information in the United States and other countries. DPMS and DDC are registered...
... liable for any additional product information as it becomes available, please register your projector's warranty on the Internet at: http://www.viewsonic.com For Your Records Product Name: Model Number: Document Number: Serial Number: Purchase Date: ViewSonic PJ650 VPROJ27747-1W A-CD-PJ650-1 1 ViewSonic PJ650 Information in the United States and other countries. DPMS and DDC are registered...

User Manual
Page 5
... Start Guide RGB Video Cable Batteries for future shipment. To avoid penetration of foreign objects, do not put the projector in the package. ViewSonic PJ650 2 Always ensure that the equipment is missing, please contact ViewSonic Corp. Before Use Package Contents Make sure all of the following items are included in a case or a bag together...
... Start Guide RGB Video Cable Batteries for future shipment. To avoid penetration of foreign objects, do not put the projector in the package. ViewSonic PJ650 2 Always ensure that the equipment is missing, please contact ViewSonic Corp. Before Use Package Contents Make sure all of the following items are included in a case or a bag together...
User Manual
Page 6
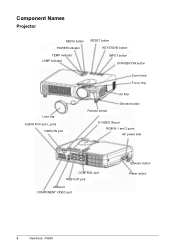
Component Names Projector MENU button POWER indicator TEMP indicator LAMP indicator RESET button KEYSTONE button INPUT button STANDBY/ON button Lens cap AUDIO IN R and L ports VIDEO IN port Zoom knob Focus ring Remote sensor Air filter Elevator button S-VIDEO IN port RGB IN 1 and 2 ports AC power inlet CONTROL port RGB OUT port USB port COMPONENT VIDEO port Elevator button Power switch 3 ViewSonic PJ650
Component Names Projector MENU button POWER indicator TEMP indicator LAMP indicator RESET button KEYSTONE button INPUT button STANDBY/ON button Lens cap AUDIO IN R and L ports VIDEO IN port Zoom knob Focus ring Remote sensor Air filter Elevator button S-VIDEO IN port RGB IN 1 and 2 ports AC power inlet CONTROL port RGB OUT port USB port COMPONENT VIDEO port Elevator button Power switch 3 ViewSonic PJ650
User Manual
Page 8
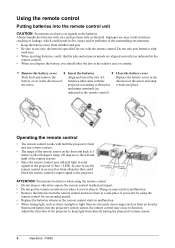
...and minus terminals are aligned correctly (as indicated in battery cracking or leakage, which could block the remote control's output signal to the projector (Class 1 LED), be using the remote control • Do not drop or otherwise expose the remote control to physical impact. &#...so may result in malfunction. • Remove the batteries from the remote control and store them only as from directly hitting the projector's remote sensor. 5 ViewSonic PJ650 Adjust the direction of the surrounding environment. • Keep the battery away from children and pets. • Be sure to...
...and minus terminals are aligned correctly (as indicated in battery cracking or leakage, which could block the remote control's output signal to the projector (Class 1 LED), be using the remote control • Do not drop or otherwise expose the remote control to physical impact. &#...so may result in malfunction. • Remove the batteries from the remote control and store them only as from directly hitting the projector's remote sensor. 5 ViewSonic PJ650 Adjust the direction of the surrounding environment. • Keep the battery away from children and pets. • Be sure to...

User Manual
Page 9
... manual. • If you can also finely adjust the height of the elevator feet is 0 to 9 degrees. 1 Press and hold in malfunction. ViewSonic PJ650 6 The adjustment range of the projector by twisting the elevator feet by hand. When you release the elevator buttons, the elevator feet will lock into position. 3 As necessary, you...
... manual. • If you can also finely adjust the height of the elevator feet is 0 to 9 degrees. 1 Press and hold in malfunction. ViewSonic PJ650 6 The adjustment range of the projector by twisting the elevator feet by hand. When you release the elevator buttons, the elevator feet will lock into position. 3 As necessary, you...

User Manual
Page 10
...(69) 32 (82) 38 (96) 43 (110) 49 (124) 54 (137) 65 (165) 81 (206) 108 (275) 135 (343) 162 (412) Lens center Side view 7 ViewSonic PJ650 The screen Top view Screen Size Inches (m) 30 (0.8) 40 (1.0) 50 (1.3) 60 (1.5) 70 (1.8) 80 (2.0) 90 (2.3) 100 (2.5) 120 (3.0) 150 (3.8) 200 (5.0) 250 (6.3) 300 (7.5) a Inches (m)...116) 51 (131) 57 (145) 69 (174) 86 (218) 114 (290) 143 (363) 171 (435) If 16:9 aspect ratio. b: Distance from the projector to the top of the screen (±10%). Adjusting the Screen Size and Projection Distance Refer to the illustrations and tables below to the bottom...
...(69) 32 (82) 38 (96) 43 (110) 49 (124) 54 (137) 65 (165) 81 (206) 108 (275) 135 (343) 162 (412) Lens center Side view 7 ViewSonic PJ650 The screen Top view Screen Size Inches (m) 30 (0.8) 40 (1.0) 50 (1.3) 60 (1.5) 70 (1.8) 80 (2.0) 90 (2.3) 100 (2.5) 120 (3.0) 150 (3.8) 200 (5.0) 250 (6.3) 300 (7.5) a Inches (m)...116) 51 (131) 57 (145) 69 (174) 86 (218) 114 (290) 143 (363) 171 (435) If 16:9 aspect ratio. b: Distance from the projector to the top of the screen (±10%). Adjusting the Screen Size and Projection Distance Refer to the illustrations and tables below to the bottom...

User Manual
Page 11
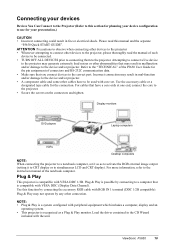
... audio cable with RCA jack NOTE: About Plug-and-Play Capability • This projector is a system composed of the computer, its operating system and peripheral equipment (i.e. ViewSonic PJ650 8 Please take advantage of computers. display devices). • Please use for determining... which projector port and cable to use the standard drivers as this projector is a Plug-and-Play monitor. • Plug...
... audio cable with RCA jack NOTE: About Plug-and-Play Capability • This projector is a system composed of the computer, its operating system and peripheral equipment (i.e. ViewSonic PJ650 8 Please take advantage of computers. display devices). • Please use for determining... which projector port and cable to use the standard drivers as this projector is a Plug-and-Play monitor. • Plug...

User Manual
Page 12
... the outlet. Power outlet AC inlet Power cord 9 ViewSonic PJ650 SetUp Reminders WARNING: Precautions to observe in regards to the power cord: Please use the power cord that came with the power cord's specified voltage range. • Only use extra caution when connecting the projector's power cord as incorrect or faulty connections may...
... the outlet. Power outlet AC inlet Power cord 9 ViewSonic PJ650 SetUp Reminders WARNING: Precautions to observe in regards to the power cord: Please use the power cord that came with the power cord's specified voltage range. • Only use extra caution when connecting the projector's power cord as incorrect or faulty connections may...
User Manual
Page 13
.... Load the driver contained in mal-function and/or damage to the device and/or projector. • A component cable and some other devices to the projector, please thoroughly read this manual and the separate "PJ650 Quick START GUIDE". ViewSonic PJ650 10 Use this function by connecting the accessory RGB cable with VESA DDC 1/2B. Attempting...
.... Load the driver contained in mal-function and/or damage to the device and/or projector. • A component cable and some other devices to the projector, please thoroughly read this manual and the separate "PJ650 Quick START GUIDE". ViewSonic PJ650 10 Use this function by connecting the accessory RGB cable with VESA DDC 1/2B. Attempting...

User Manual
Page 14
... multiple display screen modes. For details on how this projector. • For some of some RGB input modes, the optional Mac adapter is done, please refer to simultaneous LCD and CRT display). Connecting to a Computer ATTENTION: Whenever attempting to connect a laptop computer to the projector, be possible with this is necessary. 11 ViewSonic PJ650
... multiple display screen modes. For details on how this projector. • For some of some RGB input modes, the optional Mac adapter is done, please refer to simultaneous LCD and CRT display). Connecting to a Computer ATTENTION: Whenever attempting to connect a laptop computer to the projector, be possible with this is necessary. 11 ViewSonic PJ650
User Manual
Page 17
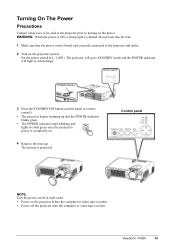
Turning On The Power Precautions Connect all devices to be used to the projector prior to turning on the projector before the computer or video tape recorder. • Power off in right order. • Power on the power. ViewSonic PJ650 14 WARNING: When the power is ON, a strong light is firmly... and correctly connected to the projector and outlet. 2 Turn on . 4 Remove the lens cap The picture is projected. Do not look...
Turning On The Power Precautions Connect all devices to be used to the projector prior to turning on the projector before the computer or video tape recorder. • Power off in right order. • Power on the power. ViewSonic PJ650 14 WARNING: When the power is ON, a strong light is firmly... and correctly connected to the projector and outlet. 2 Turn on . 4 Remove the lens cap The picture is projected. Do not look...

User Manual
Page 18
Turning Off The Power 1 Press the STANDBY/ON button (control panel or remote control) The message "Power off . The projector lamp goes off and starts cooling down the POWER indicator stops blinking orange and then lights to solid orange. 3 Check that the POWER ...control) Press the STANDBY/ON button again while the "Power off . 15 ViewSonic PJ650 The POWER indicator blinks orange while the lamp cools down , the POWER indicator will appear on the screen for turning power off ?" When the projector has completed powering down . (Pressing the STANDBY/ON button while the POWER indicator...
Turning Off The Power 1 Press the STANDBY/ON button (control panel or remote control) The message "Power off . The projector lamp goes off and starts cooling down the POWER indicator stops blinking orange and then lights to solid orange. 3 Check that the POWER ...control) Press the STANDBY/ON button again while the "Power off . 15 ViewSonic PJ650 The POWER indicator blinks orange while the lamp cools down , the POWER indicator will appear on the screen for turning power off ?" When the projector has completed powering down . (Pressing the STANDBY/ON button while the POWER indicator...

User Manual
Page 19
..., each time you wish to focus the picture ViewSonic PJ650 16 If selecting video input Press the VIDEO button Press this button to toggle between the devices connected to RGB IN 1 and 2. Select the signal you press the INPUT button, the projector switches between its input signal ports. Use the ... panel Press the INPUT button As illustrated below , each time you wish to project. Select the signal you press the RGB button, the projector switches between RGB IN 1 and 2. As illustrated below, each time you wish to project. Selecting an Input Signal Using the remote control ...
..., each time you wish to focus the picture ViewSonic PJ650 16 If selecting video input Press the VIDEO button Press this button to toggle between the devices connected to RGB IN 1 and 2. Select the signal you press the INPUT button, the projector switches between its input signal ports. Use the ... panel Press the INPUT button As illustrated below , each time you wish to project. Select the signal you press the RGB button, the projector switches between RGB IN 1 and 2. As illustrated below, each time you wish to project. Selecting an Input Signal Using the remote control ...

User Manual
Page 24
... ON/OFF feature is used , or if there is a change in the input signal's state. • If the projector continues projecting the same image for too long. 21 ViewSonic PJ650 you forget to zoom in FREEZE mode for a long time (i.e. Using the Magnify Feature 1 Press the MAGNIFY (ON) ...button The projector enters MAGNIFY mode. 2 Press the POSITION button, then use the , , , buttons to select the area to ...
... ON/OFF feature is used , or if there is a change in the input signal's state. • If the projector continues projecting the same image for too long. 21 ViewSonic PJ650 you forget to zoom in FREEZE mode for a long time (i.e. Using the Magnify Feature 1 Press the MAGNIFY (ON) ...button The projector enters MAGNIFY mode. 2 Press the POSITION button, then use the , , , buttons to select the area to ...

User Manual
Page 25
If it detects an input signal, the search will cease and the projector will return to the state it will project the detected signal. You can set the blank screen using the menu (from the SCREEN menu, select ... in prior to the input signal screen. ViewSonic PJ650 22 Press the BLANK button again to remove the blank screen, and return to the search. Signal Searching 1 Press the SEARCH button When you press the SEARCH button, the projector begins searching for input signals. If the projector is shut off, and a blank screen appears...
If it detects an input signal, the search will cease and the projector will return to the state it will project the detected signal. You can set the blank screen using the menu (from the SCREEN menu, select ... in prior to the input signal screen. ViewSonic PJ650 22 Press the BLANK button again to remove the blank screen, and return to the search. Signal Searching 1 Press the SEARCH button When you press the SEARCH button, the projector begins searching for input signals. If the projector is shut off, and a blank screen appears...

User Manual
Page 26
... ENTER button. 4 Press the / buttons to adjust the SHARPNESS. Using the Menu Functions 1 Press the MENU button The menu display appears on the screen. The projector has the following menus: MAIN, PICTURE 1, PICTURE 2, INPUT, SCREEN, and OPTION. Press the MENU button to the single menu (small display showing only the operation... return to select PICTURE 1, then press the or ENTER button. 3 Select an item using the / buttons, then press the or ENTER button. or ESC 23 ViewSonic PJ650
... ENTER button. 4 Press the / buttons to adjust the SHARPNESS. Using the Menu Functions 1 Press the MENU button The menu display appears on the screen. The projector has the following menus: MAIN, PICTURE 1, PICTURE 2, INPUT, SCREEN, and OPTION. Press the MENU button to the single menu (small display showing only the operation... return to select PICTURE 1, then press the or ENTER button. 3 Select an item using the / buttons, then press the or ENTER button. or ESC 23 ViewSonic PJ650
User Manual
Page 27
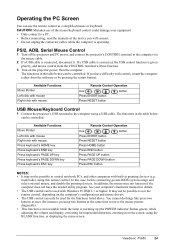
... the pointing devices. You cannot do things like press two buttons at once (for the functions listed above. ViewSonic PJ650 24 PS/2, ADB, Serial Mouse Control 1 Turn off the projector and PC power, and connect the projector's CONTROL terminal to a PC. • Before connecting, read the manuals of the device you have the needed...
... the pointing devices. You cannot do things like press two buttons at once (for the functions listed above. ViewSonic PJ650 24 PS/2, ADB, Serial Mouse Control 1 Turn off the projector and PC power, and connect the projector's CONTROL terminal to a PC. • Before connecting, read the manuals of the device you have the needed...
User Manual
Page 33
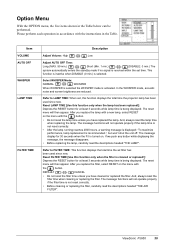
... message display for at least 3 seconds while lamp time is being displayed. Reset FILTER TIME [Use this function displays the total time the projector lamp has been used since new. This function is inactive when DISABLE (0 min.) is recommended.", but won't shut the unit off. The... (MAX. 99 min.) Short (Min. 1 min.) (DISABLE: 0 min.) The system automatically enters the standby mode if no signal is activated. ViewSonic PJ650 30 The reset menu will then appear. Option Menu With the OPTION menu, the five items shown in accordance with the button. And, always reset...
... message display for at least 3 seconds while lamp time is being displayed. Reset FILTER TIME [Use this function displays the total time the projector lamp has been used since new. This function is inactive when DISABLE (0 min.) is recommended.", but won't shut the unit off. The... (MAX. 99 min.) Short (Min. 1 min.) (DISABLE: 0 min.) The system automatically enters the standby mode if no signal is activated. ViewSonic PJ650 30 The reset menu will then appear. Option Menu With the OPTION menu, the five items shown in accordance with the button. And, always reset...


