
PJ513DB User Guide
Page 1
... - "Antes de operar su equipo lea cuidadosamente las instrucciones en este manual" - Käyttöopas Model No. : VS11959 Användarhandbok - Bedienungsanleitung - ViewSonic® PJ513D/PJ513DB DLP Projector IMPORTANT: Please read this User Guide to obtain important information on installing and using your product in a safe manner, as well as registering your...
... - "Antes de operar su equipo lea cuidadosamente las instrucciones en este manual" - Käyttöopas Model No. : VS11959 Användarhandbok - Bedienungsanleitung - ViewSonic® PJ513D/PJ513DB DLP Projector IMPORTANT: Please read this User Guide to obtain important information on installing and using your product in a safe manner, as well as registering your...

PJ513DB User Guide
Page 5
... furnishing this material, or the performance or use of VESA. For Your Records Product Name: Model Number: Document Number: Serial Number: Purchase Date: PJ513D/DB ViewSonic DLP Projector VS11959 PJ513D/DB_UG_ENG Rev. 1B 01-30-08 The lamp in the United States and other countries. Microsoft, Windows, Windows NT, and the Windows logo are...
... furnishing this material, or the performance or use of VESA. For Your Records Product Name: Model Number: Document Number: Serial Number: Purchase Date: PJ513D/DB ViewSonic DLP Projector VS11959 PJ513D/DB_UG_ENG Rev. 1B 01-30-08 The lamp in the United States and other countries. Microsoft, Windows, Windows NT, and the Windows logo are...
PJ513DB User Guide
Page 6
Table of Contents Introduction 1 Projector features 1 Shipping contents 1 Projector exterior view 2 Controls and functions 3 Positioning your projector 7 Choosing a location 7 Obtaining a preferred projected image size 8 Connection 11 Connecting a computer or monitor 11 ...a high altitude environment 26 Adjusting the sound 27 Personalizing the projector menu display 27 Shutting down the projector 28 Menu operation 29 Maintenance 37 Care of the projector 37 Lamp information 38 Troubleshooting 44 Specifications 45 Projector specifications 45 Dimensions 46 Timing chart 47
Table of Contents Introduction 1 Projector features 1 Shipping contents 1 Projector exterior view 2 Controls and functions 3 Positioning your projector 7 Choosing a location 7 Obtaining a preferred projected image size 8 Connection 11 Connecting a computer or monitor 11 ...a high altitude environment 26 Adjusting the sound 27 Personalizing the projector menu display 27 Shutting down the projector 28 Menu operation 29 Maintenance 37 Care of the projector 37 Lamp information 38 Troubleshooting 44 Specifications 45 Projector specifications 45 Dimensions 46 Timing chart 47

PJ513DB User Guide
Page 7
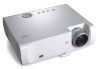
.... Standard accessories 1. Spare lamp kit 2. This is directly proportional to a PC or video equipment. Projector 2. VGA cable (4) 5. Shipping contents The projector is shipped with the cables required for data/video display • High brightness projection lamp •...use. Quick start guide and ViewSonic (2) Wizard CD 4. Soft carry case ViewSonic 1 PJ513D/PJ513DB Carefully unpack and verify that you have all of purchase. Card type remote control and battery (1) 3. Introduction Projector features The projector integrates high-performance optical engine ...
.... Standard accessories 1. Spare lamp kit 2. This is directly proportional to a PC or video equipment. Projector 2. VGA cable (4) 5. Shipping contents The projector is shipped with the cables required for data/video display • High brightness projection lamp •...use. Quick start guide and ViewSonic (2) Wizard CD 4. Soft carry case ViewSonic 1 PJ513D/PJ513DB Carefully unpack and verify that you have all of purchase. Card type remote control and battery (1) 3. Introduction Projector features The projector integrates high-performance optical engine ...

PJ513DB User Guide
Page 8
.... Quick-release foot 20. Kensington anti-theft lock slot 11. AC power cord inlet 12. Video input socket 18. Projector exterior view Front/upper side 1 2 3 4 5 1. 6 2. 3. 7 4. 5. 6. 8 7. 8. External control panel (See "Projector" on page 3 for details.) Vent (heated air exhaust) Front IR remote sensor Quick-release button Lens cap Focus ring... 11 10 9 9. RGB (PC)/Component video (YPbPr/ YCbCr) signal input socket 15. Rear IR remote sensor 13. Ceiling mounting screw holes 21 9 ViewSonic 2 PJ513D/PJ513DB Lamp cover 21. Rear adjuster foot 10. S-Video input socket 16.
.... Quick-release foot 20. Kensington anti-theft lock slot 11. AC power cord inlet 12. Video input socket 18. Projector exterior view Front/upper side 1 2 3 4 5 1. 6 2. 3. 7 4. 5. 6. 8 7. 8. External control panel (See "Projector" on page 3 for details.) Vent (heated air exhaust) Front IR remote sensor Quick-release button Lens cap Focus ring... 11 10 9 9. RGB (PC)/Component video (YPbPr/ YCbCr) signal input socket 15. Rear IR remote sensor 13. Ceiling mounting screw holes 21 9 ViewSonic 2 PJ513D/PJ513DB Lamp cover 21. Rear adjuster foot 10. S-Video input socket 16.
PJ513DB User Guide
Page 9
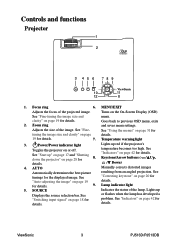
... for details. temperature becomes too high. Keystone/Arrow buttons ( / Up, details. / Down) 4. Lights up red if the projector's Toggles the projector on page 18 for details. Adjusts the size of the projected image. Temperature warning light 3. See "Indicators" on page 19 details...size and clarity" on page 28 for details. 7. See "Start up" on page 17 and "Shutting down the projector" on page 19 for 8. ViewSonic 3 PJ513D/PJ513DB Turns on page 42 for problem. SOURCE Indicates the status of the lamp. for the displayed image. Focus ring...
... for details. temperature becomes too high. Keystone/Arrow buttons ( / Up, details. / Down) 4. Lights up red if the projector's Toggles the projector on page 18 for details. Adjusts the size of the projected image. Temperature warning light 3. See "Indicators" on page 19 details...size and clarity" on page 28 for details. 7. See "Start up" on page 17 and "Shutting down the projector" on page 19 for 8. ViewSonic 3 PJ513D/PJ513DB Turns on page 42 for problem. SOURCE Indicates the status of the lamp. for the displayed image. Focus ring...

PJ513DB User Guide
Page 10
... 25 for details. 11. Right/PANEL KEY LOCK Activates panel key lock. ViewSonic 4 PJ513D/PJ513DB See "Selecting a preset mode" on page 31 for details. See "Using the menus" on page 22 for details. 12. 10. See "Hiding the image" on the projector or remote control. Enacts the selected On-Screen Display (OSD) menu...
... 25 for details. 11. Right/PANEL KEY LOCK Activates panel key lock. ViewSonic 4 PJ513D/PJ513DB See "Selecting a preset mode" on page 31 for details. See "Using the menus" on page 22 for details. 12. 10. See "Hiding the image" on the projector or remote control. Enacts the selected On-Screen Display (OSD) menu...

PJ513DB User Guide
Page 11
.... BLANK Used to previous OSD menu, exits and saves menu settings. SOURCE Displays the source selection bar. ViewSonic 5 PJ513D/PJ513DB Remote control 7. AUTO Automatically determines the best picture 3 9 timings for details. Toggles the projector on the projector or remote control. 5. To restore the image, press any button on or off. 2. DIGITAL ZOOM buttons (+, -) Magnifies...
.... BLANK Used to previous OSD menu, exits and saves menu settings. SOURCE Displays the source selection bar. ViewSonic 5 PJ513D/PJ513DB Remote control 7. AUTO Automatically determines the best picture 3 9 timings for details. Toggles the projector on the projector or remote control. 5. To restore the image, press any button on or off. 2. DIGITAL ZOOM buttons (+, -) Magnifies...

PJ513DB User Guide
Page 12
...sure that there are located on the projector that might obstruct the infra-red beam. • Operating the projector from the front • Operating the projector from possible battery leakage. Insert the new battery in the holder. ViewSonic 6 PJ513D/PJ513DB The remote control must be held ...at an angle within 30 degrees perpendicular to the projector's IR remote control sensors...
...sure that there are located on the projector that might obstruct the infra-red beam. • Operating the projector from the front • Operating the projector from possible battery leakage. Insert the new battery in the holder. ViewSonic 6 PJ513D/PJ513DB The remote control must be held ...at an angle within 30 degrees perpendicular to the projector's IR remote control sensors...
PJ513DB User Guide
Page 13
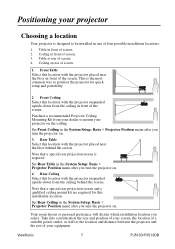
...installation location. Set Rear Ceiling in the System Setup: Basic > Projector Position menu after you turn the projector on . This is designed to be installed in front of screen. 1. ViewSonic 7 PJ513D/PJ513DB Ceiling at rear of screen; 2. Your room layout or personal... preference will dictate which installation location you turn the projector on the ceiling. Note that a special rear projection ...
...installation location. Set Rear Ceiling in the System Setup: Basic > Projector Position menu after you turn the projector on . This is designed to be installed in front of screen. 1. ViewSonic 7 PJ513D/PJ513DB Ceiling at rear of screen; 2. Your room layout or personal... preference will dictate which installation location you turn the projector on the ceiling. Note that a special rear projection ...

PJ513DB User Guide
Page 14
... level of the table (and everyone in the vertical center of the screen (projection distance), ViewSonic 8 PJ513D/PJ513DB Instead, digital projectors are two dimensions to project at a slightly downward angle. When determining the position of the screen and projector, you will project forward and upwards onto a screen positioned so that the bottom edge of...
... level of the table (and everyone in the vertical center of the screen (projection distance), ViewSonic 8 PJ513D/PJ513DB Instead, digital projectors are two dimensions to project at a slightly downward angle. When determining the position of the screen and projector, you will project forward and upwards onto a screen positioned so that the bottom edge of...

PJ513DB User Guide
Page 15
... either side of the 3 m screen are using the zoom control) to the horizontal center of the screen, at those projection distances. ViewSonic 9 PJ513D/PJ513DB and the vertical offset height of the projector from screen column labelled "Average". How to the edge of the average distance value. 3. How to determine the recommended screen size...
... either side of the 3 m screen are using the zoom control) to the horizontal center of the screen, at those projection distances. ViewSonic 9 PJ513D/PJ513DB and the vertical offset height of the projector from screen column labelled "Average". How to the edge of the average distance value. 3. How to determine the recommended screen size...

PJ513DB User Guide
Page 16
This will help you permanently install it best suits your installation location. ViewSonic 10 PJ513D/PJ513DB It is 3% tolerance among these numbers due to make allowance for this projector's optical characteristics. zoom) zoom) 1778 1867 1956 2187 2297 2406 2222 2333 2444 2667 2800 2933 2916 3062 ...240 274 300 329 360 457 There is recommended that if you intend to permanently install the projector, you should physically test the projection size and distance using the actual projector in situ before you determine the exact mounting position so that it , so as to ...
This will help you permanently install it best suits your installation location. ViewSonic 10 PJ513D/PJ513DB It is 3% tolerance among these numbers due to make allowance for this projector's optical characteristics. zoom) zoom) 1778 1867 1956 2187 2297 2406 2222 2333 2444 2667 2800 2933 2916 3062 ...240 274 300 329 360 457 There is recommended that if you intend to permanently install the projector, you should physically test the projection size and distance using the actual projector in situ before you determine the exact mounting position so that it , so as to ...

PJ513DB User Guide
Page 17
... to connect it to a laptop or desktop computer. Use the correct signal cables for each source. 3. They are firmly inserted. ViewSonic 11 PJ513D/PJ513DB Connecting a computer or monitor Connecting a computer The projector provides a VGA input socket that shown in the following diagram: Laptop or desktop computer VGA cable Audio cable Many notebooks do...
... to connect it to a laptop or desktop computer. Use the correct signal cables for each source. 3. They are firmly inserted. ViewSonic 11 PJ513D/PJ513DB Connecting a computer or monitor Connecting a computer The projector provides a VGA input socket that shown in the following diagram: Laptop or desktop computer VGA cable Audio cable Many notebooks do...

PJ513DB User Guide
Page 18
... the video monitor. 3. If you can connect the RGB signal output socket on the projector. ViewSonic 12 PJ513D/PJ513DB See "SYSTEM SETUP: Advanced menu" on page 11. 2. Connect the projector to a computer as on the screen, you wish to the projector. Take a suitable VGA cable (only one supplied) and connect one end of the cable...
... the video monitor. 3. If you can connect the RGB signal output socket on the projector. ViewSonic 12 PJ513D/PJ513DB See "SYSTEM SETUP: Advanced menu" on page 11. 2. Connect the projector to a computer as on the screen, you wish to the projector. Take a suitable VGA cable (only one supplied) and connect one end of the cable...

PJ513DB User Guide
Page 19
...one of the above connecting methods, however each provides a different level of choice in home theatre or home cinema applications. ViewSonic 13 PJ513D/PJ513DB Connecting Audio The projector has a built-in a perfectly acceptable, but less than standard composite Video. If you have a separate sound system, ... the following output sockets: • Component Video • S-Video • Video (composite) You need not connect audio to the projector if there is an alternate sound system available, or if audio is not designed for, nor intended for stereo audio reproduction use the ...
...one of the above connecting methods, however each provides a different level of choice in home theatre or home cinema applications. ViewSonic 13 PJ513D/PJ513DB Connecting Audio The projector has a built-in a perfectly acceptable, but less than standard composite Video. If you have a separate sound system, ... the following output sockets: • Component Video • S-Video • Video (composite) You need not connect audio to the projector if there is an alternate sound system available, or if audio is not designed for, nor intended for stereo audio reproduction use the ...
PJ513DB User Guide
Page 20
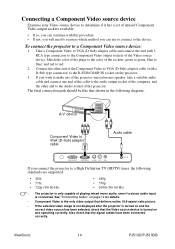
... High Definition TV (HDTV) tuner, the following diagram: A/V device Component Video to VGA (D-Sub) adaptor cable Audio cable If you connect the projector to blue; The final connection path should be like that shown in the following standards are supported: • 480i • 576i • ... to VGA (D-Sub) adaptor cable (with 3 RCA type connectors to the device. Connect the other end to the Audio socket of the projector. ViewSonic 14 PJ513D/PJ513DB Take a Component Video to VGA (D-Sub) adaptor cable and connect the end with a D-Sub type connector) to a Component Video source...
... High Definition TV (HDTV) tuner, the following diagram: A/V device Component Video to VGA (D-Sub) adaptor cable Audio cable If you connect the projector to blue; The final connection path should be like that shown in the following standards are supported: • 480i • 576i • ... to VGA (D-Sub) adaptor cable (with 3 RCA type connectors to the device. Connect the other end to the Audio socket of the projector. ViewSonic 14 PJ513D/PJ513DB Take a Component Video to VGA (D-Sub) adaptor cable and connect the end with a D-Sub type connector) to a Component Video source...

PJ513DB User Guide
Page 21
...cable and connect one end to the S-Video output socket of the S-Video cable to the S-VIDEO socket on and operating correctly. ViewSonic 15 PJ513D/PJ513DB Connecting an S-Video source device Examine your Video source device to determine if it has an unused S-Video output socket available: ... selected, check that the signal cables have been connected correctly. • If you have already made a Component Video connection between the projector and this S-Video source device using Component Video connections, you need not connect to this device using an S-Video connection as this procedure...
...cable and connect one end to the S-Video output socket of the S-Video cable to the S-VIDEO socket on and operating correctly. ViewSonic 15 PJ513D/PJ513DB Connecting an S-Video source device Examine your Video source device to determine if it has an unused S-Video output socket available: ... selected, check that the signal cables have been connected correctly. • If you have already made a Component Video connection between the projector and this S-Video source device using Component Video connections, you need not connect to this device using an S-Video connection as this procedure...

PJ513DB User Guide
Page 22
... Video source device: 1. Connect the other end of the Video cable to the VIDEO socket on and operating correctly. ViewSonic 16 PJ513D/PJ513DB To connect the projector to the composite Video output socket of the Video source device. 2. The final connection path should be like that shown... in the following diagram: A/V device Video cable Audio cable • The projector is only capable of playing mixed mono audio, even if...
... Video source device: 1. Connect the other end of the Video cable to the VIDEO socket on and operating correctly. ViewSonic 16 PJ513D/PJ513DB To connect the projector to the composite Video output socket of the Video source device. 2. The final connection path should be like that shown... in the following diagram: A/V device Video cable Audio cable • The projector is only capable of playing mixed mono audio, even if...

PJ513DB User Guide
Page 23
... connected equipment on . If you will run the cooling fan for a password, press the arrow buttons to adjust the image clearness. ViewSonic 17 PJ513D/PJ513DB Switch all of the screen. The projector will continue displaying until an input source signal is still hot from previous activity, it is on . 6. Please change to an...
... connected equipment on . If you will run the cooling fan for a password, press the arrow buttons to adjust the image clearness. ViewSonic 17 PJ513D/PJ513DB Switch all of the screen. The projector will continue displaying until an input source signal is still hot from previous activity, it is on . 6. Please change to an...


