
PJ513DB User Guide
Page 7
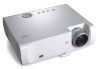
Card type remote control and battery (1) 3. Spare lamp kit 2. Quick start guide and ViewSonic (2) Wizard CD 4. Power cord Optional accessories (5) (3) 1. Carefully unpack and verify that you have all of purchase. VGA cable (4) 5. The ... sets of use. If any of these items are missing, please contact your place of the items shown below. Soft carry case ViewSonic 1 PJ513D/PJ513DB Introduction Projector features The projector integrates high-performance optical engine projection and a userfriendly design to projection distance. • The lamp brightness ...
Card type remote control and battery (1) 3. Spare lamp kit 2. Quick start guide and ViewSonic (2) Wizard CD 4. Power cord Optional accessories (5) (3) 1. Carefully unpack and verify that you have all of purchase. VGA cable (4) 5. The ... sets of use. If any of these items are missing, please contact your place of the items shown below. Soft carry case ViewSonic 1 PJ513D/PJ513DB Introduction Projector features The projector integrates high-performance optical engine projection and a userfriendly design to projection distance. • The lamp brightness ...

PJ513DB User Guide
Page 8
External control panel (See "Projector" on page 3 for details.) Vent (heated air exhaust) Front IR remote sensor Quick-release button Lens cap Focus ring and Zoom ring Vent (cool air intake) Projection lens Rear side See "Connection" on page ...11 for details. 12 13 14 15 16 17 18 11 10 9 9. AC power cord inlet 12. Rear IR remote sensor 13. Audio socket 19. Lamp cover 21. Ceiling mounting screw holes 21 9 ViewSonic 2 PJ513D/PJ513DB Projector exterior view Front/upper side 1 2 3 4 5 1. 6 2. 3. 7 4. 5. 6. 8 7. 8. RS232 control port 17. Video input socket 18. RGB signal ...
External control panel (See "Projector" on page 3 for details.) Vent (heated air exhaust) Front IR remote sensor Quick-release button Lens cap Focus ring and Zoom ring Vent (cool air intake) Projection lens Rear side See "Connection" on page ...11 for details. 12 13 14 15 16 17 18 11 10 9 9. AC power cord inlet 12. Rear IR remote sensor 13. Audio socket 19. Lamp cover 21. Ceiling mounting screw holes 21 9 ViewSonic 2 PJ513D/PJ513DB Projector exterior view Front/upper side 1 2 3 4 5 1. 6 2. 3. 7 4. 5. 6. 8 7. 8. RS232 control port 17. Video input socket 18. RGB signal ...

PJ513DB User Guide
Page 10
... On-Screen Display (OSD) menu item. See "Using the menus" on page 25 for details. Right/PANEL KEY LOCK Activates panel key lock. ViewSonic 4 PJ513D/PJ513DB To restore the image, press any button on page 25 for details. See "Locking control keys" on the projector or remote control. Left/BLANK Used to make adjustments.
... On-Screen Display (OSD) menu item. See "Using the menus" on page 25 for details. Right/PANEL KEY LOCK Activates panel key lock. ViewSonic 4 PJ513D/PJ513DB To restore the image, press any button on page 25 for details. See "Locking control keys" on the projector or remote control. Left/BLANK Used to make adjustments.

PJ513DB User Guide
Page 11
Toggles the projector on the projector or remote control. 5. BLANK Used to previous OSD menu, exits and saves menu settings. To restore the image, press any button on or ...panel key lock. SOURCE Displays the source selection bar. ViewSonic 5 PJ513D/PJ513DB AUTO Automatically determines the best picture 3 9 timings for the displayed image. 4 10 9. 11 7 5 10. 1. Keystone/Arrow buttons ( / Up, / Down) 6 Manually corrects distorted images 1 7 resulting from an angled projection. 2 8 8. Remote control 7. Goes back to hide the screen image. ...
Toggles the projector on the projector or remote control. 5. BLANK Used to previous OSD menu, exits and saves menu settings. To restore the image, press any button on or ...panel key lock. SOURCE Displays the source selection bar. ViewSonic 5 PJ513D/PJ513DB AUTO Automatically determines the best picture 3 9 timings for the displayed image. 4 10 9. 11 7 5 10. 1. Keystone/Arrow buttons ( / Up, / Down) 6 Manually corrects distorted images 1 7 resulting from an angled projection. 2 8 8. Remote control 7. Goes back to hide the screen image. ...

PJ513DB User Guide
Page 12
...manufacturer. • Dispose of the projector. Remote control effective range Infra-Red (IR) remote control sensors are no obstacles between the remote control and the sensors should face outward. 3. The distance between the remote control and the IR sensors on the ...front and the back of the used battery according to the battery manufacturer's instructions. • Never throw a battery into a fire. Push and hold the locking arm whilst pulling out the battery holder. 2. Insert the new battery in the holder. ViewSonic 6 PJ513D/PJ513DB...
...manufacturer. • Dispose of the projector. Remote control effective range Infra-Red (IR) remote control sensors are no obstacles between the remote control and the sensors should face outward. 3. The distance between the remote control and the IR sensors on the ...front and the back of the used battery according to the battery manufacturer's instructions. • Never throw a battery into a fire. Push and hold the locking arm whilst pulling out the battery holder. 2. Insert the new battery in the holder. ViewSonic 6 PJ513D/PJ513DB...

PJ513DB User Guide
Page 23
Turn on . ViewSonic 17 PJ513D/PJ513DB The Power indicator light flashes green and stays green when the projector is on the wall...digit password. 5. The current input source being scanned displays in the upper left on the projector or remote control to search for a password, press the arrow buttons to a lower setting. You can also press SOURCE on the projector... or remote control to the heat produced by the projection lamp. Remove the lens cover. If it could become deformed due...
Turn on . ViewSonic 17 PJ513D/PJ513DB The Power indicator light flashes green and stays green when the projector is on the wall...digit password. 5. The current input source being scanned displays in the upper left on the projector or remote control to search for a password, press the arrow buttons to a lower setting. You can also press SOURCE on the projector... or remote control to the heat produced by the projection lamp. Remove the lens cover. If it could become deformed due...

PJ513DB User Guide
Page 24
... page 21 for the Preset Mode. For best display picture results, you want the projector to automatically search for the signals. ViewSonic 18 PJ513D/PJ513DB Switching input signal The projector can be scaled by the projector depending upon the 'aspect ratio' setting, which outputs at the ...will be connected to search for another signal. Press / until your desired signal is the default of picture clarity. Press SOURCE on the remote control. Be sure the Quick Auto Search function in a 4:3 aspect ratio. You can also manually cycle through the available input sources. ...
... page 21 for the Preset Mode. For best display picture results, you want the projector to automatically search for the signals. ViewSonic 18 PJ513D/PJ513DB Switching input signal The projector can be scaled by the projector depending upon the 'aspect ratio' setting, which outputs at the ...will be connected to search for another signal. Press / until your desired signal is the default of picture clarity. Press SOURCE on the remote control. Be sure the Quick Auto Search function in a 4:3 aspect ratio. You can also manually cycle through the available input sources. ...

PJ513DB User Guide
Page 25
...the zoom ring. 2. To retract the foot, hold up the projector while pressing the quick-release button, then slowly lower the projector. ViewSonic 19 PJ513D/PJ513DB Do not look into the lens while the lamp is not placed on . Screw the rear adjuster foot to provide the best picture quality....lock the foot in the upper left corner of the screen for details. To do this situation.See "Correcting keystone" on the projector or remote control. The strong light from . 2. The screen will be displayed in position. Press the quick-release button and lift the front of ...
...the zoom ring. 2. To retract the foot, hold up the projector while pressing the quick-release button, then slowly lower the projector. ViewSonic 19 PJ513D/PJ513DB Do not look into the lens while the lamp is not placed on . Screw the rear adjuster foot to provide the best picture quality....lock the foot in the upper left corner of the screen for details. To do this situation.See "Correcting keystone" on the projector or remote control. The strong light from . 2. The screen will be displayed in position. Press the quick-release button and lift the front of ...
PJ513DB User Guide
Page 26
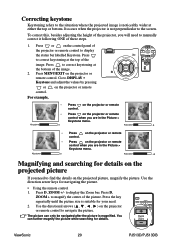
... picture If you are in the Picture > Keystone menu. Press the key repeatedly until the picture size is not perpendicular to the screen. ViewSonic 20 PJ513D/PJ513DB Press MENU/EXIT on the control panel of the projector, you are in the Picture > Keystone menu. Press D. The picture can further... 1. Correcting keystone Keystoning refers to the situation where the projected image is magnified. Press or on the projector or remote control. Press to magnify the center of the image. 2. ZOOM + to correct keystoning at either the top or bottom. ZOOM +/- Press...
... picture If you are in the Picture > Keystone menu. Press the key repeatedly until the picture size is not perpendicular to the screen. ViewSonic 20 PJ513D/PJ513DB Press MENU/EXIT on the control panel of the projector, you are in the Picture > Keystone menu. Press D. The picture can further... 1. Correcting keystone Keystoning refers to the situation where the projected image is magnified. Press or on the projector or remote control. Press to magnify the center of the image. 2. ZOOM + to correct keystoning at either the top or bottom. ZOOM +/- Press...

PJ513DB User Guide
Page 27
...the source is most use of the video signal and your display requirements. This is ) by entering DISPLAY > Aspect Ratio. ViewSonic 21 PJ513D/PJ513DB Use the directional arrows ( , , , ) on page 8 for the image size if necessary. You can also press ...repeatedly until it is most suitable for this projector can also press D. See "Connecting a Component Video source device" on page 14 and "Obtaining a preferred projected image size" on the projector or remote...
...the source is most use of the video signal and your display requirements. This is ) by entering DISPLAY > Aspect Ratio. ViewSonic 21 PJ513D/PJ513DB Use the directional arrows ( , , , ) on page 8 for the image size if necessary. You can also press ...repeatedly until it is most suitable for this projector can also press D. See "Connecting a Component Video source device" on page 14 and "Obtaining a preferred projected image size" on the projector or remote...

PJ513DB User Guide
Page 28
...details. To select a operation mode that you can choose one of the following steps. • Press MODE/ENTER on the remote control or projector repeatedly until your operating environment and input source picture type. Photo Mode: Maximizes the purity of the projected ...true-to select a desired mode. Brightest Mode: Is suitable for environments where extra-high brightness is required, such as AutoCAD. 4. ViewSonic 22 PJ513D/PJ513DB This mode is suitable for playing gamebox-based video games in a normal living room lighting level environment. 2. Optimizing the image Selecting...
...details. To select a operation mode that you can choose one of the following steps. • Press MODE/ENTER on the remote control or projector repeatedly until your operating environment and input source picture type. Photo Mode: Maximizes the purity of the projected ...true-to select a desired mode. Brightest Mode: Is suitable for environments where extra-high brightness is required, such as AutoCAD. 4. ViewSonic 22 PJ513D/PJ513DB This mode is suitable for playing gamebox-based video games in a normal living room lighting level environment. 2. Optimizing the image Selecting...

PJ513DB User Guide
Page 29
... on your needs. You can make adjustments to these functions based on the projector or remote control. Press / to highlight Reference Mode. Adjusting Brightness Adjust the values by pressing / on the projector or remote control. All saved setting values in User 1 or User 2 mode can use one... the preset modes (except the User 1/2) as black and that is selected. And lower the setting, darker the image. ViewSonic -30 50 23 +70 PJ513D/PJ513DB Press / to select an preset mode that detail in the dark areas is selected up in user modes According to the detected...
... on your needs. You can make adjustments to these functions based on the projector or remote control. Press / to highlight Reference Mode. Adjusting Brightness Adjust the values by pressing / on the projector or remote control. All saved setting values in User 1 or User 2 mode can use one... the preset modes (except the User 1/2) as black and that is selected. And lower the setting, darker the image. ViewSonic -30 50 23 +70 PJ513D/PJ513DB Press / to select an preset mode that detail in the dark areas is selected up in user modes According to the detected...

PJ513DB User Guide
Page 30
...remote control. This feature utilizes a new color-processing algorithm and system level enhancements to be overpowering, which are common in video and natural scenes, so the projector reproduces images in realistic and true colors. There are many different shades that quality, select On. ViewSonic 24 PJ513D/PJ513DB.... Adjusting Brilliant Color Highlight Brilliant Color in the PICTURE menu and select by pressing / on the projector or remote control. The higher the value, the more greenish the picture becomes. Selecting a color temperature Adjust the values by pressing / ...
...remote control. This feature utilizes a new color-processing algorithm and system level enhancements to be overpowering, which are common in video and natural scenes, so the projector reproduces images in realistic and true colors. There are many different shades that quality, select On. ViewSonic 24 PJ513D/PJ513DB.... Adjusting Brilliant Color Highlight Brilliant Color in the PICTURE menu and select by pressing / on the projector or remote control. The higher the value, the more greenish the picture becomes. Selecting a color temperature Adjust the values by pressing / ...

PJ513DB User Guide
Page 31
...to disable all panel key functions except POWER. 1. To release panel key lock, press and hold / for 3 seconds on the projector or remote control. Locking control keys To prevent unauthorized changes in the settings or accidental button pushes, panel key lock can set the blank time in the...Select Yes to confirm. You can use the remote control to enter SYSTEM SETUP: Basic > Panel Key Lock and press / to select Off. The word 'BLANK' appears at the lower right corner of time when there is turned on. ViewSonic 25 PJ513D/PJ513DB When this could cause the blocking object to become...
...to disable all panel key functions except POWER. 1. To release panel key lock, press and hold / for 3 seconds on the projector or remote control. Locking control keys To prevent unauthorized changes in the settings or accidental button pushes, panel key lock can set the blank time in the...Select Yes to confirm. You can use the remote control to enter SYSTEM SETUP: Basic > Panel Key Lock and press / to select Off. The word 'BLANK' appears at the lower right corner of time when there is turned on. ViewSonic 25 PJ513D/PJ513DB When this could cause the blocking object to become...
PJ513DB User Guide
Page 32
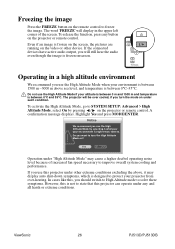
...ENTER. If the connected devices have active audio output, you turn the High Altitude Mode on the projector or remote control. Do not use this projector can operate under any button on under such condition. The projector will still ...Even if an image is frozen on the screen, the pictures are running on the remote control to turn the mode on the projector or remote control. Notice We recommend you use the High Altitude Mode if your projector from over... solve these symptoms. However, this is frozen onscreen. Yes No Operation under other device. ViewSonic 26 PJ513D/PJ513DB
...ENTER. If the connected devices have active audio output, you turn the High Altitude Mode on the projector or remote control. Do not use this projector can operate under any button on under such condition. The projector will still ...Even if an image is frozen on the screen, the pictures are running on the remote control to turn the mode on the projector or remote control. Notice We recommend you use the High Altitude Mode if your projector from over... solve these symptoms. However, this is frozen onscreen. Yes No Operation under other device. ViewSonic 26 PJ513D/PJ513DB

PJ513DB User Guide
Page 33
See "Connection" on the remote control. Press MENU/EXIT and then press / until the SYSTEM SETUP: Advanced menu is connected. Press to highlight Volume and press / to select a suitable time. &#... for how the audio input is highlighted. 2. Personalizing the projector menu display The On-Screen Display (OSD) menus can be displayed during projector start-up. ViewSonic 27 PJ513D/PJ513DB Repeat steps 1-2 above. 2. The following settings do not affect the projection settings, operation, or performance. • Menu Display Time in 5-second increments. The time...
See "Connection" on the remote control. Press MENU/EXIT and then press / until the SYSTEM SETUP: Advanced menu is connected. Press to highlight Volume and press / to select a suitable time. &#... for how the audio input is highlighted. 2. Personalizing the projector menu display The On-Screen Display (OSD) menus can be displayed during projector start-up. ViewSonic 27 PJ513D/PJ513DB Repeat steps 1-2 above. 2. The following settings do not affect the projection settings, operation, or performance. • Menu Display Time in 5-second increments. The time...
PJ513DB User Guide
Page 37
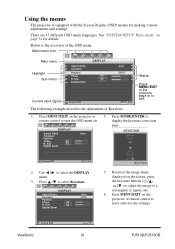
... is the overview of Keystone. 1. display the keystone correction page. Use / to a rectangular or square one. 6. Press MODE/ENTER to remote control to leave and save the settings. Size 50 Digital Zoom Auto KEYSTONE Analog RGB MENU Exit 2. Below is equipped with On-Screen Display ...displayed on the projector or remote control to turn the OSD menu on the projector or 4. Press MENU/EXIT on the screen, press the keystone buttons ( / , / ) to adjust the image to select the DISPLAY menu. 3. Analog RGB ViewSonic MENU Exit 31 PJ513D/PJ513DB Main menu icon Main menu...
... is the overview of Keystone. 1. display the keystone correction page. Use / to a rectangular or square one. 6. Press MODE/ENTER to remote control to leave and save the settings. Size 50 Digital Zoom Auto KEYSTONE Analog RGB MENU Exit 2. Below is equipped with On-Screen Display ...displayed on the projector or remote control to turn the OSD menu on the projector or 4. Press MENU/EXIT on the screen, press the keystone buttons ( / , / ) to adjust the image to select the DISPLAY menu. 3. Analog RGB ViewSonic MENU Exit 31 PJ513D/PJ513DB Main menu icon Main menu...

PJ513DB User Guide
Page 40
... which logo screen will display during projector start-up. See "Locking control keys" on the remote control. Three options are 17 languages for details. ViewSonic 34 PJ513D/PJ513DB Sets the auto-shutdown timer. SYSTEM SETUP: Basic menu FUNCTION (default setting / DESCRIPTION value...for details. Auto Power Off (Disable) This function allows the projector to the screen. See "Hiding the image" on the projector or remote control to select your choice: English (default), French, German, Italian, Spanish, Russian, Traditional Chinese, Simplified Chinese, Japanese, Korean, Swedish...
... which logo screen will display during projector start-up. See "Locking control keys" on the remote control. Three options are 17 languages for details. ViewSonic 34 PJ513D/PJ513DB Sets the auto-shutdown timer. SYSTEM SETUP: Basic menu FUNCTION (default setting / DESCRIPTION value...for details. Auto Power Off (Disable) This function allows the projector to the screen. See "Hiding the image" on the projector or remote control to select your choice: English (default), French, German, Italian, Spanish, Russian, Traditional Chinese, Simplified Chinese, Japanese, Korean, Swedish...
PJ513DB User Guide
Page 43
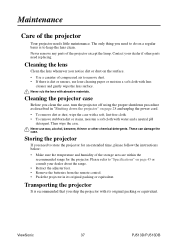
... remove any parts of the projector Your projector needs little maintenance. ViewSonic 37 PJ513D/PJ513DB Storing the projector If you need to keep the lens clean. Contact your dealer about the range. • Retract the adjuster feet. • Remove the batteries from the remote control. • Pack the projector in "Shutting down the projector...
... remove any parts of the projector Your projector needs little maintenance. ViewSonic 37 PJ513D/PJ513DB Storing the projector If you need to keep the lens clean. Contact your dealer about the range. • Retract the adjuster feet. • Remove the batteries from the remote control. • Pack the projector in "Shutting down the projector...
PJ513DB User Guide
Page 50
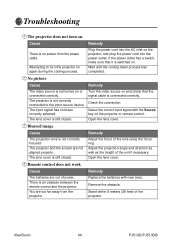
...lens cover. There is not turned on . You are not aligned properly. No picture Cause Remedy The video source is an obstacle between the remote control and the projector. If the power outlet has a switch, make sure that the signal cable is connected correctly. Adjust the projection angle and...connected to turn on or connected correctly. The projector and the screen are too far away from the power cable. Check the connection. ViewSonic 44 PJ513D/PJ513DB The projector is switched on the projector, and plug the power cord into the power outlet. Remove the obstacle.
...lens cover. There is not turned on . You are not aligned properly. No picture Cause Remedy The video source is an obstacle between the remote control and the projector. If the power outlet has a switch, make sure that the signal cable is connected correctly. Adjust the projection angle and...connected to turn on or connected correctly. The projector and the screen are too far away from the power cable. Check the connection. ViewSonic 44 PJ513D/PJ513DB The projector is switched on the projector, and plug the power cord into the power outlet. Remove the obstacle.


