User Manual
Page 2
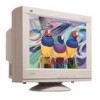
Contents Electronic Warranty Registration 2 For Your Records 2 Getting Started Package Contents 3 Precautions 3 Quick Installation 4 Using the Monitor Setting the Timing Mode 5 OSD Lock Setting 6 Adjusting the Screen Image 7 Other Information Specifications 12 Troubleshooting 13 Customer Support 14 Cleaning the Monitor 15 Limited Warranty 16 Appendix Power Cord Safety Guidelines 17 FCC Information 18 06/07/04 D ViewSonic P220f 1
Contents Electronic Warranty Registration 2 For Your Records 2 Getting Started Package Contents 3 Precautions 3 Quick Installation 4 Using the Monitor Setting the Timing Mode 5 OSD Lock Setting 6 Adjusting the Screen Image 7 Other Information Specifications 12 Troubleshooting 13 Customer Support 14 Cleaning the Monitor 15 Limited Warranty 16 Appendix Power Cord Safety Guidelines 17 FCC Information 18 06/07/04 D ViewSonic P220f 1
User Manual
Page 3
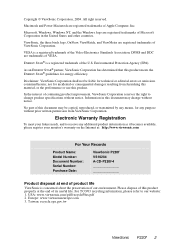
... registered trademarks of the Video Electronics Standards Association. Electronic Warranty Registration To meet your monitor's warranty on the Internet at: http://www.viewsonic.com For Your Records Product Name: Model Number: Document Number: Serial Number: Purchase Date: ViewSonic P220f VS10284 A-CD-P220f-4 Product disposal at the end of Apple Computer, Inc. For TCO'03 recycling...
... registered trademarks of the Video Electronics Standards Association. Electronic Warranty Registration To meet your monitor's warranty on the Internet at: http://www.viewsonic.com For Your Records Product Name: Model Number: Document Number: Serial Number: Purchase Date: ViewSonic P220f VS10284 A-CD-P220f-4 Product disposal at the end of Apple Computer, Inc. For TCO'03 recycling...

User Manual
Page 4
ViewSonic P220f 3 Important! The INF file ensures compatibility with Windows operating systems, and the ICM file (Image Color Matching) ensures accurate on-screen colors. Oils from the monitor. • AVOID TOUCHING THE SCREEN WITH YOUR FINGERS. Do not place anything on the monitor that you touch these conditions. • Keep the monitor away from direct sunlight...
ViewSonic P220f 3 Important! The INF file ensures compatibility with Windows operating systems, and the ICM file (Image Color Matching) ensures accurate on-screen colors. Oils from the monitor. • AVOID TOUCHING THE SCREEN WITH YOUR FINGERS. Do not place anything on the monitor that you touch these conditions. • Keep the monitor away from direct sunlight...
User Manual
Page 5
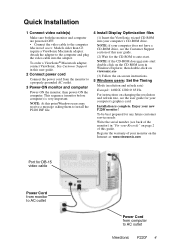
...1 Connect video cable(s) Make sure both the monitor and computer are powered OFF. • Connect the video cable to install the P220f INF file. 4 Install Display Optimization files (1) Insert the ViewSonic wizard CD-ROM into the adapter. This sequence (monitor before computer) is complete. NOTE: if the ... the user guide for DB-15 video cable Power Cord from monitor to AC outlet Power Cord from the monitor to AC outlet ViewSonic P220f 4 Enjoy your Records" on the Internet at: www.viewsonic.com Port for your monitor on page 2 of your computer's graphics card. To order...
...1 Connect video cable(s) Make sure both the monitor and computer are powered OFF. • Connect the video cable to install the P220f INF file. 4 Install Display Optimization files (1) Insert the ViewSonic wizard CD-ROM into the adapter. This sequence (monitor before computer) is complete. NOTE: if the ... the user guide for DB-15 video cable Power Cord from monitor to AC outlet Power Cord from the monitor to AC outlet ViewSonic P220f 4 Enjoy your Records" on the Internet at: www.viewsonic.com Port for your monitor on page 2 of your computer's graphics card. To order...
User Manual
Page 6
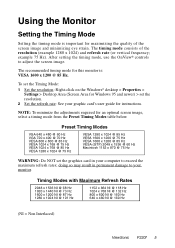
...: To minimize the adjustments required for maximizing the quality of the resolution (example 1280 x 1024) and refresh rate (or vertical frequency; Using the Monitor Setting the Timing Mode Setting the timing mode is : VESA 1600 x 1200 @ 85 Hz. The timing mode consists of the screen image and ...101 Hz 1152 x 864 NI @ 118 Hz 1024 x 768 NI @ 132 Hz 800 x 600 NI @ 160 Hz 640 x 480 NI @ 160 Hz (NI = Non Interlaced) ViewSonic P220f 5 The recommended timing mode for this monitor is important for an optimal screen image, select a timing mode from the Preset Timing Modes table below.
...: To minimize the adjustments required for maximizing the quality of the resolution (example 1280 x 1024) and refresh rate (or vertical frequency; Using the Monitor Setting the Timing Mode Setting the timing mode is : VESA 1600 x 1200 @ 85 Hz. The timing mode consists of the screen image and ...101 Hz 1152 x 864 NI @ 118 Hz 1024 x 768 NI @ 132 Hz 800 x 600 NI @ 160 Hz 640 x 480 NI @ 160 Hz (NI = Non Interlaced) ViewSonic P220f 5 The recommended timing mode for this monitor is important for an optimal screen image, select a timing mode from the Preset Timing Modes table below.
User Manual
Page 7
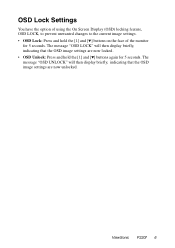
OSD Lock Settings You have the option of the monitor for 5 seconds. ViewSonic P220f 6 The message "OSD LOCK" will then display briefly, indicating that the OSD image settings are now unlocked. The message "OSD UNLOCK" will then display briefly, indicating that the OSD image settings are now locked. • OSD Unlock: Press and hold the [1] and...
OSD Lock Settings You have the option of the monitor for 5 seconds. ViewSonic P220f 6 The message "OSD LOCK" will then display briefly, indicating that the OSD image settings are now unlocked. The message "OSD UNLOCK" will then display briefly, indicating that the OSD image settings are now locked. • OSD Unlock: Press and hold the [1] and...

User Manual
Page 8
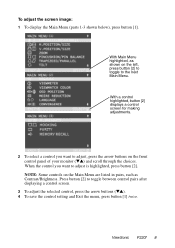
... to adjust the OnView® controls which display on the screen. also saves changes/ exits Main Menu. IMPORTANT: The monitor should be warmed up for highlighted control (or pair of the next page and are explained in the four steps at the top of controls). ViewSonic P220f 7 Main Menu with the Main Menu shown... 8-10. Adjusting the Screen Image Beginning with OnView controls 1 2 Front Control Panel Zoom expands and contracts the entire screen image Power Light Power On/Off 1 2 Displays Main Menu; The OnView controls are further explained on some control screens.
... to adjust the OnView® controls which display on the screen. also saves changes/ exits Main Menu. IMPORTANT: The monitor should be warmed up for highlighted control (or pair of the next page and are explained in the four steps at the top of controls). ViewSonic P220f 7 Main Menu with the Main Menu shown... 8-10. Adjusting the Screen Image Beginning with OnView controls 1 2 Front Control Panel Zoom expands and contracts the entire screen image Power Light Power On/Off 1 2 Displays Main Menu; The OnView controls are further explained on some control screens.
User Manual
Page 9
...Press button [2] to adjust is highlighted, press button [2]. When the control you want to toggle between control pairs after displaying a control screen. 3 To adjust the selected control, press the arrow buttons (▼▲). 4 To save the control... front control panel of your monitor (▼▲) and scroll through the choices. With Main Menu highlighted, as Contrast/Brightness. To adjust the screen image: 1 To display the Main Menu (parts 1-3 shown below), press button [1]. ViewSonic P220f 8 With a control highlighted, button [2] displays a control screen for making adjustments...
...Press button [2] to adjust is highlighted, press button [2]. When the control you want to toggle between control pairs after displaying a control screen. 3 To adjust the selected control, press the arrow buttons (▼▲). 4 To save the control... front control panel of your monitor (▼▲) and scroll through the choices. With Main Menu highlighted, as Contrast/Brightness. To adjust the screen image: 1 To display the Main Menu (parts 1-3 shown below), press button [1]. ViewSonic P220f 8 With a control highlighted, button [2] displays a control screen for making adjustments...
User Manual
Page 10
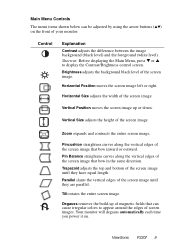
... and contracts the entire screen image. ViewSonic P220f 9 Pin Balance straightens curves along the vertical edges of the screen image until they are parallel. Parallel slants the vertical edges of the screen image that bow in the same direction. Shortcut: Before displaying the Main Menu, press ▼ ...the screen image. Vertical Position moves the screen image up of screen images. Trapezoid adjusts the top and bottom of your monitor. Your monitor will degauss automatically each time you power it on the front of the screen image until they have equal length. Control...
... and contracts the entire screen image. ViewSonic P220f 9 Pin Balance straightens curves along the vertical edges of the screen image until they are parallel. Parallel slants the vertical edges of the screen image that bow in the same direction. Shortcut: Before displaying the Main Menu, press ▼ ...the screen image. Vertical Position moves the screen image up of screen images. Trapezoid adjusts the top and bottom of your monitor. Your monitor will degauss automatically each time you power it on the front of the screen image until they have equal length. Control...
User Manual
Page 11
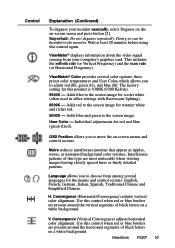
...). 9300K - Convergence (Vertical Convergence) adjusts horizontal color alignment. ViewMeter® displays information about the video signal coming from among several color options: three preset ...most noticeable when viewing images having closely spaced lines or finely detailed patterns. ViewSonic P220f 10 Use this type are present around the vertical segments of black letters... To degauss your computer's graphics card. OSD Position allows you to choose from your monitor manually, select Degauss on the on a white background. Individual adjustments for warmer white...
...). 9300K - Convergence (Vertical Convergence) adjusts horizontal color alignment. ViewMeter® displays information about the video signal coming from among several color options: three preset ...most noticeable when viewing images having closely spaced lines or finely detailed patterns. ViewSonic P220f 10 Use this type are present around the vertical segments of black letters... To degauss your computer's graphics card. OSD Position allows you to choose from your monitor manually, select Degauss on the on a white background. Individual adjustments for warmer white...
User Manual
Page 13
ViewSonic P220f 12 You will need to provide serial number of the product. 2 Warning: Do NOT set the graphics card in permanent damage to exceed these Maximum Refresh Rates; doing so could result in your computer to the monitor. To order a Macintosh adapter, contact ViewSonic Customer Support. Other Information Specifications CRT Input Signal Compatibility Timing Modes...
ViewSonic P220f 12 You will need to provide serial number of the product. 2 Warning: Do NOT set the graphics card in permanent damage to exceed these Maximum Refresh Rates; doing so could result in your computer to the monitor. To order a Macintosh adapter, contact ViewSonic Customer Support. Other Information Specifications CRT Input Signal Compatibility Timing Modes...
User Manual
Page 14
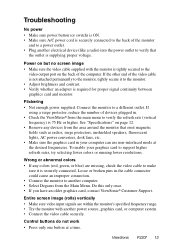
... only once. • If you have an older graphics card, contact ViewSonic® Customer Support. ViewSonic P220f 13 Troubleshooting No power • Make sure power button (or switch) is ON. • Make sure A/C power cord is securely connected to the back of the monitor and to a power outlet. • Plug another electrical device (like...
... only once. • If you have an older graphics card, contact ViewSonic® Customer Support. ViewSonic P220f 13 Troubleshooting No power • Make sure power button (or switch) is ON. • Make sure A/C power cord is securely connected to the back of the monitor and to a power outlet. • Plug another electrical device (like...
User Manual
Page 16
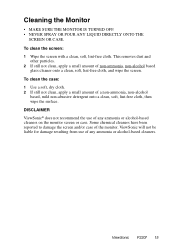
... glass cleaner onto a clean, soft, lint-free cloth, and wipe the screen. ViewSonic P220f 15 DISCLAIMER ViewSonic® does not recommend the use of any ammonia or alcohol-based cleaners on the monitor screen or case. Cleaning the Monitor • MAKE SURE THE MONITOR IS TURNED OFF. • NEVER SPRAY OR POUR ANY LIQUID DIRECTLY ONTO... the screen and/or case of any ammonia or alcohol-based cleaners. To clean the screen: 1 Wipe the screen with a clean, soft, lint-free cloth. ViewSonic will not be liable for damage resulting from use of the...
... glass cleaner onto a clean, soft, lint-free cloth, and wipe the screen. ViewSonic P220f 15 DISCLAIMER ViewSonic® does not recommend the use of any ammonia or alcohol-based cleaners on the monitor screen or case. Cleaning the Monitor • MAKE SURE THE MONITOR IS TURNED OFF. • NEVER SPRAY OR POUR ANY LIQUID DIRECTLY ONTO... the screen and/or case of any ammonia or alcohol-based cleaners. To clean the screen: 1 Wipe the screen with a clean, soft, lint-free cloth. ViewSonic will not be liable for damage resulting from use of the...
User Manual
Page 17
Who the warranty protects: This warranty is effective: ViewSonic® color CRT monitors, including the display tubes, are warranted for three (3) years for all labor from defects in the original container to shipment. b. d. Removal or installation of ... or consequential damages, so the above limitations and exclusions may not apply to follow instructions supplied with a like product. ViewSonic CRT Monitor Warranty (V3.0) Release Date: 03-26-2002 ViewSonic P220f 16 How long the warranty is valid only for all parts and three (3) years for the first consumer purchaser. To...
Who the warranty protects: This warranty is effective: ViewSonic® color CRT monitors, including the display tubes, are warranted for three (3) years for all labor from defects in the original container to shipment. b. d. Removal or installation of ... or consequential damages, so the above limitations and exclusions may not apply to follow instructions supplied with a like product. ViewSonic CRT Monitor Warranty (V3.0) Release Date: 03-26-2002 ViewSonic P220f 16 How long the warranty is valid only for all parts and three (3) years for the first consumer purchaser. To...


