User Guide
Page 1
VS18241 P/N: M1 M1 Portable LED Projector User Guide IMPORTANT: Please read this User Guide will describe your limited coverage from ViewSonic® Corporation, which is also found on installing and using the Regional selection box in a safe manner, as well as registering your product in ... "Antes de operar su equipo lea cu idadosamente las instrucciones en este manual" Model No. Warranty information contained in this User Guide to obtain important information on our web site at http://www.viewsonic.com in English, or in specific languages using your product for future service.
VS18241 P/N: M1 M1 Portable LED Projector User Guide IMPORTANT: Please read this User Guide will describe your limited coverage from ViewSonic® Corporation, which is also found on installing and using the Regional selection box in a safe manner, as well as registering your product in ... "Antes de operar su equipo lea cu idadosamente las instrucciones en este manual" Model No. Warranty information contained in this User Guide to obtain important information on our web site at http://www.viewsonic.com in English, or in specific languages using your product for future service.

User Guide
Page 3
... all instructions. • Allow at least 20" (50 cm) clearance around the projector to removing the lamp assembly for replacement. • Do not use of more than 15° degrees forwards or backwards. • Do not look straight at an angle of lamps beyond the rated lamp life. Doing so may cause death if you start using the projector. • Keep this user guide in...
... all instructions. • Allow at least 20" (50 cm) clearance around the projector to removing the lamp assembly for replacement. • Do not use of more than 15° degrees forwards or backwards. • Do not look straight at an angle of lamps beyond the rated lamp life. Doing so may cause death if you start using the projector. • Keep this user guide in...

User Guide
Page 5
... Connecting to External Devices 15 HDMI Connection 15 USB Connection...15 Micro SD...15 Using the Projector 16 Starting Up the Projector 16 Adjusting the Projected Image 17 Adjusting the Projector's Height and Projection Angle 17 Adjusting the Focus 17 First Time Activation 18 Preferred Language 18 Projection Orientation 19 Shutting Down the Projector 20 Input Source Selected - On-Screen Display (OSD) Tree 21 5 Contents Safety Precautions 3 Introduction 7 Package Contents...7 Product Overview...8 Projector...8 Remote Control...9 Initial Setup 11 Choosing a Location...
... Connecting to External Devices 15 HDMI Connection 15 USB Connection...15 Micro SD...15 Using the Projector 16 Starting Up the Projector 16 Adjusting the Projected Image 17 Adjusting the Projector's Height and Projection Angle 17 Adjusting the Focus 17 First Time Activation 18 Preferred Language 18 Projection Orientation 19 Shutting Down the Projector 20 Input Source Selected - On-Screen Display (OSD) Tree 21 5 Contents Safety Precautions 3 Introduction 7 Package Contents...7 Product Overview...8 Projector...8 Remote Control...9 Initial Setup 11 Choosing a Location...
User Guide
Page 6
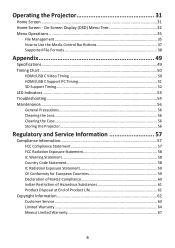
Operating the Projector 31 Home Screen...31 Home Screen - On-Screen Display (OSD) Menu Tree 32 Menu Operations 35 File Management 35 How to Use the Media Control Bar Buttons 37 Supported File Formats 38 Appendix 49 Specifications...49 Timing Chart...50 HDMI/USB C Video Timing 50 HDMI/USB C Support PC Timing 51 3D Support Timing 52 LED Indicators...53 Troubleshooting...54 Maintenance...56 General Precautions 56 Cleaning the Lens 56 Cleaning the Case 56 Storing the Projector 56 Regulatory and Service Information 57 Compliance Information...
Operating the Projector 31 Home Screen...31 Home Screen - On-Screen Display (OSD) Menu Tree 32 Menu Operations 35 File Management 35 How to Use the Media Control Bar Buttons 37 Supported File Formats 38 Appendix 49 Specifications...49 Timing Chart...50 HDMI/USB C Video Timing 50 HDMI/USB C Support PC Timing 51 3D Support Timing 52 LED Indicators...53 Troubleshooting...54 Maintenance...56 General Precautions 56 Cleaning the Lens 56 Cleaning the Case 56 Storing the Projector 56 Regulatory and Service Information 57 Compliance Information...
User Guide
Page 9
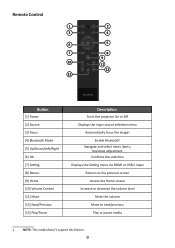
Keystone adjustment Confirms the selection Displays the Setting menu via HDMI or USB C input Returns to the previous screen Access the Home screen Increase or decrease the volume level Mute the volume Move to next/previous Play or pause media 1 NOTE: This model doesn't support this feature. 9 Remote Control 1 2 3 4 6 OK 5 7 8 9 10 11 12 13 Button [1] Power [2] Source [3] Focus [4] Bluetooth Mode [5] Up/Down/Left/Right [6] OK [7] Setting [8] Return [9] Home [10] Volume Control [11] Mute [12...
Keystone adjustment Confirms the selection Displays the Setting menu via HDMI or USB C input Returns to the previous screen Access the Home screen Increase or decrease the volume level Mute the volume Move to next/previous Play or pause media 1 NOTE: This model doesn't support this feature. 9 Remote Control 1 2 3 4 6 OK 5 7 8 9 10 11 12 13 Button [1] Power [2] Source [3] Focus [4] Bluetooth Mode [5] Up/Down/Left/Right [6] OK [7] Setting [8] Return [9] Home [10] Volume Control [11] Mute [12...

User Guide
Page 10
... to negative. 3. Replacing the Batteries 1. Remote Control - Effective Range To ensure proper function of the battery compartment. To open the cover in the direction of used batteries according to view its back, open the battery cover, turn the remote control over to the manufacturer's instructions and local environment regulations for an extended period of time, remove the battery to avoid damage to the remote control. • Dispose...
... to negative. 3. Replacing the Batteries 1. Remote Control - Effective Range To ensure proper function of the battery compartment. To open the cover in the direction of used batteries according to view its back, open the battery cover, turn the remote control over to the manufacturer's instructions and local environment regulations for an extended period of time, remove the battery to avoid damage to the remote control. • Dispose...

User Guide
Page 13
Connect the power cord to a power outlet. Connect the power cord plug to the power adapter. 2. Connecting to connect the projector with other equipment. When connected, the status LED will turn red. 2 3 1 NOTE: • Charge the projector for 4.5 hours via the power adapter before using it in battery mode for the first time. 13 Making Connections This section guides you on how to Power DC Power (Power Outlet) 1. Connect the power adapter to the DC IN jack at the side of the projector. 3.
Connect the power cord to a power outlet. Connect the power cord plug to the power adapter. 2. Connecting to connect the projector with other equipment. When connected, the status LED will turn red. 2 3 1 NOTE: • Charge the projector for 4.5 hours via the power adapter before using it in battery mode for the first time. 13 Making Connections This section guides you on how to Power DC Power (Power Outlet) 1. Connect the power adapter to the DC IN jack at the side of the projector. 3.

User Guide
Page 14
... right of the projector. 2. Battery Usage Time Information Charging Usage Hours Battery Level Indicator (Charging) About 4.5 hours up to 6 hours (Battery Saving) up to 4 hours (Extended Eco) up to 3 hours (Eco) up to the power bank. Connect the other end of the USB Type-C cable to 2.5 hours (Full) During Charging: Flashing White LED light Full Charge: Solid White LED light 14 Connect one end of the USB Type-C cable to the USB-C port of the Home Screen.
... right of the projector. 2. Battery Usage Time Information Charging Usage Hours Battery Level Indicator (Charging) About 4.5 hours up to 6 hours (Battery Saving) up to 4 hours (Extended Eco) up to 3 hours (Eco) up to the power bank. Connect the other end of the USB Type-C cable to 2.5 hours (Full) During Charging: Flashing White LED light Full Charge: Solid White LED light 14 Connect one end of the USB Type-C cable to the USB-C port of the Home Screen.

User Guide
Page 20
Shutting Down the Projector 1. If only using the Power button on the remote control. NOTE: When not in the following message: 3. Press the Up/Down buttons on the remote control to select Turn Off and press OK on the remote control to power off , the projector will enter standby mode and the embedded battery will result in use, please press the Power button to power off . Pressing the Power button on the remote control. 2. Press and hold the Power button for three (3) seconds on the projector, or press the Power button on the remote control will still consume some power. 20
Shutting Down the Projector 1. If only using the Power button on the remote control. NOTE: When not in the following message: 3. Press the Up/Down buttons on the remote control to select Turn Off and press OK on the remote control to power off , the projector will enter standby mode and the embedded battery will result in use, please press the Power button to power off . Pressing the Power button on the remote control. 2. Press and hold the Power button for three (3) seconds on the projector, or press the Power button on the remote control will still consume some power. 20
User Guide
Page 25
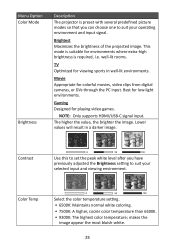
...-high brightness is preset with several predefined picture modes so that you have previously adjusted the Brightness setting to suit your selected input and viewing environment. The higher the value, the brighter the image. Gaming Designed for colorful movies, video clips from digital cameras, or DVs through the PC input. NOTE: Only supports HDMI/USB-C signal input. Color Temp 1 Select the color temperature setting. • 6500K: Maintains normal white coloring. • 7500K: A higher, cooler color temperature...
...-high brightness is preset with several predefined picture modes so that you have previously adjusted the Brightness setting to suit your selected input and viewing environment. The higher the value, the brighter the image. Gaming Designed for colorful movies, video clips from digital cameras, or DVs through the PC input. NOTE: Only supports HDMI/USB-C signal input. Color Temp 1 Select the color temperature setting. • 6500K: Maintains normal white coloring. • 7500K: A higher, cooler color temperature...

User Guide
Page 26
... default values. 26 Lower settings produce less saturated colors; If the saturation is too high, that color in a video picture. A high value results in fact, a setting of that color will be overpowering and unrealistic. in a sharper picture; Reflects the relationship between input source and picture brightness. The lower the value, the more greenish the picture becomes. a low value softens the picture. Menu Option Tint Saturation Sharpness Gamma Reset...
... default values. 26 Lower settings produce less saturated colors; If the saturation is too high, that color in a video picture. A high value results in fact, a setting of that color will be overpowering and unrealistic. in a sharper picture; Reflects the relationship between input source and picture brightness. The lower the value, the more greenish the picture becomes. a low value softens the picture. Menu Option Tint Saturation Sharpness Gamma Reset...
User Guide
Page 29
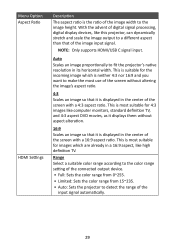
... already in a 16:9 aspect, like this projector, can dynamically stretch and scale the image output to a different aspect than that it is most use of the screen without altering the image's aspect ratio. 4:3 Scales an image so that it displays them without aspect alteration. 16:9 Scales an image so that of digital signal processing, digital display devices, like high definition TV. NOTE: Only supports HDMI/USB C signal input.
... already in a 16:9 aspect, like this projector, can dynamically stretch and scale the image output to a different aspect than that it is most use of the screen without altering the image's aspect ratio. 4:3 Scales an image so that it displays them without aspect alteration. 16:9 Scales an image so that of digital signal processing, digital display devices, like high definition TV. NOTE: Only supports HDMI/USB C signal input.

User Guide
Page 31
... Language, Projector Projection, and Keystone settings. Manage Power, Audio, and other details. 31 Menu File Management Basic Settings Source Audio Mode Advanced Settings Information Description Provides a user interface to the main Home Screen at any time by pressing the Home button on the remote control, regardless of what page you start the projector. Select the preferred input source. Operating the Projector This section will introduce the Home Screen and its menus. Home Screen The Home Screen is displayed every time you are on the remote control.
... Language, Projector Projection, and Keystone settings. Manage Power, Audio, and other details. 31 Menu File Management Basic Settings Source Audio Mode Advanced Settings Information Description Provides a user interface to the main Home Screen at any time by pressing the Home button on the remote control, regardless of what page you start the projector. Select the preferred input source. Operating the Projector This section will introduce the Home Screen and its menus. Home Screen The Home Screen is displayed every time you are on the remote control.

User Guide
Page 37
.... 4. Data on screen if a video, music, or photo file are selected to load. 5. Only use a USB extension cable, the USB device may not be compatible. 2. Back up important files. 37 How to Use the Media Control Bar Buttons The media control bar buttons will need extra time to be damaged or lost. Picture Video Music Back Back Back Play Rewind Play Next Play Pause Zoom in...
.... 4. Data on screen if a video, music, or photo file are selected to load. 5. Only use a USB extension cable, the USB device may not be compatible. 2. Back up important files. 37 How to Use the Media Control Bar Buttons The media control bar buttons will need extra time to be damaged or lost. Picture Video Music Back Back Back Play Rewind Play Next Play Pause Zoom in...

User Guide
Page 46
... level, and a temperature between 5°C-25°C. Factory reset. Reset Settings Reset to Factory Default NOTE: If you should switch to High Altitude Mode to solve these symptoms. However, this projector can operate under any and all harsh or extreme conditions. NOTE: Light Source Hours will remain unchanged. In cases like this, you use High Altitude Mode when your projector from over-heating. NOTE: Language, High Altitude Mode, Projector Position, and Light Source Hours will remain...
... level, and a temperature between 5°C-25°C. Factory reset. Reset Settings Reset to Factory Default NOTE: If you should switch to High Altitude Mode to solve these symptoms. However, this projector can operate under any and all harsh or extreme conditions. NOTE: Light Source Hours will remain unchanged. In cases like this, you use High Altitude Mode when your projector from over-heating. NOTE: Language, High Altitude Mode, Projector Position, and Light Source Hours will remain...

User Guide
Page 49
... Item Projector Input Signal Resolution Input Ouput Power Adapter Local Storage Operating Conditions Dimensions Weight Power Saving Modes Category Type Display Size Throw Distance Lens Optical Zoom Light Source Type Light Source Life (Normal) Display Color Keystone Battery Capacity HDMI Native Support HDMI USB Type-A USB Type-C Speaker USB Type A (Power) Audio Out (3.5 mm) Input Voltage Output Voltage Total: 16 GB Temperature Humidity Physical (W x H x D) Physical On Off Specifications 0.2" WVGA, LED 24"~100" 0.64-2.66 m (38"@1 m) F=1.7, f=5.5 mm Fixed RGB LED up to 30,000 hours 1.07...
... Item Projector Input Signal Resolution Input Ouput Power Adapter Local Storage Operating Conditions Dimensions Weight Power Saving Modes Category Type Display Size Throw Distance Lens Optical Zoom Light Source Type Light Source Life (Normal) Display Color Keystone Battery Capacity HDMI Native Support HDMI USB Type-A USB Type-C Speaker USB Type A (Power) Audio Out (3.5 mm) Input Voltage Output Voltage Total: 16 GB Temperature Humidity Physical (W x H x D) Physical On Off Specifications 0.2" WVGA, LED 24"~100" 0.64-2.66 m (38"@1 m) F=1.7, f=5.5 mm Fixed RGB LED up to 30,000 hours 1.07...

User Guide
Page 54
... remote control. • Adjusting the Focus Ring will help correctly focus the projection lens. • Ensure the projector and screen are aligned properly. Troubleshooting This section describes some common problems that the video source is turned on. • If the input source is not selected automatically, select the correct source with the same power outlet. • Check that the battery has remaining power1, or connect the power adaptor. • When the projector is connected...
... remote control. • Adjusting the Focus Ring will help correctly focus the projection lens. • Ensure the projector and screen are aligned properly. Troubleshooting This section describes some common problems that the video source is turned on. • If the input source is not selected automatically, select the correct source with the same power outlet. • Check that the battery has remaining power1, or connect the power adaptor. • When the projector is connected...

User Guide
Page 56
... Lens • Use a canister of compressed air to damage the lens and/or case of the projector. • ViewSonic® will not be liable for an extended period of time: • Ensure the temperature and humidity of the projector needs replacing. • Never spray or pour any parts from the projector. Maintenance General Precautions • Make sure the projector is turned off and the power cable...
... Lens • Use a canister of compressed air to damage the lens and/or case of the projector. • ViewSonic® will not be liable for an extended period of time: • Ensure the temperature and humidity of the projector needs replacing. • Never spray or pour any parts from the projector. Maintenance General Precautions • Make sure the projector is turned off and the power cable...
User Guide
Page 65
...'s serial number. 2. Removal, installation, and set-up service charges. For information about receiving service under normal conditions. ͫ Repair or attempted repair by anyone not authorized by ViewSonic®. ͫ Any damage of the product due to shipment. ͫ Removal or installation of the product. ͫ Causes external to the product, such as electric power fluctuations or failure. ͫ Use of supplies or parts not meeting Viewsonic's specifications. ͫ...
...'s serial number. 2. Removal, installation, and set-up service charges. For information about receiving service under normal conditions. ͫ Repair or attempted repair by anyone not authorized by ViewSonic®. ͫ Any damage of the product due to shipment. ͫ Removal or installation of the product. ͫ Causes external to the product, such as electric power fluctuations or failure. ͫ Use of supplies or parts not meeting Viewsonic's specifications. ͫ...

User Guide
Page 67
All accessory lamps purchased separately are warranted for an extended period of time. 4. Any product exhibiting a condition commonly known as electrical power fluctuations or failure. ͫ Use of supplies or parts not meeting ViewSonic®'s specifications. ͫ Normal wear and tear. ͫ Any other acts of nature, unauthorized product modification, unauthorized attempted repair, or failure to follow instructions supplied with a like product. Any product...
All accessory lamps purchased separately are warranted for an extended period of time. 4. Any product exhibiting a condition commonly known as electrical power fluctuations or failure. ͫ Use of supplies or parts not meeting ViewSonic®'s specifications. ͫ Normal wear and tear. ͫ Any other acts of nature, unauthorized product modification, unauthorized attempted repair, or failure to follow instructions supplied with a like product. Any product...


