User Guide
Page 1
"Antes de operar su equipo lea cu idadosamente las instrucciones en este manual" Model No. VS18176 Model Name: LS600W LS600W Projector User Guide IMPORTANT: Please read this User Guide will describe your limited coverage from ViewSonic Corporation, which is also found on installing and using the Regional selection box in a safe manner, as well ... upper right corner of our website. Warranty information contained in this User Guide to obtain important information on our web site at http://www.viewsonic.com in English, or in specific languages using your product for future service.
"Antes de operar su equipo lea cu idadosamente las instrucciones en este manual" Model No. VS18176 Model Name: LS600W LS600W Projector User Guide IMPORTANT: Please read this User Guide will describe your limited coverage from ViewSonic Corporation, which is also found on installing and using the Regional selection box in a safe manner, as well ... upper right corner of our website. Warranty information contained in this User Guide to obtain important information on our web site at http://www.viewsonic.com in English, or in specific languages using your product for future service.

User Guide
Page 3
...place liquids near any heavy objects on the projector or connection cables. • Do not stand the projector on the projector. The projector may cause the projector to fall over , causing personal injury or projector malfunction. • Avoid exposing the projector to fail. Allow the projector to cool for replacement. • Do not... tilted at an angle of more than 10° degrees left or right, nor at an angle of the projector to drop or bump the projector on anything on an uneven or unstable surface. The intense light beam may increase the temperature of more than 15&#...
...place liquids near any heavy objects on the projector or connection cables. • Do not stand the projector on the projector. The projector may cause the projector to fall over , causing personal injury or projector malfunction. • Avoid exposing the projector to fail. Allow the projector to cool for replacement. • Do not... tilted at an angle of more than 10° degrees left or right, nor at an angle of the projector to drop or bump the projector on anything on an uneven or unstable surface. The intense light beam may increase the temperature of more than 15&#...

User Guide
Page 4
... personnel. As with one wider than the other. This projector is designed to operate safely within a voltage between 100 to... outlet. • When connecting to continue using the projector. • Use only attachments/accessories specified by the ...emitted from the AC outlet if the projector is not being treaded upon or pinched, particularly ...abnormal noise, or a strange odor is present, immediately switch the projector off and call your outlet, obtain an adapter and do not...polarized or grounding-type plug. • When the projector is under operation, you may fluctuate or cut ...
... personnel. As with one wider than the other. This projector is designed to operate safely within a voltage between 100 to... outlet. • When connecting to continue using the projector. • Use only attachments/accessories specified by the ...emitted from the AC outlet if the projector is not being treaded upon or pinched, particularly ...abnormal noise, or a strange odor is present, immediately switch the projector off and call your outlet, obtain an adapter and do not...polarized or grounding-type plug. • When the projector is under operation, you may fluctuate or cut ...

User Guide
Page 5
...and attach it is securely and safely installed. We recommend that the projector may fall from the place you use of restraining the projector should its attachment to both the anti-theft lock slot on the projector and the base of the ceiling mount bracket. This will perform ...the secondary role of the wrong gauge or length screws. If you intend to mount the projector on the ceiling, we strongly recommend that you purchased your projector. Safety Precautions - You can purchase a projector ceiling mount kit from the ceiling due to an improper attachment through the use a proper ...
...and attach it is securely and safely installed. We recommend that the projector may fall from the place you use of restraining the projector should its attachment to both the anti-theft lock slot on the projector and the base of the ceiling mount bracket. This will perform ...the secondary role of the wrong gauge or length screws. If you intend to mount the projector on the ceiling, we strongly recommend that you purchased your projector. Safety Precautions - You can purchase a projector ceiling mount kit from the ceiling due to an improper attachment through the use a proper ...
User Guide
Page 6
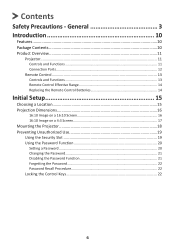
Contents Safety Precautions - General 3 Introduction 10 Features...10 Package Contents 10 Product Overview 11 Projector...11 Controls and Functions 11 Connection Ports...12 Remote Control...13 Controls and Functions 13 Remote Control Effective Range 14 Replacing the Remote ...Setup 15 Choosing a Location 15 Projection Dimensions 16 16:10 Image on a 16:10 Screen 16 16:10 Image on a 4:3 Screen 17 Mounting the Projector 18 Preventing Unauthorized Use 19 Using the Security Slot 19 Using the Password Function 20 Setting a Password...20 Changing the Password 21 Disabling the Password...
Contents Safety Precautions - General 3 Introduction 10 Features...10 Package Contents 10 Product Overview 11 Projector...11 Controls and Functions 11 Connection Ports...12 Remote Control...13 Controls and Functions 13 Remote Control Effective Range 14 Replacing the Remote ...Setup 15 Choosing a Location 15 Projection Dimensions 16 16:10 Image on a 16:10 Screen 16 16:10 Image on a 4:3 Screen 17 Mounting the Projector 18 Preventing Unauthorized Use 19 Using the Security Slot 19 Using the Password Function 20 Setting a Password...20 Changing the Password 21 Disabling the Password...
User Guide
Page 7
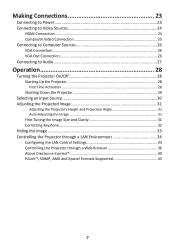
...Connecting to Audio 27 Operation 28 Turning the Projector On/Off 28 Starting Up the Projector 28 First Time Activation...28 Shutting Down the Projector 29 Selecting an Input Source 30 Adjusting the Projected Image 31 Adjusting the Projector's Height and Projection Angle 31 Auto-Adjusting ...Fine-Tuning the Image Size and Clarity 31 Correcting Keystone 32 Hiding the Image 33 Controlling the Projector through a LAN Environment 34 Configuring the LAN Control Settings 34 Controlling the Projector through a Web Browser 36 About Crestron e-Control 40 PJLink™, SNMP, AMX and Xpanel ...
...Connecting to Audio 27 Operation 28 Turning the Projector On/Off 28 Starting Up the Projector 28 First Time Activation...28 Shutting Down the Projector 29 Selecting an Input Source 30 Adjusting the Projected Image 31 Adjusting the Projector's Height and Projection Angle 31 Auto-Adjusting ...Fine-Tuning the Image Size and Clarity 31 Correcting Keystone 32 Hiding the Image 33 Controlling the Projector through a LAN Environment 34 Configuring the LAN Control Settings 34 Controlling the Projector through a Web Browser 36 About Crestron e-Control 40 PJLink™, SNMP, AMX and Xpanel ...

User Guide
Page 8
... Menu...50 IMAGE Menu...53 POWER MANAGEMENT Menu 56 BASIC Menu...59 ADVANCED Menu 62 SYSTEM Menu...66 INFORMATION Menu 69 Appendix 70 Specifications...70 Projector Dimensions 71 Timing Chart...71 Analog RGB...71 HDMI (PC)...73 HDMI (Video)...74 Video/S-Video...74 Component video 75 IR Control Table...76 ...Glossary...87 Troubleshooting...90 Common Problems 90 LED Indicators...91 Maintenance...92 General Precautions 92 Cleaning the Lens 92 Cleaning the Case 92 Storing the Projector 92 Disclaimer...92 Light Source Information 93 Light Source Hour 93 Extending Light Source Life 93 8
... Menu...50 IMAGE Menu...53 POWER MANAGEMENT Menu 56 BASIC Menu...59 ADVANCED Menu 62 SYSTEM Menu...66 INFORMATION Menu 69 Appendix 70 Specifications...70 Projector Dimensions 71 Timing Chart...71 Analog RGB...71 HDMI (PC)...73 HDMI (Video)...74 Video/S-Video...74 Component video 75 IR Control Table...76 ...Glossary...87 Troubleshooting...90 Common Problems 90 LED Indicators...91 Maintenance...92 General Precautions 92 Cleaning the Lens 92 Cleaning the Case 92 Storing the Projector 92 Disclaimer...92 Light Source Information 93 Light Source Hour 93 Extending Light Source Life 93 8

User Guide
Page 10
Introduction The LS600W is compatible with Crestron, AMX, Extron, PJ Link, ATEN, and ViewSonic's vController. Adopting 2nd generation LED technology, it frees users from frequent lamp replacement and toxic mercury, offers an amazing 30,000 ...; H/V Keystone enabling side projections • Comprehensive LAN control for more information. 10 Please contact your local reseller for efficient management* Package Contents • Projector • Remote Control & Batteries • Power Cord • Quick Start Guide • Video Cable NOTE: The power cord and video cables included in...
Introduction The LS600W is compatible with Crestron, AMX, Extron, PJ Link, ATEN, and ViewSonic's vController. Adopting 2nd generation LED technology, it frees users from frequent lamp replacement and toxic mercury, offers an amazing 30,000 ...; H/V Keystone enabling side projections • Comprehensive LAN control for more information. 10 Please contact your local reseller for efficient management* Package Contents • Projector • Remote Control & Batteries • Power Cord • Quick Start Guide • Video Cable NOTE: The power cord and video cables included in...

User Guide
Page 11
...11 Enter Enacts the selected On-Screen Display (OSD) Menu item when the OSD Menu is not activated. Product Overview Projector Controls and Functions Power key Focus Ring Zoom Ring MENU EXIT ENTER BLANK SOURCE ? COLOR MODE Power Indicator Light Temperature ...Indicator Light Light Source Indicator Light Remote IR sensor Remote IR sensor Projection Lens Key Description [ ] Power Toggles the projector between standby mode and Power On. [ / / / ] Keystone Manually corrects distorted images resulting from an angled Keys projection. [/ / /]...
...11 Enter Enacts the selected On-Screen Display (OSD) Menu item when the OSD Menu is not activated. Product Overview Projector Controls and Functions Power key Focus Ring Zoom Ring MENU EXIT ENTER BLANK SOURCE ? COLOR MODE Power Indicator Light Temperature ...Indicator Light Light Source Indicator Light Remote IR sensor Remote IR sensor Projection Lens Key Description [ ] Power Toggles the projector between standby mode and Power On. [ / / / ] Keystone Manually corrects distorted images resulting from an angled Keys projection. [/ / /]...

User Guide
Page 14
... the remote control follow the steps below: 1. The distance between the remote control and the sensor(s) should not exceed 8 m (26 ft.) NOTE: Refer to the projector's IR remote control sensor(s). 2.
... the remote control follow the steps below: 1. The distance between the remote control and the sensor(s) should not exceed 8 m (26 ft.) NOTE: Refer to the projector's IR remote control sensor(s). 2.

User Guide
Page 15
... NOTE: A special rear projection screen is required. 4. Front Ceiling The projector is placed near the floor behind the screen. Front The projector is suspeneded upsidedown from the ceiling behind the screen. Rear The projector is designed to be installed in front of a suitable power outlet. ...• Location and Distance between the projector and other equipment. The projector is placed near the floor in one of the screen. 3. Rear Ceiling The projector is suspended upside-down from the ceiling in front of the following : •...
... NOTE: A special rear projection screen is required. 4. Front Ceiling The projector is placed near the floor behind the screen. Front The projector is suspeneded upsidedown from the ceiling behind the screen. Rear The projector is designed to be installed in front of a suitable power outlet. ...• Location and Distance between the projector and other equipment. The projector is placed near the floor in one of the screen. 3. Rear Ceiling The projector is suspended upside-down from the ceiling in front of the following : •...

User Guide
Page 16
... 8828 417 10593 159 4039 (d) Vertical Offset minimum maximum in . Projection Dimensions NOTE: See "Specifications" on page 70 for the native display resolution of this projector. • 16:10 Image on a 16:10 Screen • 16:10 Image on a 4:3 Screen (a) (e) (f) (c) NOTE: (e) = Screen / (f) = Center of Lens 16:10 Image on a 16:10...
... 8828 417 10593 159 4039 (d) Vertical Offset minimum maximum in . Projection Dimensions NOTE: See "Specifications" on page 70 for the native display resolution of this projector. • 16:10 Image on a 16:10 Screen • 16:10 Image on a 4:3 Screen (a) (e) (f) (c) NOTE: (e) = Screen / (f) = Center of Lens 16:10 Image on a 16:10...

User Guide
Page 17
It is a 3% tolerance among these numbers due to physically test the projection size and distance before permanently installing the projector. 17 mm 30 762 40 1016 50 1270 60 1524 70 1778 80 2032 90 2286 100 2540 120 3048 150 3810 200 5080 250 ...
It is a 3% tolerance among these numbers due to physically test the projection size and distance before permanently installing the projector. 17 mm 30 762 40 1016 50 1270 60 1524 70 1778 80 2032 90 2286 100 2540 120 3048 150 3810 200 5080 250 ...

User Guide
Page 18
... the following specifications: • Screw type: M4 • Screw length: 12.8 mm ~ 15.8 mm 282.9 305.9 NOTE: • Avoid installing the projector near a heat source. • Keep at least a 10 cm gap between the ceiling and the bottom of the mounting plate. 1. Screw size can vary depending ...
... the following specifications: • Screw type: M4 • Screw length: 12.8 mm ~ 15.8 mm 282.9 305.9 NOTE: • Avoid installing the projector near a heat source. • Keep at least a 10 cm gap between the ceiling and the bottom of the mounting plate. 1. Screw size can vary depending ...

User Guide
Page 19
Below is an example of setting up a security slot locking device: NOTE: The security slot can also be used as a safety anchor if the projector is mounted to prevent theft, access, or accidental setting changes. Preventing Unauthorized Use The projector has several built-in security features to the ceiling. 19 Using the Security Slot To help prevent the projector from being stolen, use a security slot locking device to secure the projector to a fixed object.
Below is an example of setting up a security slot locking device: NOTE: The security slot can also be used as a safety anchor if the projector is mounted to prevent theft, access, or accidental setting changes. Preventing Unauthorized Use The projector has several built-in security features to the ceiling. 19 Using the Security Slot To help prevent the projector from being stolen, use a security slot locking device to secure the projector to a fixed object.

User Guide
Page 20
... the Security Settings page. 5. Using the Password Function To help prevent unauthorized access or use, the projector offers a password security option. Confirm the new password by pressing / . 3. The password can be entered every time the projector is set through the On-Screen Display (OSD) Menu. Once the password is started. 20 Press...
... the Security Settings page. 5. Using the Password Function To help prevent unauthorized access or use, the projector offers a password security option. Confirm the new password by pressing / . 3. The password can be entered every time the projector is set through the On-Screen Display (OSD) Menu. Once the password is started. 20 Press...
User Guide
Page 22
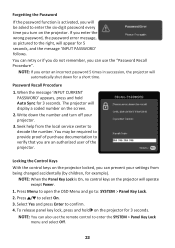
...22 Seek help from being changed accidentally (by children, for 3 seconds. NOTE: When the Panel Key Lock is activated, you can prevent your projector. 3. You can retry or if you do not remember, you will be required to provide proof of purchase documentation to the right, will appear... for 3 seconds. Locking the Control Keys With the control keys on the projector for 5 seconds, and the message 'INPUT PASSWORD' follows. To release panel key lock, press and hold Auto Sync for example). Forgetting the...
...22 Seek help from being changed accidentally (by children, for 3 seconds. NOTE: When the Panel Key Lock is activated, you can prevent your projector. 3. You can retry or if you do not remember, you will be required to provide proof of purchase documentation to the right, will appear... for 3 seconds. Locking the Control Keys With the control keys on the projector for 5 seconds, and the message 'INPUT PASSWORD' follows. To release panel key lock, press and hold Auto Sync for example). Forgetting the...

User Guide
Page 23
NOTE: When installing the projector, incorporate a readily accessible disconnect device in the fixed wiring, or connect the power plug to Power 1. Connect the power cord to the AC IN jack at the rear of the projector, use the disconnect device to connect the projector with other equipment. Plug the power cord into a power outlet. Connecting to an easily accessible outlet near the unit. If a fault should occur during operation of the projector. 2. Making Connections This section guides you on how to switch off the power supply, or disconnect the power plug. 23
NOTE: When installing the projector, incorporate a readily accessible disconnect device in the fixed wiring, or connect the power plug to Power 1. Connect the power cord to the AC IN jack at the rear of the projector, use the disconnect device to connect the projector with other equipment. Plug the power cord into a power outlet. Connecting to an easily accessible outlet near the unit. If a fault should occur during operation of the projector. 2. Making Connections This section guides you on how to switch off the power supply, or disconnect the power plug. 23

User Guide
Page 24
RJ-45 AUDIO OUT AUDIO IN HDMI 1 HDMI 2 COMPUTER IN USB 5V/1.5A OUT VIDEO (Service) RS-232 24 Connecting to Video Sources HDMI Connection Connect one end of an HDMI cable to the HDMI 1 or HDMI 2 port of your projector. Then connect the other end of the cable to the HDMI port of your video device.
RJ-45 AUDIO OUT AUDIO IN HDMI 1 HDMI 2 COMPUTER IN USB 5V/1.5A OUT VIDEO (Service) RS-232 24 Connecting to Video Sources HDMI Connection Connect one end of an HDMI cable to the HDMI 1 or HDMI 2 port of your projector. Then connect the other end of the cable to the HDMI port of your video device.

User Guide
Page 25
RJ-45 AUDIO OUT AUDIO IN HDMI 1 HDMI 2 COMPUTER IN USB 5V/1.5A OUT VIDEO (Service) RS-232 25 Composite Video Connection Connect one end of a Video cable to the VIDEO port of your projector. Then connect the other end of the cable to the Video port of your video device.
RJ-45 AUDIO OUT AUDIO IN HDMI 1 HDMI 2 COMPUTER IN USB 5V/1.5A OUT VIDEO (Service) RS-232 25 Composite Video Connection Connect one end of a Video cable to the VIDEO port of your projector. Then connect the other end of the cable to the Video port of your video device.


