
User Guide
Page 1
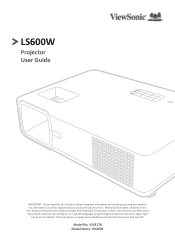
VS18176 Model Name: LS600W LS600W Projector User Guide IMPORTANT: Please read this User Guide will describe your limited coverage from ViewSonic Corporation, which is also found on installing and using the Regional selection box in a safe manner, as well as registering your product in the upper right corner of our website. Warranty information contained in this User Guide to obtain important information on our...
VS18176 Model Name: LS600W LS600W Projector User Guide IMPORTANT: Please read this User Guide will describe your limited coverage from ViewSonic Corporation, which is also found on installing and using the Regional selection box in a safe manner, as well as registering your product in the upper right corner of our website. Warranty information contained in this User Guide to obtain important information on our...

User Guide
Page 3
... projector. The projector may cause it from the power supply and call your eyes. • Always open the lens shutter or remove the lens cap when the projector light source is unplugged. • Do not attempt to have the projector serviced. 3 Do not place anything . • Do not place any heat sources such as this user guide in a safe place for replacement. • Do not use of the projector...
... projector. The projector may cause it from the power supply and call your eyes. • Always open the lens shutter or remove the lens cap when the projector light source is unplugged. • Do not attempt to have the projector serviced. 3 Do not place anything . • Do not place any heat sources such as this user guide in a safe place for replacement. • Do not use of the projector...
User Guide
Page 6
... 11 Projector...11 Controls and Functions 11 Connection Ports...12 Remote Control...13 Controls and Functions 13 Remote Control Effective Range 14 Replacing the Remote Control Batteries 14 Initial Setup 15 Choosing a Location 15 Projection Dimensions 16 16:10 Image on a 16:10 Screen 16 16:10 Image on a 4:3 Screen 17 Mounting the Projector 18 Preventing Unauthorized Use 19 Using the Security Slot 19 Using the Password Function 20 Setting a Password...20 Changing the Password 21 Disabling the Password Function...
... 11 Projector...11 Controls and Functions 11 Connection Ports...12 Remote Control...13 Controls and Functions 13 Remote Control Effective Range 14 Replacing the Remote Control Batteries 14 Initial Setup 15 Choosing a Location 15 Projection Dimensions 16 16:10 Image on a 16:10 Screen 16 16:10 Image on a 4:3 Screen 17 Mounting the Projector 18 Preventing Unauthorized Use 19 Using the Security Slot 19 Using the Password Function 20 Setting a Password...20 Changing the Password 21 Disabling the Password Function...

User Guide
Page 8
... Analog RGB...71 HDMI (PC)...73 HDMI (Video)...74 Video/S-Video...74 Component video 75 IR Control Table...76 Address Code...77 RS-232 Command Table 78 Pin Assignment...78 Interface...78 Command Table...78 Glossary...87 Troubleshooting...90 Common Problems 90 LED Indicators...91 Maintenance...92 General Precautions 92 Cleaning the Lens 92 Cleaning the Case 92 Storing the Projector 92 Disclaimer...92 Light Source Information 93 Light Source Hour 93 Extending Light Source Life 93 8
... Analog RGB...71 HDMI (PC)...73 HDMI (Video)...74 Video/S-Video...74 Component video 75 IR Control Table...76 Address Code...77 RS-232 Command Table 78 Pin Assignment...78 Interface...78 Command Table...78 Glossary...87 Troubleshooting...90 Common Problems 90 LED Indicators...91 Maintenance...92 General Precautions 92 Cleaning the Lens 92 Cleaning the Case 92 Storing the Projector 92 Disclaimer...92 Light Source Information 93 Light Source Hour 93 Extending Light Source Life 93 8

User Guide
Page 10
... Contents • Projector • Remote Control & Batteries • Power Cord • Quick Start Guide • Video Cable NOTE: The power cord and video cables included in your package may vary depending on /off for efficient power saving. Its comprehensive LAN control eases multiple device management and is a 3,000 ANSI Lumens, high brightness WXGA Lamp Free Projector for more information. 10 Adopting 2nd generation LED technology, it frees users from frequent lamp replacement and toxic mercury...
... Contents • Projector • Remote Control & Batteries • Power Cord • Quick Start Guide • Video Cable NOTE: The power cord and video cables included in your package may vary depending on /off for efficient power saving. Its comprehensive LAN control eases multiple device management and is a 3,000 ANSI Lumens, high brightness WXGA Lamp Free Projector for more information. 10 Adopting 2nd generation LED technology, it frees users from frequent lamp replacement and toxic mercury...
User Guide
Page 13
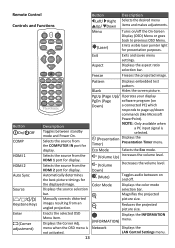
... a PC input signal is Network Displays the not activated. Color Mode Displays the color mode Displays the source selection selection bar. Reduces the projected picture size. Remote Control Controls and Functions Button Left/ Right Up/ Down Description Selects the desired menu items and makes adjustments. HDMI 2 port for presentation purposes. Displays the INFORMATION (INFORMATION) menu. images resulting from the COMPUTER IN port for display. Enacts the selected OSD Menu item. Menu (Laser) Turns on and off the On-Screen Display (OSD) Menu or...
... a PC input signal is Network Displays the not activated. Color Mode Displays the color mode Displays the source selection selection bar. Reduces the projected picture size. Remote Control Controls and Functions Button Left/ Right Up/ Down Description Selects the desired menu items and makes adjustments. HDMI 2 port for presentation purposes. Displays the INFORMATION (INFORMATION) menu. images resulting from the COMPUTER IN port for display. Enacts the selected OSD Menu item. Menu (Laser) Turns on and off the On-Screen Display (OSD) Menu or...
User Guide
Page 21
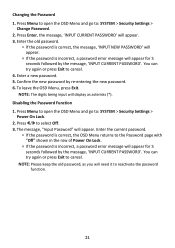
... > Security Settings > Change Password. 2. To leave the OSD Menu, press Exit. The message, "Input Password" will appear. 3. Press Menu to open the OSD Menu and go to the Password page with "Off" shown in the row of Power On Lock. ͫ If the password is incorrect, a password error message will appear for 5 seconds followed by the message, 'INPUT CURRENT PASSWORD'. Enter the current password. ͫ If the password is incorrect, a password error message will appear...
... > Security Settings > Change Password. 2. To leave the OSD Menu, press Exit. The message, "Input Password" will appear. 3. Press Menu to open the OSD Menu and go to the Password page with "Off" shown in the row of Power On Lock. ͫ If the password is incorrect, a password error message will appear for 5 seconds followed by the message, 'INPUT CURRENT PASSWORD'. Enter the current password. ͫ If the password is incorrect, a password error message will appear...
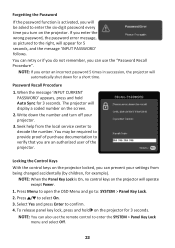
User Guide
Page 22
... the wrong password, the password error message, as pictured to the right, will appear for 5 seconds, and the message 'INPUT PASSWORD' follows. Seek help from being changed accidentally (by children, for 3 seconds. To release panel key lock, press and hold Auto Sync for example). The projector will operate except Power. 1. You may be asked to enter the six-digit password every time you turn off your settings from the local service center to...
... the wrong password, the password error message, as pictured to the right, will appear for 5 seconds, and the message 'INPUT PASSWORD' follows. Seek help from being changed accidentally (by children, for 3 seconds. To release panel key lock, press and hold Auto Sync for example). The projector will operate except Power. 1. You may be asked to enter the six-digit password every time you turn off your settings from the local service center to...

User Guide
Page 23
Plug the power cord into a power outlet. Making Connections This section guides you on how to Power 1. Connect the power cord to the AC IN jack at the rear of the projector, use the disconnect device to an easily accessible outlet near the unit. If a fault should occur during operation of the projector. 2. Connecting to connect the projector with other equipment. NOTE: When installing the projector, incorporate a readily accessible disconnect device in the fixed wiring, or connect the power plug to switch off the power supply, or disconnect the power plug. 23
Plug the power cord into a power outlet. Making Connections This section guides you on how to Power 1. Connect the power cord to the AC IN jack at the rear of the projector, use the disconnect device to an easily accessible outlet near the unit. If a fault should occur during operation of the projector. 2. Connecting to connect the projector with other equipment. NOTE: When installing the projector, incorporate a readily accessible disconnect device in the fixed wiring, or connect the power plug to switch off the power supply, or disconnect the power plug. 23

User Guide
Page 39
.... LAN Firmware Update i. NOTE: If the download process fails, please refer to download the LAN Firmware: https://www.viewsonic.com. 39 The software program will restart. Visit ViewSonic's website to the "Projector Software Update Firmware by USB" below. C. Please wait for a few minutes until it is completed. Please read the Warning message and press the "OK" button to download the Projector Software Update Firmware : https://www.viewsonic.com. The LED will begin to flash, and downloading will start...
.... LAN Firmware Update i. NOTE: If the download process fails, please refer to download the LAN Firmware: https://www.viewsonic.com. 39 The software program will restart. Visit ViewSonic's website to the "Projector Software Update Firmware by USB" below. C. Please wait for a few minutes until it is completed. Please read the Warning message and press the "OK" button to download the Projector Software Update Firmware : https://www.viewsonic.com. The LED will begin to flash, and downloading will start...
User Guide
Page 41
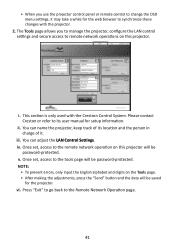
... section is only used with the projector. 2. iv. Once set , access to the remote network operation on this projector will be password-protected. • When you to manage the projector, configure the LAN control settings and secure access to the Remote Network Operation page. 41 iii. vi. The Tools page allows you use the projector control panel or remote control to change the OSD menu settings, it . ii. You can name the projector, keep track of...
... section is only used with the projector. 2. iv. Once set , access to the remote network operation on this projector will be password-protected. • When you to manage the projector, configure the LAN control settings and secure access to the Remote Network Operation page. 41 iii. vi. The Tools page allows you use the projector control panel or remote control to change the OSD menu settings, it . ii. You can name the projector, keep track of...

User Guide
Page 42
Press "Exit" to go back to the same local area network. 42 You will appear in the list blow: Category Item Crestron Control Projector Network Configuration User Password Admin Password Input Length IP Address IP ID Port Projector Name Location Assigned To DHCP (Enabled) IP Address Subnet Mask Default Gateway DNS Server Enabled New Password Confirm Enabled New Password Confirm Maximum Number of Characters 16 4 5 22 22 22 (N/A) 15 15...
Press "Exit" to go back to the same local area network. 42 You will appear in the list blow: Category Item Crestron Control Projector Network Configuration User Password Admin Password Input Length IP Address IP ID Port Projector Name Location Assigned To DHCP (Enabled) IP Address Subnet Mask Default Gateway DNS Server Enabled New Password Confirm Enabled New Password Confirm Maximum Number of Characters 16 4 5 22 22 22 (N/A) 15 15...

User Guide
Page 46
.../6500K Red Gain Green Gain Blue Gain Red Offset Green Offset Blue Offset Color Tint Sharpness Gamma Noise Reduction Color Management Reset Color Settings Auto Power On Reset Cancel Signal Smart Energy CEC Direct Power On Auto Power Off Sleep Timer Standby Settings USB A Power Power Saving Audio Pass Through On Off 0~100 0~100 0~100 -50~+50 -50~+50 -50~+50 -50~50 -50~50 0~31 1.8/2.0/2.2/2.35/ 2.5/Cubic/sRGB 0~31 Primary Color Hue Saturation Gain Disable/VGA/HDMI...
.../6500K Red Gain Green Gain Blue Gain Red Offset Green Offset Blue Offset Color Tint Sharpness Gamma Noise Reduction Color Management Reset Color Settings Auto Power On Reset Cancel Signal Smart Energy CEC Direct Power On Auto Power Off Sleep Timer Standby Settings USB A Power Power Saving Audio Pass Through On Off 0~100 0~100 0~100 -50~+50 -50~+50 -50~+50 -50~50 -50~50 0~31 1.8/2.0/2.2/2.35/ 2.5/Cubic/sRGB 0~31 Primary Color Hue Saturation Gain Disable/VGA/HDMI...

User Guide
Page 48
Main Menu ADVANCED Sub-menu Menu Option LAN Control Settings LAN Settings DHCP ON/Static IP Projector IP Address Subnet Mask Default Gateway DNS Server Standby LAN Control Off/On Apply Light Source Settings Light Source Mode Normal/Eco/ Dynamic Black 1/ Dynamic Black 2/ Custom Light Source Power 20%~100% Reset Light Source Hours Reset/Cancel Light Source Hours Information Light Source Usage Time Normal Eco Dynamic Black 1 Dynamic Black 2 Custom Closed Caption Closed Caption Enable Off/On Caption Version CC1/CC2/CC3/CC4 Reset Settings Reset Cancel 48
Main Menu ADVANCED Sub-menu Menu Option LAN Control Settings LAN Settings DHCP ON/Static IP Projector IP Address Subnet Mask Default Gateway DNS Server Standby LAN Control Off/On Apply Light Source Settings Light Source Mode Normal/Eco/ Dynamic Black 1/ Dynamic Black 2/ Custom Light Source Power 20%~100% Reset Light Source Hours Reset/Cancel Light Source Hours Information Light Source Usage Time Normal Eco Dynamic Black 1 Dynamic Black 2 Custom Closed Caption Closed Caption Enable Off/On Caption Version CC1/CC2/CC3/CC4 Reset Settings Reset Cancel 48

User Guide
Page 57
... and the projector will turn on automatically. CEC This projector supports CEC (Consumer Electronics Control) function for five (5) minutes. When the power of the connected device is detected to prevent unnecessary waste of time once no input source is turned on, the projector's power will change to Power Saving mode after no input source is fed through the VGA/HDMI cable. Auto Power Off Allows the projector to turn off automatically after a set period of light source life. When...
... and the projector will turn on automatically. CEC This projector supports CEC (Consumer Electronics Control) function for five (5) minutes. When the power of the connected device is detected to prevent unnecessary waste of time once no input source is turned on, the projector's power will change to Power Saving mode after no input source is fed through the VGA/HDMI cable. Auto Power Off Allows the projector to turn off automatically after a set period of light source life. When...

User Guide
Page 64
... this if you to adjust the light source power. Reset Light Source Hours Resets the light source timer after new light source is set to Static IP. Menu Option Description LAN Control Settings LAN Settings ͫ DHCP ON: Select this if you are in a non-DHCP environment and make adjustments to below settings. Apply Enacts the settings. Projector IP Address Subnet Mask Default Gateway DNS Server Only available when LAN Settings is installed. Use / to select a column and use / to 60% depending on...
... this if you to adjust the light source power. Reset Light Source Hours Resets the light source timer after new light source is set to Static IP. Menu Option Description LAN Control Settings LAN Settings ͫ DHCP ON: Select this if you are in a non-DHCP environment and make adjustments to below settings. Apply Enacts the settings. Projector IP Address Subnet Mask Default Gateway DNS Server Only available when LAN Settings is installed. Use / to select a column and use / to 60% depending on...

User Guide
Page 87
... the screen image to suit operating, environmental, and input source needs. 87 This mode is ideal for environments where extra-high brightness is required, such as using the projector in intelligent auto adjustment function that also supports CEC function is , if a device that will re-adjust the frequency and clock values to provide the best picture quality. Color Adjusts the color saturation. Color Mode The projector is turned on /off operation via HDMI connection. Auto Sync...
... the screen image to suit operating, environmental, and input source needs. 87 This mode is ideal for environments where extra-high brightness is required, such as using the projector in intelligent auto adjustment function that also supports CEC function is , if a device that will re-adjust the frequency and clock values to provide the best picture quality. Color Adjusts the color saturation. Color Mode The projector is turned on /off operation via HDMI connection. Auto Sync...

User Guide
Page 89
... Manually adjust the size of data, used for image adjustment and fine-tuning. P Pattern Projects a grid to be viewed and adjusted by adjusting the "Lens Shift" menu. L Light Source Settings The projector's light source information and settings can be used for connection to other devices or controller vis serial port or LAN port. Best for playing colorful movies, video clips from digital cameras, or DVs through the PC input. Standard Mode A Color Mode that you cannot see the outermost edges of the projector, i.e. Lens Shift The projector's lens...
... Manually adjust the size of data, used for image adjustment and fine-tuning. P Pattern Projects a grid to be viewed and adjusted by adjusting the "Lens Shift" menu. L Light Source Settings The projector's light source information and settings can be used for connection to other devices or controller vis serial port or LAN port. Best for playing colorful movies, video clips from digital cameras, or DVs through the PC input. Standard Mode A Color Mode that you cannot see the outermost edges of the projector, i.e. Lens Shift The projector's lens...
User Guide
Page 92
... surface. Cleaning the Lens • Use a canister of compressed air to damage the lens and/or case of the projector. • ViewSonic® will not be liable for an extended period of time: • Ensure the temperature and humidity of the storage area are within the recommend range. • Retract the adjuster foot completely. • Remove the batteries from the Remote Control. •...
... surface. Cleaning the Lens • Use a canister of compressed air to damage the lens and/or case of the projector. • ViewSonic® will not be liable for an extended period of time: • Ensure the temperature and humidity of the storage area are within the recommend range. • Retract the adjuster foot completely. • Remove the batteries from the Remote Control. •...

User Guide
Page 93
... to: Advanced > Light Source Settings > Light Source Mode and press / to : Advanced > Light Source Settings > Light Source Hours Information. 2. To obtain the light source hour information: 1. Setting Light Source Mode Setting the projector in timer. Dynamic Black 2 Reduces light source power consumption by 30% and lowers brightness, and decreases fan noise. Setting Auto Power Off This allows the projector to turn off automatically after a set the Light Source Mode, open the OSD Menu and go to select and press Enter. Light Source Hour When the projector is being used, the duration (in...
... to: Advanced > Light Source Settings > Light Source Mode and press / to : Advanced > Light Source Settings > Light Source Hours Information. 2. To obtain the light source hour information: 1. Setting Light Source Mode Setting the projector in timer. Dynamic Black 2 Reduces light source power consumption by 30% and lowers brightness, and decreases fan noise. Setting Auto Power Off This allows the projector to turn off automatically after a set the Light Source Mode, open the OSD Menu and go to select and press Enter. Light Source Hour When the projector is being used, the duration (in...


