

User Guide
Page 1
"Antes de operar su equipo lea cu idadosamente las instrucciones en este manual" Model No. VS18864/VS19011 P/N: LS500W/LS500WH/LS550W/LS550WH LS500W/LS500WH/LS550W/LS550WH Projector User Guide IMPORTANT: Please read this User Guide will describe your limited coverage from ViewSonic® Corporation, which is also found on installing and using the Regional selection box in a safe manner, as well as registering your...
"Antes de operar su equipo lea cu idadosamente las instrucciones en este manual" Model No. VS18864/VS19011 P/N: LS500W/LS500WH/LS550W/LS550WH LS500W/LS500WH/LS550W/LS550WH Projector User Guide IMPORTANT: Please read this User Guide will describe your limited coverage from ViewSonic® Corporation, which is also found on installing and using the Regional selection box in a safe manner, as well as registering your...

User Guide
Page 3
... projector malfunction. • Do not use if the projector is under operation, you may sense some heated air and odor from the power supply and call your eyes. • Do not block the projection lens with live parts. • When moving the projector, be careful not to drop or bump the projector on anything on the projector that may increase the temperature of the projector...
... projector malfunction. • Do not use if the projector is under operation, you may sense some heated air and odor from the power supply and call your eyes. • Do not block the projection lens with live parts. • When moving the projector, be careful not to drop or bump the projector on anything on the projector that may increase the temperature of the projector...

User Guide
Page 4
... of time. • Refer all servicing to qualified service personnel. The wide and third blade are NEVER REMOVED. • Protect the power cord from the projector. • In some countries, the voltage is present, immediately switch the projector off and call your outlet, obtain an adapter and do not stare into the outlet. • When connecting to a power outlet, DO NOT remove the...
... of time. • Refer all servicing to qualified service personnel. The wide and third blade are NEVER REMOVED. • Protect the power cord from the projector. • In some countries, the voltage is present, immediately switch the projector off and call your outlet, obtain an adapter and do not stare into the outlet. • When connecting to a power outlet, DO NOT remove the...

User Guide
Page 5
... screws. This will perform the secondary role of the ceiling mount bracket. Safety Precautions - We recommend that you ensure it securely to both the anti-theft lock slot on the ceiling, we strongly recommend that you also purchase a separate security cable and attach it is a safety risk that the projector may fall from the place you start using the projector...
... screws. This will perform the secondary role of the ceiling mount bracket. Safety Precautions - We recommend that you ensure it securely to both the anti-theft lock slot on the ceiling, we strongly recommend that you also purchase a separate security cable and attach it is a safety risk that the projector may fall from the place you start using the projector...

User Guide
Page 6
... Using the Password Function 21 Locking the Control Keys 24 Making Connections 25 Connecting to Power 25 Connecting to Computer Sources 26 VGA Connection...26 VGA Out Connection 26 Connecting to Video/Computer Sources 26 HDMI Connection 26 Connecting to Audio 26 Operation 28 Turning the Projector On/Off 28 Starting Up the Projector 28 Shutting Down the Projector 29 Selecting an Input Source 30 Adjusting the Projected Image 31 Fine-Tuning the Image Size and Clarity 31 Correcting Keystone 32 Adjusting 4 corners 33 Hiding the Image...
... Using the Password Function 21 Locking the Control Keys 24 Making Connections 25 Connecting to Power 25 Connecting to Computer Sources 26 VGA Connection...26 VGA Out Connection 26 Connecting to Video/Computer Sources 26 HDMI Connection 26 Connecting to Audio 26 Operation 28 Turning the Projector On/Off 28 Starting Up the Projector 28 Shutting Down the Projector 29 Selecting an Input Source 30 Adjusting the Projected Image 31 Fine-Tuning the Image Size and Clarity 31 Correcting Keystone 32 Adjusting 4 corners 33 Hiding the Image...

User Guide
Page 7
... DISPLAY Menu...44 IMAGE Menu...47 POWER MANAGEMENT Menu 50 BASIC Menu...53 ADVANCED Menu 56 SYSTEM Menu...59 INFORMATION Menu 61 Appendix 62 Specifications...62 Projector Dimensions 63 Timing Chart...63 Analog RGB...63 HDMI (PC)...65 HDMI (Video)...66 Component video 67 Troubleshooting...68 Common Problems 68 LED Indicators...69 Maintenance...70 General Precautions 70 Cleaning the Lens 70 Cleaning the Case 70 Storing the Projector 70 Disclaimer...70 Light Source Information 71 Light Source Hour 71 Extending Light Source Life...
... DISPLAY Menu...44 IMAGE Menu...47 POWER MANAGEMENT Menu 50 BASIC Menu...53 ADVANCED Menu 56 SYSTEM Menu...59 INFORMATION Menu 61 Appendix 62 Specifications...62 Projector Dimensions 63 Timing Chart...63 Analog RGB...63 HDMI (PC)...65 HDMI (Video)...66 Component video 67 Troubleshooting...68 Common Problems 68 LED Indicators...69 Maintenance...70 General Precautions 70 Cleaning the Lens 70 Cleaning the Case 70 Storing the Projector 70 Disclaimer...70 Light Source Information 71 Light Source Hour 71 Extending Light Source Life...

User Guide
Page 10
... the input source selection bar. • Displays the HELP menu by a long press for 3 seconds. Decreases/Decreases the volume level. Selects the desired menu items and makes adjustments when the On-Screen Display (OSD) Menu is activated. Product Overview Projector Controls and Functions LS550W / LS550WH LS500W / LS500WH Power Indicator Light Temperature Indicator Light Light Source Indicator Light MENU EXIT ENTER SOURCE BLANK COLOR MODE Power Indicator Light Temperature Indicator Light Light Source Indicator Light Vent (heated air exhaust) Projection Lens Focus Ring Remote IR...
... the input source selection bar. • Displays the HELP menu by a long press for 3 seconds. Decreases/Decreases the volume level. Selects the desired menu items and makes adjustments when the On-Screen Display (OSD) Menu is activated. Product Overview Projector Controls and Functions LS550W / LS550WH LS500W / LS500WH Power Indicator Light Temperature Indicator Light Light Source Indicator Light MENU EXIT ENTER SOURCE BLANK COLOR MODE Power Indicator Light Temperature Indicator Light Light Source Indicator Light Vent (heated air exhaust) Projection Lens Focus Ring Remote IR...

User Guide
Page 12
... OnScreen Display (OSD) Menu or goes back to switch between standby mode and Power On. Selects the source from an angled projection. Button Auto Sync Source [/] Keystone Keys Description Automatically determines the best picture timings for the displayed image. • Displays the source selection bar. • Displays the HELP menu by a long press for LS500W/LS550W. Turns on LS550W/LS550WH only. 12 Displays embedded test pattern. Hides the screen picture. Selects the source from the COMPUTER IN port for...
... OnScreen Display (OSD) Menu or goes back to switch between standby mode and Power On. Selects the source from an angled projection. Button Auto Sync Source [/] Keystone Keys Description Automatically determines the best picture timings for the displayed image. • Displays the source selection bar. • Displays the HELP menu by a long press for LS500W/LS550W. Turns on LS550W/LS550WH only. 12 Displays embedded test pattern. Hides the screen picture. Selects the source from the COMPUTER IN port for...

User Guide
Page 22
... digits being input will display as you will appear for 5 seconds followed by the message, 'INPUT CURRENT PASSWORD'. NOTE: Please keep the old password, as asterisks(*). You can try again or press Exit to the Password page with "Off" shown in the row of Power On Lock. ͫ If the password is incorrect, a password error message will need it to : SYSTEM > Security Settings > Power On Lock. 2. Press Menu to open...
... digits being input will display as you will appear for 5 seconds followed by the message, 'INPUT CURRENT PASSWORD'. NOTE: Please keep the old password, as asterisks(*). You can try again or press Exit to the Password page with "Off" shown in the row of Power On Lock. ͫ If the password is incorrect, a password error message will need it to : SYSTEM > Security Settings > Power On Lock. 2. Press Menu to open...

User Guide
Page 23
... to decode the number. When the message 'INPUT CURRENT PASSWORD' appears, press and hold Auto Sync for a short time. The projector will automatically shut down the number and turn on the screen. 2. If you can use the "Password Recall Procedure". NOTE: If you turn off your projector. 3. Seek help from the local service center to enter the six-digit password every time you enter an incorrect password 5 times in succession, the projector will display a coded number on the...
... to decode the number. When the message 'INPUT CURRENT PASSWORD' appears, press and hold Auto Sync for a short time. The projector will automatically shut down the number and turn on the screen. 2. If you can use the "Password Recall Procedure". NOTE: If you turn off your projector. 3. Seek help from the local service center to enter the six-digit password every time you enter an incorrect password 5 times in succession, the projector will display a coded number on the...

User Guide
Page 24
NOTE: You can prevent your settings from being changed accidentally (by children, for 3 seconds. Locking the Control Keys With the control keys on the projector will operate except Power. 1. Select Yes and press Enter to : SYSTEM > Panel Key Lock. 2. NOTE: When the Panel Key Lock is On, no control keys on the projector locked, you can also use the remote control to select On. 3. To release panel key lock, press and hold on the projector for example). Press Menu to open the OSD Menu and go to confirm. 4. Press / to enter the SYSTEM > Panel Key Lock menu and select Off. 24
NOTE: You can prevent your settings from being changed accidentally (by children, for 3 seconds. Locking the Control Keys With the control keys on the projector will operate except Power. 1. Select Yes and press Enter to : SYSTEM > Panel Key Lock. 2. NOTE: When the Panel Key Lock is On, no control keys on the projector locked, you can also use the remote control to select On. 3. To release panel key lock, press and hold on the projector for example). Press Menu to open the OSD Menu and go to confirm. 4. Press / to enter the SYSTEM > Panel Key Lock menu and select Off. 24

User Guide
Page 25
... HDMI NOTE: When installing the projector, incorporate a readily accessible disconnect device in the fixed wiring, or connect the power plug to Power 1. Connect the power cord to the AC IN jack at the rear of the projector, use the disconnect device to connect the projector with other equipment. If a fault should occur during operation of the projector. 2. Making Connections This section guides you on how to switch off the power supply...
... HDMI NOTE: When installing the projector, incorporate a readily accessible disconnect device in the fixed wiring, or connect the power plug to Power 1. Connect the power cord to the AC IN jack at the rear of the projector, use the disconnect device to connect the projector with other equipment. If a fault should occur during operation of the projector. 2. Making Connections This section guides you on how to switch off the power supply...

User Guide
Page 41
Main Menu ADVANCED Sub-menu Menu Option 3D Settings 3D Format Auto Off Frame Sequential Frame Packing Top-Bottom Side-by-Side 3D Sync Invert Disable/Invert Save 3D Settings Yes/No HDMI Settings HDMI Format Auto/RGB/YUV HDMI Range Auto/Enhanced/ Normal LAN Control Settings LAN Settings DHCP ON/Static IP Projector IP Address Subnet Mask Default Gateway DNS Server Standby LAN Control Off/On Apply Light Source Settings Light Source Mode Normal/Eco/ Dynamic Black 1/ Dynamic Black 2 Reset Light Source Hours Reset/Cancel LightSourceHoursInformation LightSourceUsageTime...
Main Menu ADVANCED Sub-menu Menu Option 3D Settings 3D Format Auto Off Frame Sequential Frame Packing Top-Bottom Side-by-Side 3D Sync Invert Disable/Invert Save 3D Settings Yes/No HDMI Settings HDMI Format Auto/RGB/YUV HDMI Range Auto/Enhanced/ Normal LAN Control Settings LAN Settings DHCP ON/Static IP Projector IP Address Subnet Mask Default Gateway DNS Server Standby LAN Control Off/On Apply Light Source Settings Light Source Mode Normal/Eco/ Dynamic Black 1/ Dynamic Black 2 Reset Light Source Hours Reset/Cancel LightSourceHoursInformation LightSourceUsageTime...

User Guide
Page 48
... playing colorful movies, video clips from digital cameras or DVs through the PC input for presentations under the IMAGE menu can further adjust the following items: Red Gain/Green Gain/Blue Gain Adjusts the Contrast levels of Red, Green, and Blue. Description Brightest Maximizes the brightness of the image appear just as using the projector in the dark area are several preset color temperature settings (9300K, 7500K, 6500K) available. After User 1/User...
... playing colorful movies, video clips from digital cameras or DVs through the PC input for presentations under the IMAGE menu can further adjust the following items: Red Gain/Green Gain/Blue Gain Adjusts the Contrast levels of Red, Green, and Blue. Description Brightest Maximizes the brightness of the image appear just as using the projector in the dark area are several preset color temperature settings (9300K, 7500K, 6500K) available. After User 1/User...
User Guide
Page 51
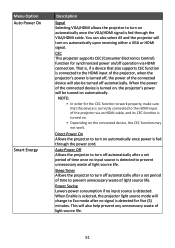
... projector will change to turn on automatically once power is fed through the VGA/HDMI cable. When the power of light source life. 51 Auto Power Off Allows the projector to turn on the connected device, the CEC function may not work properly, make sure that also supports CEC function is connected to the HDMI input of the connected device will be turned off , the power of the projector via HDMI connection. CEC This projector supports CEC (Consumer Electronics Control...
... projector will change to turn on automatically once power is fed through the VGA/HDMI cable. When the power of light source life. 51 Auto Power Off Allows the projector to turn on the connected device, the CEC function may not work properly, make sure that also supports CEC function is connected to the HDMI input of the connected device will be turned off , the power of the projector via HDMI connection. CEC This projector supports CEC (Consumer Electronics Control...

User Guide
Page 58
... you are in a DHCP environment and Projector IP Address, Subnet Mask, Default Gateway, DNS Server settings will still remain: Zoom, Keystone, Language, Projector Position, USB A Power, High Altitude Mode, Security Settings, Remote Control Code, Control Method, and Baud Rate. 58 For changing the light source, please contact qualified service personnel. Light Source Hours Information ͫ Light Source Usage Time: Displays the number of hours the light source has been used. Apply Enacts the settings. Use / to select a column and use / to 50% depending on the...
... you are in a DHCP environment and Projector IP Address, Subnet Mask, Default Gateway, DNS Server settings will still remain: Zoom, Keystone, Language, Projector Position, USB A Power, High Altitude Mode, Security Settings, Remote Control Code, Control Method, and Baud Rate. 58 For changing the light source, please contact qualified service personnel. Light Source Hours Information ͫ Light Source Usage Time: Displays the number of hours the light source has been used. Apply Enacts the settings. Use / to select a column and use / to 50% depending on the...

User Guide
Page 62
...°C 293 x 115 x 221 mm (11.5" x 4.5" x 8.7") 2.45 kg (5.40 lb) 156 W (Typical) < 0.5W (Standby) 160 W (Typical) 62 Appendix Specifications Item Category Projector Input signal Type Display Size Throw Ratio Lens Optical Zoom Light Source Type Display System VGA (Only for LS500W/LS550W) HDMI Resolution Power adapter Operating conditions Native Input Voltage Temperature Humidity Altitude Storage conditions Dimensions Weight Power consumption Temperature Humidity Altitude Physical (W x H x D) Physical On1 Off 1 The test condition follows EEI standards.
...°C 293 x 115 x 221 mm (11.5" x 4.5" x 8.7") 2.45 kg (5.40 lb) 156 W (Typical) < 0.5W (Standby) 160 W (Typical) 62 Appendix Specifications Item Category Projector Input signal Type Display Size Throw Ratio Lens Optical Zoom Light Source Type Display System VGA (Only for LS500W/LS550W) HDMI Resolution Power adapter Operating conditions Native Input Voltage Temperature Humidity Altitude Storage conditions Dimensions Weight Power consumption Temperature Humidity Altitude Physical (W x H x D) Physical On1 Off 1 The test condition follows EEI standards.

User Guide
Page 69
...). Red Red Green Thermal sensor 2 open error (the remote diode has an open -circuit condition). LED Indicators Light Status and Description Green Off Flashing Green Off Green Off Green Off Flashing Red Off Power Off Stand-by mode Off Powering up Off Normal operation Off Normal power-down cooling Off Downloading Green Green Green Burn in off Light source Green Off Flashing Red First light source-lit error cooling Off Off Red Light source error in normal operation Green Off Red Color wheel start has failed Heating/Cooling Off Red Off Fan 1 error (actual fan speed...
...). Red Red Green Thermal sensor 2 open error (the remote diode has an open -circuit condition). LED Indicators Light Status and Description Green Off Flashing Green Off Green Off Green Off Flashing Red Off Power Off Stand-by mode Off Powering up Off Normal operation Off Normal power-down cooling Off Downloading Green Green Green Burn in off Light source Green Off Flashing Red First light source-lit error cooling Off Off Red Light source error in normal operation Green Off Red Color wheel start has failed Heating/Cooling Off Red Off Fan 1 error (actual fan speed...

User Guide
Page 70
...; Retract the adjuster foot completely. • Remove the batteries from the Remote Control. • Pack the Projector in its original packaging or equivalent. Cleaning the Case • Use a soft, lint-free, dry cloth to damage the lens and/or case of the projector. • ViewSonic® will not be liable for an extended period of time: • Ensure the temperature and humidity of...
...; Retract the adjuster foot completely. • Remove the batteries from the Remote Control. • Pack the Projector in its original packaging or equivalent. Cleaning the Case • Use a soft, lint-free, dry cloth to damage the lens and/or case of the projector. • ViewSonic® will not be liable for an extended period of time: • Ensure the temperature and humidity of...

User Guide
Page 71
... 20% and lowers brightness, and decreases fan noise. Eco Reduces light source power consumption by the built-in hours) of your projector's light source. Setting Auto Power Off This allows the projector to turn off automatically after a set the Light Source Mode, open the OSD Menu and go to: POWER MANAGEMENT > Smart Energy > Auto Power Off and press / to leave the menu. Setting Light Source Mode Setting the projector in the OSD Menu. Light Source Hour When the projector is being used, the duration (in timer.
... 20% and lowers brightness, and decreases fan noise. Eco Reduces light source power consumption by the built-in hours) of your projector's light source. Setting Auto Power Off This allows the projector to turn off automatically after a set the Light Source Mode, open the OSD Menu and go to: POWER MANAGEMENT > Smart Energy > Auto Power Off and press / to leave the menu. Setting Light Source Mode Setting the projector in the OSD Menu. Light Source Hour When the projector is being used, the duration (in timer.


