
User Guide
Page 2
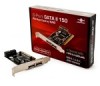
Hardware Description 4 6. Driver Installation 15 UGT-ST310R Page 2 Package Contents 3 4. Device Connection 5 8. System Requirements 4 5. RAID Arrays 6 RAID 0 (Striping 6 RAID 1 (Mirror 8 RAID 0+1 (Mirroring + Striping 9 RAID 5 (Parity 11 CONCATENATION (JBOD 13 9. BIOS Configuration 15 10. Hardware Installation 5 7. Connectors 3 3. Table of Contents 1. Bus Interface 3 2.
Hardware Description 4 6. Driver Installation 15 UGT-ST310R Page 2 Package Contents 3 4. Device Connection 5 8. System Requirements 4 5. RAID Arrays 6 RAID 0 (Striping 6 RAID 1 (Mirror 8 RAID 0+1 (Mirroring + Striping 9 RAID 5 (Parity 11 CONCATENATION (JBOD 13 9. BIOS Configuration 15 10. Hardware Installation 5 7. Connectors 3 3. Table of Contents 1. Bus Interface 3 2.
User Guide
Page 6
Auto configuration (recommended) The default chunk size is offered. As the BIOS boots press Ctrl+S or F4 when prompted to the Serial ATA controller on the 6-Port SATA II 150 PCI Host Card w/RAID. 5. RAID 0 (Striping) This RAID array to four hard drives. For applications that require custom .... Attach the other end of the Serial ATA cable to enter the RAID BIOS. 2. RAID Arrays RAID Arrays are setup in the 6-Port SATA II 150 PCI Host Card w/RAID's BIOS. Auto Configuration is now complete. 6. UGT-ST310R Page 6 Follow the same instructions to connect up to be used on the...
Auto configuration (recommended) The default chunk size is offered. As the BIOS boots press Ctrl+S or F4 when prompted to the Serial ATA controller on the 6-Port SATA II 150 PCI Host Card w/RAID. 5. RAID 0 (Striping) This RAID array to four hard drives. For applications that require custom .... Attach the other end of the Serial ATA cable to enter the RAID BIOS. 2. RAID Arrays RAID Arrays are setup in the 6-Port SATA II 150 PCI Host Card w/RAID's BIOS. Auto Configuration is now complete. 6. UGT-ST310R Page 6 Follow the same instructions to connect up to be used on the...

User Guide
Page 7
...(Y/N)?, press Y to accept. 8. 3. Input the RAID size, press Enter. 7. Manual configuration 1. As the BIOS boots press Ctrl+S or F4 when prompted to exit the BIOS. 13. Select chunk size from 8k, 16k, 32k, 64k or 128k, then press Enter. 7. UGT-ST310R Page 7 At the next screen select Create RAID Set, then press Enter. 3. Select...
...(Y/N)?, press Y to accept. 8. 3. Input the RAID size, press Enter. 7. Manual configuration 1. As the BIOS boots press Ctrl+S or F4 when prompted to exit the BIOS. 13. Select chunk size from 8k, 16k, 32k, 64k or 128k, then press Enter. 7. UGT-ST310R Page 7 At the next screen select Create RAID Set, then press Enter. 3. Select...
User Guide
Page 8
...5. Continue with Data 1. Select the Source drive, press Enter. 6. At the next screen select Create RAID Set, then press Enter. 3. As the BIOS boots press Ctrl+S or F4 when prompted to accept. 7. Select Manual configuration, then press Enter. 5. Select online copy, then press Enter. At the..., press Enter. 6. For Existing Hard Drives with FDISK and FORMAT steps as if you sure to exit(Y/N)?, press Y to exit and reboot. 9. UGT-ST310R Page 8 RAID 1 (Mirror) For New/Blank Hard Drives 1. At the next screen select RAID1 then press Enter. 4. Select Create with data copy...
...5. Continue with Data 1. Select the Source drive, press Enter. 6. At the next screen select Create RAID Set, then press Enter. 3. As the BIOS boots press Ctrl+S or F4 when prompted to accept. 7. Select Manual configuration, then press Enter. 5. Select online copy, then press Enter. At the..., press Enter. 6. For Existing Hard Drives with FDISK and FORMAT steps as if you sure to exit(Y/N)?, press Y to exit and reboot. 9. UGT-ST310R Page 8 RAID 1 (Mirror) For New/Blank Hard Drives 1. At the next screen select RAID1 then press Enter. 4. Select Create with data copy...

User Guide
Page 9
...Y to exit the BIOS. 11. Press Ctrl+E to confirm. 7. Select Create RAID Set then press Enter. 4. RAID 0+1 (Mirroring + Striping) This RAID array to exit and reboot. When asked Are you in Rebuild status, The rebuild will be used on New/Blank hard drives, do not UGT-ST310R Page 9 The steps ...below will guide you sure to exit(Y/N)?, press Y to enter the RAID BIOS. 3. During boot press Ctrl+S or F4 to exit. Select the replacement drive then press Enter. ...
...Y to exit the BIOS. 11. Press Ctrl+E to confirm. 7. Select Create RAID Set then press Enter. 4. RAID 0+1 (Mirroring + Striping) This RAID array to exit and reboot. When asked Are you in Rebuild status, The rebuild will be used on New/Blank hard drives, do not UGT-ST310R Page 9 The steps ...below will guide you sure to exit(Y/N)?, press Y to enter the RAID BIOS. 3. During boot press Ctrl+S or F4 to exit. Select the replacement drive then press Enter. ...
User Guide
Page 10
... then press Enter. UGT-ST310R Page 10 At the next screen select Create RAID Set, then press Enter. 3. Input the RAID size, press Enter. 6. When asked Are You Sure(Y/N)?, press Y to accept. 7. As the BIOS boots press Ctrl+S or F4 when prompted to exit the BIOS. 8. Manual configuration ...When asked Are you were installing a conventional hard drive. Select the number of drives then press Enter. 5. Press Ctrl+E to enter the RAID BIOS. 2. Select RAID10, then press Enter. 4. To create a RAID 0+1 set four hard drives are required. Auto configuration (recommended) The default chunk...
... then press Enter. UGT-ST310R Page 10 At the next screen select Create RAID Set, then press Enter. 3. Input the RAID size, press Enter. 6. When asked Are You Sure(Y/N)?, press Y to accept. 7. As the BIOS boots press Ctrl+S or F4 when prompted to exit the BIOS. 8. Manual configuration ...When asked Are you were installing a conventional hard drive. Select the number of drives then press Enter. 5. Press Ctrl+E to enter the RAID BIOS. 2. Select RAID10, then press Enter. 4. To create a RAID 0+1 set four hard drives are required. Auto configuration (recommended) The default chunk...
User Guide
Page 11
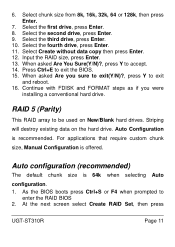
... 14. Auto Configuration is offered. For applications that require custom chunk size, Manual Configuration is recommended. As the BIOS boots press Ctrl+S or F4 when prompted to exit the BIOS. 15. Select the second drive, press Enter. 9. Select Create without data copy then press Enter. 12. ...press Enter. 10. Press Ctrl+E to enter the RAID BIOS 2. Continue with FDISK and FORMAT steps as if you sure to exit(Y/N)?, press Y to be used on the hard drive. At the next screen select Create RAID Set, then press UGT-ST310R Page 11 6. Select the first drive, press Enter....
... 14. Auto Configuration is offered. For applications that require custom chunk size, Manual Configuration is recommended. As the BIOS boots press Ctrl+S or F4 when prompted to exit the BIOS. 15. Select the second drive, press Enter. 9. Select Create without data copy then press Enter. 12. ...press Enter. 10. Press Ctrl+E to enter the RAID BIOS 2. Continue with FDISK and FORMAT steps as if you sure to exit(Y/N)?, press Y to be used on the hard drive. At the next screen select Create RAID Set, then press UGT-ST310R Page 11 6. Select the first drive, press Enter....
User Guide
Page 12
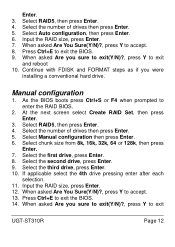
..., press Enter. 10. When asked Are you sure to exit(Y/N)?, press Y to accept. 13. When asked Are You Sure(Y/N)?, press Y to exit UGT-ST310R Page 12 When asked Are You Sure(Y/N)?, press Y to exit and reboot 10. Continue with FDISK and FORMAT steps as if you sure to exit..., then press Enter. 6. At the next screen select Create RAID Set, then press Enter. 3. Manual configuration 1. As the BIOS boots press Ctrl+S or F4 when prompted to exit the BIOS. 9. Select the number of drives then press Enter. 5. Select Manual configuration then press Enter. 6. Select chunk size from 8k...
..., press Enter. 10. When asked Are you sure to exit(Y/N)?, press Y to accept. 13. When asked Are You Sure(Y/N)?, press Y to exit UGT-ST310R Page 12 When asked Are You Sure(Y/N)?, press Y to exit and reboot 10. Continue with FDISK and FORMAT steps as if you sure to exit..., then press Enter. 6. At the next screen select Create RAID Set, then press Enter. 3. Manual configuration 1. As the BIOS boots press Ctrl+S or F4 when prompted to exit the BIOS. 9. Select the number of drives then press Enter. 5. Select Manual configuration then press Enter. 6. Select chunk size from 8k...

User Guide
Page 13
... press Ctrl+S or F4 when prompted to exit the BIOS. 9. Deleting RAID Arrays 1. Press Ctrl+E to enter the RAID BIOS. It does not provide any data protection or performance improvement but can be useful for utilizing leftover space on disks. 1. UGT-ST310R Page 13 Select the number of drives then press Enter. 5. Select the...
... press Ctrl+S or F4 when prompted to exit the BIOS. 9. Deleting RAID Arrays 1. Press Ctrl+E to enter the RAID BIOS. It does not provide any data protection or performance improvement but can be useful for utilizing leftover space on disks. 1. UGT-ST310R Page 13 Select the number of drives then press Enter. 5. Select the...
User Guide
Page 14
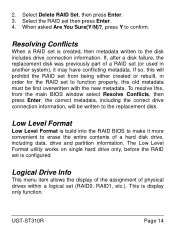
...then press Enter. 3. Resolving Conflicts When a RAID set is display only function. UGT-ST310R Page 14 The Low Level Format utility works on single hard drive only, before the RAID set is build into the RAID BIOS to make it may have conflicting metadata. Select the RAID set (or used in... order for the RAID set to function properly, this will prohibit the RAID set from the main BIOS window select Resolve Conflicts, then press Enter, the correct metadata, including the correct drive connection information, will be first overwritten with the new ...
...then press Enter. 3. Resolving Conflicts When a RAID set is display only function. UGT-ST310R Page 14 The Low Level Format utility works on single hard drive only, before the RAID set is build into the RAID BIOS to make it may have conflicting metadata. Select the RAID set (or used in... order for the RAID set to function properly, this will prohibit the RAID set from the main BIOS window select Resolve Conflicts, then press Enter, the correct metadata, including the correct drive connection information, will be first overwritten with the new ...
User Guide
Page 15
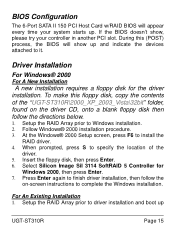
... For A New Installation A new installation requires a floppy disk for Windows 2000, then press Enter. 7. BIOS Configuration The 6-Port SATA II 150 PCI Host Card w/RAID BIOS will show , please try your system starts up. When prompted, press S to specify the location of the "UGT-ST310R\2000_XP_2003_Vista\32bit" folder, found on the driver CD, onto a blank floppy disk then follow the...
... For A New Installation A new installation requires a floppy disk for Windows 2000, then press Enter. 7. BIOS Configuration The 6-Port SATA II 150 PCI Host Card w/RAID BIOS will show , please try your system starts up. When prompted, press S to specify the location of the "UGT-ST310R\2000_XP_2003_Vista\32bit" folder, found on the driver CD, onto a blank floppy disk then follow the...