
User Guide
Page 3
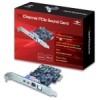
...package and use for 8-channel line output jack. z Installation Guide x 1 z Driver CD x 1 * User's Manual Is on Driver CD Note: Contents may vary depending on the market/country. Close the case. Open the computer case. Check the sound card is inserted into a blank PCIe slot. Connect the ... sure that all of its pins are touching the PCIe slot's contacts. 4. Hardware Installation 1. Check with a screw. 5. Software Installation For Windows® 2000/ XP/2003/Vista/7 (32/64 bit) UGT‐S110 Page 3 Remove any old third-party sound cards or the metal PCIe slot bracket. 3.
...package and use for 8-channel line output jack. z Installation Guide x 1 z Driver CD x 1 * User's Manual Is on Driver CD Note: Contents may vary depending on the market/country. Close the case. Open the computer case. Check the sound card is inserted into a blank PCIe slot. Connect the ... sure that all of its pins are touching the PCIe slot's contacts. 4. Hardware Installation 1. Check with a screw. 5. Software Installation For Windows® 2000/ XP/2003/Vista/7 (32/64 bit) UGT‐S110 Page 3 Remove any old third-party sound cards or the metal PCIe slot bracket. 3.

User Guide
Page 4
Click the Start button on -screen instructions to be used. Physical Connections UGT‐S110 Page 4 Type "D:\UGT-S110\2000_XP_2003_Vista_7\Setup.exe". (Assuming you have placed the CD in CD-ROM drive labeled as D). 2. Restart your PC, place the Driver CD into the CD-ROM drive. Follow any on the taskbar and click Run. Start your system. 4. Once you have rebooted the computer, this 7.1 Channel PCIe Sound card is ready to complete the software installation. 3. 1.
Click the Start button on -screen instructions to be used. Physical Connections UGT‐S110 Page 4 Type "D:\UGT-S110\2000_XP_2003_Vista_7\Setup.exe". (Assuming you have placed the CD in CD-ROM drive labeled as D). 2. Restart your PC, place the Driver CD into the CD-ROM drive. Follow any on the taskbar and click Run. Start your system. 4. Once you have rebooted the computer, this 7.1 Channel PCIe Sound card is ready to complete the software installation. 3. 1.
