User Guide
Page 2
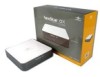
Apple, Macintosh and Mac are trademarks of Apple Computer *All other third-party brands and names are trademarks of their respective owners. Package Contents: NexStar GX External 3.5" HDD Enclosure: • NexStar GX • Power Adapter • Power Cable • USB Cable • User Manual • Driver CD • Screws TRADEMARKS MS-DOS, Microsoft, Windows 95/98/NT/2000/ME/XP are the property of Microsoft Corporation.
Apple, Macintosh and Mac are trademarks of Apple Computer *All other third-party brands and names are trademarks of their respective owners. Package Contents: NexStar GX External 3.5" HDD Enclosure: • NexStar GX • Power Adapter • Power Cable • USB Cable • User Manual • Driver CD • Screws TRADEMARKS MS-DOS, Microsoft, Windows 95/98/NT/2000/ME/XP are the property of Microsoft Corporation.
User Guide
Page 3
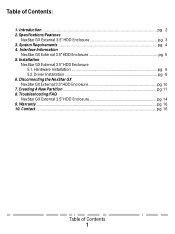
... 10. Table of Contents 1 Specifications/Features NexStar GX External 3.5" HDD Enclosure pg. 3 3. Installation NexStar GX External 3.5" HDD Enclosure 5.1. Driver Installation ...pg. 8 6. Disconnecting the NexStar GX NexStar GX External 3.5"HDD Enclosure pg. 10 7. Contact ...pg. 16 Table of Contents: 1. System Requirements ...pg. 4 4. Creating A New Partition ...pg. 11 8. Troubleshooting/FAQ NexStar GX External 3.5" HDD Enclosure pg. 14 9. Introduction ...pg. 2 2. Interface Information NexStar GX External 3.5" HDD Enclosure pg. 5 5. Hardware Installation ...pg. 6 5.2.
... 10. Table of Contents 1 Specifications/Features NexStar GX External 3.5" HDD Enclosure pg. 3 3. Installation NexStar GX External 3.5" HDD Enclosure 5.1. Driver Installation ...pg. 8 6. Disconnecting the NexStar GX NexStar GX External 3.5"HDD Enclosure pg. 10 7. Contact ...pg. 16 Table of Contents: 1. System Requirements ...pg. 4 4. Creating A New Partition ...pg. 11 8. Troubleshooting/FAQ NexStar GX External 3.5" HDD Enclosure pg. 14 9. Introduction ...pg. 2 2. Interface Information NexStar GX External 3.5" HDD Enclosure pg. 5 5. Hardware Installation ...pg. 6 5.2.
User Guide
Page 4
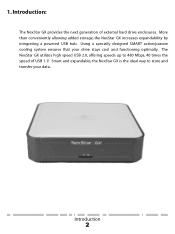
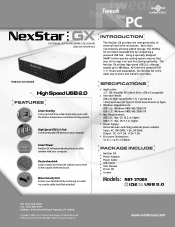
Introduction: The NexStar GX provides the next generation of USB 1.1! Introduction 2 Using a specially designed SMART active/passive cooling system ensures that your data. The NexStar GX utilizes high speed USB 2.0, offering speeds up to store and transfer your drive stays cool and functioning optimally. Smart and expandable, the NexStar GX is the ideal way to 480 Mbps, 40 times the speed of external hard drive enclosures. More than conveniently allowing added storage, the NexStar GX increases expandability by integrating a powered USB hub. 1.
Introduction: The NexStar GX provides the next generation of USB 1.1! Introduction 2 Using a specially designed SMART active/passive cooling system ensures that your data. The NexStar GX utilizes high speed USB 2.0, offering speeds up to store and transfer your drive stays cool and functioning optimally. Smart and expandable, the NexStar GX is the ideal way to 480 Mbps, 40 times the speed of external hard drive enclosures. More than conveniently allowing added storage, the NexStar GX increases expandability by integrating a powered USB hub. 1.
User Guide
Page 5
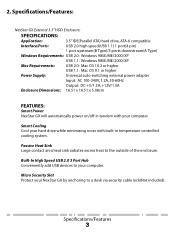
... security cable lock(Not included). Micro Security Slot Protect your computer. Specifications/Features 3 Specifications/Features: NexStar GX External 3.5" HDD Enclosure: SPECIFICATIONS: Application: 3.5" IDE(Parallel ATA) hard drive, ATA-6 compatible Interface/Ports: USB 2.0 high speed(USB 1.1) 1 port(4 pin) 1 port upstream(B Type)/3 ports downstream(A Type) Windows Requirements: USB 2.0: Windows 98SE/ME/2000/XP USB 1.1: Windows 98SE/ME/2000/XP Mac Requirements: USB 2.0: Mac OS 10.2 or higher USB 1.1: Mac OS 9.1 or higher Power Supply...
... security cable lock(Not included). Micro Security Slot Protect your computer. Specifications/Features 3 Specifications/Features: NexStar GX External 3.5" HDD Enclosure: SPECIFICATIONS: Application: 3.5" IDE(Parallel ATA) hard drive, ATA-6 compatible Interface/Ports: USB 2.0 high speed(USB 1.1) 1 port(4 pin) 1 port upstream(B Type)/3 ports downstream(A Type) Windows Requirements: USB 2.0: Windows 98SE/ME/2000/XP USB 1.1: Windows 98SE/ME/2000/XP Mac Requirements: USB 2.0: Mac OS 10.2 or higher USB 1.1: Mac OS 9.1 or higher Power Supply...

User Guide
Page 6
System Requirements: • Intel Pentium II 350MHz-compatible or Apple G3 processor and greater • Microsoft Windows 98SE/ME/2000/XP or Mac OS 9.1 and greater • USB-equipped system with available USB port • For USB 2.0 speeds, the system must support USB 2.0 specifications • CD Rom drive (if drivers are needed) System Requirements 4 3.
System Requirements: • Intel Pentium II 350MHz-compatible or Apple G3 processor and greater • Microsoft Windows 98SE/ME/2000/XP or Mac OS 9.1 and greater • USB-equipped system with available USB port • For USB 2.0 speeds, the system must support USB 2.0 specifications • CD Rom drive (if drivers are needed) System Requirements 4 3.
User Guide
Page 7
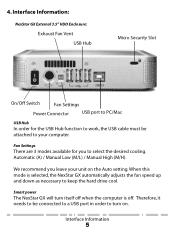
Interface Information: NexStar GX External 3.5" HDD Enclosure: Exhaust Fan Vent USB Hub Micro Security Slot On/Off Switch Fan Settings Power Connector USB port to keep the hard drive cool. Interface Information 5 Fan Settings There are 3 modes available for the USB Hub function to work, the USB cable must be connected to a USB port in order to turn itself off . When this mode is off when the...
Interface Information: NexStar GX External 3.5" HDD Enclosure: Exhaust Fan Vent USB Hub Micro Security Slot On/Off Switch Fan Settings Power Connector USB port to keep the hard drive cool. Interface Information 5 Fan Settings There are 3 modes available for the USB Hub function to work, the USB cable must be connected to a USB port in order to turn itself off . When this mode is off when the...
User Guide
Page 8
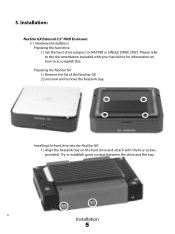
... heatsink tray. Hardware Installation: Preparing the hard drive: 1) Set the hard drive jumpers to establish good contact between the drive and the tray. Installation 5 Installing the hard drive into the NexStar GX: 1) Align the heatsink tray on the hard drive and attach with your hard drive for information on how to the documentation included with the four screws provided. Please refer to accomplish this. 5. Installation: NexStar GX External 3.5" HDD Enclosure: 5.1. Try to...
... heatsink tray. Hardware Installation: Preparing the hard drive: 1) Set the hard drive jumpers to establish good contact between the drive and the tray. Installation 5 Installing the hard drive into the NexStar GX: 1) Align the heatsink tray on the hard drive and attach with your hard drive for information on how to the documentation included with the four screws provided. Please refer to accomplish this. 5. Installation: NexStar GX External 3.5" HDD Enclosure: 5.1. Try to...

User Guide
Page 9
When finished, attach lid. Make sure drive is jumpered to the drive. Installation 7 Position the thermal probe in front of the hard drive. 2) Connect the IDE and power cables to master or single. 3) Insert the heatsink tray back into the enclosure and screw into place. 4) Fold the cables so that they are flat against the drive.
When finished, attach lid. Make sure drive is jumpered to the drive. Installation 7 Position the thermal probe in front of the hard drive. 2) Connect the IDE and power cables to master or single. 3) Insert the heatsink tray back into the enclosure and screw into place. 4) Fold the cables so that they are flat against the drive.
User Guide
Page 10
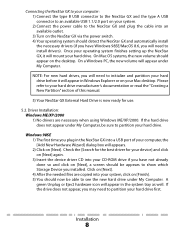
...], a screen should detect the NexStar GX and automatically install the necessary drivers (if you have Windows 98SE/MacOS 8.6, you will need to partition your hard drive first. Connecting the NexStar GX to your computer: 1) Connect the type B USB connector to the NexStar GX and the type A USB connector to an available USB 1.1/2.0 port on your system. 2) Connect the power cable to the NexStar GX and plug the cable into an available outlet...
...], a screen should detect the NexStar GX and automatically install the necessary drivers (if you have Windows 98SE/MacOS 8.6, you will need to partition your hard drive first. Connecting the NexStar GX to your computer: 1) Connect the type B USB connector to the NexStar GX and the type A USB connector to an available USB 1.1/2.0 port on your system. 2) Connect the power cable to the NexStar GX and plug the cable into an available outlet...

User Guide
Page 11
... you currently have it is not, you can download the USB Mass Storage Support 1.3.5 from the Apple Software Updates website: http://www.apple.com/support 3) Follow the direction associated with the USB Mass Storage Support driver to install 4) Repeat the steps listed under "Connecting the NexStar GX to partition your hard drive. Installation 9 Mac OS 9.0 or later: 1) No drivers are necessary when using Mac OS 9.0 or later...
... you currently have it is not, you can download the USB Mass Storage Support 1.3.5 from the Apple Software Updates website: http://www.apple.com/support 3) Follow the direction associated with the USB Mass Storage Support driver to install 4) Repeat the steps listed under "Connecting the NexStar GX to partition your hard drive. Installation 9 Mac OS 9.0 or later: 1) No drivers are necessary when using Mac OS 9.0 or later...
User Guide
Page 12
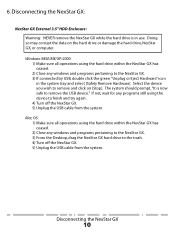
... off the NexStar GX. 5) Unplug the USB cable from the system. Disconnecting the NexStar GX: NexStar GX External 3.5" HDD Enclosure: Warning: NEVER remove the NexStar GX while the hard drive is now safe to the NexStar GX. 3) If connected by USB, double click the green "Unplug or Eject Hardware" icon in use. Doing so may corrupt the data on [Stop]. If not, wait for any windows and programs...
... off the NexStar GX. 5) Unplug the USB cable from the system. Disconnecting the NexStar GX: NexStar GX External 3.5" HDD Enclosure: Warning: NEVER remove the NexStar GX while the hard drive is now safe to the NexStar GX. 3) If connected by USB, double click the green "Unplug or Eject Hardware" icon in use. Doing so may corrupt the data on [Stop]. If not, wait for any windows and programs...
User Guide
Page 13
... Disk Management 3) Windows should be required for some hard drives.) 4) Go through the wizard. 5) Once complete, locate your hard drive documentation for complete instructions on the area with a CD that Windows XP/2000 limits FAT32 partitions to see the drive in Windows Explorer. Right click on how to see the drive in Windows Explorer. Please note that includes its installation program. Also, Windows 98...
... Disk Management 3) Windows should be required for some hard drives.) 4) Go through the wizard. 5) Once complete, locate your hard drive documentation for complete instructions on the area with a CD that Windows XP/2000 limits FAT32 partitions to see the drive in Windows Explorer. Right click on how to see the drive in Windows Explorer. Please note that includes its installation program. Also, Windows 98...

User Guide
Page 14
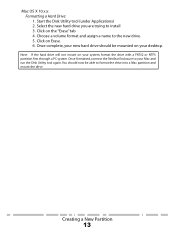
... the folder. 3. Click Initialize. Mac OS X 10.x.x: Initializing a Hard Drive: If you are using a program called Drive Setup, which is on the Mac OS CD and double-click it first. In the list of hard drive storage space, follow the steps below: 1. Resize the volumes if desired. 5. If initialization fails, do the following: 1. Click Initialize. When ready, click OK...
... the folder. 3. Click Initialize. Mac OS X 10.x.x: Initializing a Hard Drive: If you are using a program called Drive Setup, which is on the Mac OS CD and double-click it first. In the list of hard drive storage space, follow the steps below: 1. Resize the volumes if desired. 5. If initialization fails, do the following: 1. Click Initialize. When ready, click OK...
User Guide
Page 15
... your Mac and run the Disk Utility tool again. Note: If the hard drive will not mount on the "Erase" tab 4. Select the new hard drive you are trying to the new drive. 5. Choose a volume format and assign a name to install 3. Once formatted, connect the NexStar Enclosure to format the drive into a Mac partition and mount the drive Creating a New Partition 13...
... your Mac and run the Disk Utility tool again. Note: If the hard drive will not mount on the "Erase" tab 4. Select the new hard drive you are trying to the new drive. 5. Choose a volume format and assign a name to install 3. Once formatted, connect the NexStar Enclosure to format the drive into a Mac partition and mount the drive Creating a New Partition 13...
User Guide
Page 16
... hard drive be able to ? Q. My computer recognizes the NexStar GX, but sometimes gives me errors. If not, then your computer may cause the hard drive to Cable Select. A. The cables connecting front USB ports are using a brand new hard drive. If you problems with the NexStar GX, be set to this setting. Otherwise, check your data. You are probably using Windows 98SE, please refer to a rear port, directly off the disk...
... hard drive be able to ? Q. My computer recognizes the NexStar GX, but sometimes gives me errors. If not, then your computer may cause the hard drive to Cable Select. A. The cables connecting front USB ports are using a brand new hard drive. If you problems with the NexStar GX, be set to this setting. Otherwise, check your data. You are probably using Windows 98SE, please refer to a rear port, directly off the disk...
User Guide
Page 17
Windows 98SE cannot recognize the NTFS file system. FAT32 limits the file sizes to format the drive as FAT32. Why can 't I copy files larger than 4GB onto my NexStar GX? Why can 't Windows 98SE read my hard drive? A. A. The NTFS file system does not have probably formatted the hard drive in the FAT32 file system. If you wish to use the device with Windows XP/2000. Q. Troubleshooting/FAQ 15 It works with Windows XP/2000 and Windows 98SE, you need to 4GB maximum. You have this limitation. Q.
Windows 98SE cannot recognize the NTFS file system. FAT32 limits the file sizes to format the drive as FAT32. Why can 't I copy files larger than 4GB onto my NexStar GX? Why can 't Windows 98SE read my hard drive? A. A. The NTFS file system does not have probably formatted the hard drive in the FAT32 file system. If you wish to use the device with Windows XP/2000. Q. Troubleshooting/FAQ 15 It works with Windows XP/2000 and Windows 98SE, you need to 4GB maximum. You have this limitation. Q.
User Guide
Page 18
... repair. Also, check for a replacement. 10. If your unit should become defective within that time frame, please go to http://www.vantecusa.com for information on how to make sure you purchased the unit immediately and ask for any parts are missing or if there are not covered under this warranty. Warranty: The NexStar GX...
... repair. Also, check for a replacement. 10. If your unit should become defective within that time frame, please go to http://www.vantecusa.com for information on how to make sure you purchased the unit immediately and ask for any parts are missing or if there are not covered under this warranty. Warranty: The NexStar GX...
Flyer
Page 1
..., 50-60Hz Output: DC +5/1.5A, +12V/1.5A Enclosure Dimensions: 16.51 x 16.51 x 5.08cm PACKAGE INCLUDE NexStar GX Power Adapter Power Cable USB Cable User Manual Driver CD Screws Models: NST- 370GX IDE to a desk via security cable lock (Not included). All Registered Trademarks Belong To Their Respected Companies. www.vantecusa.com More than conveniently allowing added storage, the NexStar GX increases expandability by anchoring to USB 2.0 Tel...
..., 50-60Hz Output: DC +5/1.5A, +12V/1.5A Enclosure Dimensions: 16.51 x 16.51 x 5.08cm PACKAGE INCLUDE NexStar GX Power Adapter Power Cable USB Cable User Manual Driver CD Screws Models: NST- 370GX IDE to a desk via security cable lock (Not included). All Registered Trademarks Belong To Their Respected Companies. www.vantecusa.com More than conveniently allowing added storage, the NexStar GX increases expandability by anchoring to USB 2.0 Tel...
