
User Manual
Page 7
Contents Specifications 1-1 Mainboard Specifications 1-2 Mainboard Layout 1-4 Connectors Guide 1-5 Installation 2-1 CPU 2-2 The VIA C3™ E-Series Processor 2-2 The VIA Eden Processor 2-3 Memory Installation 2-4 SDRAM Module Installation Procedures 2-4 Available SDRAM Configurations 2-5 Power Supply 2-6 ATX 20-Pin Power Connector: ATXPWR 2-6 Back Panel 2-7 Mouse Connector: JMS1 2-7 Keyboard Connector: JKB1 2-7 USB Port Connectors 2-8 RJ-45 NIC Port 2-8 Parallel Port Connector: LPT1...
Contents Specifications 1-1 Mainboard Specifications 1-2 Mainboard Layout 1-4 Connectors Guide 1-5 Installation 2-1 CPU 2-2 The VIA C3™ E-Series Processor 2-2 The VIA Eden Processor 2-3 Memory Installation 2-4 SDRAM Module Installation Procedures 2-4 Available SDRAM Configurations 2-5 Power Supply 2-6 ATX 20-Pin Power Connector: ATXPWR 2-6 Back Panel 2-7 Mouse Connector: JMS1 2-7 Keyboard Connector: JKB1 2-7 USB Port Connectors 2-8 RJ-45 NIC Port 2-8 Parallel Port Connector: LPT1...
User Manual
Page 12
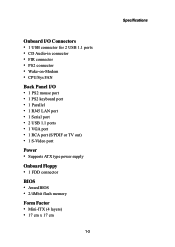
... • 1 RJ45 LAN port • 1 Serial port • 2 USB 1.1 ports • 1 VGA port • 1 RCA port (S/PDIF or TV out) • 1 S-Video port Power • Supports ATX type power supply Onboard Floppy • 1 FDD connector BIOS • Award BIOS • 2/4Mbit flash memory Form Factor • Mini-ITX (4 layers) • 17 cm x 17 cm 1-3 Specifications
... • 1 RJ45 LAN port • 1 Serial port • 2 USB 1.1 ports • 1 VGA port • 1 RCA port (S/PDIF or TV out) • 1 S-Video port Power • Supports ATX type power supply Onboard Floppy • 1 FDD connector BIOS • Award BIOS • 2/4Mbit flash memory Form Factor • Mini-ITX (4 layers) • 17 cm x 17 cm 1-3 Specifications
User Manual
Page 14
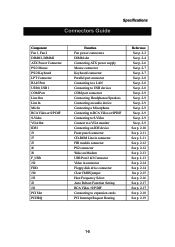
Connectors Guide Specifications Component Fan 1, Fan 2 DIMM1, DIMM2 ATX Power Connector PS/2 Mouse PS/2 Keyboard LPT Connector RJ-45 Port USB 0, USB 1 COM Port... J7 J5 J6 J8 F_USB J12 FDD J10 J13 J2 J11 PCI Slot PCI IRQ Function Fan power connectors DIMM slot Connecting ATX power supply Mouse connector Keyboard connector Parallel port connector Connecting to a LAN Connecting to USB devices COM port ... 2-9 See p. 2-10 See p. 2-11 See p. 2-11 See p. 2-12 See p. 2-12 See p. 2-13 See p. 2-13 See p. 2-14 See p. 2-14 See p. 2-15 See p. 2-16 See p. 2-17 See p. 2-17 See p. 2-18 See p. 2-19 1-5
Connectors Guide Specifications Component Fan 1, Fan 2 DIMM1, DIMM2 ATX Power Connector PS/2 Mouse PS/2 Keyboard LPT Connector RJ-45 Port USB 0, USB 1 COM Port... J7 J5 J6 J8 F_USB J12 FDD J10 J13 J2 J11 PCI Slot PCI IRQ Function Fan power connectors DIMM slot Connecting ATX power supply Mouse connector Keyboard connector Parallel port connector Connecting to a LAN Connecting to USB devices COM port ... 2-9 See p. 2-10 See p. 2-11 See p. 2-11 See p. 2-12 See p. 2-12 See p. 2-13 See p. 2-13 See p. 2-14 See p. 2-14 See p. 2-15 See p. 2-16 See p. 2-17 See p. 2-17 See p. 2-18 See p. 2-19 1-5

User Manual
Page 15
... by static electricity. The components can be damaged if they are installed incorrectly. This chapter contains the following topics: Central Processing Unit (CPU) Memory Installation Power Supply Back Panel Connectors Jumpers Slots PCI Interrupt Request Routing 2-2 2-4 2-6 2-7 2-10 2-15 2-18 2-19 2-1 If possible, use a grounded wrist strap before handling computer components. While installating...
... by static electricity. The components can be damaged if they are installed incorrectly. This chapter contains the following topics: Central Processing Unit (CPU) Memory Installation Power Supply Back Panel Connectors Jumpers Slots PCI Interrupt Request Routing 2-2 2-4 2-6 2-7 2-10 2-15 2-18 2-19 2-1 If possible, use a grounded wrist strap before handling computer components. While installating...

User Manual
Page 20
... -12V 13 GND 14 PS_ON 15 GND 16 GND 17 GND 18 NC 19 5V 20 5V 2-6 Chapter 2 Power Supply The VIA EPIA-V Mini-ITX Mainboard requires an ATX power supply to ensure that all components are correctly aligned. Before inserting the power supply connector, always make sure the plugs of the power supply are inserted in the proper orientation and the...
... -12V 13 GND 14 PS_ON 15 GND 16 GND 17 GND 18 NC 19 5V 20 5V 2-6 Chapter 2 Power Supply The VIA EPIA-V Mini-ITX Mainboard requires an ATX power supply to ensure that all components are correctly aligned. Before inserting the power supply connector, always make sure the plugs of the power supply are inserted in the proper orientation and the...
User Manual
Page 29
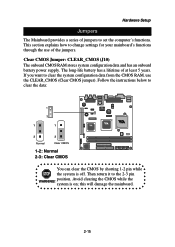
... instructions below to set the computer's functions. Clear CMOS Jumper: CLEAR_CMOS (J10) The onboard CMOS RAM stores system configuration data and has an onboard battery power supply. This section explains how to change settings for your mainboard's functions through the use the CLEAR_CMOS (Clear CMOS jumper). The long-life battery has a lifetime...
... instructions below to set the computer's functions. Clear CMOS Jumper: CLEAR_CMOS (J10) The onboard CMOS RAM stores system configuration data and has an onboard battery power supply. This section explains how to change settings for your mainboard's functions through the use the CLEAR_CMOS (Clear CMOS jumper). The long-life battery has a lifetime...
User Manual
Page 32
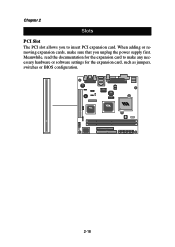
Meanwhile, read the documentation for the expansion card, such as jumpers, switches or BIOS configuration. 2-18 When adding or removing expansion cards, make any necessary hardware or software settings for the expansion card to make sure that you to insert PCI expansion card. Chapter 2 Slots PCI Slot The PCI slot allows you unplug the power supply first.
Meanwhile, read the documentation for the expansion card, such as jumpers, switches or BIOS configuration. 2-18 When adding or removing expansion cards, make any necessary hardware or software settings for the expansion card to make sure that you to insert PCI expansion card. Chapter 2 Slots PCI Slot The PCI slot allows you unplug the power supply first.

User Manual
Page 50
... back. Video Off Option Select whether or not to turn off when system enters power saving mode. Instant-Off - AC Loss Auto Restart If there happens to choose the power state when the AC power is supplied only to select S1 or S3. Settings: Disable and 1/ 2/4/6/8/10/20/30/40 min and 1 hr.... Depends on OS to essential components such as Windows XP will override this item allows you press the power button. The screen is ...
... back. Video Off Option Select whether or not to turn off when system enters power saving mode. Instant-Off - AC Loss Auto Restart If there happens to choose the power state when the AC power is supplied only to select S1 or S3. Settings: Disable and 1/ 2/4/6/8/10/20/30/40 min and 1 hr.... Depends on OS to essential components such as Windows XP will override this item allows you press the power button. The screen is ...