English Owners Manual
Page 2
... Text from Your Handset 12 Installing the Phone 13 Choosing the Best Location 13 Wall Mounting the Base (DCT7565 Only 14 Direct Wall Mounting (DCT7565 Only 15 Installing the Rechargeable Battery 16 Connecting the Base and Charging the Handset 17 Installing the Belt Clip.......... 24 Resetting Handsets 25 Setting Up the Phonebook 25 Creating Phonebook Entries 25 Programming Base Speed Dial Numbers (DCT7565 Only 27 Deleting Base Speed Dial Numbers 27 2 Parts of the Handset .......... 7 DCT756 - Contents Welcome 5 Accessibility 5 Terminology used in this Manual 5 Product Overview...
... Text from Your Handset 12 Installing the Phone 13 Choosing the Best Location 13 Wall Mounting the Base (DCT7565 Only 14 Direct Wall Mounting (DCT7565 Only 15 Installing the Rechargeable Battery 16 Connecting the Base and Charging the Handset 17 Installing the Belt Clip.......... 24 Resetting Handsets 25 Setting Up the Phonebook 25 Creating Phonebook Entries 25 Programming Base Speed Dial Numbers (DCT7565 Only 27 Deleting Base Speed Dial Numbers 27 2 Parts of the Handset .......... 7 DCT756 - Contents Welcome 5 Accessibility 5 Terminology used in this Manual 5 Product Overview...
English Owners Manual
Page 6
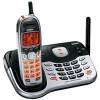
...off the cradle, no line has been activated. If you can change it is present. The handset is not in standby. Product Overview DCT7565/DCT756 Features: • 2.4GHz Digital Expandable System • Expands up to 4 Handsets • Caller ID/Call Waiting Deluxe • Base Keypad... (DCT7565 model only) • 100 shared Phonebook Entries/Caller ID Numbers • DirectLink™ • Room/Baby Monitoring • 20 Ringer Options (10 Tones/...
...off the cradle, no line has been activated. If you can change it is present. The handset is not in standby. Product Overview DCT7565/DCT756 Features: • 2.4GHz Digital Expandable System • Expands up to 4 Handsets • Caller ID/Call Waiting Deluxe • Base Keypad... (DCT7565 model only) • 100 shared Phonebook Entries/Caller ID Numbers • DirectLink™ • Room/Baby Monitoring • 20 Ringer Options (10 Tones/...

English Owners Manual
Page 7
Parts of the Handset 1.Handset Antenna 2.Headset Jack Cover 3.Beltclip Hole 4.Speakerphone Speaker and Ringer 5.Handset Battery Compartment 6.New Message LED 7.Handset Earpiece 8.LCD Display 9. [menu/clear] key 10.[redial/pause] key 11.[ /flash] key (talk/flash) 12.[ ] key (phonebook) 13.[*/tone/ key 21. DCT756 and DCT7565 - key (speaker) 22.Handset Microphone 23.Handset Charging Contacts 7
Parts of the Handset 1.Handset Antenna 2.Headset Jack Cover 3.Beltclip Hole 4.Speakerphone Speaker and Ringer 5.Handset Battery Compartment 6.New Message LED 7.Handset Earpiece 8.LCD Display 9. [menu/clear] key 10.[redial/pause] key 11.[ /flash] key (talk/flash) 12.[ ] key (phonebook) 13.[*/tone/ key 21. DCT756 and DCT7565 - key (speaker) 22.Handset Microphone 23.Handset Charging Contacts 7

English Owners Manual
Page 8
Registration button 8 Parts of the Base 30 30. DCT756 -
Registration button 8 Parts of the Base 30 30. DCT756 -

English Owners Manual
Page 14
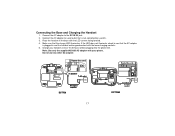
... AC adapter cord through the molded wiring channel as shown. 4. Align the mounting slots on the base with DCT7565 Base. Do not use an AC outlet controlled by a wall switch. Notes: • The DCT756 base is firmly seated. Plug the AC adapter into the telephone outlet. 7. Plug the telephone line cord... phone is not wall mountable. • Use only the supplied AD-800 AC adapter with the mounting posts on the wall. Wall Mounting the Base (DCT7565 Only) This phone can be mounted on any other AC adapter. 14 Plug the AC adapter into the notches on the base top. 2. DO NOT...
... AC adapter cord through the molded wiring channel as shown. 4. Align the mounting slots on the base with DCT7565 Base. Do not use an AC outlet controlled by a wall switch. Notes: • The DCT756 base is firmly seated. Plug the AC adapter into the telephone outlet. 7. Plug the telephone line cord... phone is not wall mountable. • Use only the supplied AD-800 AC adapter with the mounting posts on the wall. Wall Mounting the Base (DCT7565 Only) This phone can be mounted on any other AC adapter. 14 Plug the AC adapter into the notches on the base top. 2. DO NOT...
English Owners Manual
Page 17
... facing forward. 4. Note: Use only the supplied AD-800 AC adapter with your handset at least 15-20 hours before plugging into the phone line. DCT756 17 DCT7565 If the LED does not illuminate, check to the DC IN 9V jack. 2. Connect the AC adapter to see that the charge LED illuminates.
... facing forward. 4. Note: Use only the supplied AD-800 AC adapter with your handset at least 15-20 hours before plugging into the phone line. DCT756 17 DCT7565 If the LED does not illuminate, check to the DC IN 9V jack. 2. Connect the AC adapter to see that the charge LED illuminates.

English Owners Manual
Page 18
.... If your connection try making a call. Testing the Connection To test your call connects, the settings are fine. Change "dial mode" (instructions follow). 18 DCT756 Base Shown Installing the Belt Clip 1. Check the AC adapter cord. Connecting to the Phone Line Once the handset battery pack is fully charged, connect...
.... If your connection try making a call. Testing the Connection To test your call connects, the settings are fine. Change "dial mode" (instructions follow). 18 DCT756 Base Shown Installing the Belt Clip 1. Check the AC adapter cord. Connecting to the Phone Line Once the handset battery pack is fully charged, connect...
English Owners Manual
Page 22
... the voice mail number, follow the steps below: 1. Enter your phone company's voice messaging system, you receive a new voice mail message, the LED on the DCT7565 base for 5 seconds. Press when you with your personal access number (up to 20 digits). 5. Press [menu/clear]. 2. For a longer pause, press [redial/pause] multiple... before sending the next digits, press [redial/pause] to its original "no messages waiting" state. To reset, press and hold [find hs] on the DCT756 base or [mute/find hs] on the top of a button.
... the voice mail number, follow the steps below: 1. Enter your phone company's voice messaging system, you receive a new voice mail message, the LED on the DCT7565 base for 5 seconds. Press when you with your personal access number (up to 20 digits). 5. Press [menu/clear]. 2. For a longer pause, press [redial/pause] multiple... before sending the next digits, press [redial/pause] to its original "no messages waiting" state. To reset, press and hold [find hs] on the DCT756 base or [mute/find hs] on the top of a button.

English Owners Manual
Page 24
...ID number. Place the extra handset in the main base unit to the base by the factory. Registering DCX640 and DCX700 Handsets 1. For the DCT756, press and hold the registration button on the LCD display. CHARGE HANDSET ON THE BASE FOR REGISTRATION OR REFER TO OWNER'S MANUAL. (If... have not been registered display MODELS VARY! See Resetting Handsets on the LCD display. If REGISTRATION FAILED appears, please try these steps again. For the DCT7565 dualkeypad base, press and hold [#] until the charge LED starts to flash. 2. On the handset, press and hold [flash] until...
...ID number. Place the extra handset in the main base unit to the base by the factory. Registering DCX640 and DCX700 Handsets 1. For the DCT756, press and hold the registration button on the LCD display. CHARGE HANDSET ON THE BASE FOR REGISTRATION OR REFER TO OWNER'S MANUAL. (If... have not been registered display MODELS VARY! See Resetting Handsets on the LCD display. If REGISTRATION FAILED appears, please try these steps again. For the DCT7565 dualkeypad base, press and hold [#] until the charge LED starts to flash. 2. On the handset, press and hold [flash] until...
English Owners Manual
Page 39
... ID and Call Waiting can easily join a call already in a conference call on the DCT756 and up , return the handset to join the call is on the DCT7565 base to the cradle or press [ ] on hold ] on the DCT7565 base) to four people on Hold 1. Using Hold, Conference, and Transfer Placing a Call on... If you leave a caller on hold , press [ /flash] or [ ] on a handset or [speaker] on the DCT7565 base. The phone returns to the party on hold for more than ten seconds, the display screen will still be used. To return to the ...
... ID and Call Waiting can easily join a call already in a conference call on the DCT756 and up , return the handset to join the call is on the DCT7565 base to the cradle or press [ ] on hold ] on the DCT7565 base) to four people on Hold 1. Using Hold, Conference, and Transfer Placing a Call on... If you leave a caller on hold , press [ /flash] or [ ] on a handset or [speaker] on the DCT7565 base. The phone returns to the party on hold for more than ten seconds, the display screen will still be used. To return to the ...
English Owners Manual
Page 46
... on the back cover page. Caution: • Do not remove the batteries from fire or electrical shock, use only Uniden AD-800 (DCT7565) and AD-0005 (DCT756, DCX750) AC adapters and Uniden BT-909 battery pack with plain water. The contact information is removed. Dry the contacts thoroughly before returning the handset to...
... on the back cover page. Caution: • Do not remove the batteries from fire or electrical shock, use only Uniden AD-800 (DCT7565) and AD-0005 (DCT756, DCX750) AC adapters and Uniden BT-909 battery pack with plain water. The contact information is removed. Dry the contacts thoroughly before returning the handset to...

