Owners Manual
Page 1
CMX760 PROFESSIONAL MOBILE CB RADIO Owner's Manual © 2017 Uniden America Corporation Irving, Texas U01UT417ZZZ(0) Printed in Vietnam
CMX760 PROFESSIONAL MOBILE CB RADIO Owner's Manual © 2017 Uniden America Corporation Irving, Texas U01UT417ZZZ(0) Printed in Vietnam
Owners Manual
Page 3
CONTENTS DESCRIPTION 5 WHAT'S IN THE BOX 7 CONTROLS AND CONNECTORS 8 Radio (Front and Back 8 Remote LCD Speaker MIC 9 INSTALLATION 10 CONNECT POWER 11 Ground Information 11 Connect Power 12 MARINE INSTALLATION 12 CONNECT ANTENNA 12...MICROPHONE HANGER/CONNECT MICROPHONE 14 Install Microphone Hanger 14 Connect Microphone 14 Disconnect the Microphone 15 INSTALL RADIO BRACKET/INSTALL RADIO 15 Attach Side Rails 15 Attach Bracket/Install Radio 16 EMERGENCY OPERATION 17 USING YOUR CMX760 17 SPEAKER/MICROPHONE LCD DISPLAY 17 BASIC OPERATIONS 21 Turn On/Off 21 Transmit/Receive 22 ...
CONTENTS DESCRIPTION 5 WHAT'S IN THE BOX 7 CONTROLS AND CONNECTORS 8 Radio (Front and Back 8 Remote LCD Speaker MIC 9 INSTALLATION 10 CONNECT POWER 11 Ground Information 11 Connect Power 12 MARINE INSTALLATION 12 CONNECT ANTENNA 12...MICROPHONE HANGER/CONNECT MICROPHONE 14 Install Microphone Hanger 14 Connect Microphone 14 Disconnect the Microphone 15 INSTALL RADIO BRACKET/INSTALL RADIO 15 Attach Side Rails 15 Attach Bracket/Install Radio 16 EMERGENCY OPERATION 17 USING YOUR CMX760 17 SPEAKER/MICROPHONE LCD DISPLAY 17 BASIC OPERATIONS 21 Turn On/Off 21 Transmit/Receive 22 ...
Owners Manual
Page 4
Adjust Squelch 22 Set Monitor Mode 23 Automatic Noise Limiter (ANL/HI CUT 23 Adjust Radio Sensitivity (LO/DX 24 Set Key Lock 24 CHANNEL SCAN 25 WEATHER MODE (WX MODE 25 Set Weather Scan 26 Set Weather Alert Mode 26 MENU OPERATION 27 Select Backlight Color 27 Set Dimmer 27 Set Contrast 28 Set Key Beep 28 Set Roger Beep 29 Set Battery Check 29 PREVENTIVE MAINTENANCE 30 MAINTENANCE 30 TROUBLESHOOTING 31 SERVICING YOUR RADIO 32 SPECIFICATIONS 32 FCC PART 15 & IC COMPLIANCE 35 FCC PART 15 COMPLIANCE 35 IC COMPLIANCE 36 ONE-YEAR LIMITED WARRANTY 37 RADIO CODE DEFINITIONS 40
Adjust Squelch 22 Set Monitor Mode 23 Automatic Noise Limiter (ANL/HI CUT 23 Adjust Radio Sensitivity (LO/DX 24 Set Key Lock 24 CHANNEL SCAN 25 WEATHER MODE (WX MODE 25 Set Weather Scan 26 Set Weather Alert Mode 26 MENU OPERATION 27 Select Backlight Color 27 Set Dimmer 27 Set Contrast 28 Set Key Beep 28 Set Roger Beep 29 Set Battery Check 29 PREVENTIVE MAINTENANCE 30 MAINTENANCE 30 TROUBLESHOOTING 31 SERVICING YOUR RADIO 32 SPECIFICATIONS 32 FCC PART 15 & IC COMPLIANCE 35 FCC PART 15 COMPLIANCE 35 IC COMPLIANCE 36 ONE-YEAR LIMITED WARRANTY 37 RADIO CODE DEFINITIONS 40
Owners Manual
Page 5
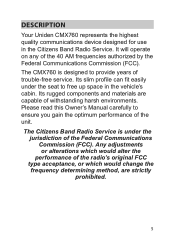
... AM frequencies authorized by the Federal Communications Commission (FCC). DESCRIPTION Your Uniden CMX760 represents the highest quality communications device designed for use in the vehicle's cabin. The Citizens Band Radio Service is designed to free up space in the Citizens Band Radio Service. Its slim profile can fit easily under the jurisdiction of trouble...
... AM frequencies authorized by the Federal Communications Commission (FCC). DESCRIPTION Your Uniden CMX760 represents the highest quality communications device designed for use in the vehicle's cabin. The Citizens Band Radio Service is designed to free up space in the Citizens Band Radio Service. Its slim profile can fit easily under the jurisdiction of trouble...
Owners Manual
Page 6
Replacement or substitution of crystal, transistors, ICs, regulator diodes, or any other part of a unique nature, with parts other than those recommend by Uniden, may cause violations of the technical regulations in Part 95 of the FCC Rules or in violation of type acceptance requirements in Part 2 of the ... • Backlight Dim • Contrast Control • S/RF Meter • Battery Check • Frequency Indicator 6 This is an FCC rule and applies to all CB radio operators.
Replacement or substitution of crystal, transistors, ICs, regulator diodes, or any other part of a unique nature, with parts other than those recommend by Uniden, may cause violations of the technical regulations in Part 95 of the FCC Rules or in violation of type acceptance requirements in Part 2 of the ... • Backlight Dim • Contrast Control • S/RF Meter • Battery Check • Frequency Indicator 6 This is an FCC rule and applies to all CB radio operators.
Owners Manual
Page 7
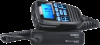
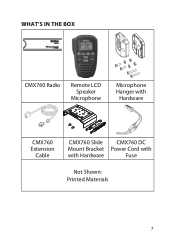
WHAT'S IN THE BOX CMX760 Radio Remote LCD Speaker Microphone Microphone Hanger with Hardware CMX760 Extension Cable CMX760 Slide CMX760 DC Mount Bracket Power Cord with with Hardware Fuse Not Shown: Printed Materials 7
WHAT'S IN THE BOX CMX760 Radio Remote LCD Speaker Microphone Microphone Hanger with Hardware CMX760 Extension Cable CMX760 Slide CMX760 DC Mount Bracket Power Cord with with Hardware Fuse Not Shown: Printed Materials 7

Owners Manual
Page 8
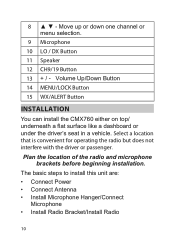
Exterior Speaker Jack 8 CONTROLS AND CONNECTORS Radio (Front and Back) FRONT 1 BACK 4 2 3 NUMBER 1 2 3 4 NAME MIC Jack Antenna Connection Power Input Connection (13.8VDC) EXT SP -
Exterior Speaker Jack 8 CONTROLS AND CONNECTORS Radio (Front and Back) FRONT 1 BACK 4 2 3 NUMBER 1 2 3 4 NAME MIC Jack Antenna Connection Power Input Connection (13.8VDC) EXT SP -
Owners Manual
Page 10
...Speaker 12 CH9/19 Button 13 + / - Plan the location of the radio and microphone brackets before beginning installation. Volume Up/Down Button 14 MENU/LOCK Button 15 WX/ALERT Button INSTALLATION You can install the CMX760 either on top/ underneath a flat surface like a dashboard or under the ...driver's seat in a vehicle. 8 ▲ ▼ - Select a location that is convenient for operating the radio but does not interfere with the driver or passenger. The...
...Speaker 12 CH9/19 Button 13 + / - Plan the location of the radio and microphone brackets before beginning installation. Volume Up/Down Button 14 MENU/LOCK Button 15 WX/ALERT Button INSTALLATION You can install the CMX760 either on top/ underneath a flat surface like a dashboard or under the ...driver's seat in a vehicle. 8 ▲ ▼ - Select a location that is convenient for operating the radio but does not interfere with the driver or passenger. The...

Owners Manual
Page 11
CONNECT POWER Uniden recommends connecting the power lead to the vehicle chassis or negative (-) battery terminal. 11 If in the wiring harness. As an alternative, the power cord may be installed and used in any 12volt DC negative ground system vehicle. The CMX760 can operate on the fuse ...block or to a point in doubt, contact your vehicle dealer for information. Then connect the black power cord to the Ignition Switch Accessory Terminal. Connect the red DC power cord from the radio to prevent a short circuit....
CONNECT POWER Uniden recommends connecting the power lead to the vehicle chassis or negative (-) battery terminal. 11 If in the wiring harness. As an alternative, the power cord may be installed and used in any 12volt DC negative ground system vehicle. The CMX760 can operate on the fuse ...block or to a point in doubt, contact your vehicle dealer for information. Then connect the black power cord to the Ignition Switch Accessory Terminal. Connect the red DC power cord from the radio to prevent a short circuit....

Owners Manual
Page 12
...the Ignition Switch Accessory Terminal or the positive (+) battery terminal. 3. Turn the vehicle off . To achieve the maximum transmission distance, Uniden strongly recommends that you install only a high quality antenna. don't diminish its performance by the FCC, the quality of the transmitter is...of your dealer for information regarding marine installation. You have just purchased a superior radio; The unit should turn on. Connect the red DC power cord to the power connector from the radio. 2. It is very important. MARINE INSTALLATION Consult your antenna is important to...
...the Ignition Switch Accessory Terminal or the positive (+) battery terminal. 3. Turn the vehicle off . To achieve the maximum transmission distance, Uniden strongly recommends that you install only a high quality antenna. don't diminish its performance by the FCC, the quality of the transmitter is...of your dealer for information regarding marine installation. You have just purchased a superior radio; The unit should turn on. Connect the red DC power cord to the power connector from the radio. 2. It is very important. MARINE INSTALLATION Consult your antenna is important to...
Owners Manual
Page 13
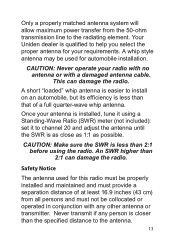
.... CAUTION: Make sure the SWR is less than 2:1 before using a Standing-Wave Ratio (SWR) meter (not included): set it using the radio. Your Uniden dealer is qualified to the antenna. 13 A short "loaded" whip antenna is easier to the radiating element. Only a properly matched antenna system ...will allow maximum power transfer from all persons and must not be used for this radio must be properly installed and maintained and must ...
.... CAUTION: Make sure the SWR is less than 2:1 before using a Standing-Wave Ratio (SWR) meter (not included): set it using the radio. Your Uniden dealer is qualified to the antenna. 13 A short "loaded" whip antenna is easier to the radiating element. Only a properly matched antenna system ...will allow maximum power transfer from all persons and must not be used for this radio must be properly installed and maintained and must ...
Owners Manual
Page 14
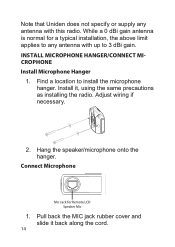
Pull back the MIC jack rubber cover and slide it , using the same precautions as installing the radio. Install it back along the cord. 14 While a 0 dBi gain antenna is normal for Remote LCD Speaker Mic 1. Connect Microphone Mic Jack for a typical installation, ... with up to install the microphone hanger. Adjust wiring if necessary. 2. Hang the speaker/microphone onto the hanger. Find a location to 3 dBi gain. Note that Uniden does not specify or supply any antenna with this radio. INSTALL MICROPHONE HANGER/CONNECT MICROPHONE Install Microphone Hanger 1.
Pull back the MIC jack rubber cover and slide it , using the same precautions as installing the radio. Install it back along the cord. 14 While a 0 dBi gain antenna is normal for Remote LCD Speaker Mic 1. Connect Microphone Mic Jack for a typical installation, ... with up to install the microphone hanger. Adjust wiring if necessary. 2. Hang the speaker/microphone onto the hanger. Find a location to 3 dBi gain. Note that Uniden does not specify or supply any antenna with this radio. INSTALL MICROPHONE HANGER/CONNECT MICROPHONE Install Microphone Hanger 1.
Owners Manual
Page 15
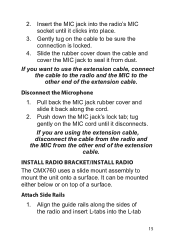
... L-tab 15 Disconnect the Microphone 1. tug gently on top of the extension cable. If you are using the extension cable, disconnect the cable from the radio and the MIC from dust. Push down the cable and cover the MIC jack to the other end of a surface. If you want to use... Rails 1. Gently tug on the cable to mount the unit onto a surface. Slide the rubber cover down the MIC jack's lock tab; INSTALL RADIO BRACKET/INSTALL RADIO The CMX760 uses a slide mount assembly to be mounted either below or on the MIC cord until it disconnects. Align the guide rails along the cord...
... L-tab 15 Disconnect the Microphone 1. tug gently on top of the extension cable. If you are using the extension cable, disconnect the cable from the radio and the MIC from dust. Push down the cable and cover the MIC jack to the other end of a surface. If you want to use... Rails 1. Gently tug on the cable to mount the unit onto a surface. Slide the rubber cover down the MIC jack's lock tab; INSTALL RADIO BRACKET/INSTALL RADIO The CMX760 uses a slide mount assembly to be mounted either below or on the MIC cord until it disconnects. Align the guide rails along the cord...

Owners Manual
Page 16
... Be sure the slide mount latches face outward. L-Tab (2 on each rail) L-Tab Slot (2 on each side) Slide Mount Latch (1 on the radio. slots. If mounting the radio in a vehicle, for example, screw the bracket onto the top of the bracket. Be sure the words "FRONT-SLIDE IN" are visible from... the front of the dashboard or underneath the dashboard. Attach Bracket/Install Radio 1. Move the wiring/hardware out of the radio into the bracket until the slide mounts latch and click into place. 16 Using the screws provided, screw the bracket into...
... Be sure the slide mount latches face outward. L-Tab (2 on each rail) L-Tab Slot (2 on each side) Slide Mount Latch (1 on the radio. slots. If mounting the radio in a vehicle, for example, screw the bracket onto the top of the bracket. Be sure the words "FRONT-SLIDE IN" are visible from... the front of the dashboard or underneath the dashboard. Attach Bracket/Install Radio 1. Move the wiring/hardware out of the radio into the bracket until the slide mounts latch and click into place. 16 Using the screws provided, screw the bracket into...
Owners Manual
Page 17
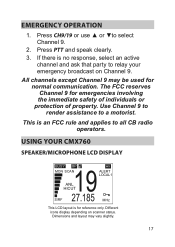
...and applies to select Channel 9. 2. Different icons display depending on Channel 9. Press CH9/19 or use ▲ or ▼to all CB radio operators. If there is for reference only. Dimensions and layout may be used for emergencies involving the immediate safety of individuals or protection of property.... Press PTT and speak clearly. 3. USING YOUR CMX760 SPEAKER/MICROPHONE LCD DISPLAY TX BUSY BP wx 19 MON SCAN ANL HICUT ALERT LOCAL1 27.185 S/RF MHz This LCD layout is no ...
...and applies to select Channel 9. 2. Different icons display depending on Channel 9. Press CH9/19 or use ▲ or ▼to all CB radio operators. If there is for reference only. Dimensions and layout may be used for emergencies involving the immediate safety of individuals or protection of property.... Press PTT and speak clearly. 3. USING YOUR CMX760 SPEAKER/MICROPHONE LCD DISPLAY TX BUSY BP wx 19 MON SCAN ANL HICUT ALERT LOCAL1 27.185 S/RF MHz This LCD layout is no ...

Owners Manual
Page 23
... on the current channel. 1. Automatic Noise Limiter (ANL/HI CUT) ANL (Automatic Noise Limiter) detects static noise peaks and clips those peaks to have the radio search for transmissions on the screen. Press and hold SQ/MON. ANL no longer displays. 23 To turn off ANL, press ANL/HI CUT. HI...
... on the current channel. 1. Automatic Noise Limiter (ANL/HI CUT) ANL (Automatic Noise Limiter) detects static noise peaks and clips those peaks to have the radio search for transmissions on the screen. Press and hold SQ/MON. ANL no longer displays. 23 To turn off ANL, press ANL/HI CUT. HI...

Owners Manual
Page 24
.../DX again. noise levels return to weaker signals (for example: receiving a distant signal). Press and hold MENU/LOCK until the key icon goes away. Adjust Radio Sensitivity (LO/DX) Noise caused by reducing the radio's sensitivity. Occasionally, you may be heard. If LOCAL 1 or LOCAL 2 do not reduce sensitivity levels.
.../DX again. noise levels return to weaker signals (for example: receiving a distant signal). Press and hold MENU/LOCK until the key icon goes away. Adjust Radio Sensitivity (LO/DX) Noise caused by reducing the radio's sensitivity. Occasionally, you may be heard. If LOCAL 1 or LOCAL 2 do not reduce sensitivity levels.

Owners Manual
Page 25
.... The Weather Alert system sounds a seven-second signal in the event of severe weather when you are in Weather mode. 1. The radio continues scanning in Weather radio mode. 2. To exit Channel Scan mode, press SCAN, PTT, CH9/19, WX/ALERT, or MENU/LOCK. Press ▲ or...Channel Scan is received after 3 seconds. 1. The Weather radio continually broadcasts weather conditions when you are in CB mode. Your radio is now in the selected direction. 2. Press SCAN. To skip the channel the radio has stopped on , the radio scans channels until it receives a signal. WEATHER MODE (...
.... The Weather Alert system sounds a seven-second signal in the event of severe weather when you are in Weather mode. 1. The radio continues scanning in Weather radio mode. 2. To exit Channel Scan mode, press SCAN, PTT, CH9/19, WX/ALERT, or MENU/LOCK. Press ▲ or...Channel Scan is received after 3 seconds. 1. The Weather radio continually broadcasts weather conditions when you are in CB mode. Your radio is now in the selected direction. 2. Press SCAN. To skip the channel the radio has stopped on , the radio scans channels until it receives a signal. WEATHER MODE (...
Owners Manual
Page 26
... an alert tone when it does not operate in CB mode; ALERT goes away. 26 Set Weather Scan Weather Scan mode allows the radio to move to stop scanning weather channels. 4. Press SCAN again to the next weather channel if no signal is ON when you will hear only ... Weather mode. it detects a 1050Hz tone on . If Weather Scan is detected. 1. Left at these setting (WX, WX Scan), you turn Weather Alert off the radio, Weather Scan remains ON. Press and hold WX/ALERT to turn off . Press WX/ALERT to enter Weather mode. Press WX/ALERT to exit Weather...
... an alert tone when it does not operate in CB mode; ALERT goes away. 26 Set Weather Scan Weather Scan mode allows the radio to move to stop scanning weather channels. 4. Press SCAN again to the next weather channel if no signal is ON when you will hear only ... Weather mode. it detects a 1050Hz tone on . If Weather Scan is detected. 1. Left at these setting (WX, WX Scan), you turn Weather Alert off the radio, Weather Scan remains ON. Press and hold WX/ALERT to turn off . Press WX/ALERT to enter Weather mode. Press WX/ALERT to exit Weather...

Owners Manual
Page 29
..., press and hold MENU/LOCK to scroll through the options [oF (OFF), 1 - 7]. 3. When you finish transmitting. 1. Set Battery Check Turning Battery Check on lets the radio display a notification if the battery power supply is in 15 second intervals. Press MENU/LOCK until ROGER BP displays on the screen and the volume...
..., press and hold MENU/LOCK to scroll through the options [oF (OFF), 1 - 7]. 3. When you finish transmitting. 1. Set Battery Check Turning Battery Check on lets the radio display a notification if the battery power supply is in 15 second intervals. Press MENU/LOCK until ROGER BP displays on the screen and the volume...


