
English Owners Manual
Page 10
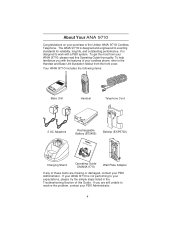
...help familiarize you are missing or damaged, contact your expectations, please try the simple steps listed in the Troubleshooting Section of the Uniden ANA 9710 Cordless Telephone. Your ANA 9710 includes the following items: Base Unit Handset Telephone Cord 2 AC Adapters Rechargeable Battery (BT2499...) Beltclip (EXP9702) Charging Stand Operating Guide OMANA 9710 Wall Plate Adapter If any of your cordless phone, refer to your PBX Administrator. It is designed and engineered to resolve the problem, contact your ANA 9710, please read ...
...help familiarize you are missing or damaged, contact your expectations, please try the simple steps listed in the Troubleshooting Section of the Uniden ANA 9710 Cordless Telephone. Your ANA 9710 includes the following items: Base Unit Handset Telephone Cord 2 AC Adapters Rechargeable Battery (BT2499...) Beltclip (EXP9702) Charging Stand Operating Guide OMANA 9710 Wall Plate Adapter If any of your cordless phone, refer to your PBX Administrator. It is designed and engineered to resolve the problem, contact your ANA 9710, please read ...

English Owners Manual
Page 11
.... Telephone Line Problems The FCC and IC have rated this product. Caution: Changes or modifications to this product not expressly approved by Uniden, or operation of your household wiring and damage any appliance during an electrical storm. We have granted the telephone company the right to... range by transmitting and receiving according to the highest specifications set forth by this Operating Guide, could void your authority to operate this phone to operate at a maximum distance with your telephone company must leave it disconnected until the trouble has been corrected. 5 If you ...
.... Telephone Line Problems The FCC and IC have rated this product. Caution: Changes or modifications to this product not expressly approved by Uniden, or operation of your household wiring and damage any appliance during an electrical storm. We have granted the telephone company the right to... range by transmitting and receiving according to the highest specifications set forth by this Operating Guide, could void your authority to operate this phone to operate at a maximum distance with your telephone company must leave it disconnected until the trouble has been corrected. 5 If you ...
English Owners Manual
Page 12
...on the unit is experienced, moving the cordless telephone farther away from another cordless telephone or another source of interference. Privacy Note: Cordless phones are radio devices. Finally, it should not be placed near or on your office to select a channel that the antenna on different... or distracting transmissions on top of a TV or VCR. If these noises continue and are too distracting, please check around your phone, you consistently hear other than one cordless telephone in your own cordless telephone unit. Be certain that provides the clearest communication. To...
...on the unit is experienced, moving the cordless telephone farther away from another cordless telephone or another source of interference. Privacy Note: Cordless phones are radio devices. Finally, it should not be placed near or on your office to select a channel that the antenna on different... or distracting transmissions on top of a TV or VCR. If these noises continue and are too distracting, please check around your phone, you consistently hear other than one cordless telephone in your own cordless telephone unit. Be certain that provides the clearest communication. To...
English Owners Manual
Page 14
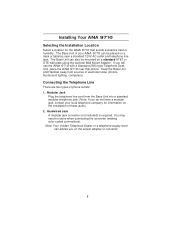
... a modular jack, contact your ANA 9710 can also be placed on the installation of your local telephone company for the ANA 9710 that phone. Connecting the Telephone Line There are two types of electrical noise (motors, fluorescent lighting, computers). The Base Unit can be mounted on ...jack converter (not included) is required. If you on a standard AT&T or GTE wall plate using the optional Wall Mount Adapter. Note: Your Uniden Telephone Dealer or a telephone supply store can advise you will use the ANA 9710 with a Standard 2500 type Telephone Desk Unit, place the ANA ...
... a modular jack, contact your ANA 9710 can also be placed on the installation of your local telephone company for the ANA 9710 that phone. Connecting the Telephone Line There are two types of electrical noise (motors, fluorescent lighting, computers). The Base Unit can be mounted on ...jack converter (not included) is required. If you on a standard AT&T or GTE wall plate using the optional Wall Mount Adapter. Note: Your Uniden Telephone Dealer or a telephone supply store can advise you will use the ANA 9710 with a Standard 2500 type Telephone Desk Unit, place the ANA ...
English Owners Manual
Page 15
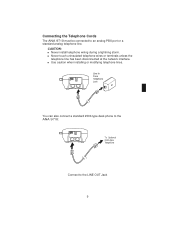
n Never touch uninsulated telephone wires or terminals unless the telephone line has been disconnected at the network interface. You can also connect a standard 2500-type desk phone to the ANA 9710: Connect to an analog PBX port or a standard analog telephone line. n Use caution when installing or modifying telephone lines. Connecting the Telephone Cords The ANA 9710 must be connected to the LINE OUT Jack 9 CAUTION: n Never install telephone wiring during a lightning storm.
n Never touch uninsulated telephone wires or terminals unless the telephone line has been disconnected at the network interface. You can also connect a standard 2500-type desk phone to the ANA 9710: Connect to an analog PBX port or a standard analog telephone line. n Use caution when installing or modifying telephone lines. Connecting the Telephone Cords The ANA 9710 must be connected to the LINE OUT Jack 9 CAUTION: n Never install telephone wiring during a lightning storm.
English Owners Manual
Page 18
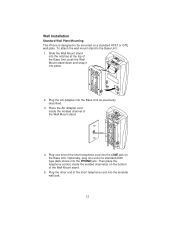
Wall Installation Standard Wall Plate Mounting This Phone is designed to the Base Unit: 1. Optionally, plug one end of the Base Unit, push the Wall Mount stand down and snap it into place. 2. ... the AC Adapter cord inside the molded channel(s) on the bottom of the short telephone cord into the PHONE jack. Then place the telephone cord(s) inside the molded channel of a standard 2500 type desk phone into the modular wall jack. 12 Plug the other end of the Wall Mount stand. 5. To attach...
Wall Installation Standard Wall Plate Mounting This Phone is designed to the Base Unit: 1. Optionally, plug one end of the Base Unit, push the Wall Mount stand down and snap it into place. 2. ... the AC Adapter cord inside the molded channel(s) on the bottom of the short telephone cord into the PHONE jack. Then place the telephone cord(s) inside the molded channel of a standard 2500 type desk phone into the modular wall jack. 12 Plug the other end of the Wall Mount stand. 5. To attach...
English Owners Manual
Page 19
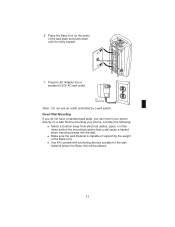
Direct Wall Mounting If you do not have a standard wall plate, you can mount your phone, consider the following: n Select a location away from electrical cables, pipes, or other items behind the mounting location that could cause a hazard when inserting screws into a ... capable of supporting the weight of the wall plate and push down until it's firmly seated. 7. 6. Place the Base Unit on a wall. Before mounting your phone directly on the posts of the Base Unit.
Direct Wall Mounting If you do not have a standard wall plate, you can mount your phone, consider the following: n Select a location away from electrical cables, pipes, or other items behind the mounting location that could cause a hazard when inserting screws into a ... capable of supporting the weight of the wall plate and push down until it's firmly seated. 7. 6. Place the Base Unit on a wall. Before mounting your phone directly on the posts of the Base Unit.
English Owners Manual
Page 20
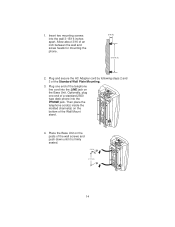
... Plate Mounting. 3. Plug and secure the AC Adapter cord by following steps 2 and 3 of an inch between the wall and screw heads for mounting the phone. 2. Optionally, plug one end of the telephone line cord into the LINE jack on the bottom of the Wall Mount stand. 4. 1. Plug one end of... Then place the telephone cord(s) inside the molded channel(s) on the Base Unit. Place the Base Unit on the posts of a standard 2500 type desk phone into the wall 3-15/16 inches apart.
... Plate Mounting. 3. Plug and secure the AC Adapter cord by following steps 2 and 3 of an inch between the wall and screw heads for mounting the phone. 2. Optionally, plug one end of the telephone line cord into the LINE jack on the bottom of the Wall Mount stand. 4. 1. Plug one end of... Then place the telephone cord(s) inside the molded channel(s) on the Base Unit. Place the Base Unit on the posts of a standard 2500 type desk phone into the wall 3-15/16 inches apart.

English Owners Manual
Page 21
... Charging Unit will be wall mounted. Wrap the AC Adapter cord around the strain relief. 15 Before mounting your phone directly on a wall. 5. n Use #10 screws with anchoring devices suitable for mounting the phone. 2. Insert two mounting screws into the Charging Unit as previously described. Charging Unit Wall Mounting The Charging Unit...
... Charging Unit will be wall mounted. Wrap the AC Adapter cord around the strain relief. 15 Before mounting your phone directly on a wall. 5. n Use #10 screws with anchoring devices suitable for mounting the phone. 2. Insert two mounting screws into the Charging Unit as previously described. Charging Unit Wall Mounting The Charging Unit...

English Owners Manual
Page 31
..., enter the number you finish the call, place the Handset back in the Charging Unit. AutoStandby automatically hangs up the phone. -OR- The AutoTalk feature allows you to hang up the phone Making a Call Press talk. Answering a Call When you receive a call, the Handset rings and you finish the call, press the...
..., enter the number you finish the call, place the Handset back in the Charging Unit. AutoStandby automatically hangs up the phone. -OR- The AutoTalk feature allows you to hang up the phone Making a Call Press talk. Answering a Call When you receive a call, the Handset rings and you finish the call, press the...

English Owners Manual
Page 34
You will redial the last number called , press talk, then rdl. The phone will hear a "beep". Press desired function. REDIAL To dial the last number called . Press once to resume the call (local hold). Function Keys HOLD Press ...
You will redial the last number called , press talk, then rdl. The phone will hear a "beep". Press desired function. REDIAL To dial the last number called . Press once to resume the call (local hold). Function Keys HOLD Press ...

English Owners Manual
Page 36
Press mem. Enter 5551234. Press mem. 2. Example: Store 555-1234 in memory location 12: A. B. D. Enter the memory location number (01) to (20) you will hear a long beep and see : The phone then returns to Standby. Press mem. Erasing a Stored Number 1. The Handset beeps. Press 12. Press mem. 3. This is confirmation that you have programmed 5551234 into memory location 12 and you want to Standby mode. C. 5. The ANA 9710 then returns to clear. You will see : 30
Press mem. Enter 5551234. Press mem. 2. Example: Store 555-1234 in memory location 12: A. B. D. Enter the memory location number (01) to (20) you will hear a long beep and see : The phone then returns to Standby. Press mem. Erasing a Stored Number 1. The Handset beeps. Press 12. Press mem. 3. This is confirmation that you have programmed 5551234 into memory location 12 and you want to Standby mode. C. 5. The ANA 9710 then returns to clear. You will see : 30

English Owners Manual
Page 37
Dialing with a Stored Number Note: The following applies when the phone is in Standby Mode, and you can automatically dial that number by pressing the talk key. 1. Search automatically starts at memory Location 01. (If Memory ... press r/vol to move to find the number you need. B.You can search all 20 Memory Locations to the previous used Programmed Memory Location. The phone automatically dials the number shown. Once you have found the number, you have a stored number, search will display the first stored number.) 2. Press r/vol to...
Dialing with a Stored Number Note: The following applies when the phone is in Standby Mode, and you can automatically dial that number by pressing the talk key. 1. Search automatically starts at memory Location 01. (If Memory ... press r/vol to move to find the number you need. B.You can search all 20 Memory Locations to the previous used Programmed Memory Location. The phone automatically dials the number shown. Once you have found the number, you have a stored number, search will display the first stored number.) 2. Press r/vol to...

English Owners Manual
Page 38
Pressing the mute key, you will move down through the Memory (1 to 20). The phone dials the number. 32 Pressing r/vol you will then automatically dial the number. The phone will move up through the Memory (20 to locate the number in Memory. 3. Once you reach the desired Memory Location. 4. Press r/vol or...
Pressing the mute key, you will move down through the Memory (1 to 20). The phone dials the number. 32 Pressing r/vol you will then automatically dial the number. The phone will move up through the Memory (20 to locate the number in Memory. 3. Once you reach the desired Memory Location. 4. Press r/vol or...

English Owners Manual
Page 39
...ANA 9710 is connected to , press hold on the Base unit then pick up the desk top phone. 2. The power/status LED (2) blinks whenever the Handset is connected to a call. 1. ... the Handset, press hold button (1) is used in order for the page/find button (3) is used to a desk top phone. 1. Page/Find Button Using the Hold The hold on the Base unit, then press talk on and set to Type A,... B or C in conjunction with a desk top phone to switch from the Handset to locate the Handset. Note: The Handset Ringer must be on the Handset. Using...
...ANA 9710 is connected to , press hold on the Base unit then pick up the desk top phone. 2. The power/status LED (2) blinks whenever the Handset is connected to a call. 1. ... the Handset, press hold button (1) is used in order for the page/find button (3) is used to a desk top phone. 1. Page/Find Button Using the Hold The hold on the Base unit, then press talk on and set to Type A,... B or C in conjunction with a desk top phone to switch from the Handset to locate the Handset. Note: The Handset Ringer must be on the Handset. Using...
English Owners Manual
Page 41
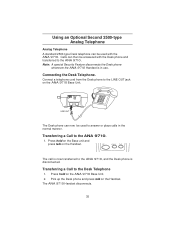
... on the Base unit and press talk on the ANA 9710 Base Unit. 2. Note: A special Security Feature disconnects the Desk phone whenever the ANA 9710 Handset is disconnected. The Desk phone can then be answered with the ANA 9710. Press hold on the Handset. Calls can now be used with the Desk... phone and transferred to the ANA 9710. Transferring a Call to the LINE OUT jack on the Handset. Transferring a Call to the Desk Telephone 1. The call is ...
... on the Base unit and press talk on the ANA 9710 Base Unit. 2. Note: A special Security Feature disconnects the Desk phone whenever the ANA 9710 Handset is disconnected. The Desk phone can then be answered with the ANA 9710. Press hold on the Handset. Calls can now be used with the Desk... phone and transferred to the ANA 9710. Transferring a Call to the LINE OUT jack on the Handset. Transferring a Call to the Desk Telephone 1. The call is ...

