
English Owners Manual
Page 9
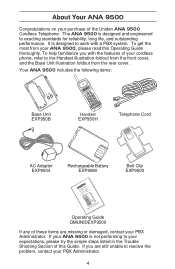
To get the most from the rear cover. The ANA 9500 is designed and engineered to work with the features of your cordless phone, refer to your purchase of the Uniden ANA 9500 Cordless Telephone. Your ANA 9500 includes the following items: CHARGE POWER CBHAATTRGE IN USE/HOLD PAGE/FIND Base Unit EXP950B...
To get the most from the rear cover. The ANA 9500 is designed and engineered to work with the features of your cordless phone, refer to your purchase of the Uniden ANA 9500 Cordless Telephone. Your ANA 9500 includes the following items: CHARGE POWER CBHAATTRGE IN USE/HOLD PAGE/FIND Base Unit EXP950B...
English Owners Manual
Page 11
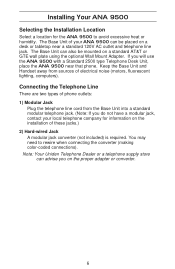
...the optional Wall Mount Adapter. The Base Unit of electrical noise (motors, fluorescent lighting, computers). Connecting the Telephone Line There are two types of phone outlets: 1) Modular Jack Plug the telephone line cord from sources of your local telephone company for the ANA 9500 to rewire when connecting the ... Location Select a location for information on the installation of these jacks.) 2) Hard-wired Jack A modular jack converter (not included) is required. Note: Your Uniden Telephone Dealer or a telephone supply store can also be placed on a desk or tabletop near that...
...the optional Wall Mount Adapter. The Base Unit of electrical noise (motors, fluorescent lighting, computers). Connecting the Telephone Line There are two types of phone outlets: 1) Modular Jack Plug the telephone line cord from sources of your local telephone company for the ANA 9500 to rewire when connecting the ... Location Select a location for information on the installation of these jacks.) 2) Hard-wired Jack A modular jack converter (not included) is required. Note: Your Uniden Telephone Dealer or a telephone supply store can also be placed on a desk or tabletop near that...
English Owners Manual
Page 12
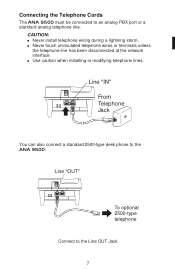
n Use caution when installing or modifying telephone lines. n Never touch uninsulated telephone wires or terminals unless the telephone line has been disconnected at the network interface. Line "IN" From Telephone Jack You can also connect a standard 2500-type desk phone to the ANA 9500: Line "OUT" To optional 2500-type telephone Connect to an analog PBX port or a standard analog telephone line. CAUTION: n Never install telephone wiring during a lightning storm. Connecting the Telephone Cords The ANA 9500 must be connected to the Line OUT Jack 7
n Use caution when installing or modifying telephone lines. n Never touch uninsulated telephone wires or terminals unless the telephone line has been disconnected at the network interface. Line "IN" From Telephone Jack You can also connect a standard 2500-type desk phone to the ANA 9500: Line "OUT" To optional 2500-type telephone Connect to an analog PBX port or a standard analog telephone line. CAUTION: n Never install telephone wiring during a lightning storm. Connecting the Telephone Cords The ANA 9500 must be connected to the Line OUT Jack 7
English Owners Manual
Page 14
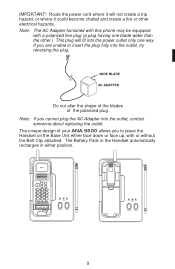
... it could become chafed and create a fire or other electrical hazards. The unique design of the polarized plug. Note: The AC Adapter furnished with this phone may be equipped with or without the Belt Clip attached. TALK XFER HOLD CONF MEMO 1 2 3 ABC DEF 4 5 6 GHI JKL MNO 7 8 9 PRS TUV WXY , 0 # OPER F1...
... it could become chafed and create a fire or other electrical hazards. The unique design of the polarized plug. Note: The AC Adapter furnished with this phone may be equipped with or without the Belt Clip attached. TALK XFER HOLD CONF MEMO 1 2 3 ABC DEF 4 5 6 GHI JKL MNO 7 8 9 PRS TUV WXY , 0 # OPER F1...

English Owners Manual
Page 20
... Tone Line in Use Error Tone When communication is made between the Base Unit and the Handset, the screen will go to "Standby", and the phone is at the range limit of the following action: LCD Display NO SERVICE SYSTEM BUSY LINE IN USE Condition Action During a Call Warning Tone Move... back in range within 20 seconds In Standby Mode Can't make or answer calls (Phone may ring intermittently) Move back within range. 15 If the Handset is ready to use.
... Tone Line in Use Error Tone When communication is made between the Base Unit and the Handset, the screen will go to "Standby", and the phone is at the range limit of the following action: LCD Display NO SERVICE SYSTEM BUSY LINE IN USE Condition Action During a Call Warning Tone Move... back in range within 20 seconds In Standby Mode Can't make or answer calls (Phone may ring intermittently) Move back within range. 15 If the Handset is ready to use.

English Owners Manual
Page 21
... Base Unit Pick up .) Press TALK. The TALK LED will light, and you'll see : Handset on the Base Unit. AutoStandby automatically hangs up the phone. -OR- The AutoTalk feature allows you are calling. (You can also dial from memory. AutoStandby automatically hangs up the... phone. -OR- Press TALK to hang up the phone. Answering a Call When you receive a call, the Handset rings and you'll see : If the Line is on the Base Unit. Press TALK to answer...
... Base Unit Pick up .) Press TALK. The TALK LED will light, and you'll see : Handset on the Base Unit. AutoStandby automatically hangs up the phone. -OR- The AutoTalk feature allows you are calling. (You can also dial from memory. AutoStandby automatically hangs up the... phone. -OR- Press TALK to hang up the phone. Answering a Call When you receive a call, the Handset rings and you'll see : If the Line is on the Base Unit. Press TALK to answer...

English Owners Manual
Page 24
... Section for Memory Search.) The SEARCH LED remains lit during the Search operation. 19 The REDIAL LED lights momentarily while the Key is pressed. The phone will redial the last number called , press TALK, then F3 (REDIAL). REDIAL (F3) To dial the last number called . The FLASH LED lights momentarily while...
... Section for Memory Search.) The SEARCH LED remains lit during the Search operation. 19 The REDIAL LED lights momentarily while the Key is pressed. The phone will redial the last number called , press TALK, then F3 (REDIAL). REDIAL (F3) To dial the last number called . The FLASH LED lights momentarily while...

English Owners Manual
Page 26
Erasing a Stored Number 1. Press MEMO 3. Press TALK 2. Press MEMO 21 Enter 5551234 c. Press MEMO d. You will hear a long beep and see : The phone then returns to clear. Press 12 The Handset beeps confirmation and you have already established a connection between Handset and Base Unit. 1. Example: Store 555-1234 in Standby Mode, and you see : Dialing with a Stored Number NOTE: The following applies when the phone is in memory location 12: a. Press MEMO 2. Press MEMO b. Enter the memory location number (01) to (20) you want to Standby.
Erasing a Stored Number 1. Press MEMO 3. Press TALK 2. Press MEMO 21 Enter 5551234 c. Press MEMO d. You will hear a long beep and see : The phone then returns to clear. Press 12 The Handset beeps confirmation and you have already established a connection between Handset and Base Unit. 1. Example: Store 555-1234 in Standby Mode, and you see : Dialing with a Stored Number NOTE: The following applies when the phone is in memory location 12: a. Press MEMO 2. Press MEMO b. Enter the memory location number (01) to (20) you want to Standby.

English Owners Manual
Page 27
...TALK. a. Press v (VOL) again to move to a previous Memory Location. 3.c. Once you need. Enter the Memory Location (01 - 20) The phone automatically dials the number shown. If you press w at Memory Location 01, you can also press w (MUTE) to move directly to find the number you... have a stored number, v will then automatically dial the number. 22 The phone will display the first stored number. 3. You can automatically dial that number. 1. Memory Search You can search all 20 Memory Locations to location 20. ...
...TALK. a. Press v (VOL) again to move to a previous Memory Location. 3.c. Once you need. Enter the Memory Location (01 - 20) The phone automatically dials the number shown. If you press w at Memory Location 01, you can also press w (MUTE) to move directly to find the number you... have a stored number, v will then automatically dial the number. 22 The phone will display the first stored number. 3. You can automatically dial that number. 1. Memory Search You can search all 20 Memory Locations to location 20. ...

English Owners Manual
Page 28
Press v (VOL) or w (MUTE) as needed for Long Distance Access Codes or Account Access Numbers. 1. Once you are on the call . The SEARCH LED goes out, and the phone dials the number. 23 Chain Dialing You can dial any stored number while you are on a call , press SEARCH (F4). The SEARCH LED lights. 2. This is sometimes needed to locate the number in Memory. 3. While you have the desired number, press TALK.
Press v (VOL) or w (MUTE) as needed for Long Distance Access Codes or Account Access Numbers. 1. Once you are on the call . The SEARCH LED goes out, and the phone dials the number. 23 Chain Dialing You can dial any stored number while you are on a call , press SEARCH (F4). The SEARCH LED lights. 2. This is sometimes needed to locate the number in Memory. 3. While you have the desired number, press TALK.

English Owners Manual
Page 31
To install the Backup Adapter: 1. Disconnect the Standard AC Adapter from the EXP9505 into the jack of the Base Unit. To Phone From AC Adapter Backup AC Adapter 26 Plug the AC Adapter into the DC IN jack of the EXP9505. 3. Optional Backup AC Adapter (EXP9505) The Optional Backup AC Adapter provides protection against losing a call and hang up. Plug the wire from the Base Unit of AC Power failure. The Backup Adapter contains a Battery Pack that provides enough power for you to complete the call in case of the ANA 9500. 2.
To install the Backup Adapter: 1. Disconnect the Standard AC Adapter from the EXP9505 into the jack of the Base Unit. To Phone From AC Adapter Backup AC Adapter 26 Plug the AC Adapter into the DC IN jack of the EXP9505. 3. Optional Backup AC Adapter (EXP9505) The Optional Backup AC Adapter provides protection against losing a call and hang up. Plug the wire from the Base Unit of AC Power failure. The Backup Adapter contains a Battery Pack that provides enough power for you to complete the call in case of the ANA 9500. 2.
English Owners Manual
Page 32
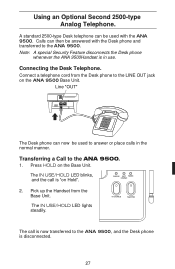
...A standard 2500-type Desk telephone can be answered with the ANA 9500. Press HOLD on Hold". Pick up the Handset from the Desk phone to answer or place calls in use. IN USE/HOLD PAGE/FIND The call is in the normal manner. Using an Optional Second 2500-...type Analog Telephone. Transferring a Call to the ANA 9500, and the Desk phone is now transferred to the ANA 9500. 1. Note: A special Security Feature disconnects the Desk phone whenever the ANA 9500Handset is "on the Base Unit. The IN USE/HOLD LED lights steadily. Line "OUT...
...A standard 2500-type Desk telephone can be answered with the ANA 9500. Press HOLD on Hold". Pick up the Handset from the Desk phone to answer or place calls in use. IN USE/HOLD PAGE/FIND The call is in the normal manner. Using an Optional Second 2500-...type Analog Telephone. Transferring a Call to the ANA 9500, and the Desk phone is now transferred to the ANA 9500. 1. Note: A special Security Feature disconnects the Desk phone whenever the ANA 9500Handset is "on the Base Unit. The IN USE/HOLD LED lights steadily. Line "OUT...
English Owners Manual
Page 33
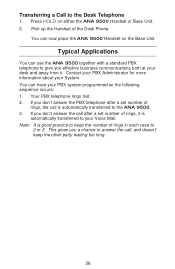
... 1. Transferring a Call to give you don't answer the PBX telephone after a set number of rings, the call , and doesn't keep the number of the Desk Phone.
... 1. Transferring a Call to give you don't answer the PBX telephone after a set number of rings, the call , and doesn't keep the number of the Desk Phone.

