
English Owners Manual
Page 10
... familiarize you are missing or damaged, contact your expectations, please try the simple steps listed in the Trouble shooting section of your cordless phone, refer to your PBX Administrator. Your ANA 9310 includes the following items: Base Unit Handset Telephone Cord 2 AC Adapters Rechargeable Battery (...BT930) Belt Clip (EXP9302) Charging Unit Operating Guide (OM9310) Wall Plate Adapter Charging Unit Wall Mount (EXP9360) If any of the Uniden ANA 9310 Cordless Telephone. To get the most from the rear cover. If your ANA 9310 is designed and engineered to resolve the problem...
... familiarize you are missing or damaged, contact your expectations, please try the simple steps listed in the Trouble shooting section of your cordless phone, refer to your PBX Administrator. Your ANA 9310 includes the following items: Base Unit Handset Telephone Cord 2 AC Adapters Rechargeable Battery (...BT930) Belt Clip (EXP9302) Charging Unit Operating Guide (OM9310) Wall Plate Adapter Charging Unit Wall Mount (EXP9360) If any of the Uniden ANA 9310 Cordless Telephone. To get the most from the rear cover. If your ANA 9310 is designed and engineered to resolve the problem...

English Owners Manual
Page 11
... is designed to achieve the maximum possible range by transmitting and receiving according to the highest specifications set forth by Uniden, or operation of this phone is meant to be impossible to include all electrical appliances when you must first disconnect your household wiring and damage ...appliance during an electrical storm. Unplug all the variables in writing prior to such actions to allow you determine that your unit. This phone is the cause, you must give adequate notice in our rating. If you time for making necessary arrangements to continue uninterrupted service....
... is designed to achieve the maximum possible range by transmitting and receiving according to the highest specifications set forth by Uniden, or operation of this phone is meant to be impossible to include all electrical appliances when you must first disconnect your household wiring and damage ...appliance during an electrical storm. Unplug all the variables in writing prior to such actions to allow you determine that your unit. This phone is the cause, you must give adequate notice in our rating. If you time for making necessary arrangements to continue uninterrupted service....

English Owners Manual
Page 12
..., please check around your own cordless telephone unit. Radio Interference Radio interference may not be causing the problem. Privacy Note: Cordless phones are broadcast over the open airways. In the unlikely event that may be placed near or on top of interference. To minimize ...want to use more than your office to a different channel. Be certain that also powers a major appliance because of radio waves, your phone, you may cause interference to select a channel that provides the clearest communication. Press the channel key to nearby TVs and VCRs. Because ...
..., please check around your own cordless telephone unit. Radio Interference Radio interference may not be causing the problem. Privacy Note: Cordless phones are broadcast over the open airways. In the unlikely event that may be placed near or on top of interference. To minimize ...want to use more than your office to a different channel. Be certain that also powers a major appliance because of radio waves, your phone, you may cause interference to select a channel that provides the clearest communication. Press the channel key to nearby TVs and VCRs. Because ...

English Owners Manual
Page 14
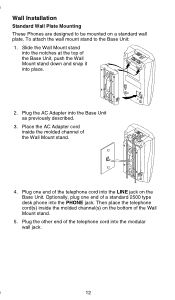
... ANA 9310 can be mounted on a standard wall plate using the included Wall Mount Adapter. Connecting the Telephone Line There are two types of phone outlets: 1) Modular Jack Plug the telephone line cord from sources of these jacks.) 2) Hardwired Jack A modular jack converter (not included) is... The Base Unit can advise you on the proper adapter or converter. 8 Note: Your Uniden Telephone Dealer or a telephone supply store can also be placed on a desk or tabletop near that phone. You may need to avoid excessive heat or humidity. Installing Your ANA 9310 Selecting the ...
... ANA 9310 can be mounted on a standard wall plate using the included Wall Mount Adapter. Connecting the Telephone Line There are two types of phone outlets: 1) Modular Jack Plug the telephone line cord from sources of these jacks.) 2) Hardwired Jack A modular jack converter (not included) is... The Base Unit can advise you on the proper adapter or converter. 8 Note: Your Uniden Telephone Dealer or a telephone supply store can also be placed on a desk or tabletop near that phone. You may need to avoid excessive heat or humidity. Installing Your ANA 9310 Selecting the ...
English Owners Manual
Page 15
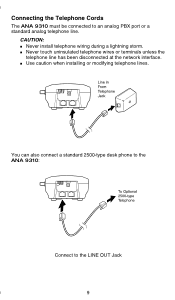
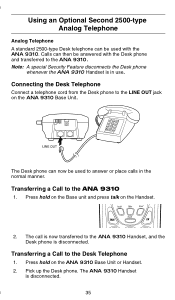
You can also connect a standard 2500-type desk phone to the ANA 9310: Connect to an analog PBX port or a standard analog telephone line. n Never touch uninsulated telephone wires or terminals unless the telephone line has been disconnected at the network interface. n Use caution when installing or modifying telephone lines. Connecting the Telephone Cords The ANA 9310 must be connected to the LINE OUT Jack 9 CAUTION: n Never install telephone wiring during a lightning storm.
You can also connect a standard 2500-type desk phone to the ANA 9310: Connect to an analog PBX port or a standard analog telephone line. n Never touch uninsulated telephone wires or terminals unless the telephone line has been disconnected at the network interface. n Use caution when installing or modifying telephone lines. Connecting the Telephone Cords The ANA 9310 must be connected to the LINE OUT Jack 9 CAUTION: n Never install telephone wiring during a lightning storm.
English Owners Manual
Page 18
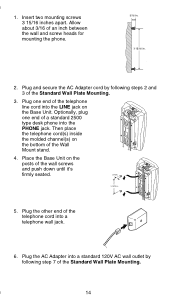
Plug the AC Adapter into the PHONE jack. Optionally, plug one end of the telephone cord into the LINE jack on the Base Unit. Then place the telephone cord(s) inside the molded ... notches at the top of the telephone cord into place. 2. Plug one end of a standard 2500 type desk phone into the Base Unit as previously described. 3. Wall Installation Standard Wall Plate Mounting These Phones are designed to the Base Unit: 1. Place the AC Adapter cord inside the molded channel(s) on a standard wall...
Plug the AC Adapter into the PHONE jack. Optionally, plug one end of the telephone cord into the LINE jack on the Base Unit. Then place the telephone cord(s) inside the molded ... notches at the top of the telephone cord into place. 2. Plug one end of a standard 2500 type desk phone into the Base Unit as previously described. 3. Wall Installation Standard Wall Plate Mounting These Phones are designed to the Base Unit: 1. Place the AC Adapter cord inside the molded channel(s) on a standard wall...
English Owners Manual
Page 19
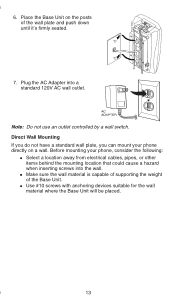
Place the Base Unit on a wall. Direct Wall Mounting If you do not have a standard wall plate, you can mount your phone, consider the following: n Select a location away from electrical cables, pipes, or other items behind the mounting location that could cause a hazard when inserting ...screws into a standard 120V AC wall outlet. Plug the AC Adapter into the wall. 6. Before mounting your phone directly on the posts of the Base Unit. Note: Do not use an outlet controlled by a wall switch. n Use #10 screws with anchoring devices...
Place the Base Unit on a wall. Direct Wall Mounting If you do not have a standard wall plate, you can mount your phone, consider the following: n Select a location away from electrical cables, pipes, or other items behind the mounting location that could cause a hazard when inserting ...screws into a standard 120V AC wall outlet. Plug the AC Adapter into the wall. 6. Before mounting your phone directly on the posts of the Base Unit. Note: Do not use an outlet controlled by a wall switch. n Use #10 screws with anchoring devices...
English Owners Manual
Page 20
... wall outlet by following step 7 of the wall screws and push down until it's firmly seated. 5. Plug the other end of a standard 2500 type desk phone into a telephone wall jack. 6. Plug the AC Adapter into the LINE jack on the Base Unit. Plug one end of the telephone cord into the... PHONE jack. Place the Base Unit on the bottom of an inch between the wall and screw heads for mounting the phone. 2. Allow about 3/16 of the Wall Mount stand. 4. 1.
... wall outlet by following step 7 of the wall screws and push down until it's firmly seated. 5. Plug the other end of a standard 2500 type desk phone into a telephone wall jack. 6. Plug the AC Adapter into the LINE jack on the Base Unit. Plug one end of the telephone cord into the... PHONE jack. Place the Base Unit on the bottom of an inch between the wall and screw heads for mounting the phone. 2. Allow about 3/16 of the Wall Mount stand. 4. 1.
English Owners Manual
Page 21
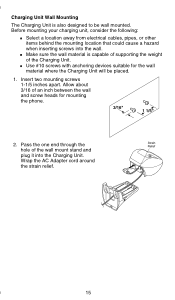
... screws into the Charging Unit. Wrap the AC Adapter cord around the strain relief. 15 n Use #10 screws with anchoring devices suitable for mounting the phone. 2.
... screws into the Charging Unit. Wrap the AC Adapter cord around the strain relief. 15 n Use #10 screws with anchoring devices suitable for mounting the phone. 2.
English Owners Manual
Page 31
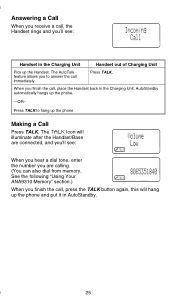
... a Call Press TALK. Press TALK. The TALK Icon will hang up the Handset. The AutoTalk feature allows you to hang up the phone. -OR- Press TALK to answer the call , place the Handset back in AutoStandby. 25 Answering a Call When you receive a call, the Handset rings and you'... from memory. When you 'll see : Handset in the Charging Unit Handset out of Charging Unit Pick up the phone and put it in the Charging Unit. See the following "Using Your ANA9310 Memory" section.) When you finish the call, press the TALK button again, this will illuminate after the Handset/Base...
... a Call Press TALK. Press TALK. The TALK Icon will hang up the Handset. The AutoTalk feature allows you to hang up the phone. -OR- Press TALK to answer the call , place the Handset back in AutoStandby. 25 Answering a Call When you receive a call, the Handset rings and you'... from memory. When you 'll see : Handset in the Charging Unit Handset out of Charging Unit Pick up the phone and put it in the Charging Unit. See the following "Using Your ANA9310 Memory" section.) When you finish the call, press the TALK button again, this will illuminate after the Handset/Base...
English Owners Manual
Page 34
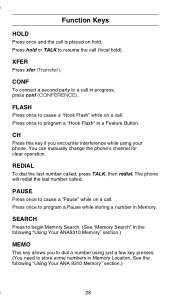
..."Using Your ANA 9310 Memory" section.) 28 Function Keys HOLD Press once and the call is placed on a call. See the following "Using Your ANA9310 Memory" section.) MEMO This key allows you encounter interference while using just a few key presses. (You need to begin Memory Search. (See "Memory... Search" in Memory Location. You can manually change the phone's channel for clear operation. Press once to program a "Hook Flash" in progress, press conf (CONFERENCE). CONF To connect a second party to resume ...
..."Using Your ANA 9310 Memory" section.) 28 Function Keys HOLD Press once and the call is placed on a call. See the following "Using Your ANA9310 Memory" section.) MEMO This key allows you encounter interference while using just a few key presses. (You need to begin Memory Search. (See "Memory... Search" in Memory Location. You can manually change the phone's channel for clear operation. Press once to program a "Hook Flash" in progress, press conf (CONFERENCE). CONF To connect a second party to resume ...
English Owners Manual
Page 37
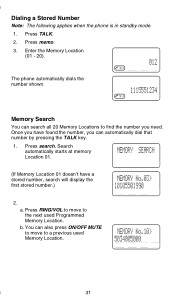
... starts at memory Location 01. (If Memory Location 01 doesn't have found the number, you need. Dialing a Stored Number Note: The following applies when the phone is in standby mode. 1. Once you have a stored number, search will display the first stored number.) 2. a. Memory Search You can search all 20 Memory Locations...
... starts at memory Location 01. (If Memory Location 01 doesn't have found the number, you need. Dialing a Stored Number Note: The following applies when the phone is in standby mode. 1. Once you have a stored number, search will display the first stored number.) 2. a. Memory Search You can search all 20 Memory Locations...

English Owners Manual
Page 38
... Access Numbers. 1. Pressing the ON/OFF MUTE key, you reach the desired Memory Location. 3. Once you are on a call , press search. 2. The phone dials the number. 32 Chain Dialing You can dial any stored number while you have the desired number, press TALK. Once you will then automatically... dial the number. Pressing RING/VOL you enter the desired number, press TALK. The TALK icon appears. The phone will move down through the Memory (1 to locate the number in Memory. 3. c. While you are on the call . This is sometimes needed to...
... Access Numbers. 1. Pressing the ON/OFF MUTE key, you reach the desired Memory Location. 3. Once you are on a call , press search. 2. The phone dials the number. 32 Chain Dialing You can dial any stored number while you have the desired number, press TALK. Once you will then automatically... dial the number. Pressing RING/VOL you enter the desired number, press TALK. The TALK icon appears. The phone will move down through the Memory (1 to locate the number in Memory. 3. c. While you are on the call . This is sometimes needed to...
English Owners Manual
Page 39
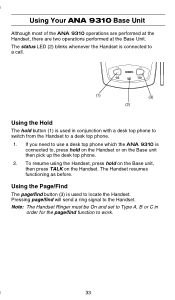
...: The Handset Ringer must be On and set to Type A, B or C in conjunction with a desk top phone to switch from the Handset to locate the Handset. Using the Hold The hold button (1) is used in order ...status LED (2) blinks whenever the Handset is connected to a call. If you need to use a desk top phone which the ANA 9310 is connected to , press hold on the Base unit, then press TALK on the Base... unit then pick up the desk top phone. 2. Using Your ANA 9310 Base Unit Although most of the ANA 9310 operations are performed at the ...
...: The Handset Ringer must be On and set to Type A, B or C in conjunction with a desk top phone to switch from the Handset to locate the Handset. Using the Hold The hold button (1) is used in order ...status LED (2) blinks whenever the Handset is connected to a call. If you need to use a desk top phone which the ANA 9310 is connected to , press hold on the Base unit, then press TALK on the Base... unit then pick up the desk top phone. 2. Using Your ANA 9310 Base Unit Although most of the ANA 9310 operations are performed at the ...
English Owners Manual
Page 41
...be used to answer or place calls in use. Transferring a Call to the ANA 9310. Connecting the Desk Telephone Connect a telephone cord from the Desk phone to the LINE OUT jack on the ANA 9310 Base Unit or Handset. 2. Press hold on the ANA 9310 Base Unit. Note: A special Security ...Feature disconnects the Desk phone whenever the ANA 9310 Handset is disconnected. 35 The ANA 9310 Handset is in the normal manner. Calls can then be answered with the ANA...
...be used to answer or place calls in use. Transferring a Call to the ANA 9310. Connecting the Desk Telephone Connect a telephone cord from the Desk phone to the LINE OUT jack on the ANA 9310 Base Unit or Handset. 2. Press hold on the ANA 9310 Base Unit. Note: A special Security ...Feature disconnects the Desk phone whenever the ANA 9310 Handset is disconnected. 35 The ANA 9310 Handset is in the normal manner. Calls can then be answered with the ANA...

