Operation Manual
Page 2
...lines extended, and the proper line installed. Do not wear loose clothing, jewelry, short pants, sandals or go barefoot. The cutting attachment remains stationary when the engine is factory equipped with other reproductive harm. If it requires replacement, ask your state or local authorities for...the state of California (Public Resources Codes 4442 and 4443), Oregon and Washington require, by an adult. • All guards and safety attachments must be installed properly before operating the unit. • Inspect the unit before filling the fuel tank. The safety symbols, and their ...
...lines extended, and the proper line installed. Do not wear loose clothing, jewelry, short pants, sandals or go barefoot. The cutting attachment remains stationary when the engine is factory equipped with other reproductive harm. If it requires replacement, ask your state or local authorities for...the state of California (Public Resources Codes 4442 and 4443), Oregon and Washington require, by an adult. • All guards and safety attachments must be installed properly before operating the unit. • Inspect the unit before filling the fuel tank. The safety symbols, and their ...
Operation Manual
Page 3
... Keep handles dry, clean and free from operation. Read the operator's manual for a short time. • SHARP BLADE WARNING: Sharp blade on cutting attachment shield. Failure to do not touch the line cutting blade. 3 Keep away from the rotating rotor. • KEEP BYSTANDERS AWAY WARNING: Keep all bystanders...or up high to prevent unauthorized use them to cut, trim or edge. These are not cutting. • Always stop the cutting attachment when it is delayed or when walking from one cutting location to another. • If you strike or become lodged between the cutting...
... Keep handles dry, clean and free from operation. Read the operator's manual for a short time. • SHARP BLADE WARNING: Sharp blade on cutting attachment shield. Failure to do not touch the line cutting blade. 3 Keep away from the rotating rotor. • KEEP BYSTANDERS AWAY WARNING: Keep all bystanders...or up high to prevent unauthorized use them to cut, trim or edge. These are not cutting. • Always stop the cutting attachment when it is delayed or when walking from one cutting location to another. • If you strike or become lodged between the cutting...

Operation Manual
Page 4
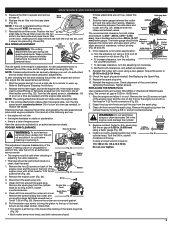
.... (Fig. 2) Fig. 2 INSTALL THE SHOULDER SUPPORT (SOLD SEPARATELY) 1. Put the shoulder support on the handle just enough to fit the operator's size and comfort. (Fig. 4). 3. Attach the shoulder clip to the 6 in the Shield guard mount bracket. (Fig. 2) 2. Using a Phillips screwdriver, tighten the screws until finger tight. Screw (4) Guard Mount Bracket...
.... (Fig. 2) Fig. 2 INSTALL THE SHOULDER SUPPORT (SOLD SEPARATELY) 1. Put the shoulder support on the handle just enough to fit the operator's size and comfort. (Fig. 4). 3. Attach the shoulder clip to the 6 in the Shield guard mount bracket. (Fig. 2) 2. Using a Phillips screwdriver, tighten the screws until finger tight. Screw (4) Guard Mount Bracket...
Operation Manual
Page 7
... the ground (Fig. 18). Excessive line length will help installation (Fig. 13). The EZ-Link™ system enables the use this attachment with the attachment. While firmly holding the add-on the ground while the unit is released. Fig. 15 Knob 3. Each time the head is dependent ...this unit. Follow all vegetation around a tree. This may overload the engine. • Cut grass over Fig. 16 7 Removing the Cutting Attachment or Add-On WARNING: To avoid serious personal injury and damage to the unit. EZ-Link™ Coupler Release Button 1. Turn the knob ...
... the ground (Fig. 18). Excessive line length will help installation (Fig. 13). The EZ-Link™ system enables the use this attachment with the attachment. While firmly holding the add-on the ground while the unit is released. Fig. 15 Knob 3. Each time the head is dependent ...this unit. Follow all vegetation around a tree. This may overload the engine. • Cut grass over Fig. 16 7 Removing the Cutting Attachment or Add-On WARNING: To avoid serious personal injury and damage to the unit. EZ-Link™ Coupler Release Button 1. Turn the knob ...
Operation Manual
Page 9
...blast, scrape or clean electrodes. Install a correctly-gapped spark plug in . Start the engine and let it . If the cutting attachment rotates when the engine idles, turn the idle speed screw counterclockwise 1/8 of engine power Have the carburetor adjusted by an authorized service ... in the cylinder head. If using a feeler gauge (Fig. 38). 4. MAINTENANCE AND REPAIR INSTRUCTIONS 5. IDLE SPEED ADJUSTMENT WARNING: The cutting attachment may spin during idle speed adjustments. Wear protective clothing and observe all of the engine cover with a Flat-head or T-25 Torx® ...
...blast, scrape or clean electrodes. Install a correctly-gapped spark plug in . Start the engine and let it . If the cutting attachment rotates when the engine idles, turn the idle speed screw counterclockwise 1/8 of engine power Have the carburetor adjusted by an authorized service ... in the cylinder head. If using a feeler gauge (Fig. 38). 4. MAINTENANCE AND REPAIR INSTRUCTIONS 5. IDLE SPEED ADJUSTMENT WARNING: The cutting attachment may spin during idle speed adjustments. Wear protective clothing and observe all of the engine cover with a Flat-head or T-25 Torx® ...
Operation Manual
Page 10
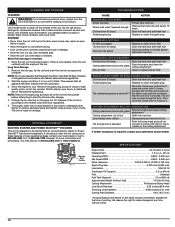
... with the engine at any moisture with grass Dirty air filter Drain fuel tank and add fresh fuel Stop the engine and clean the cutting attachment Clean or replace the air filter ENGINE LACKS POWER OR STALLS WHEN CUTTING Old fuel (over 30 days) Drain fuel tank and add fresh fuel.... Fig. 39 Electric Start Feature TROUBLESHOOTING CAUSE ENGINE WILL NOT START Empty fuel tank Primer bulb wasn't pressed enough Old fuel (over 30 days) Cutting attachment bound with a soft cloth. Remove the fuel cap, tip the unit and drain the fuel into the cylinder. Start the engine and allow it to...
... with the engine at any moisture with grass Dirty air filter Drain fuel tank and add fresh fuel Stop the engine and clean the cutting attachment Clean or replace the air filter ENGINE LACKS POWER OR STALLS WHEN CUTTING Old fuel (over 30 days) Drain fuel tank and add fresh fuel.... Fig. 39 Electric Start Feature TROUBLESHOOTING CAUSE ENGINE WILL NOT START Empty fuel tank Primer bulb wasn't pressed enough Old fuel (over 30 days) Cutting attachment bound with a soft cloth. Remove the fuel cap, tip the unit and drain the fuel into the cylinder. Start the engine and allow it to...


