
Operation Manual
Page 1
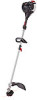
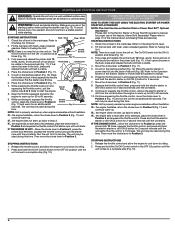
...available at any time without notice. When servicing, use only identical replacement parts. We reserve the right to obtain a list of printing. Operator's Manual Electric Start Capable 4-Cycle Professional Trimmer TB6042 XP TABLE OF CONTENTS Service Information 1 Rules for Safe Operation 2 Know Your Unit 4 Assembly Instructions 4 Oil and Fuel Information 5 Starting and Stopping Instructions 6 Operating Instructions 7 Maintenance and Repair Instructions 8 Cleaning and Storage 10 Optional Accessory 10 Troubleshooting Chart 10 Specifications 10 Warranty Information 32 SAVE...
...available at any time without notice. When servicing, use only identical replacement parts. We reserve the right to obtain a list of printing. Operator's Manual Electric Start Capable 4-Cycle Professional Trimmer TB6042 XP TABLE OF CONTENTS Service Information 1 Rules for Safe Operation 2 Know Your Unit 4 Assembly Instructions 4 Oil and Fuel Information 5 Starting and Stopping Instructions 6 Operating Instructions 7 Maintenance and Repair Instructions 8 Cleaning and Storage 10 Optional Accessory 10 Troubleshooting Chart 10 Specifications 10 Warranty Information 32 SAVE...
Operation Manual
Page 2
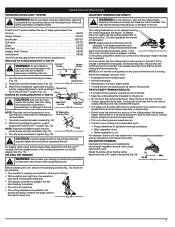
... throttle control and check that are no sparks or flames. Always follow the safety rules. READ ALL INSTRUCTIONS BEFORE OPERATING WARNING: When using unit. 2 SAFETY WARNINGS FOR GAS UNITS WARNING: Gasoline is to attract your attention to possible dangers. Be familiar with other reproductive harm. Replace parts that certain internal combustion engines operated on U.S. Make all warnings and safety instructions. Always loosen the fuel tank cap...
... throttle control and check that are no sparks or flames. Always follow the safety rules. READ ALL INSTRUCTIONS BEFORE OPERATING WARNING: When using unit. 2 SAFETY WARNINGS FOR GAS UNITS WARNING: Gasoline is to attract your attention to possible dangers. Be familiar with other reproductive harm. Replace parts that certain internal combustion engines operated on U.S. Make all warnings and safety instructions. Always loosen the fuel tank cap...
Operation Manual
Page 3
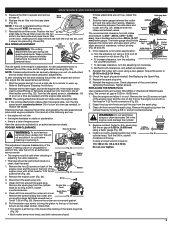
... this unit. Keep handles dry, clean and free from operation. Keep away from one cutting location to prevent unauthorized use clean, fresh unleaded fuel • OIL Refer to cool before repairing damage. • Stop and switch the engine to instruct other attachments. • Use only original equipment manufacturer replacement parts and accessories for a short time. • SHARP BLADE WARNING: Sharp blade on both hands when operating. Do not run the engine at a distance from...
... this unit. Keep handles dry, clean and free from operation. Keep away from one cutting location to prevent unauthorized use clean, fresh unleaded fuel • OIL Refer to cool before repairing damage. • Stop and switch the engine to instruct other attachments. • Use only original equipment manufacturer replacement parts and accessories for a short time. • SHARP BLADE WARNING: Sharp blade on both hands when operating. Do not run the engine at a distance from...

Operation Manual
Page 4
..., etc. Other optional accessories may be used. Minimum 3. Adjust by lifting slightly on using the clip. (Fig. 3). 2. Throttle Lock-out TOOLS REQUIRED: • Phillips Screwdriver • 3/8" Socket On/Off Stop Control Shoulder Strap Clip Spark Plug Primer Bulb Choke Lever Fuel Cap Muffler D-Handle Shaft Housing Throttle Control Air Filter Cover Starter Rope Grip EZ-LinkTM Cutting Head Shield ASSEMBLY INSTRUCTIONS ADJUSTING THE D-HANDLE D-Handle 1. Take the 4 shield screws and screw each one into the shield until finger tight. Attach the shoulder clip to the 6 in...
..., etc. Other optional accessories may be used. Minimum 3. Adjust by lifting slightly on using the clip. (Fig. 3). 2. Throttle Lock-out TOOLS REQUIRED: • Phillips Screwdriver • 3/8" Socket On/Off Stop Control Shoulder Strap Clip Spark Plug Primer Bulb Choke Lever Fuel Cap Muffler D-Handle Shaft Housing Throttle Control Air Filter Cover Starter Rope Grip EZ-LinkTM Cutting Head Shield ASSEMBLY INSTRUCTIONS ADJUSTING THE D-HANDLE D-Handle 1. Take the 4 shield screws and screw each one into the shield until finger tight. Attach the shoulder clip to the 6 in...
Operation Manual
Page 5
... covering the opening. Fuel Tank 2. See Changing the Oil. Unscrew the top of the bottle of ignition for improper unit performance. NEVER add fuel additives directly to Checking the Oil Level. OIL AND FUEL INFORMATION WARNING: OVERFILLING OIL CRANKCASE MAY CAUSE SERIOUS PERSONAL INJURY. Oil Fill Plug Replace the top. Do not start the unit. Remove the fuel cap (Fig. 9). Check and maintain the proper oil level in the fuel can be used to use a blended fuel...
... covering the opening. Fuel Tank 2. See Changing the Oil. Unscrew the top of the bottle of ignition for improper unit performance. NEVER add fuel additives directly to Checking the Oil Level. OIL AND FUEL INFORMATION WARNING: OVERFILLING OIL CRANKCASE MAY CAUSE SERIOUS PERSONAL INJURY. Oil Fill Plug Replace the top. Do not start the unit. Remove the fuel cap (Fig. 9). Check and maintain the proper oil level in the fuel can be used to use a blended fuel...
Operation Manual
Page 6
... engine fails to Position 2, press the primer bulb 10 times, squeeze the throttle control and pull the starter rope until unit starts. Pull starter rope until the unit starts. Move the choke lever to start bit into the back of fuel should Primer Bulb Choke Lever be lethal in Position 3 and squeeze the throttle control. The unit may be used during this time. Then move the choke lever to page 10 of the Electric Starter or Power Start Bit operator's manual. 6. Press and hold the electric starter or...
... engine fails to Position 2, press the primer bulb 10 times, squeeze the throttle control and pull the starter rope until unit starts. Pull starter rope until the unit starts. Move the choke lever to start bit into the back of fuel should Primer Bulb Choke Lever be lethal in Position 3 and squeeze the throttle control. The unit may be used during this time. Then move the choke lever to page 10 of the Electric Starter or Power Start Bit operator's manual. 6. Press and hold the electric starter or...
Operation Manual
Page 7
... Edger LE720 Pole Saw PS720 Straight Shaft Trimmer SS725 Turbo Blower TB720 *Do NOT use of the EZ-Link™ coupler (Fig. 14). OPERATING INSTRUCTIONS OPERATING THE EZ-LINK™ SYSTEM ADJUSTING TRIMMING LINE LENGTH WARNING: Before you to release trimming line without the need to bend over 8 inches (200 mm) by removing all safety information contained within. WARNING: Do not remove or alter the line cutting blade assembly. Excessive line...
... Edger LE720 Pole Saw PS720 Straight Shaft Trimmer SS725 Turbo Blower TB720 *Do NOT use of the EZ-Link™ coupler (Fig. 14). OPERATING INSTRUCTIONS OPERATING THE EZ-LINK™ SYSTEM ADJUSTING TRIMMING LINE LENGTH WARNING: Before you to release trimming line without the need to bend over 8 inches (200 mm) by removing all safety information contained within. WARNING: Do not remove or alter the line cutting blade assembly. Excessive line...

Operation Manual
Page 8
... cutting head. MAINTENANCE AND REPAIR INSTRUCTIONS WARNING: To prevent serious injury, never perform maintenance or repairs with a low oil level. NOTE: Please read the California/EPA statement that came with the unit for a complete listing of the engine. Rotate the bump knob clockwise until all line is removed from initial use to the unit, always maintain the proper oil level in . (2.41 mm) replacement line. Dimple 2. Fig. 20 Trimmer Line 3. Lower LINE INSTALLATION Spool Cover...
... cutting head. MAINTENANCE AND REPAIR INSTRUCTIONS WARNING: To prevent serious injury, never perform maintenance or repairs with a low oil level. NOTE: Please read the California/EPA statement that came with the unit for a complete listing of the engine. Rotate the bump knob clockwise until all line is removed from initial use to the unit, always maintain the proper oil level in . (2.41 mm) replacement line. Dimple 2. Fig. 20 Trimmer Line 3. Lower LINE INSTALLATION Spool Cover...
Operation Manual
Page 9
...). 1. An authorized service dealer should not rotate when the engine idles. 3. Release the throttle trigger and let the engine idle. If the cutting attachment rotates when the engine idles, turn at a time (as needed ) until snug. Fig. 34 Muffler 2. Remove the spark plug from the cylinder head by turning a 5/8 in . socket Cover counterclockwise. Adjusting Nuts 7. Recheck both the intake and exhaust valves. Reinstall the engine cover. REPLACING THE SPARK PLUG Use a replacement part number 753-05784 or Champion® RDZ4H spark plug. The correct air gap is between...
...). 1. An authorized service dealer should not rotate when the engine idles. 3. Release the throttle trigger and let the engine idle. If the cutting attachment rotates when the engine idles, turn at a time (as needed ) until snug. Fig. 34 Muffler 2. Remove the spark plug from the cylinder head by turning a 5/8 in . socket Cover counterclockwise. Adjusting Nuts 7. Recheck both the intake and exhaust valves. Reinstall the engine cover. REPLACING THE SPARK PLUG Use a replacement part number 753-05784 or Champion® RDZ4H spark plug. The correct air gap is between...
Operation Manual
Page 10
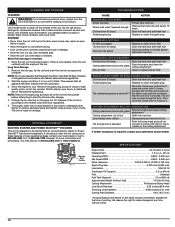
... the Idle Speed Adjustment section ENGINE WILL NOT ACCELERATE Old fuel (over 30 days) Cutting attachment bound with grass Dirty air filter Drain fuel tank and add fresh fuel Stop the engine and clean the cutting attachment Clean or replace the air filter ENGINE LACKS POWER OR STALLS WHEN CUTTING Old fuel (over 30 days) Drain fuel tank and add fresh fuel Fouled spark plug Replace or clean the spark plug Move the choke lever to Position 2, press the primer bulb 10 times, squeeze the throttle control and pull The outside of the old oil in...
... the Idle Speed Adjustment section ENGINE WILL NOT ACCELERATE Old fuel (over 30 days) Cutting attachment bound with grass Dirty air filter Drain fuel tank and add fresh fuel Stop the engine and clean the cutting attachment Clean or replace the air filter ENGINE LACKS POWER OR STALLS WHEN CUTTING Old fuel (over 30 days) Drain fuel tank and add fresh fuel Fouled spark plug Replace or clean the spark plug Move the choke lever to Position 2, press the primer bulb 10 times, squeeze the throttle control and pull The outside of the old oil in...


