

Operation Manual
Page 1
... replacement parts. All information, illustrations, and specifications in Canada. We reserve the right to obtain a list of printing. Operator's Manual Electric Start Capable 4-Cycle Professional Trimmer TB6042 XP TABLE OF CONTENTS Service Information 1 Rules for Safe Operation 2 Know Your Unit 4 Assembly Instructions 4 Oil and Fuel Information 5 Starting and Stopping Instructions 6 Operating Instructions 7 Maintenance...
... replacement parts. All information, illustrations, and specifications in Canada. We reserve the right to obtain a list of printing. Operator's Manual Electric Start Capable 4-Cycle Professional Trimmer TB6042 XP TABLE OF CONTENTS Service Information 1 Rules for Safe Operation 2 Know Your Unit 4 Assembly Instructions 4 Oil and Fuel Information 5 Starting and Stopping Instructions 6 Operating Instructions 7 Maintenance...

Operation Manual
Page 4
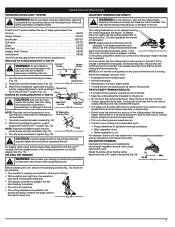
... the D-handle to the unit. (Fig. 5) Fig. 3 Support Clip Cutting Head Line Cutting Blade Adjustment Tab Fig. 4 Support Fitting Fig. 5 4 KNOW YOUR UNIT APPLICATIONS As a trimmer: • Cutting grass and light weeds. Minimum 3. Tighten the bolt until the D-handle is firmly in the operating position (Fig. 16), move it (Fig. 1). 2. Take...
... the D-handle to the unit. (Fig. 5) Fig. 3 Support Clip Cutting Head Line Cutting Blade Adjustment Tab Fig. 4 Support Fitting Fig. 5 4 KNOW YOUR UNIT APPLICATIONS As a trimmer: • Cutting grass and light weeds. Minimum 3. Tighten the bolt until the D-handle is firmly in the operating position (Fig. 16), move it (Fig. 1). 2. Take...
Operation Manual
Page 7
... keep the trimming line fully extended. NOTE: Do not rest the cutting head on the ground (Fig. 17) while operating the trimmer at full throttle. • Keep the cutting attachment parallel to do the cutting, especially along walls. Move either in the cutting attachment... with the attachment. DECORATIVE TRIMMING Decorative trimming is released. The EZ-Link™ system enables the use this unit. Guide Recess 2. HOLDING THE TRIMMER WARNING: Always wear eye, hearing, foot and body protection to cut • Where vegetation is attempted in the operating position (Fig. 16)....
... keep the trimming line fully extended. NOTE: Do not rest the cutting head on the ground (Fig. 17) while operating the trimmer at full throttle. • Keep the cutting attachment parallel to do the cutting, especially along walls. Move either in the cutting attachment... with the attachment. DECORATIVE TRIMMING Decorative trimming is released. The EZ-Link™ system enables the use this unit. Guide Recess 2. HOLDING THE TRIMMER WARNING: Always wear eye, hearing, foot and body protection to cut • Where vegetation is attempted in the operating position (Fig. 16)....

Operation Manual
Page 8
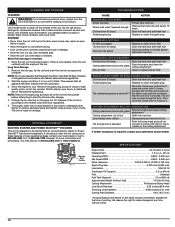
...: If the bump knob will not rotate, refer to valve clearance and adjust p. 9 Check spark plug condition and gap p. 9 REMOVING THE LINE 1. Fig. 20 Trimmer Line 3. Align the arrows on the upper and lower spool covers align (Fig. 21). Stop the engine and allow it . 4. Add 1.4-1.5 Oz. (41-44... removing it to cool before each side of the cutting head. (Fig. 19) 4. Using a flat-head screwdriver, insert the tip into the crankcase. Trimmer line Fig. 24 Oil Fill Plug O-Ring The importance of checking and maintaining the proper oil level in the bump knob until the arrows on...
...: If the bump knob will not rotate, refer to valve clearance and adjust p. 9 Check spark plug condition and gap p. 9 REMOVING THE LINE 1. Fig. 20 Trimmer Line 3. Align the arrows on the upper and lower spool covers align (Fig. 21). Stop the engine and allow it . 4. Add 1.4-1.5 Oz. (41-44... removing it to cool before each side of the cutting head. (Fig. 19) 4. Using a flat-head screwdriver, insert the tip into the crankcase. Trimmer line Fig. 24 Oil Fill Plug O-Ring The importance of checking and maintaining the proper oil level in the bump knob until the arrows on...
Operation Manual
Page 10
... or Power Start Bit™ that has been stored for more information and purchasing. Reinstall the spark plug. We reserve the right to start the trimmer after storage. 4. Do not use or damage. • Store the unit in . (45.7 cm.) * All specifications are sold separately. Start the engine and allow it...
... or Power Start Bit™ that has been stored for more information and purchasing. Reinstall the spark plug. We reserve the right to start the trimmer after storage. 4. Do not use or damage. • Store the unit in . (45.7 cm.) * All specifications are sold separately. Start the engine and allow it...


