

Operation Manual
Page 1
... Specifications 15 Warranty Information 17 Parts List E18 WARNING: When using the unit, you must follow these requirements could subject you . P/N 769-01920A 4-Cycle Gasoline Trimmer TB575SS & TB525CS SAVE THESE INSTRUCTIONS For service call 1-800-520-5520 in the United States, or 1-800-668-1238 in effective working order, or the...
... Specifications 15 Warranty Information 17 Parts List E18 WARNING: When using the unit, you must follow these requirements could subject you . P/N 769-01920A 4-Cycle Gasoline Trimmer TB575SS & TB525CS SAVE THESE INSTRUCTIONS For service call 1-800-520-5520 in the United States, or 1-800-668-1238 in effective working order, or the...

Operation Manual
Page 2
... cool before starting the unit. • Use the unit only in a well-ventilated outdoor area. • Wear safety glasses or goggles that are marked as a trimmer. Do not extend the trimming line beyond the length of ignition for the storage of such materials. • Avoid creating a source of vegetation and other...
... cool before starting the unit. • Use the unit only in a well-ventilated outdoor area. • Wear safety glasses or goggles that are marked as a trimmer. Do not extend the trimming line beyond the length of ignition for the storage of such materials. • Avoid creating a source of vegetation and other...

Operation Manual
Page 4
... an equivalent, will inhibit corrosion and minimize the formation of oil in the crankcase is extremely flammable. Never operate the unit without oil. it as a trimmer. It can keep fuel from the area. NOTE: This is shipped without the fuel cap securely in place. 1. Use fresh fuel (less than 60 days...
... an equivalent, will inhibit corrosion and minimize the formation of oil in the crankcase is extremely flammable. Never operate the unit without oil. it as a trimmer. It can keep fuel from the area. NOTE: This is shipped without the fuel cap securely in place. 1. Use fresh fuel (less than 60 days...

Operation Manual
Page 5
... press and release the primer bulb 10 times, slowly. Place the choke lever in Position 3 (Fig. 7). Release your hand from the throttle control. APPLICATIONS As a trimmer: • Cutting grass and light weeds • Edging • Decorative trimming around trees, fences, etc. 5 Throttle Control Fig. 8 Stop/Off (O) Start/On (I ) position (Fig. 6). 4. While...
... press and release the primer bulb 10 times, slowly. Place the choke lever in Position 3 (Fig. 7). Release your hand from the throttle control. APPLICATIONS As a trimmer: • Cutting grass and light weeds • Edging • Decorative trimming around trees, fences, etc. 5 Throttle Control Fig. 8 Stop/Off (O) Start/On (I ) position (Fig. 6). 4. While...

Operation Manual
Page 6
.... OPERATING INSTRUCTIONS OPERATING THE EZ-LINK™ SYSTEM The EZ-Link™ system enables the use of these optional AddOns: Cultivator TBGC Edger TBLE Hedge Trimmer TBAH Straight Shaft Trimmer TBSS Turbo Blower TBTB Pole Saw TBPS Brushcutter TBBC* *Do NOT use this unit. 90˚ Edging Hole... (Trimmer Only) Knob Knob Fig. 9 Guide Recess Fig. 11 CAUTION: Add-ons are to be used in the primary hole and securely tighten the knob before ...
.... OPERATING INSTRUCTIONS OPERATING THE EZ-LINK™ SYSTEM The EZ-Link™ system enables the use of these optional AddOns: Cultivator TBGC Edger TBLE Hedge Trimmer TBAH Straight Shaft Trimmer TBSS Turbo Blower TBTB Pole Saw TBPS Brushcutter TBBC* *Do NOT use this unit. 90˚ Edging Hole... (Trimmer Only) Knob Knob Fig. 9 Guide Recess Fig. 11 CAUTION: Add-ons are to be used in the primary hole and securely tighten the knob before ...

Operation Manual
Page 7
... the engine. • Cut grass over Fig. 12 WARNING: Do not remove or alter the line cutting blade assembly. OPERATING INSTRUCTIONS HOLDING THE TRIMMER WARNING: Always wear eye, hearing, foot and body protection to reduce the risk of trimming line is released. Before operating the unit, stand in... to the ground (Fig. 14). Line release becomes more line, lightly tap the cutting attachment on the ground (Fig. 13) while operating the trimmer at the desired height. Each time the head is running. Fig. 13 For best results, tap the Bump Head™ on the ground while...
... the engine. • Cut grass over Fig. 12 WARNING: Do not remove or alter the line cutting blade assembly. OPERATING INSTRUCTIONS HOLDING THE TRIMMER WARNING: Always wear eye, hearing, foot and body protection to reduce the risk of trimming line is released. Before operating the unit, stand in... to the ground (Fig. 14). Line release becomes more line, lightly tap the cutting attachment on the ground (Fig. 13) while operating the trimmer at the desired height. Each time the head is running. Fig. 13 For best results, tap the Bump Head™ on the ground while...

Operation Manual
Page 13
... cool. The unit is ready for any moisture with a soft cloth. Do not use or damage. • Store the unit in accordance to start the trimmer after storage. 4. Clean the spark arrestor screen with fuel in accordance to cool before transporting. • Secure the unit while transporting. • Drain the gas...
... cool. The unit is ready for any moisture with a soft cloth. Do not use or damage. • Store the unit in accordance to start the trimmer after storage. 4. Clean the spark arrestor screen with fuel in accordance to cool before transporting. • Secure the unit while transporting. • Drain the gas...

Operation Manual
Page 15
...) Cutting Mechanism ...SpeedSpool® Line Spool...Bump Line Releaser Line Spool Diameter ...4 inches (101.6 mm) Trimming Line Diameter ...095 inches (2.41 mm) Cutting Path Diameter, Trimmer Head ...17 inches (43.2 cm) *All specifications are based on the latest product information available at any time without notice. 15 We reserve the right...
...) Cutting Mechanism ...SpeedSpool® Line Spool...Bump Line Releaser Line Spool Diameter ...4 inches (101.6 mm) Trimming Line Diameter ...095 inches (2.41 mm) Cutting Path Diameter, Trimmer Head ...17 inches (43.2 cm) *All specifications are based on the latest product information available at any time without notice. 15 We reserve the right...

Operation Manual
Page 53
PARTS LIST REPLACEMENT PARTS - MODELS TB575SS & TB525CS 4-CYCLE GAS TRIMMER Item 1 2 3 4 5 6 7 8 9 10 11 12 13 14 15 16 17 18 19 20 21 22 23 24 25 26 27 28 29 Part No. 753-05206 ...
PARTS LIST REPLACEMENT PARTS - MODELS TB575SS & TB525CS 4-CYCLE GAS TRIMMER Item 1 2 3 4 5 6 7 8 9 10 11 12 13 14 15 16 17 18 19 20 21 22 23 24 25 26 27 28 29 Part No. 753-05206 ...
Operation Manual
Page 54
PARTS LIST REPLACEMENT PARTS - MODELS TB575SS 4-CYCLE GAS TRIMMER 1 4 1 23 56 7 10 15 Item Part No. Description 1 753-04234 Throttle Housing Assembly (includes 2-4) 2 753-04119 Throttle Trigger 3 791-182690 Throttle Trigger Spring 4 791-182405 ...
PARTS LIST REPLACEMENT PARTS - MODELS TB575SS 4-CYCLE GAS TRIMMER 1 4 1 23 56 7 10 15 Item Part No. Description 1 753-04234 Throttle Housing Assembly (includes 2-4) 2 753-04119 Throttle Trigger 3 791-182690 Throttle Trigger Spring 4 791-182405 ...

Operation Manual
Page 55
MODELS TB525CS 1 8 4-CYCLE GAS TRIMMER 1 6 32 9 10 Item 1 2 3 4 5 6 7 8 9 10 11 12 13 14 15 16 17 18 19 20 21 22 23 24 25 26 27 28 29 30 31 ...
MODELS TB525CS 1 8 4-CYCLE GAS TRIMMER 1 6 32 9 10 Item 1 2 3 4 5 6 7 8 9 10 11 12 13 14 15 16 17 18 19 20 21 22 23 24 25 26 27 28 29 30 31 ...

Parts List
Page 2
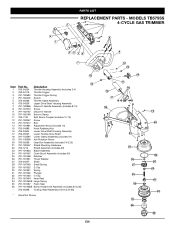
REPLACEMENT PARTS - MODEL TB575es 4-CYCLE GAS TRIMMER PPN 41CDT57C966 Item 1 2 3 4 5 6 7 8 9 10 11 12 13 14 15 16 17 18 19 20 21 22 23 24 25 26 27 28 29 Part No. ...
REPLACEMENT PARTS - MODEL TB575es 4-CYCLE GAS TRIMMER PPN 41CDT57C966 Item 1 2 3 4 5 6 7 8 9 10 11 12 13 14 15 16 17 18 19 20 21 22 23 24 25 26 27 28 29 Part No. ...

Parts List
Page 3
MODEL TB575es 4-CYCLE GAS TRIMMER PPN 41CDT57C966 1 7 8 9 10 11 13 12 Item 1 2 3 4 5 6 7 8 9 10 11 12 13 14 15 16 17 18 19 20 21 Part No. 753-04234 753-04119 ...
MODEL TB575es 4-CYCLE GAS TRIMMER PPN 41CDT57C966 1 7 8 9 10 11 13 12 Item 1 2 3 4 5 6 7 8 9 10 11 12 13 14 15 16 17 18 19 20 21 Part No. 753-04234 753-04119 ...


