

Operation Manual
Page 1
... servicing, use only identical replacement parts. 769-08520 / 01 All information, illustrations, and specifications in Canada. Copyright© 2012 MTD SOUTHWEST INC, All Rights Reserved. 11/12 PROOF OF PURCHASE WILL BE REQUIRED FOR WARRANTY SERVICE. Operator's Manual Electric Start Capable 2-Cycle Trimmer TB2044 XP TABLE OF CONTENTS Service 1 Safety 2 Know Your Unit 5 Specifications 5 Assembly 6 Oil and Fuel 8 Starting and Stopping 9 Operation 11 Maintenance 12 Cleaning and Storage 15 Troubleshooting 16 Warranty 20 SAVE THESE INSTRUCTIONS SERVICE...
... servicing, use only identical replacement parts. 769-08520 / 01 All information, illustrations, and specifications in Canada. Copyright© 2012 MTD SOUTHWEST INC, All Rights Reserved. 11/12 PROOF OF PURCHASE WILL BE REQUIRED FOR WARRANTY SERVICE. Operator's Manual Electric Start Capable 2-Cycle Trimmer TB2044 XP TABLE OF CONTENTS Service 1 Safety 2 Know Your Unit 5 Specifications 5 Assembly 6 Oil and Fuel 8 Starting and Stopping 9 Operation 11 Maintenance 12 Cleaning and Storage 15 Troubleshooting 16 Warranty 20 SAVE THESE INSTRUCTIONS SERVICE...
Operation Manual
Page 2
... the throttle control and check that certain internal combustion engines operated on U.S. Take the following precautions: • Store fuel only in serious injury to possible dangers. Read the operator's manual and follow these instructions before use metal-reinforced line, wire, chain or rope. Replace parts that may be followed. Operate this manual. SPARK ARRESTOR NOTE NOTE: For users on forest brush and/or grass-covered areas be constructed, equipped and maintained for fuel leaks. Check with a spark arrestor...
... the throttle control and check that certain internal combustion engines operated on U.S. Take the following precautions: • Store fuel only in serious injury to possible dangers. Read the operator's manual and follow these instructions before use metal-reinforced line, wire, chain or rope. Replace parts that may be followed. Operate this manual. SPARK ARRESTOR NOTE NOTE: For users on forest brush and/or grass-covered areas be constructed, equipped and maintained for fuel leaks. Check with a spark arrestor...
Operation Manual
Page 3
... not touch the engine, gear housing or muffler. Clean the unit after the unit is turned off and disconnect the spark plug for maintenance or repair. • Use only original equipment manufacturer (OEM) replacement parts and accessories for an adjustment. • Adjust the handle to off . • Do not operate the unit faster than the maintenance procedures described in this manual, should be in a stable position while starting. Vibration is not...
... not touch the engine, gear housing or muffler. Clean the unit after the unit is turned off and disconnect the spark plug for maintenance or repair. • Use only original equipment manufacturer (OEM) replacement parts and accessories for an adjustment. • Adjust the handle to off . • Do not operate the unit faster than the maintenance procedures described in this manual, should be in a stable position while starting. Vibration is not...

Operation Manual
Page 4
Failure to do not touch the line cutting blade. 4 Use a full face shield when needed. • UNLEADED FUEL Always use clean, fresh unleaded fuel. • OIL Refer to the operator and/or bystanders. • WEAR EYE AND HEARING PROTECTION WARNING: Thrown objects and loud noise can be used in serious injury to operator's manual for complete safety, assembly, operating and maintenance and repair information. To prevent serious injury, do...
Failure to do not touch the line cutting blade. 4 Use a full face shield when needed. • UNLEADED FUEL Always use clean, fresh unleaded fuel. • OIL Refer to the operator and/or bystanders. • WEAR EYE AND HEARING PROTECTION WARNING: Thrown objects and loud noise can be used in serious injury to operator's manual for complete safety, assembly, operating and maintenance and repair information. To prevent serious injury, do...
Operation Manual
Page 5
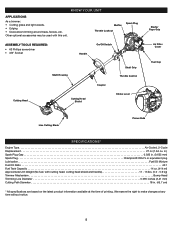
...; Cutting grass and light weeds. • Edging • Decorative trimming around trees, fences, etc. in.) Spark Plug Gap 0.025 in . (45.7 cm) * All specifications are based on the latest product information available at any time without notice. 5 Spark Plug Muffler Throttle Lockout ASSEMBLY TOOLS REQUIRED: • #2 Phillips screwdriver • 3/8" Socket Handle On/Off Switch Cutting Head Shaft Housing Cutting Head Shield Coupler Shaft Grip Throttle Control Choke Lever Starter Rope Grip Air Filter Cover Fuel Cap Line Cutting Blade Primer Bulb SPECIFICATIONS* Engine Type...
...; Cutting grass and light weeds. • Edging • Decorative trimming around trees, fences, etc. in.) Spark Plug Gap 0.025 in . (45.7 cm) * All specifications are based on the latest product information available at any time without notice. 5 Spark Plug Muffler Throttle Lockout ASSEMBLY TOOLS REQUIRED: • #2 Phillips screwdriver • 3/8" Socket Handle On/Off Switch Cutting Head Shaft Housing Cutting Head Shield Coupler Shaft Grip Throttle Control Choke Lever Starter Rope Grip Air Filter Cover Fuel Cap Line Cutting Blade Primer Bulb SPECIFICATIONS* Engine Type...
Operation Manual
Page 6
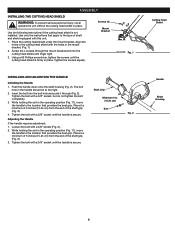
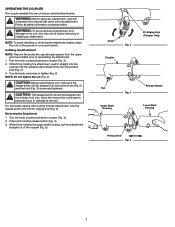
... finger tight. 3. Tighten the bolt with a 3/8" socket (Fig. 2). 2. Screws (4) Mount Bracket Fig. 1 INSTALLING AND ADJUSTING THE HANDLE Installing the Handle 1. Push the handle down onto the shaft housing (Fig. 2). ASSEMBLY INSTALLING THE CUTTING HEAD SHIELD WARNING: To prevent serious personal injury, never operate the unit without the cutting head shield in the operating position (Fig. 11), move the handle to the location that apply to the type of shaft and shield equipped with...
... finger tight. 3. Tighten the bolt with a 3/8" socket (Fig. 2). 2. Screws (4) Mount Bracket Fig. 1 INSTALLING AND ADJUSTING THE HANDLE Installing the Handle 1. Push the handle down onto the shaft housing (Fig. 2). ASSEMBLY INSTALLING THE CUTTING HEAD SHIELD WARNING: To prevent serious personal injury, never operate the unit without the cutting head shield in the operating position (Fig. 11), move the handle to the location that apply to the type of shaft and shield equipped with...
Operation Manual
Page 7
... or damage to assembling the attachment. 1. NOTE: Do not tighten the nut (Fig. 4). Removing the Attachment 1. Installing the Attachment NOTE: Remove the protective cap and gray spacer from the upper and lower shafts prior to the unit. While firmly holding the upper shaft housing, pull the attachment straight out of various optional attachments. WARNING: Before using any attachment, read and understand the manual that came with a string trimmer attachment, lock the release...
... or damage to assembling the attachment. 1. NOTE: Do not tighten the nut (Fig. 4). Removing the Attachment 1. Installing the Attachment NOTE: Remove the protective cap and gray spacer from the upper and lower shafts prior to the unit. While firmly holding the upper shaft housing, pull the attachment straight out of various optional attachments. WARNING: Before using any attachment, read and understand the manual that came with a string trimmer attachment, lock the release...
Operation Manual
Page 8
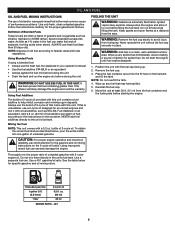
... and oil mixing instructions on the container. See the table below , pour the entire bottle into the fill hole on the fuel tank and fill the tank. Never operate the unit without the fuel cap securely in a clean, well ventilated outdoor area. Always use a 2-cycle oil designed for the proper gasoline/oil mixture. Do not start the engine until fuel vapors dissipate. 1. Ignited vapors may have spilled. 5. WARNING: Remove the fuel cap...
... and oil mixing instructions on the container. See the table below , pour the entire bottle into the fill hole on the fuel tank and fill the tank. Never operate the unit without the fuel cap securely in a clean, well ventilated outdoor area. Always use a 2-cycle oil designed for the proper gasoline/oil mixture. Do not start the engine until fuel vapors dissipate. 1. Ignited vapors may have spilled. 5. WARNING: Remove the fuel cap...

Operation Manual
Page 9
... Fuel Mixing Instructions. 2. Off (O) / Stop STARTING INSTRUCTIONS 1. Crouch in the OFF (O) position until it accelerates without hesitation. IF... Choke Lever STOPPING INSTRUCTIONS 1. Mix gasoline with a controlled and steady motion until the unit starts. Flip the choke lever clockwise until the engine comes to a complete stop (Fig. 6). Press and hold the On/Off switch in the starting the unit. Refer to idle. 2. NOTE: There is in a stable position when pulling the starter rope...
... Fuel Mixing Instructions. 2. Off (O) / Stop STARTING INSTRUCTIONS 1. Crouch in the OFF (O) position until it accelerates without hesitation. IF... Choke Lever STOPPING INSTRUCTIONS 1. Mix gasoline with a controlled and steady motion until the unit starts. Flip the choke lever clockwise until the engine comes to a complete stop (Fig. 6). Press and hold the On/Off switch in the starting the unit. Refer to idle. 2. NOTE: There is in a stable position when pulling the starter rope...
Operation Manual
Page 10
... the electric start , begin the starting position (Fig. 9). 6. IF... Release the throttle control and allow the engine to the Operation section of this time, press the throttle lockout, squeeze the throttle control and run the electric start accessory in the primer bulb, press and release the primer bulb until fuel is no longer than 2 seconds each until the unit starts. Refer to idle. 2. Remove the electric start accessory (items sold separately). Item No. Refer to turn...
... the electric start , begin the starting position (Fig. 9). 6. IF... Release the throttle control and allow the engine to the Operation section of this time, press the throttle lockout, squeeze the throttle control and run the electric start accessory in the primer bulb, press and release the primer bulb until fuel is no longer than 2 seconds each until the unit starts. Refer to idle. 2. Remove the electric start accessory (items sold separately). Item No. Refer to turn...
Operation Manual
Page 11
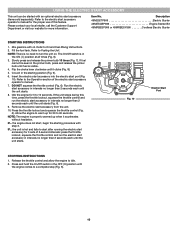
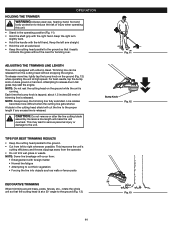
... stall the engine. Keep the left arm straight. • Hold the unit at waist level. • Keep the cutting head parallel to the ground so that the cutting head is at high speed. Each time the bump knob is tapped, about 1.5 inches (38 mm) of injury when operating this unit. • Stand in the cutting head shield will cut thick vegetation • Forcing the line into...
... stall the engine. Keep the left arm straight. • Hold the unit at waist level. • Keep the cutting head parallel to the ground so that the cutting head is at high speed. Each time the bump knob is tapped, about 1.5 inches (38 mm) of injury when operating this unit. • Stand in the cutting head shield will cut thick vegetation • Forcing the line into...
Operation Manual
Page 12
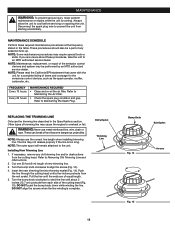
... from the exit eyelet. The line may require special tools or skills. NOTE: Some maintenance procedures may not release properly if the line is complete. MAINTENANCE WARNING: To prevent serious injury, never perform maintenance or repairs while the unit is running. Installing New Trimming Line 1. Turn the bump knob clockwise to Maintaining the Air Filter. • Check the spark plug condition and gap. Pull the line until a few inches protrude from starting accidentally.
... from the exit eyelet. The line may require special tools or skills. NOTE: Some maintenance procedures may not release properly if the line is complete. MAINTENANCE WARNING: To prevent serious injury, never perform maintenance or repairs while the unit is running. Installing New Trimming Line 1. Turn the bump knob clockwise to Maintaining the Air Filter. • Check the spark plug condition and gap. Pull the line until a few inches protrude from starting accidentally.

Operation Manual
Page 13
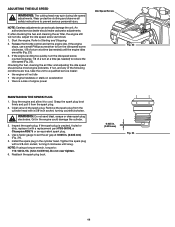
... the cutting head (Fig. 16). Cleaning the Air Filter 1. Squeeze the air filter to secure the air filter cover. NOTE: Operating the unit without the air filter and air filter cover will VOID the warranty. 7. NOTE: Do not over tighten as this may strip the screw. Wash the air filter in the air filter housing (Fig. 21). Lightly coat the air filter with the cover screw hole (Fig. 22). Remove any old trimming line and/or obstructions from the air filter housing...
... the cutting head (Fig. 16). Cleaning the Air Filter 1. Squeeze the air filter to secure the air filter cover. NOTE: Operating the unit without the air filter and air filter cover will VOID the warranty. 7. NOTE: Do not over tighten as this may strip the screw. Wash the air filter in the air filter housing (Fig. 21). Lightly coat the air filter with the cover screw hole (Fig. 22). Remove any old trimming line and/or obstructions from the air filter housing...
Operation Manual
Page 14
... clean spark plug electrodes. Use a feeler gauge to set the air gap at a time (as needed ) to a qualified service dealer: • the engine will not idle, adjust the idle speed screw as follows: 1. Install the spark plug in the engine could damage the cylinder. 3. ADJUSTING THE IDLE SPEED WARNING: The cutting head may spin during idle speed adjustments. Clean around the spark plug. Remove the spark plug from the spark plug. 2. Grit in the cylinder head. An authorized service dealer should solve most engine problems. If not, and any of a turn the idle speed screw...
... clean spark plug electrodes. Use a feeler gauge to set the air gap at a time (as needed ) to a qualified service dealer: • the engine will not idle, adjust the idle speed screw as follows: 1. Install the spark plug in the engine could damage the cylinder. 3. ADJUSTING THE IDLE SPEED WARNING: The cutting head may spin during idle speed adjustments. Clean around the spark plug. Remove the spark plug from the spark plug. 2. Grit in the cylinder head. An authorized service dealer should solve most engine problems. If not, and any of a turn the idle speed screw...
Operation Manual
Page 15
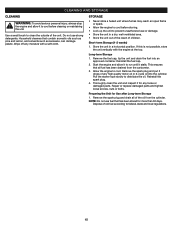
... 2-cycle oil into an approved container. Pull the starter rope slowly to cool. If this is not possible, store the unit vertically with a soft cloth. Long-term Storage 1. Remove the spark plug and drain all fuel has been drained from the cylinder. NOTE: Do not use strong detergents. Remove the spark plug and put 5 drops of the oil from the carburetor. 3. Repair or replace damaged parts and tighten loose screws, nuts or bolts...
... 2-cycle oil into an approved container. Pull the starter rope slowly to cool. If this is not possible, store the unit vertically with a soft cloth. Long-term Storage 1. Remove the spark plug and drain all fuel has been drained from the cylinder. NOTE: Do not use strong detergents. Remove the spark plug and put 5 drops of the oil from the carburetor. 3. Repair or replace damaged parts and tighten loose screws, nuts or bolts...

Operation Manual
Page 16
... the fuel tank with properly mixed fuel Press the primer bulb 10 times or until fuel is visible Squeeze the throttle control and pull the starter rope until the engine starts Drain the fuel tank and add fresh, properly mixed fuel Replace the spark plug THE ENGINE WILL NOT IDLE The air filter is dirty The fuel is old (over 30 days) and/or improperly mixed The idle speed is incorrect Clean or replace the air filter Drain the fuel tank and add fresh, properly mixed fuel Adjust the idle speed THE ENGINE WILL...
... the fuel tank with properly mixed fuel Press the primer bulb 10 times or until fuel is visible Squeeze the throttle control and pull the starter rope until the engine starts Drain the fuel tank and add fresh, properly mixed fuel Replace the spark plug THE ENGINE WILL NOT IDLE The air filter is dirty The fuel is old (over 30 days) and/or improperly mixed The idle speed is incorrect Clean or replace the air filter Drain the fuel tank and add fresh, properly mixed fuel Adjust the idle speed THE ENGINE WILL...

Operation Manual
Page 20
No product returned directly to the parts as identified. Bump Knobs, Outer Spools, Cutting Line, Inner Reels, Starter Pulley, Starter Ropes, Drive Belts, Saw Chains, Guide Bars, Cultivator Tines, Blades. No implied warranty, including any implied warranty of merchantability or fitness for a particular purpose, applies after the applicable period of express written warranty above as to the factory will be liable for incidental or consequential loss or damages including, without...
No product returned directly to the parts as identified. Bump Knobs, Outer Spools, Cutting Line, Inner Reels, Starter Pulley, Starter Ropes, Drive Belts, Saw Chains, Guide Bars, Cultivator Tines, Blades. No implied warranty, including any implied warranty of merchantability or fitness for a particular purpose, applies after the applicable period of express written warranty above as to the factory will be liable for incidental or consequential loss or damages including, without...


