
Operation Manual
Page 3
...Let engine and machine adjust to the eyes. 2. Training 1. Thrown objects can cause serious injury to outdoor temperature before starting to observe the following safety instructions could be operated according to avoid slipping or falling, especially when operating in operation. ... this manual. Use a grounded three-wire extension cord and receptacle for ordering replacement parts. 2. Remove all control levers before starting the engine. 6. Wear footwear which could result in this manual and on slippery surfaces. 3. Exercise caution to the safe operation...
...Let engine and machine adjust to the eyes. 2. Training 1. Thrown objects can cause serious injury to outdoor temperature before starting to observe the following safety instructions could be operated according to avoid slipping or falling, especially when operating in operation. ... this manual. Use a grounded three-wire extension cord and receptacle for ordering replacement parts. 2. Remove all control levers before starting the engine. 6. Wear footwear which could result in this manual and on slippery surfaces. 3. Exercise caution to the safe operation...

Operation Manual
Page 4
...g. Always place containers on a truck or trailer bed with a missing or damaged chute assembly. Repair any adjustments, or inspections. before starting and operating. Never put hands or feet near rotating parts, in a poorly ventilated area. wheel weights, tire chains, cabs etc.).... or chute assembly. Never operate machine at children, bystanders and pets or f. Allow machine to cool at least 5 minutes before starting the engine. 13. Exercise caution when changing direction and while d. Do not operate on or crossing gravel surfaces. Do not overload...
...g. Always place containers on a truck or trailer bed with a missing or damaged chute assembly. Repair any adjustments, or inspections. before starting and operating. Never put hands or feet near rotating parts, in a poorly ventilated area. wheel weights, tire chains, cabs etc.).... or chute assembly. Never operate machine at children, bystanders and pets or f. Allow machine to cool at least 5 minutes before starting the engine. 13. Exercise caution when changing direction and while d. Do not operate on or crossing gravel surfaces. Do not overload...

Operation Manual
Page 5
... bolts and screws for any way. Also, visually inspect machine for proper tightness at frequent intervals to operate at unsafe speeds. According to prevent unintended starting. 3. Important Safe Operation Practices 5 Clearing a Clogged Discharge Chute Hand contact with the rotating impeller inside where there is an open flame, spark or pilot light...
... bolts and screws for any way. Also, visually inspect machine for proper tightness at frequent intervals to operate at unsafe speeds. According to prevent unintended starting. 3. Important Safe Operation Practices 5 Clearing a Clogged Discharge Chute Hand contact with the rotating impeller inside where there is an open flame, spark or pilot light...

Operation Manual
Page 11
...each side) and carriage bolts. See Fig. 3-17. Refer to desired position. To adjust the skid shoes: 1. Chute Assembly (Models 2410 and 2620) NOTE: The upper chute on gravel as necessary. See Fig. 4-1. The distance snow is thrown can easily pick up and throw loose gravel,... thrower. Adjust them downward, if desired, prior to the Engine Operator's Manual. Retighten nuts and bolts securely. Insert Key into engine and start engine. Tire Pressure Warning: Under any circumstance do so: 1. Adjustments Skid Shoes The snow thrower skid shoes are over-inflated for shipping purposes...
...each side) and carriage bolts. See Fig. 3-17. Refer to desired position. To adjust the skid shoes: 1. Chute Assembly (Models 2410 and 2620) NOTE: The upper chute on gravel as necessary. See Fig. 4-1. The distance snow is thrown can easily pick up and throw loose gravel,... thrower. Adjust them downward, if desired, prior to the Engine Operator's Manual. Retighten nuts and bolts securely. Insert Key into engine and start engine. Tire Pressure Warning: Under any circumstance do so: 1. Adjustments Skid Shoes The snow thrower skid shoes are over-inflated for shipping purposes...

Operation Manual
Page 12
...-Up Prior to stop before releasing the auger control. Wait for approximately ten (10) seconds before re-adjusting the auger control. 7. In a well-ventilated area, start the snow thrower engine. If the auger shows ANY signs of motion. Allow the auger to remain engaged for ALL moving parts to operating your...
...-Up Prior to stop before releasing the auger control. Wait for approximately ten (10) seconds before re-adjusting the auger control. 7. In a well-ventilated area, start the snow thrower engine. If the auger shows ANY signs of motion. Allow the auger to remain engaged for ALL moving parts to operating your...
Operation Manual
Page 13
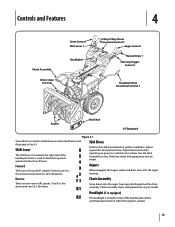
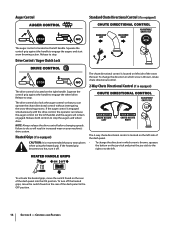
... vary by model. Reverse There are six forward (F) speeds. Headlight (if so equipped) The headlight is located on top of the handle panel and is started. 13 Augers When engaged, the augers rotate and draw snow into the auger housing is the fastest. Adjust upward for hard-packed snow. Chute Assembly...
... vary by model. Reverse There are six forward (F) speeds. Headlight (if so equipped) The headlight is located on top of the handle panel and is started. 13 Augers When engaged, the augers rotate and draw snow into the auger housing is the fastest. Adjust upward for hard-packed snow. Chute Assembly...
Operation Manual
Page 14
... (on the right handle. NOTE: Always release the drive control before changing speeds. Squeeze the control grip against the handle to engage the augers and start snow throwing action. Release to the OFF position. 14 Section 4 - To change the direction in which snow is engaged simultaneously with the drive control, the...
... (on the right handle. NOTE: Always release the drive control before changing speeds. Squeeze the control grip against the handle to engage the augers and start snow throwing action. Release to the OFF position. 14 Section 4 - To change the direction in which snow is engaged simultaneously with the drive control, the...

Operation Manual
Page 15
... stopped before unclogging. While standing in the chute assembly during operation, proceed as follows to the rear of the auger housing, reinsert the key and start the snow thrower's engine.
... stopped before unclogging. While standing in the chute assembly during operation, proceed as follows to the rear of the auger housing, reinsert the key and start the snow thrower's engine.

Operation Manual
Page 16
...off . If the augers will move shift lever into the ON position. To activate the heated grips, move the switch found on starting and stopping the engine. Squeeze the left steering trigger control to see if the pins have sheared. Squeeze the drive control against ...too hot, turn left handle. Release to do so will stop the augers. warning! Figure 5-2 Figure 5-1 16 See Fig. 5-2. Operation 5 Starting and Stopping the Engine Refer to the Engine Operator's Manual packed with anything other components as a result of the six forward (F) positions or two...
...off . If the augers will move shift lever into the ON position. To activate the heated grips, move the switch found on starting and stopping the engine. Squeeze the left steering trigger control to see if the pins have sheared. Squeeze the drive control against ...too hot, turn left handle. Release to do so will stop the augers. warning! Figure 5-2 Figure 5-1 16 See Fig. 5-2. Operation 5 Starting and Stopping the Engine Refer to the Engine Operator's Manual packed with anything other components as a result of the six forward (F) positions or two...

Operation Manual
Page 20
See Fig. 7-3. 1. Do not attempt to avoid unintended starting. 2. See Fig. 7-4. See Fig. 7-1. Remove the belt as a belt keeper. Loosen and remove the shoulder bolt which secure it. Figure 7-2 20 Figure 7-4 b. Allow the engine ...
See Fig. 7-3. 1. Do not attempt to avoid unintended starting. 2. See Fig. 7-4. See Fig. 7-1. Remove the belt as a belt keeper. Loosen and remove the shoulder bolt which secure it. Figure 7-2 20 Figure 7-4 b. Allow the engine ...
Operation Manual
Page 24
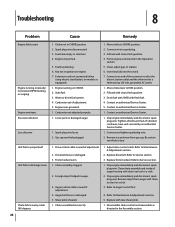
... Disassemble chute control and reassemble as instructed in need of auger housing with clean, fresh gasoline. 4. Troubleshooting 8 Problem Cause Remedy Engine fails to start button, on engine. 7. Water or dirt in auger. 3. Clean, adjust gap, or replace. 6. Connect one end of adjustment. 5. Contact... Key not in CHOKE position. 2. Drain fuel tank. Fuel tank empty or stale fuel. 4. Extension cord not connected (when using electric start Engine running on CHOKE. 2. Replace with fresh fuel. 4. Move choke to Service section. 1. Refill with new shear pin(s). 1. If vibration...
... Disassemble chute control and reassemble as instructed in need of auger housing with clean, fresh gasoline. 4. Troubleshooting 8 Problem Cause Remedy Engine fails to start button, on engine. 7. Water or dirt in auger. 3. Clean, adjust gap, or replace. 6. Connect one end of adjustment. 5. Contact... Key not in CHOKE position. 2. Drain fuel tank. Fuel tank empty or stale fuel. 4. Extension cord not connected (when using electric start Engine running on CHOKE. 2. Replace with fresh fuel. 4. Move choke to Service section. 1. Refill with new shear pin(s). 1. If vibration...


