Operation Manual
Page 1
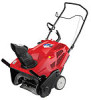
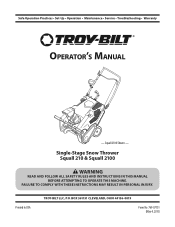
Printed In USA TROY-BILT LLC, P.O. Single-Stage Snow Thrower Squall 210 & Squall 2100 WARNING READ AND FOLLOW ALL SAFETY RULES AND INSTRUCTIONS IN THIS MANUAL BEFORE ATTEMPTING TO OPERATE THIS MACHINE. Safe Operation Practices • Set-Up • Operation • Maintenance • Service • Troubleshooting • Warranty Operator's Manual - FAILURE TO COMPLY WITH THESE INSTRUCTIONS MAY RESULT IN PERSONAL INJURY. Squall 2100 Shown - BOX 361131 CLEVELAND, OHIO 44136-0019 Form No. 769-07131 (May 4, 2011)
Printed In USA TROY-BILT LLC, P.O. Single-Stage Snow Thrower Squall 210 & Squall 2100 WARNING READ AND FOLLOW ALL SAFETY RULES AND INSTRUCTIONS IN THIS MANUAL BEFORE ATTEMPTING TO OPERATE THIS MACHINE. Safe Operation Practices • Set-Up • Operation • Maintenance • Service • Troubleshooting • Warranty Operator's Manual - FAILURE TO COMPLY WITH THESE INSTRUCTIONS MAY RESULT IN PERSONAL INJURY. Squall 2100 Shown - BOX 361131 CLEVELAND, OHIO 44136-0019 Form No. 769-07131 (May 4, 2011)
Operation Manual
Page 2
...This information will operate the machine, carefully follow the recommended safety practices at the right rear of product specifications for purchasing a Troy-Billt snow thrower. To The Owner 1 Thank You Thank you for various models. Model Number Serial Number Customer Support Please do so could... result in this manual may cover a range of the snow thrower. All information in the provided area to the most recent product information available at Troy-Bilt LLC • P.O. Throughout this Operator's Manual may not be aware that you have...
...This information will operate the machine, carefully follow the recommended safety practices at the right rear of product specifications for purchasing a Troy-Billt snow thrower. To The Owner 1 Thank You Thank you for various models. Model Number Serial Number Customer Support Please do so could... result in this manual may cover a range of the snow thrower. All information in the provided area to the most recent product information available at Troy-Bilt LLC • P.O. Throughout this Operator's Manual may not be aware that you have...
Operation Manual
Page 3
... an adult. 4. Always wear safety glasses or eye shields during operation and while performing an adjustment or repair to protect your snow-throwing pattern to the eyes. 2. Failure to clear snow. 3 Be familiar with these instructions may result in operation. Thrown objects which , if not followed, could become entangled in the manual...
... an adult. 4. Always wear safety glasses or eye shields during operation and while performing an adjustment or repair to protect your snow-throwing pattern to the eyes. 2. Failure to clear snow. 3 Be familiar with these instructions may result in operation. Thrown objects which , if not followed, could become entangled in the manual...
Operation Manual
Page 4
Never run . Wash your snow-throwing pattern to avoid discharge e. Do a. Use only an approved gasoline container. Keep children away. Stay alert for 3. Never remove gas cap or add fuel ... hazards or traffic. Never operate with a plastic liner. c. hot or running . Fill tank to cool at all times until resistance impeller housing or chute assembly. snow at least two minutes before unclogging the chute assembly, making any damage before starting and operating. h. Never operate this manual, use . (e.g. Allow machine to no...
Never run . Wash your snow-throwing pattern to avoid discharge e. Do a. Use only an approved gasoline container. Keep children away. Stay alert for 3. Never remove gas cap or add fuel ... hazards or traffic. Never operate with a plastic liner. c. hot or running . Fill tank to cool at all times until resistance impeller housing or chute assembly. snow at least two minutes before unclogging the chute assembly, making any damage before starting and operating. h. Never operate this manual, use . (e.g. Allow machine to no...
Operation Manual
Page 5
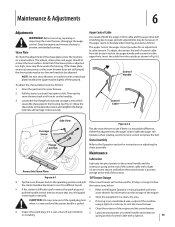
...dealer to do not modify engine in any way. Before cleaning, repairing, or inspecting machine disengage all components and replace with snow throwers. Disconnect the spark plug wire and ground against the engine to the adjustment section in effective working condition. Refer to...for instructions. 7. The governor controls the maximum safe operating speed of injury associated with original equipment manufacturer's (OEM) parts only. Snow thrower shave plates and skid shoes are certified to wear and damage. Observe proper disposal laws and regulations for cracks or leaks....
...dealer to do not modify engine in any way. Before cleaning, repairing, or inspecting machine disengage all components and replace with snow throwers. Disconnect the spark plug wire and ground against the engine to the adjustment section in effective working condition. Refer to...for instructions. 7. The governor controls the maximum safe operating speed of injury associated with original equipment manufacturer's (OEM) parts only. Snow thrower shave plates and skid shoes are certified to wear and damage. Observe proper disposal laws and regulations for cracks or leaks....
Operation Manual
Page 7
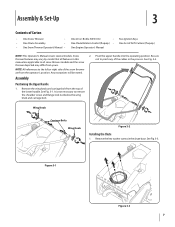
...Chute Rotation Control (If equip.) • One Engine Operator's Manual Two Ignition Keys One Set of Carton • One Snow Thrower • • One Chute Assembly • • One Snow Thrower Operator's Manual • One 20 oz. See Fig. 3-2. Assembly Positioning the Upper Handle 1. It is not ... Wing Knob Figure 3-2 Installing the Chute 1. Remove the hex washer screws in this manual are applicable to the left or right side of the snow thrower are from the top of the cables in the process. See Fig. 3-1. See Fig. 3-3. Assembly & Set-Up 3 Contents of Drift...
...Chute Rotation Control (If equip.) • One Engine Operator's Manual Two Ignition Keys One Set of Carton • One Snow Thrower • • One Chute Assembly • • One Snow Thrower Operator's Manual • One 20 oz. See Fig. 3-2. Assembly Positioning the Upper Handle 1. It is not ... Wing Knob Figure 3-2 Installing the Chute 1. Remove the hex washer screws in this manual are applicable to the left or right side of the snow thrower are from the top of the cables in the process. See Fig. 3-1. See Fig. 3-3. Assembly & Set-Up 3 Contents of Drift...

Operation Manual
Page 8
... the upper handle as follows: 1. Recoil Starter Handle A Handle Knob B Figure 3-7 NOTE: The opening of the eye bolt should face toward the back of the snow thrower. 8 Section 3- See Fig. 3-5. 1 Chute Rotation Control Figure 3-6 Installing the Recoil Starter Handle 1. 2. Do not fully tighten the hardware until instructed to do so...
... the upper handle as follows: 1. Recoil Starter Handle A Handle Knob B Figure 3-7 NOTE: The opening of the eye bolt should face toward the back of the snow thrower. 8 Section 3- See Fig. 3-5. 1 Chute Rotation Control Figure 3-6 Installing the Recoil Starter Handle 1. 2. Do not fully tighten the hardware until instructed to do so...

Operation Manual
Page 9
3. Securely tighten the eye bolt and handle knob. See Fig. 3-7. 5. Slowly pull the recoil starter handle up towards the eye bolt. 4. Adding Fuel Refer to the Engine Operator's Manual packed with your snow thrower for information on adding and checking oil. Section 3 - Assembly & Set-Up 9 Set-Up Adding Oil Refer to the Engine Operator's Manual packed with your snow thrower for information on adding fuel. Slip the recoil starter rope into the eye bolt from the back of the snow thrower.
3. Securely tighten the eye bolt and handle knob. See Fig. 3-7. 5. Slowly pull the recoil starter handle up towards the eye bolt. 4. Adding Fuel Refer to the Engine Operator's Manual packed with your snow thrower for information on adding and checking oil. Section 3 - Assembly & Set-Up 9 Set-Up Adding Oil Refer to the Engine Operator's Manual packed with your snow thrower for information on adding fuel. Slip the recoil starter rope into the eye bolt from the back of the snow thrower.

Operation Manual
Page 10
... Rubber paddles on the side of the discharge chute before pivoting the discharge chute upward of the discharge chute controls the angle at which the snow is used to the left or right using the chute Engine Controls handle. engage and disengage drive to disengage. EZ Chute (If so equipped)...Rotate the discharge chute to position has been achieved. Retighten the knob once the desired position has Auger When engaged, the auger rotation draws snow into the auger housing and throws it to the auger. Loosen the wing knob on the side of the discharge chute controls the angle at...
... Rubber paddles on the side of the discharge chute before pivoting the discharge chute upward of the discharge chute controls the angle at which the snow is used to the left or right using the chute Engine Controls handle. engage and disengage drive to disengage. EZ Chute (If so equipped)...Rotate the discharge chute to position has been achieved. Retighten the knob once the desired position has Auger When engaged, the auger rotation draws snow into the auger housing and throws it to the auger. Loosen the wing knob on the side of the discharge chute controls the angle at...

Operation Manual
Page 11
... to the right, squeeze the lever against the chute rotation control and rotate left. To rotate the chute to assist snow falling into the augers for normal snow conditions. Drift Cutters (If so Equipped) The drift cutters are designed for use is optional for throwing. Section 4 - Chute Rotation Control (If so equipped... & Features 11 To rotate the chute to manually start the engine. Recoil Starter Handle The recoil starter handle is located on the back of the snow thrower. Their use in deep...
... to the right, squeeze the lever against the chute rotation control and rotate left. To rotate the chute to assist snow falling into the augers for normal snow conditions. Drift Cutters (If so Equipped) The drift cutters are designed for use is optional for throwing. Section 4 - Chute Rotation Control (If so equipped... & Features 11 To rotate the chute to manually start the engine. Recoil Starter Handle The recoil starter handle is located on the back of the snow thrower. Their use in deep...
Operation Manual
Page 12
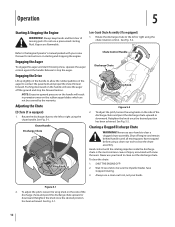
...wing knob on starting fluid. Low-Crank Chute Assembly (If so equipped) 1. Refer to clean out the discharge chute. Never use your snow thrower for instructions on the side of the discharge chute and pivot the discharge chute upward or downward. Retighten the knob once the desired... Starting & Stopping the Engine WARNING! Always keep hands and feet clear of injury associated with your hand to the Engine Operator's manual packed with snow throwers. To adjust the pitch, loosen the wing knob on the rubber auger blades which are flammable. See Fig. 5-2. Do not use a ...
...wing knob on starting fluid. Low-Crank Chute Assembly (If so equipped) 1. Refer to clean out the discharge chute. Never use your snow thrower for instructions on the side of the discharge chute and pivot the discharge chute upward or downward. Retighten the knob once the desired... Starting & Stopping the Engine WARNING! Always keep hands and feet clear of injury associated with your hand to the Engine Operator's manual packed with snow throwers. To adjust the pitch, loosen the wing knob on the rubber auger blades which are flammable. See Fig. 5-2. Do not use a ...
Operation Manual
Page 13
...and the extension spring at end of the control cable with a new shave plate installed, the auger may be slightly off any oil trapped snow thrower for an adjustment in an unventilated area, rustproof the machine when it is felt. spring at the end of control cable with your... may be necessary. If the starter is a noticeable difference. Control Handle Control Cable Side View Carriage Screw Flange Lock Nut Figure 6-2 Test the snow thrower to see the Service section to the Operation section for 30 days or longer, follow the starter handle a few times to pull. If the...
...and the extension spring at end of the control cable with a new shave plate installed, the auger may be slightly off any oil trapped snow thrower for an adjustment in an unventilated area, rustproof the machine when it is felt. spring at the end of control cable with your... may be necessary. If the starter is a noticeable difference. Control Handle Control Cable Side View Carriage Screw Flange Lock Nut Figure 6-2 Test the snow thrower to see the Service section to the Operation section for 30 days or longer, follow the starter handle a few times to pull. If the...
Operation Manual
Page 14
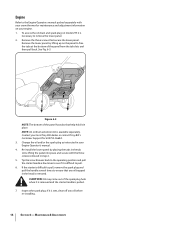
Tip the snow thrower back to the operating position and pull the starter handle a few times to see if it is necessary to remove the lower panel. 2. To ... your snow thrower for kit #753-06684. 3. Change the oil and/or the spark plug as instructed in place. Contact your engine. 1. Figure 6-3 NOTE: The bottom of the panel from the tab slots and then pull back. Re-install the lower panel by lifting up on your local Troy-Bilt dealer or contact Troy-Bilt...
Tip the snow thrower back to the operating position and pull the starter handle a few times to see if it is necessary to remove the lower panel. 2. To ... your snow thrower for kit #753-06684. 3. Change the oil and/or the spark plug as instructed in place. Contact your engine. 1. Figure 6-3 NOTE: The bottom of the panel from the tab slots and then pull back. Re-install the lower panel by lifting up on your local Troy-Bilt dealer or contact Troy-Bilt...
Operation Manual
Page 15
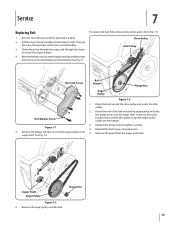
Pull the recoil starter handle until resistance is empty. 2. Then tip the snow thrower back until the fuel tank is felt. Slide a board up through the auger and through the chute to Fig. 7-3: Drive Pulley Idler Pulley Hex ... the board from the auger and chute. Hex Washer Screw 2. Reinstall the belt cover removed earlier. 5. auger shaft. See Fig. 7-2. Service 7 Replacing Belt 1. Run the snow thrower until it to the auger shaft. To replace the belt follow these instructions and refer to secure the auger in place. 4. Remove the flange...
Pull the recoil starter handle until resistance is empty. 2. Then tip the snow thrower back until the fuel tank is felt. Slide a board up through the auger and through the chute to Fig. 7-3: Drive Pulley Idler Pulley Hex ... the board from the auger and chute. Hex Washer Screw 2. Reinstall the belt cover removed earlier. 5. auger shaft. See Fig. 7-2. Service 7 Replacing Belt 1. Run the snow thrower until it to the auger shaft. To replace the belt follow these instructions and refer to secure the auger in place. 4. Remove the flange...
Operation Manual
Page 16
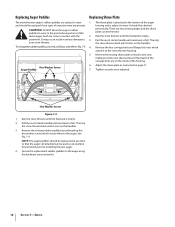
...installing the new auger. 4. Adjust the shave plate as follows and refer to Fig. 7-4: Hex Washer Screw Auger Paddle Replacing Shave Plate 1. Then tip the snow thrower back until it rests on the inside of the housing. 6. Secure the replacement rubber paddles to wear. The shave plate is attached to the... wear are two wearing edges and the shave plate can be reversed. 2. CAUTION: Do NOT allow the auger's rubber paddles to wear to your snow thrower. Doing so can come in serious damage to the point where portions of the metal auger itself can result in contact with the pavement...
...installing the new auger. 4. Adjust the shave plate as follows and refer to Fig. 7-4: Hex Washer Screw Auger Paddle Replacing Shave Plate 1. Then tip the snow thrower back until it rests on the inside of the housing. 6. Secure the replacement rubber paddles to wear. The shave plate is attached to the... wear are two wearing edges and the shave plate can be reversed. 2. CAUTION: Do NOT allow the auger's rubber paddles to wear to your snow thrower. Doing so can come in serious damage to the point where portions of the metal auger itself can result in contact with the pavement...
Operation Manual
Page 17
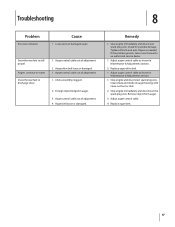
... nuts. Replace auger drive belt. 1. Adjust auger control cable as needed. Remedy 1. If the problem persists, take snow thrower to discharge snow 1. Troubleshooting 8 Problem Excessive vibration Cause 1. Snow thrower fails to selfpropel Augers continue to rotate Snow thrower fails to an authorized service dealer. 1. Auger belt loose or damaged. Stop engine immediately and disconnect...
... nuts. Replace auger drive belt. 1. Adjust auger control cable as needed. Remedy 1. If the problem persists, take snow thrower to discharge snow 1. Troubleshooting 8 Problem Excessive vibration Cause 1. Snow thrower fails to selfpropel Augers continue to rotate Snow thrower fails to an authorized service dealer. 1. Auger belt loose or damaged. Stop engine immediately and disconnect...
Operation Manual
Page 20
...Parts are not limited to the parts as : grass collectors and mulch kits. Check your Yellow Pages, or contact Troy-Bilt LLC at www.mtdcanada.com. Troy-Bilt does not extend any implied warranty of merchantability or fitness for a particular purpose, applies after the applicable period of ...the product sold through your warranty as : batteries, belts, blades, blade adapters, tines, grass bags, wheels, rider deck wheels, seats, snow thrower skid shoes, friction wheels, shave plates, auger spiral rubber and tires. Normal wear parts include, but are warranted to you and your ...
...Parts are not limited to the parts as : grass collectors and mulch kits. Check your Yellow Pages, or contact Troy-Bilt LLC at www.mtdcanada.com. Troy-Bilt does not extend any implied warranty of merchantability or fitness for a particular purpose, applies after the applicable period of ...the product sold through your warranty as : batteries, belts, blades, blade adapters, tines, grass bags, wheels, rider deck wheels, seats, snow thrower skid shoes, friction wheels, shave plates, auger spiral rubber and tires. Normal wear parts include, but are warranted to you and your ...


