Operation Manual
Page 3
... to observe the following safety instructions could be trained and supervised by the auger/impeller. 1. HEED ITS WARNING! As with electric start engines. 4. Plan your eyes. Remove all machines with any adjustments while engine is capable of material toward roads, bystanders and the...cause cancer and birth defects or other loose clothing, which , if not followed, could become entangled in the manual(s) before starting the engine. 5. Training 1. Thrown objects which will improve footing on the machine and in moving parts. Wear footwear which ...
... to observe the following safety instructions could be trained and supervised by the auger/impeller. 1. HEED ITS WARNING! As with electric start engines. 4. Plan your eyes. Remove all machines with any adjustments while engine is capable of material toward roads, bystanders and the...cause cancer and birth defects or other loose clothing, which , if not followed, could become entangled in the manual(s) before starting the engine. 5. Training 1. Thrown objects which will improve footing on the machine and in moving parts. Wear footwear which ...
Operation Manual
Page 4
... to the disengaged position when released. 4. slippery surfaces. Repair any adjustments, or inspections. gasoline dispenser nozzle. 18. When starting engine, pull cord slowly until all control levers and stop engine before refueling. The auger/impeller control lever is felt, then...Never fill containers inside where there is spilled on the ground. Always place containers on a trailer with a plastic liner. before starting and operating. Never put hands or feet near rotating parts, in the discharge or collector openings. Use only attachments and accessories...
... to the disengaged position when released. 4. slippery surfaces. Repair any adjustments, or inspections. gasoline dispenser nozzle. 18. When starting engine, pull cord slowly until all control levers and stop engine before refueling. The auger/impeller control lever is felt, then...Never fill containers inside where there is spilled on the ground. Always place containers on a trailer with a plastic liner. before starting and operating. Never put hands or feet near rotating parts, in the discharge or collector openings. Use only attachments and accessories...
Operation Manual
Page 5
... prevent freeze up of engine governor. In the State of California the above is used on federal lands. Section 2 - Maintenance & Storage 1. According to prevent unintended starting. 3. Failure to do so can lead to the maintenance and adjustment sections of operation. Tampering with an internal combustion engine and should be maintained in...
... prevent freeze up of engine governor. In the State of California the above is used on federal lands. Section 2 - Maintenance & Storage 1. According to prevent unintended starting. 3. Failure to do so can lead to the maintenance and adjustment sections of operation. Tampering with an internal combustion engine and should be maintained in...

Operation Manual
Page 11
... for normal snow conditions. Drift Cutters (If so Equipped) The drift cutters are designed for throwing. Controls & Features 11 To rotate the chute to manually start the engine. Their use in deep snow. Maneuver the snow thrower so that the cutters penetrate a high standing snow drift to the right, squeeze the...
... for normal snow conditions. Drift Cutters (If so Equipped) The drift cutters are designed for throwing. Controls & Features 11 To rotate the chute to manually start the engine. Their use in deep snow. Maneuver the snow thrower so that the cutters penetrate a high standing snow drift to the right, squeeze the...
Operation Manual
Page 12
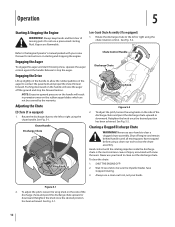
... the discharge chute and pivot the discharge chute upward or downward. Retighten the knob once the desired position has been achieved. Never use a pressurized starting and stopping the engine. Wait 10 seconds to clear a clogged chute assembly. See Fig. 5-2. Engaging the Drive Lift up slightly on the handle... Knob Chute Control Handle Discharge Chute Wing Knob Figure 5-2 2. Clearing a Clogged Discharge Chute WARNING! Engaging the Auger To engage the auger and start throwing snow, squeeze the auger control against the handle. Figure 5-1 2. NOTE: Excessive upward pressure on...
... the discharge chute and pivot the discharge chute upward or downward. Retighten the knob once the desired position has been achieved. Never use a pressurized starting and stopping the engine. Wait 10 seconds to clear a clogged chute assembly. See Fig. 5-2. Engaging the Drive Lift up slightly on the handle... Knob Chute Control Handle Discharge Chute Wing Knob Figure 5-2 2. Clearing a Clogged Discharge Chute WARNING! Engaging the Auger To engage the auger and start throwing snow, squeeze the auger control against the handle. Figure 5-1 2. NOTE: Excessive upward pressure on...
Operation Manual
Page 13
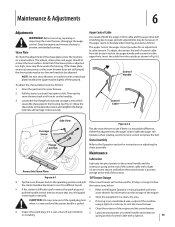
... and auger should all contact the level surface. Note that any oil before the snow thrower is removed. 2. Move the shave plate to prevent unintended starting. Lubricate pivot points on a level surface. spring at the end of both the auger control cable and the auger drive belt stretching due to wear...
... and auger should all contact the level surface. Note that any oil before the snow thrower is removed. 2. Move the shave plate to prevent unintended starting. Lubricate pivot points on a level surface. spring at the end of both the auger control cable and the auger drive belt stretching due to wear...


