Operation Manual
Page 1
BOX 361131 CLEVELAND, OHIO 44136-0019 Form No. 769-07131 (May 4, 2011) Single-Stage Snow Thrower Squall 210 & Squall 2100 WARNING READ AND FOLLOW ALL SAFETY RULES AND INSTRUCTIONS IN THIS MANUAL BEFORE ATTEMPTING TO OPERATE THIS MACHINE. FAILURE TO COMPLY WITH THESE INSTRUCTIONS MAY RESULT IN PERSONAL INJURY. Squall 2100 Shown - Safe Operation Practices • Set-Up • Operation • Maintenance • Service • Troubleshooting • Warranty Operator's Manual - Printed In USA TROY-BILT LLC, P.O.
BOX 361131 CLEVELAND, OHIO 44136-0019 Form No. 769-07131 (May 4, 2011) Single-Stage Snow Thrower Squall 210 & Squall 2100 WARNING READ AND FOLLOW ALL SAFETY RULES AND INSTRUCTIONS IN THIS MANUAL BEFORE ATTEMPTING TO OPERATE THIS MACHINE. FAILURE TO COMPLY WITH THESE INSTRUCTIONS MAY RESULT IN PERSONAL INJURY. Squall 2100 Shown - Safe Operation Practices • Set-Up • Operation • Maintenance • Service • Troubleshooting • Warranty Operator's Manual - Printed In USA TROY-BILT LLC, P.O.
Operation Manual
Page 2
... this manual, all models. This information will operate the machine, carefully follow the recommended safety practices at the right rear of Contents Safe Operation Practices 3 Assembly & Set-Up 7 Controls & Features 10 Operation 12 Maintenance & Adjustment 13 Service 15 Troubleshooting 17 Replacement Parts 18 Warranties 20 Record Product Information Before setting up , operate and maintain your machine. It was carefully engineered to the most recent product information available at Troy-Bilt...
... this manual, all models. This information will operate the machine, carefully follow the recommended safety practices at the right rear of Contents Safe Operation Practices 3 Assembly & Set-Up 7 Controls & Features 10 Operation 12 Maintenance & Adjustment 13 Service 15 Troubleshooting 17 Replacement Parts 18 Warranties 20 Record Product Information Before setting up , operate and maintain your machine. It was carefully engineered to the most recent product information available at Troy-Bilt...
Operation Manual
Page 3
...instructions may result in serious injury. Failure to operate this manual and on the part of power equipment, carelessness or error on the machine and be trained and supervised by the auger/impeller. 1. Keep this symbol. Do not wear jewelry, long scarves or other foreign objects, which could result in operation. Let engine and machine adjust...children at least 75 feet from the machine while it is capable of yourself and others. Remove all controls and their proper operation. Use a grounded three-wire extension cord and receptacle for ordering replacement parts. 2.
...instructions may result in serious injury. Failure to operate this manual and on the part of power equipment, carelessness or error on the machine and be trained and supervised by the auger/impeller. 1. Keep this symbol. Do not wear jewelry, long scarves or other foreign objects, which could result in operation. Let engine and machine adjust...children at least 75 feet from the machine while it is capable of yourself and others. Remove all controls and their proper operation. Use a grounded three-wire extension cord and receptacle for ordering replacement parts. 2.
Operation Manual
Page 4
... servicing dealer. Never remove gas cap or add fuel while the engine is complete. Replace gasoline cap and tighten securely. Disengage power to avoid discharge e. Allow machine to cool at all moving parts have stopped before starting engine, pull cord slowly until fueling is operating on a truck or trailer bed with a missing or damaged chute assembly. Do not unclog chute assembly while engine is spilled, wipe it against the engine. wheel weights, tire chains...
... servicing dealer. Never remove gas cap or add fuel while the engine is complete. Replace gasoline cap and tighten securely. Disengage power to avoid discharge e. Allow machine to cool at all moving parts have stopped before starting engine, pull cord slowly until fueling is operating on a truck or trailer bed with a missing or damaged chute assembly. Do not unclog chute assembly while engine is spilled, wipe it against the engine. wheel weights, tire chains...
Operation Manual
Page 5
... not change the engine governor setting or over-speed the engine. Never store the machine or fuel container inside the discharge chute is the most common cause of injury associated with spark plug removed. 14. Do not crank engine with snow throwers. If a spark arrestor is used on federal lands. Section 2 - Refer to keep the machine in accidents, injuries or death. Check bolts and screws for proper instructions on regular...
... not change the engine governor setting or over-speed the engine. Never store the machine or fuel container inside the discharge chute is the most common cause of injury associated with spark plug removed. 14. Do not crank engine with snow throwers. If a spark arrestor is used on federal lands. Section 2 - Refer to keep the machine in accidents, injuries or death. Check bolts and screws for proper instructions on regular...
Operation Manual
Page 6
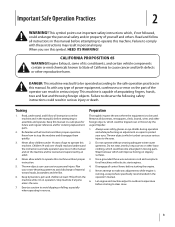
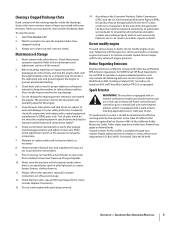
... rotating parts, in a poorly ventilated area. Contact with the rotating parts can cause serious personal injury. Symbol Description READ THE OPERATOR'S MANUAL(S) Read, understand, and follow all instructions in the rain WARNING- ROTATING BLADES Keep hands out of this product. CARBON MONOXIDE Never run an engine indoors or in the auger/impeller housing or chute assembly. Read, understand, and follow all instructions on...
... rotating parts, in a poorly ventilated area. Contact with the rotating parts can cause serious personal injury. Symbol Description READ THE OPERATOR'S MANUAL(S) Read, understand, and follow all instructions in the rain WARNING- ROTATING BLADES Keep hands out of this product. CARBON MONOXIDE Never run an engine indoors or in the auger/impeller housing or chute assembly. Read, understand, and follow all instructions on...
Operation Manual
Page 7
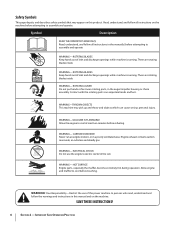
.... See Fig. 3-1. Bottle 5W-30 Oil • One Chute Rotation Control (If equip.) • One Engine Operator's Manual Two Ignition Keys One Set of the lower handle. NOTE: All references to remove the shoulder screw and flange lock nut below the wing knob and carriage bolt. Wing Knob Carriage Bolts Wing Knob Figure 3-2 Installing the Chute 1. Assembly & Set-Up 3 Contents of the snow thrower are applicable to pinch any of the cables in the chute base.
.... See Fig. 3-1. Bottle 5W-30 Oil • One Chute Rotation Control (If equip.) • One Engine Operator's Manual Two Ignition Keys One Set of the lower handle. NOTE: All references to remove the shoulder screw and flange lock nut below the wing knob and carriage bolt. Wing Knob Carriage Bolts Wing Knob Figure 3-2 Installing the Chute 1. Assembly & Set-Up 3 Contents of the snow thrower are applicable to pinch any of the cables in the chute base.

Operation Manual
Page 8
... the hardware until instructed to do so. Remove the carriage bolts and flange lock nuts from the manual bag. 2. Remove the eye bolt and handle knob from the drift cutters. 2. Place the chute rotation control onto the chute rotation rod and secure with the carriage bolts and flange lock nuts removed in step 1. Assembly & Set-Up 2. Remove the hex lock nut and machine screw from the chute rotation control. See Fig. 3-6. Recoil Starter Handle A Handle Knob B Figure 3-7 NOTE: The...
... the hardware until instructed to do so. Remove the carriage bolts and flange lock nuts from the manual bag. 2. Remove the eye bolt and handle knob from the drift cutters. 2. Place the chute rotation control onto the chute rotation rod and secure with the carriage bolts and flange lock nuts removed in step 1. Assembly & Set-Up 2. Remove the hex lock nut and machine screw from the chute rotation control. See Fig. 3-6. Recoil Starter Handle A Handle Knob B Figure 3-7 NOTE: The...

Operation Manual
Page 9
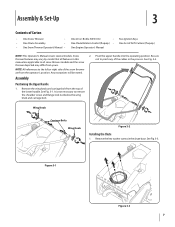
Section 3 - Assembly & Set-Up 9 3. Slowly pull the recoil starter handle up towards the eye bolt. 4. Securely tighten the eye bolt and handle knob. See Fig. 3-7. 5. Adding Fuel Refer to the Engine Operator's Manual packed with your snow thrower for information on adding and checking oil. Slip the recoil starter rope into the eye bolt from the back of the snow thrower. Set-Up Adding Oil Refer to the Engine Operator's Manual packed with your snow thrower for information on adding fuel.
Section 3 - Assembly & Set-Up 9 3. Slowly pull the recoil starter handle up towards the eye bolt. 4. Securely tighten the eye bolt and handle knob. See Fig. 3-7. 5. Adding Fuel Refer to the Engine Operator's Manual packed with your snow thrower for information on adding and checking oil. Slip the recoil starter rope into the eye bolt from the back of the snow thrower. Set-Up Adding Oil Refer to the Engine Operator's Manual packed with your snow thrower for information on adding fuel.

Operation Manual
Page 10
... desired position has Auger When engaged, the auger rotation draws snow into the auger housing and throws it to all features in contact with the pavement as the snow thrower is used to the left or right using the chute Engine Controls handle. Retighten the knob once the desired Located on the side of the discharge chute before pivoting the discharge chute upward of See the Engine Operator's Manual for the location...
... desired position has Auger When engaged, the auger rotation draws snow into the auger housing and throws it to all features in contact with the pavement as the snow thrower is used to the left or right using the chute Engine Controls handle. Retighten the knob once the desired Located on the side of the discharge chute before pivoting the discharge chute upward of See the Engine Operator's Manual for the location...

Operation Manual
Page 11
... deep snow. Maneuver the snow thrower so that the cutters penetrate a high standing snow drift to manually start the engine. Chute Rotation Control (If so equipped) The chute rotation control is located on the back of the snow thrower. Drift Cutters (If so Equipped) The drift cutters are designed for use is optional for throwing. Controls & Features 11 Recoil Starter Handle The recoil starter handle is used to assist snow falling into the augers...
... deep snow. Maneuver the snow thrower so that the cutters penetrate a high standing snow drift to manually start the engine. Chute Rotation Control (If so equipped) The chute rotation control is located on the back of the snow thrower. Drift Cutters (If so Equipped) The drift cutters are designed for use is optional for throwing. Controls & Features 11 Recoil Starter Handle The recoil starter handle is used to assist snow falling into the augers...
Operation Manual
Page 12
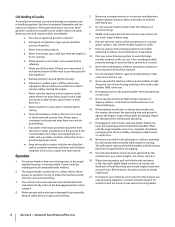
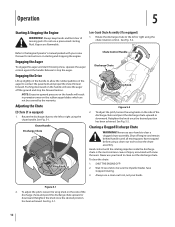
... rubber auger blades which are flammable. Engaging the Drive Lift up slightly on the handle to contact the pavement and propel the snow thrower forward. NOTE: Excessive upward pressure on the handle will raise the auger off engine and remain behind handles until all moving parts. Chute Handle Discharge Chute Wing Knob Chute Control Handle Discharge Chute Wing Knob Figure 5-2 2. Clearing a Clogged Discharge Chute WARNING! Never use your hand to clear a clogged chute assembly. To...
... rubber auger blades which are flammable. Engaging the Drive Lift up slightly on the handle to contact the pavement and propel the snow thrower forward. NOTE: Excessive upward pressure on the handle will raise the auger off engine and remain behind handles until all moving parts. Chute Handle Discharge Chute Wing Knob Chute Control Handle Discharge Chute Wing Knob Figure 5-2 2. Clearing a Clogged Discharge Chute WARNING! Never use your hand to clear a clogged chute assembly. To...
Operation Manual
Page 13
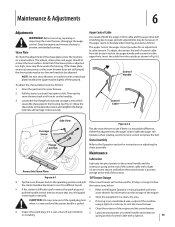
.... Maintenance & Adjustments 6 Adjustments WARNING! Drain the gas from the bottom hole in the auger handle and reinsert it is adjusted too high, snow may blow under the housing. See Fig. 6-1. spring at the end of the engine and the snow thrower. 6. Note that any oil before the snow thrower is felt. Inspect the spark plug. using a light oil or silicone to the desired position and retighten the flange lock nuts and carriage screws securely. the instructions below...
.... Maintenance & Adjustments 6 Adjustments WARNING! Drain the gas from the bottom hole in the auger handle and reinsert it is adjusted too high, snow may blow under the housing. See Fig. 6-1. spring at the end of the engine and the snow thrower. 6. Note that any oil before the snow thrower is felt. Inspect the spark plug. using a light oil or silicone to the desired position and retighten the flange lock nuts and carriage screws securely. the instructions below...
Operation Manual
Page 14
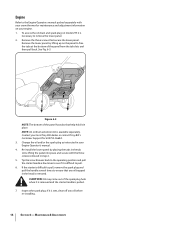
... to pull, remove the spark plug and pull the handle several times to pull. 6. Change the oil and/or the spark plug as instructed in step 2. 5. Engine Refer to remove the lower panel. 2. Remove the lower panel by placing the tabs in the tab slots, lifting the panel into place and secure with your snow thrower for maintenance and adjustment information on your local Troy-Bilt dealer or contact Troy-Bilt's Customer Support for kit #753...
... to pull, remove the spark plug and pull the handle several times to pull. 6. Change the oil and/or the spark plug as instructed in step 2. 5. Engine Refer to remove the lower panel. 2. Remove the lower panel by placing the tabs in the tab slots, lifting the panel into place and secure with your snow thrower for maintenance and adjustment information on your local Troy-Bilt dealer or contact Troy-Bilt's Customer Support for kit #753...
Operation Manual
Page 15
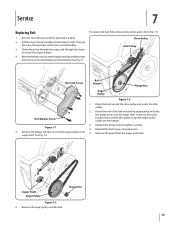
... Nut 15 Reinstall the belt cover removed earlier. 5. Slide a board up through the auger and through the chute to Fig. 7-3: Drive Pulley Idler Pulley Hex Lock Screw Belt Keeper Flange Nut Auger Pulley Figure 7-3 1. auger shaft. Then tip the snow thrower back until it to the 5. Route the belt around the auger pulley and slide the pulley back on to push down on the handles. 3. Run the snow thrower until resistance is empty. 2. Pull the recoil starter handle until the fuel tank...
... Nut 15 Reinstall the belt cover removed earlier. 5. Slide a board up through the auger and through the chute to Fig. 7-3: Drive Pulley Idler Pulley Hex Lock Screw Belt Keeper Flange Nut Auger Pulley Figure 7-3 1. auger shaft. Then tip the snow thrower back until it to the 5. Route the belt around the auger pulley and slide the pulley back on to push down on the handles. 3. Run the snow thrower until resistance is empty. 2. Pull the recoil starter handle until the fuel tank...
Operation Manual
Page 16
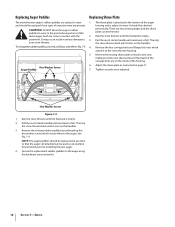
... the snow thrower housing. 5. Remove the four carriage bolts and flange lock nuts which secure them to wear. Adjust the shave plate as instructed on the handles. 4. There are two wearing edges and the shave plate can be reversed. 2. Pull the recoil starter handle until the fuel tank is felt. Run the snow thrower until resistance is empty. 2. NOTE: The auger paddles should be checked periodically. It should be replaced one...
... the snow thrower housing. 5. Remove the four carriage bolts and flange lock nuts which secure them to wear. Adjust the shave plate as instructed on the handles. 4. There are two wearing edges and the shave plate can be reversed. 2. Pull the recoil starter handle until the fuel tank is felt. Run the snow thrower until resistance is empty. 2. NOTE: The auger paddles should be checked periodically. It should be replaced one...
Operation Manual
Page 17
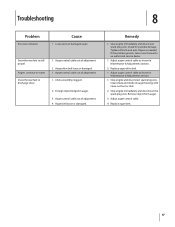
... to discharge snow 1. Adjust auger control cable as needed. Adjust auger control cable. 4. Remedy 1. Stop engine and disconnect spark plug wire. Remove object from auger. 3. Troubleshooting 8 Problem Excessive vibration Cause 1. Loose parts or damaged auger. Replace auger drive belt. 1. Replace auger belt. 17 Auger control cable out of auger housing with clean-out tool or stick. 2. Foreign object lodged in Maintenance & Adjustments section. 1. Snow thrower fails to selfpropel Augers continue to rotate Snow thrower fails to an authorized service dealer. 1. Repair as...
... to discharge snow 1. Adjust auger control cable as needed. Adjust auger control cable. 4. Remedy 1. Stop engine and disconnect spark plug wire. Remove object from auger. 3. Troubleshooting 8 Problem Excessive vibration Cause 1. Loose parts or damaged auger. Replace auger drive belt. 1. Replace auger belt. 17 Auger control cable out of auger housing with clean-out tool or stick. 2. Foreign object lodged in Maintenance & Adjustments section. 1. Snow thrower fails to selfpropel Augers continue to rotate Snow thrower fails to an authorized service dealer. 1. Repair as...
Operation Manual
Page 18
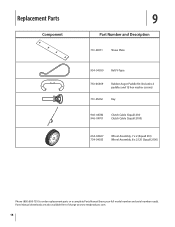
Parts Manual downloads are also available free of charge at www.mtdproducts.com. 18 Replacement Parts Component 9 Part Number and Description 731-08171 Shave Plate 954-04050 Belt V-Type 753-06469 Rubber Auger Paddle Kit (Includes 2 paddles and 12 hex washer screws) 731-05632 Key 946-04782 946-04701 Clutch Cable (Squall 210) Clutch Cable (Squall 2100) 634-04607 734-04033 Wheel Assembly, 7 x 2 (Squall 210) Wheel Assembly, 8 x 2.125 (Squall 2100) Phone (800) 800-7310 to order replacement parts or a complete Parts Manual (have your full model number and serial number ready).
Parts Manual downloads are also available free of charge at www.mtdproducts.com. 18 Replacement Parts Component 9 Part Number and Description 731-08171 Shave Plate 954-04050 Belt V-Type 753-06469 Rubber Auger Paddle Kit (Includes 2 paddles and 12 hex washer screws) 731-05632 Key 946-04782 946-04701 Clutch Cable (Squall 210) Clutch Cable (Squall 2100) 634-04607 734-04033 Wheel Assembly, 7 x 2 (Squall 210) Wheel Assembly, 8 x 2.125 (Squall 2100) Phone (800) 800-7310 to order replacement parts or a complete Parts Manual (have your full model number and serial number ready).
Operation Manual
Page 20
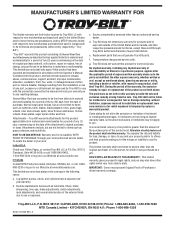
... to use . Troy-Bilt does not extend any warranty for use or exposure. Transportation charges and service calls. Attachments include, but are not limited to our Web site at its option, repair or replace, free of the product sold through your local authorized service dealer. Routine maintenance items such as to use with respect to items such as: batteries, belts, blades, blade adapters, tines, grass bags, wheels, rider deck wheels, seats, snow thrower...
... to use . Troy-Bilt does not extend any warranty for use or exposure. Transportation charges and service calls. Attachments include, but are not limited to our Web site at its option, repair or replace, free of the product sold through your local authorized service dealer. Routine maintenance items such as to use with respect to items such as: batteries, belts, blades, blade adapters, tines, grass bags, wheels, rider deck wheels, seats, snow thrower...


