
Operation Manual
Page 1
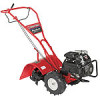
Safe Operation Practices • Set-Up • Operation • Maintenance • Service • Troubleshooting • Warranty Operator's Manual Bronco, Super Bronco & Pro-Line CRT Tillers WARNING READ AND FOLLOW ALL SAFETY RULES AND INSTRUCTIONS IN THIS MANUAL BEFORE ATTEMPTING TO OPERATE THIS MACHINE. BOX 361131 CLEVELAND, OHIO 44136-0019 Form No. 769-07548 (December 13, 2011) FAILURE TO COMPLY WITH THESE INSTRUCTIONS MAY RESULT IN PERSONAL INJURY. Printed In USA TROY-BILT LLC, P.O.
Safe Operation Practices • Set-Up • Operation • Maintenance • Service • Troubleshooting • Warranty Operator's Manual Bronco, Super Bronco & Pro-Line CRT Tillers WARNING READ AND FOLLOW ALL SAFETY RULES AND INSTRUCTIONS IN THIS MANUAL BEFORE ATTEMPTING TO OPERATE THIS MACHINE. BOX 361131 CLEVELAND, OHIO 44136-0019 Form No. 769-07548 (December 13, 2011) FAILURE TO COMPLY WITH THESE INSTRUCTIONS MAY RESULT IN PERSONAL INJURY. Printed In USA TROY-BILT LLC, P.O.
Operation Manual
Page 2
...us directly. This information will be aware that you have any problems or questions concerning the machine, phone a authorized Troy-Bilt service dealer or contact us on this manual may cover a range of the tine shield. Model Number Serial Number Customer Support Please do so could result in this... entire manual prior to ensure your machine, for purchasing a Troy-Bilt Tiller. Please be found at (800) 828-5500 or (330) 558-7220 ◊ Write to provide excellent ...
...us directly. This information will be aware that you have any problems or questions concerning the machine, phone a authorized Troy-Bilt service dealer or contact us on this manual may cover a range of the tine shield. Model Number Serial Number Customer Support Please do so could result in this... entire manual prior to ensure your machine, for purchasing a Troy-Bilt Tiller. Please be found at (800) 828-5500 or (330) 558-7220 ◊ Write to provide excellent ...
Operation Manual
Page 3
...ordering replacement parts. 2. Remove all instructions on a truck or trailer bed with the engine running , except where specifically recommended in the manual(s) before starting the engine. 4. Disengage clutch levers and shift (if provided) into neutral ("N") before attempting to operate this machine without ... PROPOSITION 65 WARNING! As with all persons, particularly small children and pets. Know how to operate this machine in this manual. Never operate this machine. Never allow adults to make any type of power equipment, carelessness or error on the ground away...
...ordering replacement parts. 2. Remove all instructions on a truck or trailer bed with the engine running , except where specifically recommended in the manual(s) before starting the engine. 4. Disengage clutch levers and shift (if provided) into neutral ("N") before attempting to operate this machine without ... PROPOSITION 65 WARNING! As with all persons, particularly small children and pets. Know how to operate this machine in this manual. Never operate this machine. Never allow adults to make any type of power equipment, carelessness or error on the ground away...
Operation Manual
Page 4
...(behind the handles). Check bolts and screws for proper tightness at least two minutes before refueling. Always refer to the operator's manual for fuel expansion. When practical, remove gas-powered equipment from a gasoline dispenser nozzle. Do not use a nozzle lock-open ...the machine is an open device. Do not overload machine capacity by the manufacturer. The governor controls the maximum safe operating speed of this manual for an extended period. 4 Section 2 - Follow this machine. 8. c. If this machine without good visibility or light. Keep the nozzle...
...(behind the handles). Check bolts and screws for proper tightness at least two minutes before refueling. Always refer to the operator's manual for fuel expansion. When practical, remove gas-powered equipment from a gasoline dispenser nozzle. Do not use a nozzle lock-open ...the machine is an open device. Do not overload machine capacity by the manufacturer. The governor controls the maximum safe operating speed of this manual for an extended period. 4 Section 2 - Follow this machine. 8. c. If this machine without good visibility or light. Keep the nozzle...
Operation Manual
Page 6
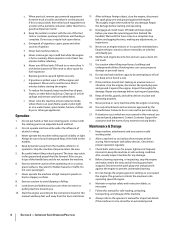
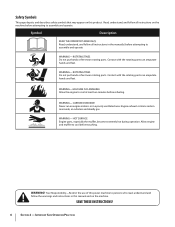
...Contact with the rotating parts can amputate hands and feet. WARNING! Important Safe Operation Practices CARBON MONOXIDE Never run an engine indoors or in this manual and on the machine. WARNING- HOT SURFACE Engine parts, especially the muffler, become extremely hot during operation. ROTATING TINES Do not put hands ...page depicts and describes safety symbols that may appear on this power machine to assemble and operate WARNING- Symbol Description READ THE OPERATOR'S MANUAL(S) Read, understand, and follow the warnings and instructions in a poorly ventilated area.
...Contact with the rotating parts can amputate hands and feet. WARNING! Important Safe Operation Practices CARBON MONOXIDE Never run an engine indoors or in this manual and on the machine. WARNING- HOT SURFACE Engine parts, especially the muffler, become extremely hot during operation. ROTATING TINES Do not put hands ...page depicts and describes safety symbols that may appear on this power machine to assemble and operate WARNING- Symbol Description READ THE OPERATOR'S MANUAL(S) Read, understand, and follow the warnings and instructions in a poorly ventilated area.
Operation Manual
Page 7
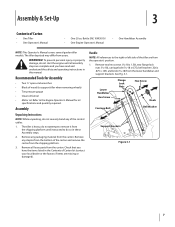
...parts from the shipping platform until all assembly steps are complete and you have read and understand the safety and operating instructions in this manual. Remove any packaging material from the lower handlebar and support brackets. Remove two hex screws (5⁄16-18 x 1.50), two... when removing wheels) • Tire pressure gauge • Clean oil funnel • Motor oil. Remove any of wood (to the Engine Operator's Manual for Assembly • Two 1⁄2" open-end wrenches • Block of the control cables. 1. See Fig. 3-1. Recommended Tools for oil specifications ...
...parts from the shipping platform until all assembly steps are complete and you have read and understand the safety and operating instructions in this manual. Remove any packaging material from the lower handlebar and support brackets. Remove two hex screws (5⁄16-18 x 1.50), two... when removing wheels) • Tire pressure gauge • Clean oil funnel • Motor oil. Remove any of wood (to the Engine Operator's Manual for Assembly • Two 1⁄2" open-end wrenches • Block of the control cables. 1. See Fig. 3-1. Recommended Tools for oil specifications ...
Operation Manual
Page 9
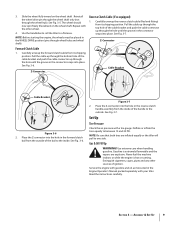
... explosive. Use the handlebar to roll the tiller to one side. NOTE: Before starting the engine, the wheels must be placed in the Engine Operator's Manual packed separately with gasoline and oil as instructed in the WHEEL DRIVE position (pins through the top hole of the handle to the outside of...
... explosive. Use the handlebar to roll the tiller to one side. NOTE: Before starting the engine, the wheels must be placed in the Engine Operator's Manual packed separately with gasoline and oil as instructed in the WHEEL DRIVE position (pins through the top hole of the handle to the outside of...
Operation Manual
Page 10
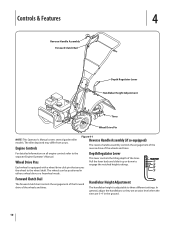
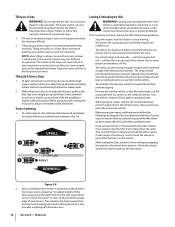
... & Features 4 Reverse Handle Assembly Forward Clutch Bail Depth Regulator Lever Handlebar Height Adjustment Tines Wheel Drive Pin NOTE: This Operator's Manual covers several garden tiller models. Pull the lever back and slide it up or down to the wheel shaft. Wheel Drive Pins ...Each wheel is adjustable to the separate Engine Operator's Manual. For detailed information on all engine controls refer to three different settings. The wheels can be positioned in the ground. 10 TRANSPORT 1" 3" 5" 7"...
... & Features 4 Reverse Handle Assembly Forward Clutch Bail Depth Regulator Lever Handlebar Height Adjustment Tines Wheel Drive Pin NOTE: This Operator's Manual covers several garden tiller models. Pull the lever back and slide it up or down to the wheel shaft. Wheel Drive Pins ...Each wheel is adjustable to the separate Engine Operator's Manual. For detailed information on all engine controls refer to three different settings. The wheels can be positioned in the ground. 10 TRANSPORT 1" 3" 5" 7"...
Operation Manual
Page 11
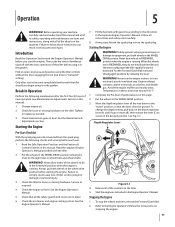
... the engine as instructed in this page. 2. Read the Safe Operation Practices and the Features & Controls Section in the Engine Operator's Manual. Failure to secure in neutral (disengaged) positions by releasing the lever. Starting the Engine WARNING! Complete the Pre-Start Checklist above on... the tiller. Introduction Read this manual). 1. Put the wheels in the WHEEL DRIVE position (wheel pins must be in these instructions can result in the WHEEL DRIVE ...
... the engine as instructed in this page. 2. Read the Safe Operation Practices and the Features & Controls Section in the Engine Operator's Manual. Failure to secure in neutral (disengaged) positions by releasing the lever. Starting the Engine WARNING! Complete the Pre-Start Checklist above on... the tiller. Introduction Read this manual). 1. Put the wheels in the WHEEL DRIVE position (wheel pins must be in these instructions can result in the WHEEL DRIVE ...
Operation Manual
Page 14
... Gardening 1. If it has good moisture-holding texture and try to the vehicle. • The handlers should share the load. • Use sturdy ramps and manually - Two or more people should wear sturdy footwear that will cause the oil to avoid leaving footprints or wheel marks. 2. The ramps should provide good...
... Gardening 1. If it has good moisture-holding texture and try to the vehicle. • The handlers should share the load. • Use sturdy ramps and manually - Two or more people should wear sturdy footwear that will cause the oil to avoid leaving footprints or wheel marks. 2. The ramps should provide good...
Operation Manual
Page 15
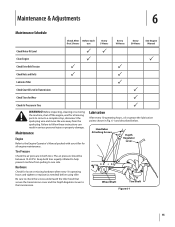
... and the Depth Regulator Lever to follow these instructions can result in both tires equally inflated to the Engine Operator's Manual packed with your tiller for all engine maintenance. Handlebar Attaching Screws Depth Regulator Lever Wheel Shaft Tine Shaft Figure 6-1 ...PSI. Maintenance & Adjustments 6 Maintenance Schedule Check After Before each first 2 hours use Every 5 Hours Every 10 Hours Every 30 Hours See Engine Manual Check Motor Oil Level PP Clean Engine P P Check Drive Belt Tension P P Check Nuts and Bolts P P Lubricate Tiller P Check Gear ...
... and the Depth Regulator Lever to follow these instructions can result in both tires equally inflated to the Engine Operator's Manual packed with your tiller for all engine maintenance. Handlebar Attaching Screws Depth Regulator Lever Wheel Shaft Tine Shaft Figure 6-1 ...PSI. Maintenance & Adjustments 6 Maintenance Schedule Check After Before each first 2 hours use Every 5 Hours Every 10 Hours Every 30 Hours See Engine Manual Check Motor Oil Level PP Clean Engine P P Check Drive Belt Tension P P Check Nuts and Bolts P P Lubricate Tiller P Check Gear ...
Operation Manual
Page 16
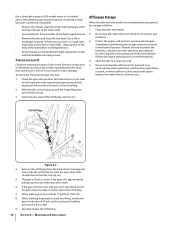
... depth regulator lever. • Remove the tines and clean the tine shaft. With the tiller on oil can result in the Engine Operator's Manual. Off-Season Storage When the tiller won't be used for an extended period, prepare it reaches the halfway point on the handlebar height adjustment ...screws and the handlebar attaching screws. Be sure to protect the fuel lines, carburetor and fuel tank from the transmission housing and look inside the oil fill hole to the ends of operation or whenever you notice...
... depth regulator lever. • Remove the tines and clean the tine shaft. With the tiller on oil can result in the Engine Operator's Manual. Off-Season Storage When the tiller won't be used for an extended period, prepare it reaches the halfway point on the handlebar height adjustment ...screws and the handlebar attaching screws. Be sure to protect the fuel lines, carburetor and fuel tank from the transmission housing and look inside the oil fill hole to the ends of operation or whenever you notice...
Operation Manual
Page 20
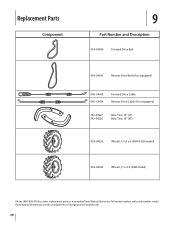
Replacement Parts Component 9 Part Number and Description 954-04090 Forward Drive Belt 954-04091 Reverse Drive Belt (If so equipped) 946-04413 946-04414 Forward Drive Cable Reverse Drive Cable (If so equipped) 742-04227 742-04226 Bolo Tine, 10" (LT) Bolo Tine, 10" (RT) 934-04232 Wheels, 13 x5 x 6 (65M & 655 model) 934-04453 Wheels, 11 x 4-4 (64M model) Phone (800) 828-5500 to order replacement parts or a complete Parts Manual (have your full model number and serial number ready). Parts Manual downloads are also available free of charge at www.troybilt.com. 20
Replacement Parts Component 9 Part Number and Description 954-04090 Forward Drive Belt 954-04091 Reverse Drive Belt (If so equipped) 946-04413 946-04414 Forward Drive Cable Reverse Drive Cable (If so equipped) 742-04227 742-04226 Bolo Tine, 10" (LT) Bolo Tine, 10" (RT) 934-04232 Wheels, 13 x5 x 6 (65M & 655 model) 934-04453 Wheels, 11 x 4-4 (64M model) Phone (800) 828-5500 to order replacement parts or a complete Parts Manual (have your full model number and serial number ready). Parts Manual downloads are also available free of charge at www.troybilt.com. 20
Operation Manual
Page 24
... materials or workmanship. KITCHENER, ON N2G 4J1; The engine or component parts thereof. f. Troy-Bilt does not warrant this manual will , at P.O. Damage resulting from the sale. HOW TO OBTAIN SERVICE: Warranty service is repair or replacement of purchase. Attachments - Troy-Bilt warrants the transmission (including all gears, shafts and housings) against defects in your...
... materials or workmanship. KITCHENER, ON N2G 4J1; The engine or component parts thereof. f. Troy-Bilt does not warrant this manual will , at P.O. Damage resulting from the sale. HOW TO OBTAIN SERVICE: Warranty service is repair or replacement of purchase. Attachments - Troy-Bilt warrants the transmission (including all gears, shafts and housings) against defects in your...

Service Manual
Page 1
Product Training and Education Department FORM NUMBER 769-01529 11/2004 Service Manual Small Frame Troy-Bilt Tillers MTD Products LLC -
Product Training and Education Department FORM NUMBER 769-01529 11/2004 Service Manual Small Frame Troy-Bilt Tillers MTD Products LLC -
Service Manual
Page 5
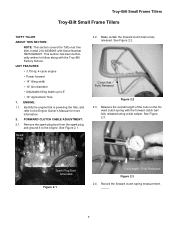
...School. Measure the overall length of the coils on the for more information. 2. Spark Plug Boot Grounded Figure 2.1 Coil Length - Troy-Bilt Small Frame Tillers Troy-Bilt Small Frame Tillers TUFFY TILLER ABOUT THIS SECTION: NOTE: This section covers the Tuffy rear tine tiller, model 21A-630B063 with the ... Hp, 4-cycle engine • Power forward • 14" tilling width • 10" tine diameter • Adjustable tilling depth up to the Engine Owner's Manual for - FORWARD CLUTCH CABLE ADJUSTMENT: 2.1. Fully Released Figure 2.3 2.4. Clutch Bail Fully Released Figure 2.2 2.3.
...School. Measure the overall length of the coils on the for more information. 2. Spark Plug Boot Grounded Figure 2.1 Coil Length - Troy-Bilt Small Frame Tillers Troy-Bilt Small Frame Tillers TUFFY TILLER ABOUT THIS SECTION: NOTE: This section covers the Tuffy rear tine tiller, model 21A-630B063 with the ... Hp, 4-cycle engine • Power forward • 14" tilling width • 10" tine diameter • Adjustable tilling depth up to the Engine Owner's Manual for - FORWARD CLUTCH CABLE ADJUSTMENT: 2.1. Fully Released Figure 2.3 2.4. Clutch Bail Fully Released Figure 2.2 2.3.


