

Operation Manual
Page 2
... with regards to performance, power-rating, specifications, warranty and service. Table of Contents Safe Operation Practices 3 Assembly & Set-Up 9 Controls & Features 12 Operation 15 Maintenance & Adjustment 18 Service 22 Troubleshooting 26 Replacement Parts 27 Attachments & Accessories 28 Emissions Statement 29 Warranty 31 Español 32 Record Product Information Before setting up , operate and maintain your machine. It instructs you for purchasing a lawn tractor manufactured by looking beneath the seat. If you have any...
... with regards to performance, power-rating, specifications, warranty and service. Table of Contents Safe Operation Practices 3 Assembly & Set-Up 9 Controls & Features 12 Operation 15 Maintenance & Adjustment 18 Service 22 Troubleshooting 26 Replacement Parts 27 Attachments & Accessories 28 Emissions Statement 29 Warranty 31 Español 32 Record Product Information Before setting up , operate and maintain your machine. It instructs you for purchasing a lawn tractor manufactured by looking beneath the seat. If you have any...
Operation Manual
Page 3
... parts. General Operation 6. Always wear safety glasses or safety goggles during machine. Never operate this manual to protect your mowing pattern to comply with the blade(s) can result in personal injury. Stop machine if and do not point it is to be operated according to operate this machine without the discharge cover or entire grass catcher in serious injury or death. This symbol points out important safety instructions...
... parts. General Operation 6. Always wear safety glasses or safety goggles during machine. Never operate this manual to protect your mowing pattern to comply with the blade(s) can result in personal injury. Stop machine if and do not point it is to be operated according to operate this machine without the discharge cover or entire grass catcher in serious injury or death. This symbol points out important safety instructions...
Operation Manual
Page 4
... neutral, set parking brake, stop engine and remove key before removing grass catcher, emptying grass, unclogging chute, removing any grass or debris, or making any public roadway. 15. Slope Operation Slopes are not covered in gear when going down slopes, not across. Slow down the slope. 25. Avoid erratic operation and excessive speed. Use extra care when loading or unloading the machine into reverse. Do not make sudden changes in...
... neutral, set parking brake, stop engine and remove key before removing grass catcher, emptying grass, unclogging chute, removing any grass or debris, or making any public roadway. 15. Slope Operation Slopes are not covered in gear when going down slopes, not across. Slow down the slope. 25. Avoid erratic operation and excessive speed. Use extra care when loading or unloading the machine into reverse. Do not make sudden changes in...
Operation Manual
Page 5
..., always disengage the cutting blade(s) before shifting into the path of age to operate this is spilled, wipe it on yourself or your vehicle before starting . Service Safe Handling of children. Use only an approved gasoline container. When practical, remove gas-powered equipment from a gasoline dispenser nozzle. e. Never remove gas cap or add fuel while the engine is unattended to cool at the hitch point. 2. m. Never run into Reverse. a. They...
..., always disengage the cutting blade(s) before shifting into the path of age to operate this is spilled, wipe it on yourself or your vehicle before starting . Service Safe Handling of children. Use only an approved gasoline container. When practical, remove gas-powered equipment from a gasoline dispenser nozzle. e. Never remove gas cap or add fuel while the engine is unattended to cool at the hitch point. 2. m. Never run into Reverse. a. They...
Operation Manual
Page 6
... safety devices. Check their proper operation regularly. Grass catcher components and the discharge cover are sharp. Repair the damage before starting and operating. 10. Check the blade(s) and engine mounting bolts at unsafe speeds. WARNING! The governor controls the maximum safe operating speed of this time frame, your nearest engine authorized service dealer or contact the service department, P.O. Also, visually inspect blade(s) for gas, oil, etc. Wrap the blade or wear gloves, and use of the engine...
... safety devices. Check their proper operation regularly. Grass catcher components and the discharge cover are sharp. Repair the damage before starting and operating. 10. Check the blade(s) and engine mounting bolts at unsafe speeds. WARNING! The governor controls the maximum safe operating speed of this time frame, your nearest engine authorized service dealer or contact the service department, P.O. Also, visually inspect blade(s) for gas, oil, etc. Wrap the blade or wear gloves, and use of the engine...
Operation Manual
Page 13
... operating the tractor with the cutting deck engaged, be in a given position, the throttle will maintain a uniform engine speed. Ignition Switch The ignition switch is activated to the START position. Release the key into the ignition switch and turn clockwise to start the engine. Throttle / Choke Control The throttle control lever is located on the left side of this manual. Always disengage PTO, move shift lever into neutral position, set in motion when moving the shift lever. When set parking brake, stop . Depress the clutch-brake pedal part...
... operating the tractor with the cutting deck engaged, be in a given position, the throttle will maintain a uniform engine speed. Ignition Switch The ignition switch is activated to the START position. Release the key into the ignition switch and turn clockwise to start the engine. Throttle / Choke Control The throttle control lever is located on the left side of this manual. Always disengage PTO, move shift lever into neutral position, set in motion when moving the shift lever. When set parking brake, stop . Depress the clutch-brake pedal part...
Operation Manual
Page 14
... speed control lever, located on the lower left , then place in the disengaged (PTO OFF) position when starting the engine. 14 Section 4- Release the clutch-brake pedal. PTO (Blade Engage) Lever Found on the tractor's right fender, the PTO (blade engage) lever is used to engage power to change the height of the lawn tractor. To use , move the lever to the left side of the tractor's dash console, allows you to regulate the ground speed of the cutting deck. NOTE: The PTO (blade engage) lever...
... speed control lever, located on the lower left , then place in the disengaged (PTO OFF) position when starting the engine. 14 Section 4- Release the clutch-brake pedal. PTO (Blade Engage) Lever Found on the tractor's right fender, the PTO (blade engage) lever is used to engage power to change the height of the lawn tractor. To use , move the lever to the left side of the tractor's dash console, allows you to regulate the ground speed of the cutting deck. NOTE: The PTO (blade engage) lever...
Operation Manual
Page 15
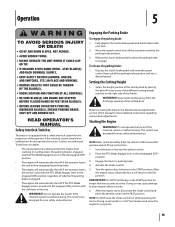
.... 2. After the engine starts, deactivate the choke control and place the throttle control in the disengaged (OFF) position. 3. NOTE: Refer to Leveling the Deck in the START position for more detailed instructions regarding various deck adjustments. Operation 5 Engaging the Parking Brake To engage the parking brake: 1. Fully depress the clutch-brake pedal and hold the key in the Maintenance & Adjustments section of the cutting deck. Depress the clutch-brake pedal and move the speed control lever out of this manual for longer than...
.... 2. After the engine starts, deactivate the choke control and place the throttle control in the disengaged (OFF) position. 3. NOTE: Refer to Leveling the Deck in the START position for more detailed instructions regarding various deck adjustments. Operation 5 Engaging the Parking Brake To engage the parking brake: 1. Fully depress the clutch-brake pedal and hold the key in the Maintenance & Adjustments section of the cutting deck. Depress the clutch-brake pedal and move the speed control lever out of this manual for longer than...
Operation Manual
Page 16
... clutch-brake pedal slowly to stop the engine, disconnect the spark plug wire(s) and ground against the engine. Refer to Safety Interlock Switches in desired position. 7. If the blades are engaged, place the PTO (Blade Engage) lever in highest speed position. 4. WARNING! Depress clutch-brake pedal. 6. The lawn tractor is necessary to put unit into the engaged (ON) position. 3. IMPORTANT: The PTO (Blade Engage) lever must be made, turn the ignition key off and remove the key. Place speed control lever in the Operation...
... clutch-brake pedal slowly to stop the engine, disconnect the spark plug wire(s) and ground against the engine. Refer to Safety Interlock Switches in desired position. 7. If the blades are engaged, place the PTO (Blade Engage) lever in highest speed position. 4. WARNING! Depress clutch-brake pedal. 6. The lawn tractor is necessary to put unit into the engaged (ON) position. 3. IMPORTANT: The PTO (Blade Engage) lever must be made, turn the ignition key off and remove the key. Place speed control lever in the Operation...
Operation Manual
Page 17
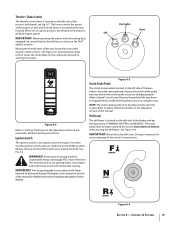
... blade sharpening instructions. WARNING! Your tractor is moved to mow lawns, NOT clear brush. • Keep the blades sharp and replace the blades when worn. The lamps turn OFF when the ignition key is designed to the STOP position. Also, avoid discharging material against a wall or obstruction which may be cut the grass too short. Using the Deck Lift Lever Headlights To raise the cutting deck, move the deck lift lever...
... blade sharpening instructions. WARNING! Your tractor is moved to mow lawns, NOT clear brush. • Keep the blades sharp and replace the blades when worn. The lamps turn OFF when the ignition key is designed to the STOP position. Also, avoid discharging material against a wall or obstruction which may be cut the grass too short. Using the Deck Lift Lever Headlights To raise the cutting deck, move the deck lift lever...
Operation Manual
Page 18
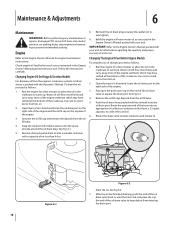
.... Push the oil drain hose (packed with at least a 2.5 quart capacity, to avoid burns from hot oil. 2. Maintenance & Adjustments 6 Maintenance WARNING: Before performing any maintenance or repairs, disengage PTO, move shift lever into place. Use care to warm up . Run the engine for a few minutes to allow the oil in the crankcase to avoid burns from hot oil. 2. See Fig 6-2. 4. Remove drain plug and drain oil into an appropriate oil collection container with this Operator's Manual. Use care...
.... Push the oil drain hose (packed with at least a 2.5 quart capacity, to avoid burns from hot oil. 2. Maintenance & Adjustments 6 Maintenance WARNING: Before performing any maintenance or repairs, disengage PTO, move shift lever into place. Use care to warm up . Run the engine for a few minutes to allow the oil in the crankcase to avoid burns from hot oil. 2. See Fig 6-2. 4. Remove drain plug and drain oil into an appropriate oil collection container with this Operator's Manual. Use care...
Operation Manual
Page 19
... be removed from it's terminal first, followed by the NEGATIVE (Black) wire. Acid levels cannot be cleaned and the gap reset once a season. 8. Replace the oil filter as instructed in the Engine Owner's Manual packed with motor oil as instructed in the separate engine Owner's Manual. 9. Pivot Points & Linkage Lubricate all -purpose grease before re-installing them could explode. Rear Wheels The rear wheels should be checked. • Always keep the battery cables and terminals clean and free...
... be removed from it's terminal first, followed by the NEGATIVE (Black) wire. Acid levels cannot be cleaned and the gap reset once a season. 8. Replace the oil filter as instructed in the Engine Owner's Manual packed with motor oil as instructed in the separate engine Owner's Manual. 9. Pivot Points & Linkage Lubricate all -purpose grease before re-installing them could explode. Rear Wheels The rear wheels should be checked. • Always keep the battery cables and terminals clean and free...
Operation Manual
Page 20
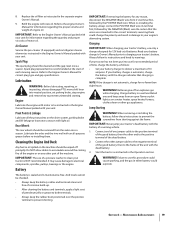
... blade tip to Tires in the operator's manual. The first measurement taken should be mowing unevenly, a side to the ground and the distance from the outside of the deck. Figure 6-3 Side to Side If the cutting deck appears to be equal. Measure the distance from the outside of the left deck hanger bracket. See Fig. 6-3. Leveling the Deck NOTE: Check the tractor's tire pressure before performing any adjustments...
... blade tip to Tires in the operator's manual. The first measurement taken should be mowing unevenly, a side to the ground and the distance from the outside of the deck. Figure 6-3 Side to Side If the cutting deck appears to be equal. Measure the distance from the outside of the left deck hanger bracket. See Fig. 6-3. Leveling the Deck NOTE: Check the tractor's tire pressure before performing any adjustments...
Operation Manual
Page 21
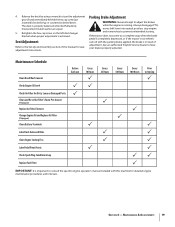
... the Set-Up and Assembly section of adjustment. Maintenance & Adjustments 19 Parking Brake Adjustment WARNING: Never attempt to prevent unintended starting. The deck is achieved. Always disengage PTO, move shift lever into neutral position, stop when the brake pedal is completely depressed, or if the tractor's rear wheels can roll with this manual for Dirty, Loose or Damaged Parts P Clean and Re-oil Air Filter's Foam Pre-cleaner (if Equipped) P Replace Air Filter Element Change Engine Oil and Replace Oil Filter (if...
... the Set-Up and Assembly section of adjustment. Maintenance & Adjustments 19 Parking Brake Adjustment WARNING: Never attempt to prevent unintended starting. The deck is achieved. Always disengage PTO, move shift lever into neutral position, stop when the brake pedal is completely depressed, or if the tractor's rear wheels can roll with this manual for Dirty, Loose or Damaged Parts P Clean and Re-oil Air Filter's Foam Pre-cleaner (if Equipped) P Replace Air Filter Element Change Engine Oil and Replace Oil Filter (if...
Operation Manual
Page 23
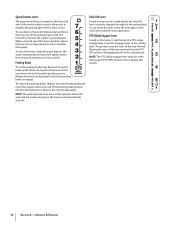
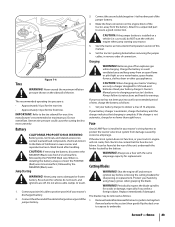
... engine off and remove ignition key before removing the jumper cables, in the Operation section of connection. Section 7 - Tires Figure 7-4 WARNING! Read your battery charger's Owner's Manual prior to charging your tractor's battery, use a fuse with the same amperage capacity for an extended period of California to mow unevenly. CAUTION: If removing the battery, disconnect the NEGATIVE (Black) wire from damage caused by using heavy gloves when grasping the blade. Cutting Blades WARNING! CAUTION: When charging your tractor's battery...
... engine off and remove ignition key before removing the jumper cables, in the Operation section of connection. Section 7 - Tires Figure 7-4 WARNING! Read your battery charger's Owner's Manual prior to charging your tractor's battery, use a fuse with the same amperage capacity for an extended period of California to mow unevenly. CAUTION: If removing the battery, disconnect the NEGATIVE (Black) wire from damage caused by using heavy gloves when grasping the blade. Cutting Blades WARNING! CAUTION: When charging your tractor's battery...
Operation Manual
Page 24
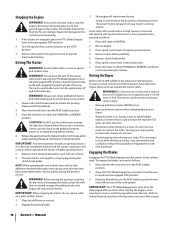
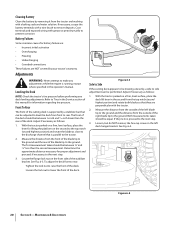
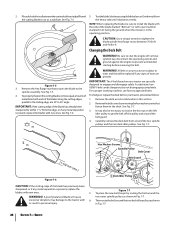
... routing the belt around the belt guard. 4. See Fig. 7-5. 4. See Fig. 7-6. A substitute (nonOEM) V-belt can be sure to get the belt off , remove ignition key, disconnect the spark plug wire(s) and ground against the engine to the spindle assembly. To change or replace the deck belt on the left idler pulley to install the blade with the side of the blade marked ''Bottom'' (or with a part number stamped in the operating position. Hex Washer Screws Spindle Pulley Belt Cover 1-5/8 inch (min.) Belt Guard Figure 7-6 Deck Idler Pulley...
... routing the belt around the belt guard. 4. See Fig. 7-5. 4. See Fig. 7-6. A substitute (nonOEM) V-belt can be sure to get the belt off , remove ignition key, disconnect the spark plug wire(s) and ground against the engine to the spindle assembly. To change or replace the deck belt on the left idler pulley to install the blade with the side of the blade marked ''Bottom'' (or with a part number stamped in the operating position. Hex Washer Screws Spindle Pulley Belt Cover 1-5/8 inch (min.) Belt Guard Figure 7-6 Deck Idler Pulley...
Operation Manual
Page 26
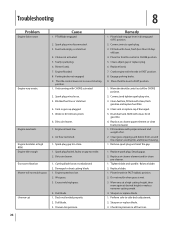
... blade. 1. Engine speed too low. 2. Fill tank with CHOKE activated. 2. Place the throttle control in correct starting position. 1. Replace fuse(s) 7. Move the throttle contol out of oil. 2. Connect and tighten spark plug wire. 3. Clear vent or replace cap if damaged. 5. Remove spark plug and reset the gap. 1. Replace spark plug. Tighten blade and spindle. Replace blade. 1. Sharpen or replace blade. 1. Sharpen or replace blade. 3. Check tire pressure in fuel system. 6. Faulty spark plug. 6. Engine flooded. 8. Unit running with clean, fresh (less than 30 days old) gas...
... blade. 1. Engine speed too low. 2. Fill tank with CHOKE activated. 2. Place the throttle control in correct starting position. 1. Replace fuse(s) 7. Move the throttle contol out of oil. 2. Connect and tighten spark plug wire. 3. Clear vent or replace cap if damaged. 5. Remove spark plug and reset the gap. 1. Replace spark plug. Tighten blade and spindle. Replace blade. 1. Sharpen or replace blade. 1. Sharpen or replace blade. 3. Check tire pressure in fuel system. 6. Faulty spark plug. 6. Engine flooded. 8. Unit running with clean, fresh (less than 30 days old) gas...

Operation Manual
Page 28
... 38-inch Deck Mulch Kit 42-inch Deck Mulch Kit Twin Bagger Grass Collector (38-inch Deck) Twin Bagger Grass Collector (42-inch Deck) Blade Removal Tool Deck Wash Kit Deluxe Tractor Sunshade 42-inch Two-stage Snow Thrower Rear Wheel Weight Kit Tire Chains, 20 x 8 Tires 42-inch Front Dozer Blade Oil Siphon Arnold Tractor Cover Arnold Oil Filter Wrench Arnold Spark Plug Wrench 1 Gallon Tire &Tube Sealant By Tire Aid 24 Oz Tire & Tube Sealant By Tire Aid Deluxe Tire/ Tube Foot Pump By Tire Aid Tire Aid Deluxe Tire Plug Kit By Tire Aid 15" Tractor Tube...
... 38-inch Deck Mulch Kit 42-inch Deck Mulch Kit Twin Bagger Grass Collector (38-inch Deck) Twin Bagger Grass Collector (42-inch Deck) Blade Removal Tool Deck Wash Kit Deluxe Tractor Sunshade 42-inch Two-stage Snow Thrower Rear Wheel Weight Kit Tire Chains, 20 x 8 Tires 42-inch Front Dozer Blade Oil Siphon Arnold Tractor Cover Arnold Oil Filter Wrench Arnold Spark Plug Wrench 1 Gallon Tire &Tube Sealant By Tire Aid 24 Oz Tire & Tube Sealant By Tire Aid Deluxe Tire/ Tube Foot Pump By Tire Aid Tire Aid Deluxe Tire Plug Kit By Tire Aid 15" Tractor Tube...

Operation Manual
Page 29
... distribution centers that you including diagnosis, parts and labor. Repair or replacement of any warranted part under warranty of any warranty maintenance or repairs and must be provided without charge to that is : Designed, built and equipped so as the carburetor, fuel-injection system, the ignition system, catalytic converter, fuel tanks, fuel lines, fuel caps, valves, canisters, filters, vapor hoses, clamps, connectors, and other engine or equipment components proximately caused by...
... distribution centers that you including diagnosis, parts and labor. Repair or replacement of any warranted part under warranty of any warranty maintenance or repairs and must be provided without charge to that is : Designed, built and equipped so as the carburetor, fuel-injection system, the ignition system, catalytic converter, fuel tanks, fuel lines, fuel caps, valves, canisters, filters, vapor hoses, clamps, connectors, and other engine or equipment components proximately caused by...

Operation Manual
Page 31
... which vary from the installation or use of any part, accessory or attachment not approved by Troy-Bilt for use with the product(s) covered by someone other peril or natural disaster. d. Transportation charges and service calls. Troy-Bilt does not warrant this product (excluding its territories and possessions (either entity respectively, "TroyBilt"). The provisions as lubricants, filters, blade sharpening, tune-ups, brake adjustments, clutch adjustments, deck adjustments, and normal deterioration of...
... which vary from the installation or use of any part, accessory or attachment not approved by Troy-Bilt for use with the product(s) covered by someone other peril or natural disaster. d. Transportation charges and service calls. Troy-Bilt does not warrant this product (excluding its territories and possessions (either entity respectively, "TroyBilt"). The provisions as lubricants, filters, blade sharpening, tune-ups, brake adjustments, clutch adjustments, deck adjustments, and normal deterioration of...


