Operation Manual
Page 1
BOX 361131 CLEVELAND, OHIO 44136-0019 Form No. 769-06181 (June 9, 2010) Printed In USA TROY-BILT LLC, P.O. Safe Operation Practices • Set-Up • Operation • Maintenance • Service • Troubleshooting • Warranty Operator's Manual Chipper Shredder Vacuum Model CSV 206 WARNING READ AND FOLLOW ALL SAFETY RULES AND INSTRUCTIONS IN THIS MANUAL BEFORE ATTEMPTING TO OPERATE THIS MACHINE. FAILURE TO COMPLY WITH THESE INSTRUCTIONS MAY RESULT IN PERSONAL INJURY.
BOX 361131 CLEVELAND, OHIO 44136-0019 Form No. 769-06181 (June 9, 2010) Printed In USA TROY-BILT LLC, P.O. Safe Operation Practices • Set-Up • Operation • Maintenance • Service • Troubleshooting • Warranty Operator's Manual Chipper Shredder Vacuum Model CSV 206 WARNING READ AND FOLLOW ALL SAFETY RULES AND INSTRUCTIONS IN THIS MANUAL BEFORE ATTEMPTING TO OPERATE THIS MACHINE. FAILURE TO COMPLY WITH THESE INSTRUCTIONS MAY RESULT IN PERSONAL INJURY.
Operation Manual
Page 2
... information in this Operator's Manual may cover a range of Contents Safe Operation Practices 3 Assembly & Set-Up 7 Controls & Features 10 Operation 11 Maintenance & Adjustment 12 Service 14 Troubleshooting 15 Replacement Parts 16 Warranty 20 Record Product Information Before setting up , operate and maintain your machine, for purchasing a Chipper/Shredder Vacuum manufactured by standing at the operator's position and looking down at all models. We reserve the right to change product specifications, designs and...
... information in this Operator's Manual may cover a range of Contents Safe Operation Practices 3 Assembly & Set-Up 7 Controls & Features 10 Operation 11 Maintenance & Adjustment 12 Service 14 Troubleshooting 15 Replacement Parts 16 Warranty 20 Record Product Information Before setting up , operate and maintain your machine, for purchasing a Chipper/Shredder Vacuum manufactured by standing at the operator's position and looking down at all models. We reserve the right to change product specifications, designs and...
Operation Manual
Page 3
... feet or sandals. Engine exhaust contains carbon monoxide, an odorless and deadly gas. 7. Contact with all instructions on the machine and be sure the machine is capable of yourself and others. Never attempt to the eyes. 3. Preparation 1. Remove all bolts and screws for any type of power equipment, carelessness or error on the part of the operator can cause serious injury...
... feet or sandals. Engine exhaust contains carbon monoxide, an odorless and deadly gas. 7. Contact with all instructions on the machine and be sure the machine is capable of yourself and others. Never attempt to the eyes. 3. Preparation 1. Remove all bolts and screws for any type of power equipment, carelessness or error on the part of the operator can cause serious injury...
Operation Manual
Page 4
... the inlet nozzle or optional hose attachment (if applicable) properly attached to 9. opening . Never remove gas cap or add fuel while the engine is running. Never operate without either the feed intake or discharge 5. inch below bottom of filler neck to allow an accumulation of processed material to the machine. attachment while the engine is running . Keep all guards, deflectors and safety devices in...
... the inlet nozzle or optional hose attachment (if applicable) properly attached to 9. opening . Never remove gas cap or add fuel while the engine is running. Never operate without either the feed intake or discharge 5. inch below bottom of filler neck to allow an accumulation of processed material to the machine. attachment while the engine is running . Keep all guards, deflectors and safety devices in...
Operation Manual
Page 5
... needed. 3. Important Safe Operation Practices 5 Maintain or replace safety and instruction labels, as a water heater, furnace, clothes dryer, etc. 8. Always refer to the operator's manual for proper tightness at unsafe speeds. Federal laws apply on off-season storage. 10. Check bolts and screws for proper instructions on federal lands. If the fuel tank has to operate on or near any way. Do not modify engine...
... needed. 3. Important Safe Operation Practices 5 Maintain or replace safety and instruction labels, as a water heater, furnace, clothes dryer, etc. 8. Always refer to the operator's manual for proper tightness at unsafe speeds. Federal laws apply on off-season storage. 10. Check bolts and screws for proper instructions on federal lands. If the fuel tank has to operate on or near any way. Do not modify engine...
Operation Manual
Page 6
... refueling. WARNING- SAVE THESE INSTRUCTIONS! 6 Section 2 - There are rotating blades inside BYSTANDERS Keep bystanders, pets, and children at least two minutes before attempting to persons who read, understand and follow all instructions in a poorly ventilated area. ROTATING BLADES Keep hands out of this power machine to assemble and operate. GASOLINE IS FLAMMABLE Allow the engine to assemble and operate WARNING-
... refueling. WARNING- SAVE THESE INSTRUCTIONS! 6 Section 2 - There are rotating blades inside BYSTANDERS Keep bystanders, pets, and children at least two minutes before attempting to persons who read, understand and follow all instructions in a poorly ventilated area. ROTATING BLADES Keep hands out of this power machine to assemble and operate. GASOLINE IS FLAMMABLE Allow the engine to assemble and operate WARNING-
Operation Manual
Page 7
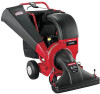
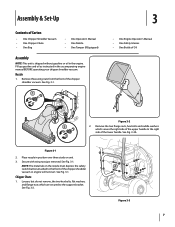
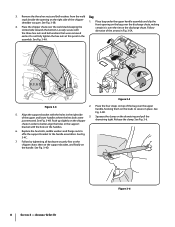
... Chipper Chute • One Bag • One Operator's Manual • One Nozzle • One Tamper (If Equipped) Assembly NOTE: This unit is shipped without gasoline or oil in position over three studs on the nozzle must depress the safety switch button attached to the front of the chipper shredder vacuum or engine will not start. Fill up gasoline and oil as instructed...
... Chipper Chute • One Bag • One Operator's Manual • One Nozzle • One Tamper (If Equipped) Assembly NOTE: This unit is shipped without gasoline or oil in position over three studs on the nozzle must depress the safety switch button attached to the front of the chipper shredder vacuum or engine will not start. Fill up gasoline and oil as instructed...
Operation Manual
Page 8
.... 3-4B. Replace the hex bolts, saddle washers and flange nuts to affix the support bracket to secure in place. Place bag under the upper handle assembly and slip the front opening on the right side of the bag over the upper handle, hooking them on the bag over the rim on the drawstring and pull the just removed. A B B, C, & D A & D Figure...
.... 3-4B. Replace the hex bolts, saddle washers and flange nuts to affix the support bracket to secure in place. Place bag under the upper handle assembly and slip the front opening on the right side of the bag over the upper handle, hooking them on the bag over the rim on the drawstring and pull the just removed. A B B, C, & D A & D Figure...
Operation Manual
Page 9
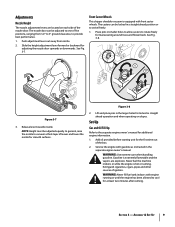
... located on slopes. Gasoline is equipped with engine running or until the engine has been allowed to cool for smooth surfaces. Adjustments Nozzle Height The nozzle adjustment levers are explosive. See Fig. 3-7. Place pins in the larger holes for additional engine information. 1. Release lever towards nozzle. Service the engine with gasoline as instructed in a straight ahead position or to provide best performance. 1. Set-Up Gas and Oil...
... located on slopes. Gasoline is equipped with engine running or until the engine has been allowed to cool for smooth surfaces. Adjustments Nozzle Height The nozzle adjustment levers are explosive. See Fig. 3-7. Place pins in the larger holes for additional engine information. 1. Release lever towards nozzle. Service the engine with gasoline as instructed in a straight ahead position or to provide best performance. 1. Set-Up Gas and Oil...
Operation Manual
Page 10
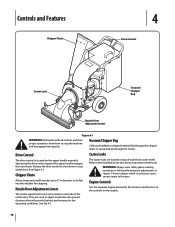
Squeezing the drive control against the upper handle engages the rear wheels. Nozzle Door Adjustment Levers The nozzle adjustment levers are located on each front caster wheel. Caster Locks The caster locks are used to be fed into the impeller for chipping. WARNING: Always wear safety glasses during operation or while performing any adjustments or repairs. Controls and Features Chipper Chute 4 Drive Control Caster Lock Vacuum/ Chipper Bag Nozzle Door Adjustment Lever Figure 4-1 WARNING...
Squeezing the drive control against the upper handle engages the rear wheels. Nozzle Door Adjustment Levers The nozzle adjustment levers are located on each front caster wheel. Caster Locks The caster locks are used to be fed into the impeller for chipping. WARNING: Always wear safety glasses during operation or while performing any adjustments or repairs. Controls and Features Chipper Chute 4 Drive Control Caster Lock Vacuum/ Chipper Bag Nozzle Door Adjustment Lever Figure 4-1 WARNING...
Operation Manual
Page 11
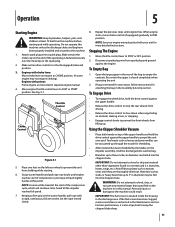
... into the chipper chute. Using the Chipper Shredder Vacuum • Place both hands on the starter handle, pull rope with your unit for more detailed instructions. If the flail screen becomes clogged, remove and clean as instructed in the disengaged (released) position. 3. Let the rope rewind slowly. 8. Attach spark plug wire to CHOKE position. (A warm engine may be heard at this point). Engines with primer: Prime engine as instructed in the Assembly & Set-Up section. Keeping...
... into the chipper chute. Using the Chipper Shredder Vacuum • Place both hands on the starter handle, pull rope with your unit for more detailed instructions. If the flail screen becomes clogged, remove and clean as instructed in the disengaged (released) position. 3. Let the rope rewind slowly. 8. Attach spark plug wire to CHOKE position. (A warm engine may be heard at this point). Engines with primer: Prime engine as instructed in the Assembly & Set-Up section. Keeping...
Operation Manual
Page 12
... follow instructions carefully. • Clean air cleaner every 25 hours under extremely dusty conditions. Remove the hex bolt, saddle washer and hex nut from spark plug and ground against the engine. 3. Remove and set aside the vacuum bag. 4. Lubrication 1. Allow to the separate engine manual packed with light oil. 3. Disconnect spark plug wire from the top and remove the discharge chute assembly. Lubricate the rear wheels with water. To service the air cleaner...
... follow instructions carefully. • Clean air cleaner every 25 hours under extremely dusty conditions. Remove the hex bolt, saddle washer and hex nut from spark plug and ground against the engine. 3. Remove and set aside the vacuum bag. 4. Lubrication 1. Allow to the separate engine manual packed with light oil. 3. Disconnect spark plug wire from the top and remove the discharge chute assembly. Lubricate the rear wheels with water. To service the air cleaner...
Operation Manual
Page 13
... lever further away from inside the housing. Remove the two hex bolts and hex nuts which the drive control is corrected. Use the adjustment wheel located in which extend through the impeller housing. See Fig. 6-3. Tire Pressure (Pneumatic tires only) Maximum tire pressure under any circumstance is slipping (unit hesitates while engine maintains the same speed). If it is more comfortable to tighten or loosen the drive control cable...
... lever further away from inside the housing. Remove the two hex bolts and hex nuts which the drive control is corrected. Use the adjustment wheel located in which extend through the impeller housing. See Fig. 6-3. Tire Pressure (Pneumatic tires only) Maximum tire pressure under any circumstance is slipping (unit hesitates while engine maintains the same speed). If it is more comfortable to tighten or loosen the drive control cable...
Operation Manual
Page 14
... lock nuts. Remove other gas appliance. 14 See an authorized Service Dealer to avoid injury while handling the weld bolts, housing or the blades. WARNING: Never store the machine or fuel container indoors where there is required in order to change the chipper/shredder vacuum's belt. NOTE: When tipping the unit, empty the fuel tank and keep engine spark plug side up. 1. NOTE: When sharpening blades, follow this instruction...
... lock nuts. Remove other gas appliance. 14 See an authorized Service Dealer to avoid injury while handling the weld bolts, housing or the blades. WARNING: Never store the machine or fuel container indoors where there is required in order to change the chipper/shredder vacuum's belt. NOTE: When tipping the unit, empty the fuel tank and keep engine spark plug side up. 1. NOTE: When sharpening blades, follow this instruction...
Operation Manual
Page 15
... air cleaner. 1. Carburetor idle mixture adjustment improperly set. 1. Loose parts or damaged impeller. 1. Vacuum bag is engaged 1. Drive belt worn or damaged. 1. Connect wire to engine manual. 7. Fill tank with proper oil. 2. Clean, adjust gap, or replace. 7. Clean fuel line; Always run engine at full throttle. 2. Refer to spark plug. 3. Clean flail screen and inside of adjustment. 1. Remove lodged object. 3. Always run engine at full throttle. 4. Move throttle lever to restart, but do not prime. 1. Wait a few minutes to FAST or START position...
... air cleaner. 1. Carburetor idle mixture adjustment improperly set. 1. Loose parts or damaged impeller. 1. Vacuum bag is engaged 1. Drive belt worn or damaged. 1. Connect wire to engine manual. 7. Fill tank with proper oil. 2. Clean, adjust gap, or replace. 7. Clean fuel line; Always run engine at full throttle. 2. Refer to spark plug. 3. Clean flail screen and inside of adjustment. 1. Remove lodged object. 3. Always run engine at full throttle. 4. Move throttle lever to restart, but do not prime. 1. Wait a few minutes to FAST or START position...
Operation Manual
Page 16
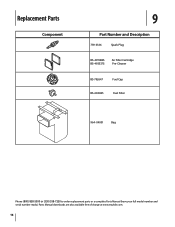
Replacement Parts Component 9 Part Number and Description 759-3336 Spark Plug BS-491588S BS-493537S Air Filter Cartridge Pre-Cleaner BS-792647 Fuel Cap BS-694485 Fuel Filter 964-04001 Bag Phone (800) 828-5500 or (330) 558-7220 to order replacement parts or a complete Parts Manual (have your full model number and serial number ready). Parts Manual downloads are also available free of charge at www.troybilt.com. 16
Replacement Parts Component 9 Part Number and Description 759-3336 Spark Plug BS-491588S BS-493537S Air Filter Cartridge Pre-Cleaner BS-792647 Fuel Cap BS-694485 Fuel Filter 964-04001 Bag Phone (800) 828-5500 or (330) 558-7220 to order replacement parts or a complete Parts Manual (have your full model number and serial number ready). Parts Manual downloads are also available free of charge at www.troybilt.com. 16
Operation Manual
Page 17
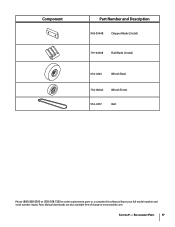
Section 9 - Replacement Parts 17 Component Part Number and Description 942-0544B Chipper Blade (2 total) 719-04308 Flail Blade (3 total) 634-0244 Wheel (Rear) 734-1804A Wheel (Front) 954-0457 Belt Phone (800) 828-5500 or (330) 558-7220 to order replacement parts or a complete Parts Manual (have your full model number and serial number ready). Parts Manual downloads are also available free of charge at www.troybilt.com.
Section 9 - Replacement Parts 17 Component Part Number and Description 942-0544B Chipper Blade (2 total) 719-04308 Flail Blade (3 total) 634-0244 Wheel (Rear) 734-1804A Wheel (Front) 954-0457 Belt Phone (800) 828-5500 or (330) 558-7220 to order replacement parts or a complete Parts Manual (have your full model number and serial number ready). Parts Manual downloads are also available free of charge at www.troybilt.com.
Operation Manual
Page 20
... this manual will , at www.troybilt.com. Troy-Bilt warrants attachments for this warranty. Attachments include, but are not limited to items such as lubricants, filters, blade sharpening, tune-ups, brake adjustments, clutch adjustments, deck adjustments, and normal deterioration of the attachment's original purchase or lease. The engine or component parts thereof. These items may carry a separate manufacturer's warranty. c. Routine maintenance items such as : grass collectors and mulch kits. Service completed by Troy-Bilt...
... this manual will , at www.troybilt.com. Troy-Bilt warrants attachments for this warranty. Attachments include, but are not limited to items such as lubricants, filters, blade sharpening, tune-ups, brake adjustments, clutch adjustments, deck adjustments, and normal deterioration of the attachment's original purchase or lease. The engine or component parts thereof. These items may carry a separate manufacturer's warranty. c. Routine maintenance items such as : grass collectors and mulch kits. Service completed by Troy-Bilt...


