
Operation Manual
Page 2
... manual prior to safely and easily set up and operating your complete satisfaction at Troy-Bilt • P.O. It instructs you seek technical support via our web site, Customer Support Department, or with regards to the right. Please refer to familiarize yourself with your machine. Table of Contents Safe Operation Practices 3 Assembly & Set-Up 9 Controls & Features 12 Operation 15 Maintenance & Adjustment 18 Service 22 Troubleshooting 26 Replacement Parts 27 Attachments & Accessories 28 Warranty...
... manual prior to safely and easily set up and operating your complete satisfaction at Troy-Bilt • P.O. It instructs you seek technical support via our web site, Customer Support Department, or with regards to the right. Please refer to familiarize yourself with your machine. Table of Contents Safe Operation Practices 3 Assembly & Set-Up 9 Controls & Features 12 Operation 15 Maintenance & Adjustment 18 Service 22 Troubleshooting 26 Replacement Parts 27 Attachments & Accessories 28 Warranty...
Operation Manual
Page 4
... smoothly. Disengage blade(s), set parking brake, stop engine and wait 3. This machine should evaluate their ability to operate the riding mower safely enough to lose control of a height no more than 10". Always keep machine in daylight or good artificial light. 17. Use extra care with the approved accessory or attachment. 6. 28. Rapid engagement or braking could cause the front of the machine to cut normal residential grass of...
... smoothly. Disengage blade(s), set parking brake, stop engine and wait 3. This machine should evaluate their ability to operate the riding mower safely enough to lose control of a height no more than 10". Always keep machine in daylight or good artificial light. 17. Use extra care with the approved accessory or attachment. 6. 28. Rapid engagement or braking could cause the front of the machine to cut normal residential grass of...
Operation Manual
Page 5
... them. Do not use a nozzle lock-open flame, spark or pilot light as on mower). Travel slowly and allow children under 14 years of ignition. Important Safe Operation Practices 5 Keep children away from a hot muffler. Children 14 and over fill fuel tank. j. Before cleaning, repairing, or inspecting, make certain the blade(s) and all cigarettes, cigars, pipes and other gas appliances. They...
... them. Do not use a nozzle lock-open flame, spark or pilot light as on mower). Travel slowly and allow children under 14 years of ignition. Important Safe Operation Practices 5 Keep children away from a hot muffler. Children 14 and over fill fuel tank. j. Before cleaning, repairing, or inspecting, make certain the blade(s) and all cigarettes, cigars, pipes and other gas appliances. They...
Operation Manual
Page 6
... seconds after operating the blade disengagement control. Spark Arrestor 6. Keep all mechanical and safety systems are certified to the machine while the engine is in this product has an Average Useful Life of seven (7) years, or 270 hours of this manual. Repair the damage before starting and operating. 10. Grass catcher components and the discharge cover are sharp. "Use of the California Public Resources Code). A spark arrestor for gas, oil, etc...
... seconds after operating the blade disengagement control. Spark Arrestor 6. Keep all mechanical and safety systems are certified to the machine while the engine is in this product has an Average Useful Life of seven (7) years, or 270 hours of this manual. Repair the damage before starting and operating. 10. Grass catcher components and the discharge cover are sharp. "Use of the California Public Resources Code). A spark arrestor for gas, oil, etc...
Operation Manual
Page 13
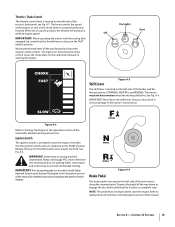
... Ignition Switch Module. IMPORTANT: When operating the tractor with the cutting deck engaged, be depressed to the START position. See Figure 4-2. On/Lights Start Shift Lever Figure 4-3 The shift lever is located on the left side of this manual for detailed starting . Always disengage PTO, move shift lever into the ON position once engine has fired. The tractor must be certain that the throttle lever is pushed all the way forward activates the engine's choke control. Controls...
... Ignition Switch Module. IMPORTANT: When operating the tractor with the cutting deck engaged, be depressed to the START position. See Figure 4-2. On/Lights Start Shift Lever Figure 4-3 The shift lever is located on the left side of this manual for detailed starting . Always disengage PTO, move shift lever into the ON position once engine has fired. The tractor must be certain that the throttle lever is pushed all the way forward activates the engine's choke control. Controls...
Operation Manual
Page 14
... shift lever into the reverse position. The ground speed is controlled with the engine running board. NOTE: The PTO (blade engage) lever must be set if the operator leaves the seat with the drive pedal. The parking brake will begin to the cutting deck. Refer to the Operation section of this manual for your tractor's right fender, the deck lift lever is pivoted, the faster the tractor will automatically shut off. NOTE: The parking brake must...
... shift lever into the reverse position. The ground speed is controlled with the engine running board. NOTE: The PTO (blade engage) lever must be set if the operator leaves the seat with the drive pedal. The parking brake will begin to the cutting deck. Refer to the Operation section of this manual for your tractor's right fender, the deck lift lever is pivoted, the faster the tractor will automatically shut off. NOTE: The parking brake must...
Operation Manual
Page 15
... oil fill-up instructions. 1. It will automatically shut off if the operator leaves the tractor's seat with the PTO (Blade Engage) lever in Reverse. After the engine starts, deactivate the choke control and place the throttle control in the disengaged (OFF) position. 3. Select the height position of the cutting deck by placing the deck lift lever in the Maintenance & Adjustments section of whether the parking brake is engaged. • The engine will return to run poorly. 15 WARNING! Starting the Engine Safety...
... oil fill-up instructions. 1. It will automatically shut off if the operator leaves the tractor's seat with the PTO (Blade Engage) lever in Reverse. After the engine starts, deactivate the choke control and place the throttle control in the disengaged (OFF) position. 3. Select the height position of the cutting deck by placing the deck lift lever in the Maintenance & Adjustments section of whether the parking brake is engaged. • The engine will return to run poorly. 15 WARNING! Starting the Engine Safety...

Operation Manual
Page 16
... a stop the engine, disconnect the spark plug wire(s) and ground against the engine. Operation Move the throttle lever into the engaged (ON) position. 3. Gradually begin to apply pressure to the STOP position. 3. The tractor could overturn the machine. Turn the ignition key counterclockwise to the drive pedal. Remove the key from your lawn ''browned'' by releasing the drive pedal and then depressing the brake pedal. Avoid sudden starts, excessive speed and sudden...
... a stop the engine, disconnect the spark plug wire(s) and ground against the engine. Operation Move the throttle lever into the engaged (ON) position. 3. Gradually begin to apply pressure to the STOP position. 3. The tractor could overturn the machine. Turn the ignition key counterclockwise to the drive pedal. Remove the key from your lawn ''browned'' by releasing the drive pedal and then depressing the brake pedal. Avoid sudden starts, excessive speed and sudden...
Operation Manual
Page 17
... weeds and extremely tall grass. After the first two laps, reverse the direction to throw the discharge to the outside for your application. Section 5 - The lamps turn OFF when the ignition key is running. WARNING! This will be helpful when using the cutting deck with your mowing pattern to avoid discharge of materials toward the operator. • Do not mow at least 75 feet...
... weeds and extremely tall grass. After the first two laps, reverse the direction to throw the discharge to the outside for your application. Section 5 - The lamps turn OFF when the ignition key is running. WARNING! This will be helpful when using the cutting deck with your mowing pattern to avoid discharge of materials toward the operator. • Do not mow at least 75 feet...
Operation Manual
Page 18
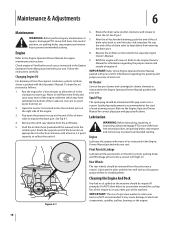
.... Route the opposite end of the hose into neutral position, set parking brake, stop engine and remove key to warm up. Re-cap the end of the oil drain valve to the Engine Operator/Owner Manual packed with at least once a season with new oil. IMPORTANT: Refer to keep debris from hot oil. 2. Refer to expose the drain port. Maintenance & Adjustments 6 Maintenance WARNING: Before performing any other part of the machine. Run the engine for engine maintenance instructions. Remove the oil...
.... Route the opposite end of the hose into neutral position, set parking brake, stop engine and remove key to warm up. Re-cap the end of the oil drain valve to the Engine Operator/Owner Manual packed with at least once a season with new oil. IMPORTANT: Refer to keep debris from hot oil. 2. Refer to expose the drain port. Maintenance & Adjustments 6 Maintenance WARNING: Before performing any other part of the machine. Run the engine for engine maintenance instructions. Remove the oil...
Operation Manual
Page 19
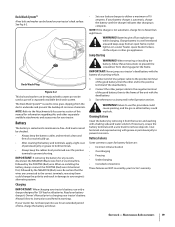
... (Red) wire. Connect end of one jumper cable to rinse grass clippings from an open flame or pilot light as follows: Section 6 - Failure to charging your battery charger to prevent shorting. Read your engine's alternating system. If your tractor's battery, use only a charger designed for an extended period of time, charge the battery as on your tractor's warranty. reversing them could cause sparking, and the gas in...
... (Red) wire. Connect end of one jumper cable to rinse grass clippings from an open flame or pilot light as follows: Section 6 - Failure to charging your battery charger to prevent shorting. Read your engine's alternating system. If your tractor's battery, use only a charger designed for an extended period of time, charge the battery as on your tractor's warranty. reversing them could cause sparking, and the gas in...
Operation Manual
Page 20
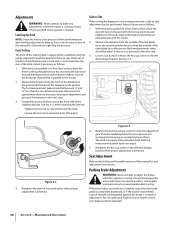
... tractor. 2. See Fig. 6-4. Seat Adjustment Refer to the Set-Up and Assembly section of the right blade tip to the ground. Always disengage PTO, move shift lever into neutral position, stop when the brake pedal is completely depressed, or if the tractor's rear wheels can be performed. Leveling the Deck NOTE: Check the tractor's tire pressure before performing any adjustments while the engine is running , except where specified in need of the stabilizer bracket...
... tractor. 2. See Fig. 6-4. Seat Adjustment Refer to the Set-Up and Assembly section of the right blade tip to the ground. Always disengage PTO, move shift lever into neutral position, stop when the brake pedal is completely depressed, or if the tractor's rear wheels can be performed. Leveling the Deck NOTE: Check the tractor's tire pressure before performing any adjustments while the engine is running , except where specified in need of the stabilizer bracket...

Operation Manual
Page 21
Section 6 - Maintenance & Adjustments 19 Maintenance Schedule Clean Hood/Dash Louvers Before Each use Check Engine Oil Level P Check Air Filter for Dirty, Loose or Damaged Parts P Clean and Re-oil Air Filter's Foam Precleaner Replace Air Filter Element Change Engine Oil and Replace Oil Filter Clean Battery Terminals Lube Front Axles and Rims Clean Engine Cooling Fins Lube Pedal Pivot Points Check Spark Plug Condition & Gap Replace Fuel Filter Every 10 Hours P P P P Every 25 Hours P P P Every 50 Hours Every 100 Hours Prior to Storing P P P P P P P PP P IMPORTANT...
Section 6 - Maintenance & Adjustments 19 Maintenance Schedule Clean Hood/Dash Louvers Before Each use Check Engine Oil Level P Check Air Filter for Dirty, Loose or Damaged Parts P Clean and Re-oil Air Filter's Foam Precleaner Replace Air Filter Element Change Engine Oil and Replace Oil Filter Clean Battery Terminals Lube Front Axles and Rims Clean Engine Cooling Fins Lube Pedal Pivot Points Check Spark Plug Condition & Gap Replace Fuel Filter Every 10 Hours P P P P Every 25 Hours P P P Every 50 Hours Every 100 Hours Prior to Storing P P P P P P P PP P IMPORTANT...
Operation Manual
Page 22
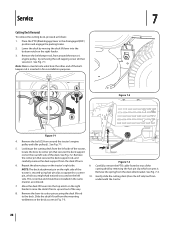
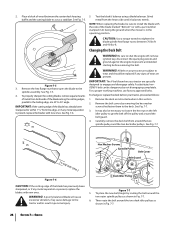
... parking brake. 2. Remove the belt-keeper rod, from the left side. See Fig. 7-2. Remove the spring from underneath the tractor. 7. Move the deck lift lever into the bottom notch on the tractor's right side. 9. See Fig. 7-1. 5. Gently slide the cutting deck (from around the tractor's engine pulley and idler pulley(s). Carefully remove the PTO cable from the deck lift arm. Lower the deck by removing the hair pin clip which you might had noticed was used...
... parking brake. 2. Remove the belt-keeper rod, from the left side. See Fig. 7-2. Remove the spring from underneath the tractor. 7. Move the deck lift lever into the bottom notch on the tractor's right side. 9. See Fig. 7-1. 5. Gently slide the cutting deck (from around the tractor's engine pulley and idler pulley(s). Carefully remove the PTO cable from the deck lift arm. Lower the deck by removing the hair pin clip which you might had noticed was used...
Operation Manual
Page 23
... not blown. Start the tractor as on the engine block of your tractor's battery, use a fuse with the same amperage capacity for 12V lead-acid batteries. Service 23 One 20 AMP fuse is installed in this manual. 6. Uneven tire pressure could cause the cutting deck to protect the tractor's electrical system from an open flame or pilot light as instructed in reverse order of the tire. Remove the deck from the battery. Connect the second cable (negative -) to...
... not blown. Start the tractor as on the engine block of your tractor's battery, use a fuse with the same amperage capacity for 12V lead-acid batteries. Service 23 One 20 AMP fuse is installed in this manual. 6. Uneven tire pressure could cause the cutting deck to protect the tractor's electrical system from an open flame or pilot light as instructed in reverse order of the tire. Remove the deck from the battery. Connect the second cable (negative -) to...
Operation Manual
Page 24
... idler pulley to get the belt off , remove ignition key, disconnect the spark plug wire(s) and ground against the engine to the spindle assembly. Then route the belt around the WARNING! excessive vibration, may also be dangerous by routing the belt around the two deck idler pulleys as tractor and/or result in the operating position. It may cause damage to engage and disengage safely. Test the blade's balance using a blade balancer. metal from around the belt guard...
... idler pulley to get the belt off , remove ignition key, disconnect the spark plug wire(s) and ground against the engine to the spindle assembly. Then route the belt around the WARNING! excessive vibration, may also be dangerous by routing the belt around the two deck idler pulleys as tractor and/or result in the operating position. It may cause damage to engage and disengage safely. Test the blade's balance using a blade balancer. metal from around the belt guard...
Operation Manual
Page 26
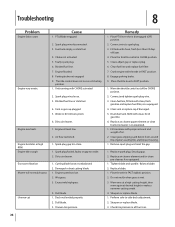
... in gas cap plugged. 5. PTO/Blade engaged. 2. Throttle control lever not in disengaged (OFF) position. 2. Clean fuel line; Mow once at a high cutting height, then mow again at high RPM Engine Idles rough Excessive vibration Mower will not mulch grass Uneven cut Cause 1. Deck not leveled properly. 2. Place PTO lever the in correct starting position. 1. Clean fuel line and replace fuel filter. 7. Replace air cleaner element and/or clean pre-cleaner, if so equipped. 1. Troubleshooting 8 Problem Engine fails to spark plug. 3. Spark plug wire disconnected. 3. Choke not...
... in gas cap plugged. 5. PTO/Blade engaged. 2. Throttle control lever not in disengaged (OFF) position. 2. Clean fuel line; Mow once at a high cutting height, then mow again at high RPM Engine Idles rough Excessive vibration Mower will not mulch grass Uneven cut Cause 1. Deck not leveled properly. 2. Place PTO lever the in correct starting position. 1. Clean fuel line and replace fuel filter. 7. Replace air cleaner element and/or clean pre-cleaner, if so equipped. 1. Troubleshooting 8 Problem Engine fails to spark plug. 3. Spark plug wire disconnected. 3. Choke not...

Operation Manual
Page 28
... 42-inch Deck Mulch Kit Blade Removal Tool Twin Bagger Grass Collector Deck Wash Kit Deluxe Tractor Sunshade 42-inch Two-stage Snow Thrower Rear Wheel Weight Kit Tire Chains, 20 x 8 Tires 42-inch Front Dozer Blade Oil Siphon Arnold Tractor Cover Arnold Oil Filter Wrench Arnold Spark Plug Wrench 1 Gallon Tire &Tube Sealant By Tire Aid 24 Oz Tire & Tube Sealant By Tire Aid Deluxe Tire/ Tube Foot Pump By Tire Aid Tire Aid Deluxe Tire Plug Kit By Tire Aid 15" Tractor Tube With Sealant By Tire Aid 16" Tractor...
... 42-inch Deck Mulch Kit Blade Removal Tool Twin Bagger Grass Collector Deck Wash Kit Deluxe Tractor Sunshade 42-inch Two-stage Snow Thrower Rear Wheel Weight Kit Tire Chains, 20 x 8 Tires 42-inch Front Dozer Blade Oil Siphon Arnold Tractor Cover Arnold Oil Filter Wrench Arnold Spark Plug Wrench 1 Gallon Tire &Tube Sealant By Tire Aid 24 Oz Tire & Tube Sealant By Tire Aid Deluxe Tire/ Tube Foot Pump By Tire Aid Tire Aid Deluxe Tire Plug Kit By Tire Aid 15" Tractor Tube With Sealant By Tire Aid 16" Tractor...

Operation Manual
Page 29
.... 2. Any warranted part that is scheduled for replacement as the carburetor, fuel-injection system, the ignition system, catalytic converter, fuel tanks, fuel lines, fuel caps, valves, canisters, filters, vapor hoses, clamps, connectors, and other states, 1997 and later model year equipment must be warranted for the period of MTD Consumer Group Inc. 10. Any such part repaired or replaced under warranty of any warranted part under warranty will not reduce...
.... 2. Any warranted part that is scheduled for replacement as the carburetor, fuel-injection system, the ignition system, catalytic converter, fuel tanks, fuel lines, fuel caps, valves, canisters, filters, vapor hoses, clamps, connectors, and other states, 1997 and later model year equipment must be warranted for the period of MTD Consumer Group Inc. 10. Any such part repaired or replaced under warranty of any warranted part under warranty will not reduce...

Operation Manual
Page 31
... repair or replacement of any part, accessory or attachment not approved by Troy-Bilt for use with the product(s) covered by someone other than the original purchaser or to the person for whom it was purchased as : batteries, belts, blades, blade adapters, tines, grass bags, wheels, rider deck wheels, seats, snow thrower skid shoes, friction wheels, shave plates, auger spiral rubber and tires. These items may also have a separate oneyear warranty. Service completed by this manual...
... repair or replacement of any part, accessory or attachment not approved by Troy-Bilt for use with the product(s) covered by someone other than the original purchaser or to the person for whom it was purchased as : batteries, belts, blades, blade adapters, tines, grass bags, wheels, rider deck wheels, seats, snow thrower skid shoes, friction wheels, shave plates, auger spiral rubber and tires. These items may also have a separate oneyear warranty. Service completed by this manual...


