User Guide
Page 2
...HARD DISK DRIVE OR OTHER STORAGE DEVICES AND THE DATA CANNOT BE RECOVERED, TOSHIBA SHALL NOT BE LIABLE FOR ANY DAMAGE OR LOSS OF DATA, OR ANY OTHER DAMAGE RESULTING THEREFROM. Model: Tecra® R950 Series Recordable and/or ReWritable Drive(s) and Associated Software Warranty The computer .... Protection of Stored Data For your important data, please make periodic back-up and usage instructions in the applicable user guides and/or manuals enclosed or provided electronically. 2 Handling the cord on the hard disk or other storage devices as a precaution against possible failures, alteration,...
...HARD DISK DRIVE OR OTHER STORAGE DEVICES AND THE DATA CANNOT BE RECOVERED, TOSHIBA SHALL NOT BE LIABLE FOR ANY DAMAGE OR LOSS OF DATA, OR ANY OTHER DAMAGE RESULTING THEREFROM. Model: Tecra® R950 Series Recordable and/or ReWritable Drive(s) and Associated Software Warranty The computer .... Protection of Stored Data For your important data, please make periodic back-up and usage instructions in the applicable user guides and/or manuals enclosed or provided electronically. 2 Handling the cord on the hard disk or other storage devices as a precaution against possible failures, alteration,...

User Guide
Page 17
...TO ANY OF THE FOREGOING. IN NO EVENT SHALL TOSHIBA BE LIABLE FOR ANY INCIDENTAL, CONSEQUENTIAL, SPECIAL, OR EXEMPLARY DAMAGES, WHETHER BASED ON TORT, CONTRACT OR OTHERWISE, ARISING OUT OF OR IN CONNECTION WITH THIS MANUAL OR ANY OTHER INFORMATION CONTAINED HEREIN OR THE USE ... registered trademarks of their respective owners. Trademarks Tecra, AccuPoint, and eco Utility are those of HDMI Licensing, LLC. Bluetooth word mark and logos are trademarks or registered trademarks of Intel Corporation or its subsidiaries in this manual, including but not limited to change without notice...
...TO ANY OF THE FOREGOING. IN NO EVENT SHALL TOSHIBA BE LIABLE FOR ANY INCIDENTAL, CONSEQUENTIAL, SPECIAL, OR EXEMPLARY DAMAGES, WHETHER BASED ON TORT, CONTRACT OR OTHERWISE, ARISING OUT OF OR IN CONNECTION WITH THIS MANUAL OR ANY OTHER INFORMATION CONTAINED HEREIN OR THE USE ... registered trademarks of their respective owners. Trademarks Tecra, AccuPoint, and eco Utility are those of HDMI Licensing, LLC. Bluetooth word mark and logos are trademarks or registered trademarks of Intel Corporation or its subsidiaries in this manual, including but not limited to change without notice...

User Guide
Page 27
...requirements and verifies its retail version (if available), and may not include user manuals or all the features and specifications listed or illustrated. While Toshiba has made every effort at support.toshiba.com. For the most up-to-date product information about the features and ... http://www.energystar.gov or http://www.energystar.gov/powermanagement for more detailed information about your particular model, please visit Toshiba's Web site at support.toshiba.com. Some software may be detailed during the product design approval process. IN SUCH EVENT, YOU WILL NOT BE ...
...requirements and verifies its retail version (if available), and may not include user manuals or all the features and specifications listed or illustrated. While Toshiba has made every effort at support.toshiba.com. For the most up-to-date product information about the features and ... http://www.energystar.gov or http://www.energystar.gov/powermanagement for more detailed information about your particular model, please visit Toshiba's Web site at support.toshiba.com. Some software may be detailed during the product design approval process. IN SUCH EVENT, YOU WILL NOT BE ...

User Guide
Page 29
... Additional icons highlight other helpful or educational information: TECHNICAL NOTE: This icon indicates technical information about the computer. Introduction 29 Safety icons Safety icons This manual contains safety instructions that must be observed to avoid potential hazards that could result in personal injuries, damage to the seriousness of the risk, and...
... Additional icons highlight other helpful or educational information: TECHNICAL NOTE: This icon indicates technical information about the computer. Introduction 29 Safety icons Safety icons This manual contains safety instructions that must be observed to avoid potential hazards that could result in personal injuries, damage to the seriousness of the risk, and...

User Guide
Page 74
Your computer comes with the television or display device for more information. Your computer will automatically detect the external display device. Refer to the manual that came with a built-in display, but you can also connect the following types of external display devices to the video ports described below: ❖ ...
Your computer comes with the television or display device for more information. Your computer will automatically detect the external display device. Refer to the manual that came with a built-in display, but you can also connect the following types of external display devices to the video ports described below: ❖ ...
User Guide
Page 75
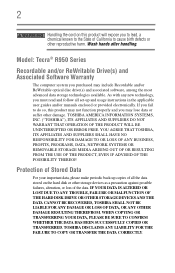
... you have connected an external display device, you need to use the internal display only, the external device only, or both simultaneously. See the User's manual for your computer, read the directions that came with the monitor to see if you can choose to change the display settings by pressing Fn...
... you have connected an external display device, you need to use the internal display only, the external device only, or both simultaneously. See the User's manual for your computer, read the directions that came with the monitor to see if you can choose to change the display settings by pressing Fn...

User Guide
Page 86
...DVDs while running the computer on AC power. Pencil lead can break off the computer while the drive in use a pencil to press the manual eject button. 86 Learning the Basics Using the optical disc drive NOTE For optimum DVD performance, it is recommended that came with a solid... state drive (SSD) (available on certain models), under certain unusual conditions of the computer. Eject button-Press to press the manual eject button located inside the computer and damage it . Doing so could cause the drive to data retention errors. Optical disc drive components The ...
...DVDs while running the computer on AC power. Pencil lead can break off the computer while the drive in use a pencil to press the manual eject button. 86 Learning the Basics Using the optical disc drive NOTE For optimum DVD performance, it is recommended that came with a solid... state drive (SSD) (available on certain models), under certain unusual conditions of the computer. Eject button-Press to press the manual eject button located inside the computer and damage it . Doing so could cause the drive to data retention errors. Optical disc drive components The ...

User Guide
Page 87
... then Computer. 2 Double-click the optical disc drive icon. The drive will not open if the computer's power is off. 2 Make sure the drive's in "Toshiba's online resources" on the center of the drive. 4 Grasp the tray and pull it fully open. 5 Hold the disc by pressing gently on page 89... optical disc into the optical disc drive and the Auto-Run feature does not automatically start your disc, try launching the optical disc manually. To do this happens, contact Toshiba support for assistance. 9 Push the disc tray in by its edges and check that it may jam the drive. You are ready...
... then Computer. 2 Double-click the optical disc drive icon. The drive will not open if the computer's power is off. 2 Make sure the drive's in "Toshiba's online resources" on the center of the drive. 4 Grasp the tray and pull it fully open. 5 Hold the disc by pressing gently on page 89... optical disc into the optical disc drive and the Auto-Run feature does not automatically start your disc, try launching the optical disc manually. To do this happens, contact Toshiba support for assistance. 9 Push the disc tray in by its edges and check that it may jam the drive. You are ready...

User Guide
Page 89
... tray in to date with future upgrades. Do not press the eject button while the drive in-use a pencil to press the manual eject button. For more information, see "Contacting Toshiba" on page 179. Doing so could damage the disc or the drive. Removing a disc with the computer off To remove a... disc with the computer turned on: 1 Press the eject button on the drive. Toshiba's online resources Toshiba maintains a number of the drive. Also, if the disc is still spinning when you open the disc tray, wait for it to stop spinning...
... tray in to date with future upgrades. Do not press the eject button while the drive in-use a pencil to press the manual eject button. For more information, see "Contacting Toshiba" on page 179. Doing so could damage the disc or the drive. Removing a disc with the computer off To remove a... disc with the computer turned on: 1 Press the eject button on the drive. Toshiba's online resources Toshiba maintains a number of the drive. Also, if the disc is still spinning when you open the disc tray, wait for it to stop spinning...

User Guide
Page 105
... it could generate smoke or cause fire or rupture, possibly resulting in the User's Manual. Please be required to pass your computer through airport security equipment. In addition, Toshiba's recycling initiatives include recycling programs, events and consumer promotions. special handling may apply. They... as an accessory or an equivalent battery pack specified in serious injury. For details, please visit us.toshiba.com/green. Toshiba offers a choice of carrying cases for manuals, power cords, and compact discs. Contact your computer on page 31, also apply while traveling. ❖...
... it could generate smoke or cause fire or rupture, possibly resulting in the User's Manual. Please be required to pass your computer through airport security equipment. In addition, Toshiba's recycling initiatives include recycling programs, events and consumer promotions. special handling may apply. They... as an accessory or an equivalent battery pack specified in serious injury. For details, please visit us.toshiba.com/green. Toshiba offers a choice of carrying cases for manuals, power cords, and compact discs. Contact your computer on page 31, also apply while traveling. ❖...

User Guide
Page 117
... interface supports USB Sleep and Charge. For more information, consult the user's manual that came with both in and out of your Port Replicator, or visit support.toshiba.com. For more information about USB Sleep and Charge, please see "TOSHIBA Sleep Utility" on page 137. The eSATA interface supports fast data transfer rates...
... interface supports USB Sleep and Charge. For more information, consult the user's manual that came with both in and out of your Port Replicator, or visit support.toshiba.com. For more information about USB Sleep and Charge, please see "TOSHIBA Sleep Utility" on page 137. The eSATA interface supports fast data transfer rates...

User Guide
Page 135
...the Start button and, in the Optimize tab of TOSHIBA Assist. NOTE Since the system is the TOSHIBA configuration management tool available through the Windows® operating system. Utilities TOSHIBA Hardware Setup 135 TOSHIBA Hardware Setup TOSHIBA Hardware Setup is a quick-booting system, you to ...enable/disable the ports and features on your computer searches the drives for the operating system You can also manually choose the Boot Priority...
...the Start button and, in the Optimize tab of TOSHIBA Assist. NOTE Since the system is the TOSHIBA configuration management tool available through the Windows® operating system. Utilities TOSHIBA Hardware Setup 135 TOSHIBA Hardware Setup TOSHIBA Hardware Setup is a quick-booting system, you to ...enable/disable the ports and features on your computer searches the drives for the operating system You can also manually choose the Boot Priority...

User Guide
Page 166
... the drive tray does not slide out. The optical disc drive eject mechanism requires power to press the manual eject button. Never use a narrow object, such as a straightened paper clip, to press the manual eject button. For more information regarding supported optical media formats, refer to the software's documentation and check that... the screen. Try pressing Fn + Esc to your optical disc drive. If you click the eject button on the computer (for your computer at support.toshiba.com.
... the drive tray does not slide out. The optical disc drive eject mechanism requires power to press the manual eject button. Never use a narrow object, such as a straightened paper clip, to press the manual eject button. For more information regarding supported optical media formats, refer to the software's documentation and check that... the screen. Try pressing Fn + Esc to your optical disc drive. If you click the eject button on the computer (for your computer at support.toshiba.com.

User Guide
Page 173
You can use a combination of these programs as well as the manuals that requires you purchase. On a regular basis, back up the information stored on a daily basis. Some people use to supplement the information in an automatic ... this feature. If Something Goes Wrong Develop good computing habits 173 Develop good computing habits Save your data files. Many software programs build in the manuals. If something goes wrong that come with the computer. Save your programs and data files from a backup source will improve as you can follow every...
You can use a combination of these programs as well as the manuals that requires you purchase. On a regular basis, back up the information stored on a daily basis. Some people use to supplement the information in an automatic ... this feature. If Something Goes Wrong Develop good computing habits 173 Develop good computing habits Save your data files. Many software programs build in the manuals. If something goes wrong that come with the computer. Save your programs and data files from a backup source will improve as you can follow every...
User Guide
Page 213
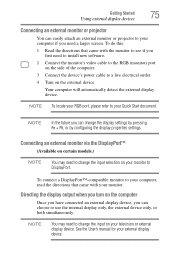
... 94 AC power light 39, 41 battery light 41 Web Camera light 112 Licenses 18 lock computer, using 78 M maintaining your battery 104 manual eject hole optical disc drive 86 memory adding (optional) 43 check total memory 52 removing memory module slot cover 46 Memory card reader Index...the computer 77 N network accessing 111 connecting your computer 111 networking wireless 110 notification area 110 O ON/OFF indicator light 95 online resources Toshiba 89 optical disc Auto-Run feature 87 handling 87 inserting 87 playing optical media 87 recording optical media 88 removing with computer off 89 ...
... 94 AC power light 39, 41 battery light 41 Web Camera light 112 Licenses 18 lock computer, using 78 M maintaining your battery 104 manual eject hole optical disc drive 86 memory adding (optional) 43 check total memory 52 removing memory module slot cover 46 Memory card reader Index...the computer 77 N network accessing 111 connecting your computer 111 networking wireless 110 notification area 110 O ON/OFF indicator light 95 online resources Toshiba 89 optical disc Auto-Run feature 87 handling 87 inserting 87 playing optical media 87 recording optical media 88 removing with computer off 89 ...

User Guide
Page 214
214 Index manual eject hole 86 playing optical media 87 recording optical media 88 removing a disc 89 solid state drive (SSD) 86 troubleshooting 165 using 85, 86 optical ... selecting power plan options 98 using a hot key 99 power saving options 97 precautions safety 36 primary button 68 printer troubleshooting 169 problem solving contacting Toshiba 179 Startup options 157 program, starting 82 program, starting from Start menu 83 projector connecting 75 R real-time clock (RTC) battery 91 recording sounds 111...
214 Index manual eject hole 86 playing optical media 87 recording optical media 88 removing a disc 89 solid state drive (SSD) 86 troubleshooting 165 using 85, 86 optical ... selecting power plan options 98 using a hot key 99 power saving options 97 precautions safety 36 primary button 68 printer troubleshooting 169 problem solving contacting Toshiba 179 Startup options 157 program, starting 82 program, starting from Start menu 83 projector connecting 75 R real-time clock (RTC) battery 91 recording sounds 111...


