User Manual
Page 27
... display devices 78 Directing the display output when you turn on the computer 78 Adjusting the quality of the external display......80 Using an external keyboard 80 Using a mouse 80 Connecting a printer 81 Setting up a printer 82 Connecting an optional external diskette drive........83 Turning off the computer 84 Options for...
... display devices 78 Directing the display output when you turn on the computer 78 Adjusting the quality of the external display......80 Using an external keyboard 80 Using a mouse 80 Connecting a printer 81 Setting up a printer 82 Connecting an optional external diskette drive........83 Turning off the computer 84 Options for...
User Manual
Page 28
... computer 93 Moving the computer 93 Using a computer lock 94 Chapter 2: Learning the Basics 95 Computing tips 95 Using the keyboard 97 Character keys 97 Making your keyboard emulate a full-size keyboard 97 Ctrl, Fn, and Alt keys 98 Function keys 98 Windows special keys 99 Overlay keys 99 Using the overlay to... 112 Creating a CD 113 Removing a disc with the computer on...........114 Removing a disc with the computer off ..........114 Caring for CD or DVD Discs 115 Toshiba's online resources 115
... computer 93 Moving the computer 93 Using a computer lock 94 Chapter 2: Learning the Basics 95 Computing tips 95 Using the keyboard 97 Character keys 97 Making your keyboard emulate a full-size keyboard 97 Ctrl, Fn, and Alt keys 98 Function keys 98 Windows special keys 99 Overlay keys 99 Using the overlay to... 112 Creating a CD 113 Removing a disc with the computer on...........114 Removing a disc with the computer off ..........114 Caring for CD or DVD Discs 115 Toshiba's online resources 115

User Manual
Page 31
... supervisor password 165 Deleting a supervisor password 166 Toshiba Password Utility 167 PC Diagnostic Tool Utility 168 HDD Protection Utility 170 Fn-esse 171 Starting Fn-esse 171 Using drag-and-drop to assign a key 172 Using the keyboard or pointing device to assign a key 173... Viewing existing key assignments 174 Changing or removing existing key assignments 175 Toshiba Hotkey Utility 175 Toshiba SD™ Memory Card Format Utility............176 Toshiba SD™ Memory Boot Utility 177 Booting ...
... supervisor password 165 Deleting a supervisor password 166 Toshiba Password Utility 167 PC Diagnostic Tool Utility 168 HDD Protection Utility 170 Fn-esse 171 Starting Fn-esse 171 Using drag-and-drop to assign a key 172 Using the keyboard or pointing device to assign a key 173... Viewing existing key assignments 174 Changing or removing existing key assignments 175 Toshiba Hotkey Utility 175 Toshiba SD™ Memory Card Format Utility............176 Toshiba SD™ Memory Boot Utility 177 Booting ...
User Manual
Page 32
... A plan of action 212 Resolving hardware conflicts on your own .....213 Fixing a problem with Device Manager ...........214 Memory problems 216 Power and the batteries 217 Keyboard problems 219 Display problems 220 Disk drive problems 222 Optical drive problems 225 Sound system problems 226 PC Card problems 226 Printer problems 230 Modem...
... A plan of action 212 Resolving hardware conflicts on your own .....213 Fixing a problem with Device Manager ...........214 Memory problems 216 Power and the batteries 217 Keyboard problems 219 Display problems 220 Disk drive problems 222 Optical drive problems 225 Sound system problems 226 PC Card problems 226 Printer problems 230 Modem...
User Manual
Page 33
...habits 238 Data and system configuration backup in Windows XP 239 If you need further assistance 245 Before you contact Toshiba 245 Contacting Toshiba 246 Other Toshiba Internet Web sites 247 Toshiba's worldwide offices 248 Appendix A: Hot Keys 250 Volume Mute 250 Password security 251 Without a password 251 With a... brightness 257 Disabling or enabling wireless devices 257 Disabling or enabling the TouchPad 258 Zooming applications in/out 258 Keyboard hot keys 259 Appendix B: Power Cord/Cable Connectors 260 USA and Canada 260 United Kingdom 260 Australia 260 Europe 260
...habits 238 Data and system configuration backup in Windows XP 239 If you need further assistance 245 Before you contact Toshiba 245 Contacting Toshiba 246 Other Toshiba Internet Web sites 247 Toshiba's worldwide offices 248 Appendix A: Hot Keys 250 Volume Mute 250 Password security 251 Without a password 251 With a... brightness 257 Disabling or enabling wireless devices 257 Disabling or enabling the TouchPad 258 Zooming applications in/out 258 Keyboard hot keys 259 Appendix B: Power Cord/Cable Connectors 260 USA and Canada 260 United Kingdom 260 Australia 260 Europe 260

User Manual
Page 44
... up to and including "Setting up your computer Always make sure your PC and AC adaptor have adequate ventilation and are not limited to, a mouse, keyboard, printer, memory, and PC Cards. Your computer contains a rechargeable main battery that needs to be charged before adding external or internal components to a power outlet...
... up to and including "Setting up your computer Always make sure your PC and AC adaptor have adequate ventilation and are not limited to, a mouse, keyboard, printer, memory, and PC Cards. Your computer contains a rechargeable main battery that needs to be charged before adding external or internal components to a power outlet...
User Manual
Page 47
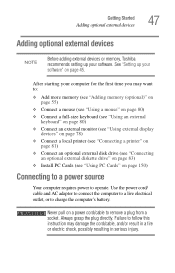
... memory (optional)" on page 55) ❖ Connect a mouse (see "Using a mouse" on page 80) ❖ Connect a full-size keyboard (see "Using an external keyboard" on page 80) ❖ Connect an external monitor (see "Using external display devices" on page 78) ❖ Connect a local printer (... plug from a socket. Getting Started Adding optional external devices 47 Adding optional external devices NOTE Before adding external devices or memory, Toshiba recommends setting up your software. Never pull on page 45. See "Setting up your software" on a power cord/cable to charge...
... memory (optional)" on page 55) ❖ Connect a mouse (see "Using a mouse" on page 80) ❖ Connect a full-size keyboard (see "Using an external keyboard" on page 80) ❖ Connect an external monitor (see "Using external display devices" on page 78) ❖ Connect a local printer (... plug from a socket. Getting Started Adding optional external devices 47 Adding optional external devices NOTE Before adding external devices or memory, Toshiba recommends setting up your software. Never pull on page 45. See "Setting up your software" on a power cord/cable to charge...
User Manual
Page 66
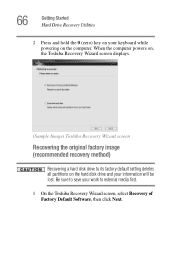
... Wizard screen Recovering the original factory image (recommended recovery method) Recovering a hard disk drive to external media first. 1 On the Toshiba Recovery Wizard screen, select Recovery of Factory Default Software, then click Next. Be sure to save your work to its factory default setting ...deletes all partitions on the hard disk drive and your keyboard while powering on the computer. 66 Getting Started Hard Drive Recovery Utilities 2 Press and hold the 0 (zero) key on your information will be...
... Wizard screen Recovering the original factory image (recommended recovery method) Recovering a hard disk drive to external media first. 1 On the Toshiba Recovery Wizard screen, select Recovery of Factory Default Software, then click Next. Be sure to save your work to its factory default setting ...deletes all partitions on the hard disk drive and your keyboard while powering on the computer. 66 Getting Started Hard Drive Recovery Utilities 2 Press and hold the 0 (zero) key on your information will be...
User Manual
Page 67
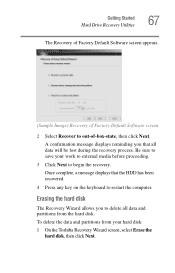
Erasing the hard disk The Recovery Wizard allows you that the HDD has been recovered. 4 Press any key on the keyboard to begin the recovery. To delete the data and partitions from the hard disk. A confirmation message displays reminding you to delete all data will be ...) Recovery of -box-state, then click Next. Be sure to out-of Factory Default Software screen 2 Select Recover to save your hard disk: 1 On the Toshiba Recovery Wizard screen, select Erase the hard disk, then click Next.
Erasing the hard disk The Recovery Wizard allows you that the HDD has been recovered. 4 Press any key on the keyboard to begin the recovery. To delete the data and partitions from the hard disk. A confirmation message displays reminding you to delete all data will be ...) Recovery of -box-state, then click Next. Be sure to out-of Factory Default Software screen 2 Select Recover to save your hard disk: 1 On the Toshiba Recovery Wizard screen, select Erase the hard disk, then click Next.

User Manual
Page 68
..., depending on the size of the data on the hard disk without overwriting the HDD. ❖ Delete all partitions and overwrite all sectors on the keyboard to begin deleting the HDD. A confirmation message displays reminding you that all data, then overwrites the entire HDD for security purposes. When the process is...
..., depending on the size of the data on the hard disk without overwriting the HDD. ❖ Delete all partitions and overwrite all sectors on the keyboard to begin deleting the HDD. A confirmation message displays reminding you that all data, then overwrites the entire HDD for security purposes. When the process is...
User Manual
Page 69
... be lost during the recovery process. A confirmation message appears, reminding you that the HDD has been recovered. 4 Press any information on your C: drive: 1 On the Toshiba Recovery Wizard Screen, select Recovery of the HDD without changing the hard drive partitions. To recover only your...
... be lost during the recovery process. A confirmation message appears, reminding you that the HDD has been recovered. 4 Press any information on your C: drive: 1 On the Toshiba Recovery Wizard Screen, select Recovery of the HDD without changing the hard drive partitions. To recover only your...
User Manual
Page 70
... with a user specified size Resizing and recovering your C: drive to its factory default setting reformats all partitions on your keyboard to restart the computer. To resize and recover your work to save your C: drive: 1 On the Toshiba Recovery Wizard screen, select Recovery of Factory Default Software. Be sure to external media first.
... with a user specified size Resizing and recovering your C: drive to its factory default setting reformats all partitions on your keyboard to restart the computer. To resize and recover your work to save your C: drive: 1 On the Toshiba Recovery Wizard screen, select Recovery of Factory Default Software. Be sure to external media first.
User Manual
Page 72
.... Click Next. Recovering the C: partition of Factory Default Software. If you have created other partitions (for example, a D: drive) those partitions and any key on the keyboard to out-of Factory Default Software. Be sure you have saved your work to external media before proceeding. 3 Click Next to save your C: drive: 1 Select...
.... Click Next. Recovering the C: partition of Factory Default Software. If you have created other partitions (for example, a D: drive) those partitions and any key on the keyboard to out-of Factory Default Software. Be sure you have saved your work to external media before proceeding. 3 Click Next to save your C: drive: 1 Select...

User Manual
Page 73
... your C: drive to begin the restoration. Click Next. 2 Select Recover using all information on your C: drive without the HDD Recovery Area This option recovers your keyboard to external media first. Be sure you have saved your work to external media before proceeding. 3 Click Next to its factory default state without the...
... your C: drive to begin the restoration. Click Next. 2 Select Recover using all information on your C: drive without the HDD Recovery Area This option recovers your keyboard to external media first. Be sure you have saved your work to external media before proceeding. 3 Click Next to its factory default state without the...

User Manual
Page 74
...After restoring your hard disk drive, you want to restart the computer. Once complete, a message displays that were originally bundled with your keyboard to install. 4 Click Install. 5 Follow the on your computer. 74 Getting Started Hard Drive Recovery Utilities 3 Click Yes to complete... the installation process. Installing drivers and applications The Toshiba Application Installer allows you to reinstall the drivers and applications that the HDD has been recovered. 4 Press any key on -screen ...
...After restoring your hard disk drive, you want to restart the computer. Once complete, a message displays that were originally bundled with your keyboard to install. 4 Click Install. 5 Follow the on your computer. 74 Getting Started Hard Drive Recovery Utilities 3 Click Yes to complete... the installation process. Installing drivers and applications The Toshiba Application Installer allows you to reinstall the drivers and applications that the HDD has been recovered. 4 Press any key on -screen ...
User Manual
Page 75
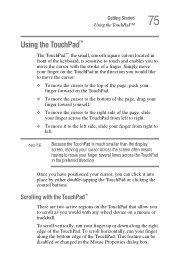
... left. Getting Started Using the TouchPad™ 75 Using the TouchPad™ The TouchPad™, the small, smooth square cutout located in front of the keyboard, is much smaller than the display screen, moving your cursor across the TouchPad in the direction you would like to move the cursor: ❖ To...
... left. Getting Started Using the TouchPad™ 75 Using the TouchPad™ The TouchPad™, the small, smooth square cutout located in front of the keyboard, is much smaller than the display screen, moving your cursor across the TouchPad in the direction you would like to move the cursor: ❖ To...
User Manual
Page 80
TECHNICAL NOTE: To use one to your television (or other video display device), you can use a full-size keyboard, you may need to the upper-right side of the external display device. Using a mouse You may move to adjust the video settings. If .... You can attach one of the simultaneous modes, you must support a resolution of 800 X 600 or higher. The computer's USB ports support any USBcompatible keyboard. See the video device documentation for additional configuration steps. NOTE After logging on to your system, the mouse cursor may want to match the resolution...
TECHNICAL NOTE: To use one to your television (or other video display device), you can use a full-size keyboard, you may need to the upper-right side of the external display device. Using a mouse You may move to adjust the video settings. If .... You can attach one of the simultaneous modes, you must support a resolution of 800 X 600 or higher. The computer's USB ports support any USBcompatible keyboard. See the video device documentation for additional configuration steps. NOTE After logging on to your system, the mouse cursor may want to match the resolution...
User Manual
Page 93
.... Caring for your computer. Cleaning the computer Keep liquids, including cleaning fluid, out of the computer. To keep dust and dirt out of the computer's keyboard, speaker, and other openings. For information about taking care of your computer's battery, see "Taking care of your battery" on cleaning and moving your computer...
.... Caring for your computer. Cleaning the computer Keep liquids, including cleaning fluid, out of the computer. To keep dust and dirt out of the computer's keyboard, speaker, and other openings. For information about taking care of your computer's battery, see "Taking care of your battery" on cleaning and moving your computer...
User Manual
Page 97
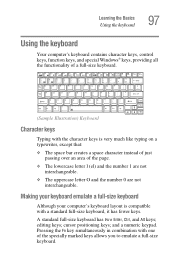
...simultaneously in combination with a standard full-size keyboard, it has fewer keys. cursor positioning keys; A standard full-size keyboard has two Enter, Ctrl, and Alt keys; Learning the Basics Using the keyboard 97 Using the keyboard Your computer's keyboard contains character keys, control keys, function ...keys, and special Windows® keys, providing all the functionality of a full-size keyboard. (Sample Illustration) Keyboard Character keys Typing with the character keys is compatible with one of the page. ❖ The lowercase letter l ...
...simultaneously in combination with a standard full-size keyboard, it has fewer keys. cursor positioning keys; A standard full-size keyboard has two Enter, Ctrl, and Alt keys; Learning the Basics Using the keyboard 97 Using the keyboard Your computer's keyboard contains character keys, control keys, function ...keys, and special Windows® keys, providing all the functionality of a full-size keyboard. (Sample Illustration) Keyboard Character keys Typing with the character keys is compatible with one of the page. ❖ The lowercase letter l ...

User Manual
Page 98
...simulate these separate keys, as follows: ❖ Press Fn and Ctrl simultaneously to simulate the Enter key on page 250. Most of the enhanced keyboard. ❖ Press Fn and Enter simultaneously to simulate the Ctrl key on the right side of the time, this does not matter. Function ... pressed. For more information, see your program documentation. For example, Fn+F9 turns off the TouchPad. 98 Learning the Basics Using the keyboard Your computer's keyboard has only one Enter and one Ctrl key. However, some programs assign separate functions to the right and left Ctrl and Alt keys, ...
...simulate these separate keys, as follows: ❖ Press Fn and Ctrl simultaneously to simulate the Enter key on page 250. Most of the enhanced keyboard. ❖ Press Fn and Enter simultaneously to simulate the Ctrl key on the right side of the time, this does not matter. Function ... pressed. For more information, see your program documentation. For example, Fn+F9 turns off the TouchPad. 98 Learning the Basics Using the keyboard Your computer's keyboard has only one Enter and one Ctrl key. However, some programs assign separate functions to the right and left Ctrl and Alt keys, ...

