
User Manual
Page 73
... page 61. For more information on these options, see "Backing up your work" on your computer. Click Yes to continue. 6 When the Toshiba Recovery Wizard opens and the Selecting a Process screen displays, select Recovery of Factory Default Software and then click Next. NOTE When you restore your ... the files you have created to external media using , and then press Enter. 5 A warning screen appears, stating that you created are restored. The boot menu displays. 4 Using the arrow keys, select the DVD option or the USB Flash option, depending on which type of media you are on a USB...
... page 61. For more information on these options, see "Backing up your work" on your computer. Click Yes to continue. 6 When the Toshiba Recovery Wizard opens and the Selecting a Process screen displays, select Recovery of Factory Default Software and then click Next. NOTE When you restore your ... the files you have created to external media using , and then press Enter. 5 A warning screen appears, stating that you created are restored. The boot menu displays. 4 Using the arrow keys, select the DVD option or the USB Flash option, depending on which type of media you are on a USB...
User Manual
Page 75
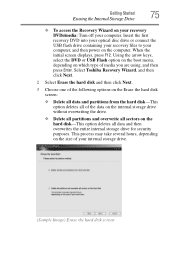
...10070; To access the Recovery Wizard on your recovery DVDs/media: Turn off your internal storage drive. (Sample Image) Erase the hard disk screen Select Toshiba Recovery Wizard, and then click Next. 2 Select Erase the hard disk and then click Next. 3 Choose one of the following options on the Erase ... on the hard disk-This option deletes all sectors on the computer. Using the arrow keys, select the DVD or USB Flash option on the boot menu, depending on which type of the data on the internal storage drive without overwriting the drive. ❖ Delete all partitions and overwrite all data...
...10070; To access the Recovery Wizard on your recovery DVDs/media: Turn off your internal storage drive. (Sample Image) Erase the hard disk screen Select Toshiba Recovery Wizard, and then click Next. 2 Select Erase the hard disk and then click Next. 3 Choose one of the following options on the Erase ... on the hard disk-This option deletes all sectors on the computer. Using the arrow keys, select the DVD or USB Flash option on the boot menu, depending on which type of the data on the internal storage drive without overwriting the drive. ❖ Delete all partitions and overwrite all data...
User Manual
Page 184
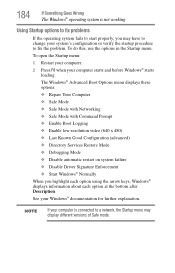
The Windows® Advanced Boot Options menu displays these options: ❖ Repair Your Computer ❖ Safe Mode ❖ Safe Mode with Networking ❖ Safe Mode with Command Prompt ❖ Enable Boot Logging ❖ Enable low-resolution video (640 x 480) ❖ Last Known Good Configuration (advanced) &#... at the bottom after Description. NOTE If your system's configuration or verify the startup procedure to a network, the Startup menu may display different versions of Safe mode. See your computer starts and before Windows® starts loading. 184 If Something Goes...
The Windows® Advanced Boot Options menu displays these options: ❖ Repair Your Computer ❖ Safe Mode ❖ Safe Mode with Networking ❖ Safe Mode with Command Prompt ❖ Enable Boot Logging ❖ Enable low-resolution video (640 x 480) ❖ Last Known Good Configuration (advanced) &#... at the bottom after Description. NOTE If your system's configuration or verify the startup procedure to a network, the Startup menu may display different versions of Safe mode. See your computer starts and before Windows® starts loading. 184 If Something Goes...


