
Owners Manual
Page 2
...to the presence of important operating and maintenance (servicing) instructions in the literature accompanying the appliance. Retain this Owner's Manual. • Toshiba Corporation accepts no liability whatsoever for a long time. Avoid Volatile Liquid Do not use the unit for future reference. 2 located at ...the factory. They will come in handy if you ever have to ship your LCD projector. SAFETY PRECAUTIONS The lightning flash with equipment or software that may condense on the crucial internal parts. WARNING: TO REDUCE THE ...
...to the presence of important operating and maintenance (servicing) instructions in the literature accompanying the appliance. Retain this Owner's Manual. • Toshiba Corporation accepts no liability whatsoever for a long time. Avoid Volatile Liquid Do not use the unit for future reference. 2 located at ...the factory. They will come in handy if you ever have to ship your LCD projector. SAFETY PRECAUTIONS The lightning flash with equipment or software that may condense on the crucial internal parts. WARNING: TO REDUCE THE ...

Owners Manual
Page 5
... product. A product and cart combination should break, please handle with care. Top and bottom plates of the lamp rupturing, thoroughly clean the area around the projector and discard any way. If such parts should be moved with care to overturn. 17. Attachments Do not use a mounting accessory recommended by the product...
... product. A product and cart combination should break, please handle with care. Top and bottom plates of the lamp rupturing, thoroughly clean the area around the projector and discard any way. If such parts should be moved with care to overturn. 17. Attachments Do not use a mounting accessory recommended by the product...

Owners Manual
Page 7
... of power supply being in Stand-by Mode and consumes a little electric power. Confirm an AC plug type with a peripheral equipment before turning a projector on your sales dealer. To reduce risk of electrical shock, do not plug into any other type of 100-120 V or 200-240 V AC... AC Outlet. (120 V AC) To the AC Outlet. (200 - 240 V AC) To the AC Outlet. (200 - 240 V AC) 7 This projector automatically selects correct input voltage. Connect a projector with chart below and proper AC Power Cord must be used . and Canada For Continental Europe Ground For the U.K. When this equipment...
... of power supply being in Stand-by Mode and consumes a little electric power. Confirm an AC plug type with a peripheral equipment before turning a projector on your sales dealer. To reduce risk of electrical shock, do not plug into any other type of 100-120 V or 200-240 V AC... AC Outlet. (120 V AC) To the AC Outlet. (200 - 240 V AC) To the AC Outlet. (200 - 240 V AC) 7 This projector automatically selects correct input voltage. Connect a projector with chart below and proper AC Power Cord must be used . and Canada For Continental Europe Ground For the U.K. When this equipment...

Owners Manual
Page 8
TABLE OF CONTENTS FEATURES AND DESIGN 9 PREPARATION 10 NAME OF EACH PART OF PROJECTOR 10 SETTING-UP PROJECTOR 11 POSITIONING PROJECTOR 11 ADJUSTABLE FEET 12 MOVING PROJECTOR 12 CONNECTING PROJECTOR .........13 TERMINALS OF PROJECTOR 13 CONNECTING TO COMPUTER 14 CONNECTING TO VIDEO EQUIPMENT 15 BEFORE OPERATION 16 OPERATION ... ON-SCREEN MENU 19 FLOW OF ON-SCREEN MENU OPERATION 19 MENU BAR 20 BASIC OPERATION 21 TURNING ON / OFF PROJECTOR 21 ADJUSTING SCREEN 22 ZOOM ADJUSTMENT 22 FOCUS ADJUSTMENT 22 LENS SHIFT ADJUSTMENT 22 KEYSTONE ADJUSTMENT 22 PICTURE FREEZE FUNCTION 23 ...
TABLE OF CONTENTS FEATURES AND DESIGN 9 PREPARATION 10 NAME OF EACH PART OF PROJECTOR 10 SETTING-UP PROJECTOR 11 POSITIONING PROJECTOR 11 ADJUSTABLE FEET 12 MOVING PROJECTOR 12 CONNECTING PROJECTOR .........13 TERMINALS OF PROJECTOR 13 CONNECTING TO COMPUTER 14 CONNECTING TO VIDEO EQUIPMENT 15 BEFORE OPERATION 16 OPERATION ... ON-SCREEN MENU 19 FLOW OF ON-SCREEN MENU OPERATION 19 MENU BAR 20 BASIC OPERATION 21 TURNING ON / OFF PROJECTOR 21 ADJUSTING SCREEN 22 ZOOM ADJUSTMENT 22 FOCUS ADJUSTMENT 22 LENS SHIFT ADJUSTMENT 22 KEYSTONE ADJUSTMENT 22 PICTURE FREEZE FUNCTION 23 ...

Owners Manual
Page 9
... various video and computer input signals including; ● Computers IBM-compatible or Macintosh computer up to reduce power consumption while a projector is not in multimedia features, a palette of original image size, allowing you to focus on a projected screen. ◆ ...Wireless Mouse Remote Control Unit supplied with this function ON. ◆ Digital Visual Interface This projector is equipped with DVI 24-pin terminal for optional parts. 9 This function helps you to make a smart presentation on crucial information at a ...
... various video and computer input signals including; ● Computers IBM-compatible or Macintosh computer up to reduce power consumption while a projector is not in multimedia features, a palette of original image size, allowing you to focus on a projected screen. ◆ ...Wireless Mouse Remote Control Unit supplied with this function ON. ◆ Digital Visual Interface This projector is equipped with DVI 24-pin terminal for optional parts. 9 This function helps you to make a smart presentation on crucial information at a ...

Owners Manual
Page 10
...POWER CORD CONNECTOR TERMINALS AND CONNECTORS INFRARED REMOTE RECEIVER HOT AIR EXHAUSTED ! Air blown from any objects. When using or installing a projector, following to ensure proper ventilation and avoid a possible risk of fire and malfunction. ● Do not cover vent slots. ●...; Keep side clear of Cooling Fans. Obstructions may block cooling air. This projector detects internal temperature and automatically controls operating power of any object, especially heat-sensitive object. ● Do not touch this area, ...
...POWER CORD CONNECTOR TERMINALS AND CONNECTORS INFRARED REMOTE RECEIVER HOT AIR EXHAUSTED ! Air blown from any objects. When using or installing a projector, following to ensure proper ventilation and avoid a possible risk of fire and malfunction. ● Do not cover vent slots. ●...; Keep side clear of Cooling Fans. Obstructions may block cooling air. This projector detects internal temperature and automatically controls operating power of any object, especially heat-sensitive object. ● Do not touch this area, ...
Owners Manual
Page 11
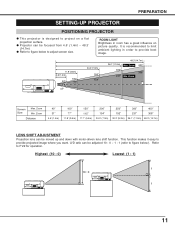
... can be adjusted 10 : 0 ~ 1 : 1 (refer to figure below to adjust screen size. PREPARATION SETTING-UP PROJECTOR POSITIONING PROJECTOR ● This projector is recommended to limit ambient lighting in room has a great influence on a flat projection surface. ● Projector can be focused from 4.6' (1.4m) ~ 48.3' (14.7m). ● Refer to figure below .). Refer to provide...
... can be adjusted 10 : 0 ~ 1 : 1 (refer to figure below to adjust screen size. PREPARATION SETTING-UP PROJECTOR POSITIONING PROJECTOR ● This projector is recommended to limit ambient lighting in room has a great influence on a flat projection surface. ● Projector can be focused from 4.6' (1.4m) ~ 48.3' (14.7m). ● Refer to figure below .). Refer to provide...

Owners Manual
Page 12
...be adjusted using a courier or transport service in use a suitable carrying case. ● Do not transport a projector by rotating ADJUSTABLE FEET. This may result. ● When carrying a projector, use for best way. 12 Position and keystone distortion of image can be adjusted to 10.5 degrees. 1 Lift...feet to prevent damage to fine tune position and tilt. 3 To shorten ADJUSTABLE FEET, lift front of a projector and pull and undo FEET LOCK LATCHES. To transport a projector through a courier or transport service, consult your dealer for an extended period, put it into case (dust ...
...be adjusted using a courier or transport service in use a suitable carrying case. ● Do not transport a projector by rotating ADJUSTABLE FEET. This may result. ● When carrying a projector, use for best way. 12 Position and keystone distortion of image can be adjusted to 10.5 degrees. 1 Lift...feet to prevent damage to fine tune position and tilt. 3 To shorten ADJUSTABLE FEET, lift front of a projector and pull and undo FEET LOCK LATCHES. To transport a projector through a courier or transport service, consult your dealer for an extended period, put it into case (dust ...
Owners Manual
Page 13
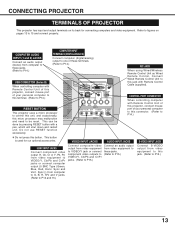
... and need to P14.) ✽ Do not press this connector. (Refer to be done by pressing RESET button with Remote Control Unit of this projector, connect mouse port of your personal computer to this button. ANALOG INPUT 1 DIGITAL(DVI-D) R/C JACK AUDIO 1 USB RESET CONTROL PORT AUDIO 2 ...B) When controlling computer with a pen, which will shut down and restart unit. Do not use RESET function excessively. CONNECTING PROJECTOR TERMINALS OF PROJECTOR This projector has input and output terminals on pages 13 to VIDEO/Y, Cb/Pb and Cr/Pr jacks or connect computer output {5 BNC...
... and need to P14.) ✽ Do not press this connector. (Refer to be done by pressing RESET button with Remote Control Unit of this projector, connect mouse port of your personal computer to this button. ANALOG INPUT 1 DIGITAL(DVI-D) R/C JACK AUDIO 1 USB RESET CONTROL PORT AUDIO 2 ...B) When controlling computer with a pen, which will shut down and restart unit. Do not use RESET function excessively. CONNECTING PROJECTOR TERMINALS OF PROJECTOR This projector has input and output terminals on pages 13 to VIDEO/Y, Cb/Pb and Cr/Pr jacks or connect computer output {5 BNC...

Owners Manual
Page 14
...870) ON ON ON ON OFF OFF NOTE : When connecting cable, power cords of your computer. Turn a projector and peripheral equipment on projec- 123456 tor and computer. CONNECTING PROJECTOR CONNECTING TO COMPUTER Cables used for connection (✽ = Cable or adapter is switched on RESOLU- CONTROL PORT &#...PS/2 port ADB port 14 BNC Cable ✽ MAC Adapter Set slide switches according to ON DIP use before computer is not supplied with this projector.) • VGA Cable (HDB 15 pin) • USB Cable ✽ • DVI-Digital Cable (for Single Link T.M.D.S.) ✽ ...
...870) ON ON ON ON OFF OFF NOTE : When connecting cable, power cords of your computer. Turn a projector and peripheral equipment on projec- 123456 tor and computer. CONNECTING PROJECTOR CONNECTING TO COMPUTER Cables used for connection (✽ = Cable or adapter is switched on RESOLU- CONTROL PORT &#...PS/2 port ADB port 14 BNC Cable ✽ MAC Adapter Set slide switches according to ON DIP use before computer is not supplied with this projector.) • VGA Cable (HDB 15 pin) • USB Cable ✽ • DVI-Digital Cable (for Single Link T.M.D.S.) ✽ ...
Owners Manual
Page 15
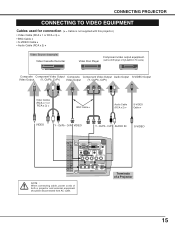
... 3 NOTE : When connecting cable, power cords of a Projector 15 Cb/Pb - Terminals of both a projector and external equipment should be disconnected from AC outlet. Cr/Pr VIDEO Y - Cb/Pb - CONNECTING PROJECTOR CONNECTING TO VIDEO EQUIPMENT Cables used for connection (✽ =... Cable is not supplied with this projector.) • Video Cable (RCA x 1 or RCA x 3) ✽ • BNC Cable ✽ •...
... 3 NOTE : When connecting cable, power cords of a Projector 15 Cb/Pb - Terminals of both a projector and external equipment should be disconnected from AC outlet. Cr/Pr VIDEO Y - Cb/Pb - CONNECTING PROJECTOR CONNECTING TO VIDEO EQUIPMENT Cables used for connection (✽ =... Cable is not supplied with this projector.) • Video Cable (RCA x 1 or RCA x 3) ✽ • BNC Cable ✽ •...

Owners Manual
Page 16
... ALL-OFF SWITCH When using this button within 1 minute. Laser beam is pressed, laser light goes on or off . When using Remote Control Unit, turn projector on . LASER POINTER INDICATOR lights RED and Laser is emitted with RED light to operate Laser Pointer Function. Three marks bellow are put on ONSCREEN...
... ALL-OFF SWITCH When using this button within 1 minute. Laser beam is pressed, laser light goes on or off . When using Remote Control Unit, turn projector on . LASER POINTER INDICATOR lights RED and Laser is emitted with RED light to operate Laser Pointer Function. Three marks bellow are put on ONSCREEN...

Owners Manual
Page 17
mode and resize image. (P31) Operating Range Point Remote Control Unit toward projector (Receiver Window) whenever pressing any button. Battery installation is incorrectly replaced. ● Dispose of used battery. ● Avoid contact with pins in front ...drop Remote Control Unit. ● If a battery has leaked on Remote Control Unit, carefully wipe case clean and install new batteries. ● Danger of a projector. 60° KEYSTONE BUTTON Used to correct keystone distortion. (P22, 37) NO SHOW BUTTON Used to turn picture into compartment. 3 Replace compartment lid. BEFORE ...
mode and resize image. (P31) Operating Range Point Remote Control Unit toward projector (Receiver Window) whenever pressing any button. Battery installation is incorrectly replaced. ● Dispose of used battery. ● Avoid contact with pins in front ...drop Remote Control Unit. ● If a battery has leaked on Remote Control Unit, carefully wipe case clean and install new batteries. ● Danger of a projector. 60° KEYSTONE BUTTON Used to correct keystone distortion. (P22, 37) NO SHOW BUTTON Used to turn picture into compartment. 3 Replace compartment lid. BEFORE ...
Owners Manual
Page 18
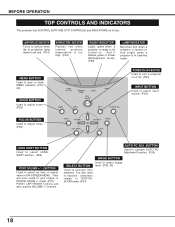
... focus. (P22) LENS SHIFT BUTTON Used to select LENS SHIFT function. (P22) POINT (VOLUME + / - ) BUTTONS Used to be turned on. And bright when a projector is also used to an end. (P41) WARNING TEMP. They are also used to execute item selected. BUTTON Used to operate AUTO PC Adjustment function...(P29, 34) Used to pan image in ON-SCREEN MENU. And it flashes green in Power Management mode. (P38) LAMP INDICATOR Becomes dim when a projector is ready to select an item or adjust value in DIGITAL ZOOM +/- It is in DIGITAL ZOOM mode. (P31) 18 LAMP REPLACE INDICATOR Turns to...
... focus. (P22) LENS SHIFT BUTTON Used to select LENS SHIFT function. (P22) POINT (VOLUME + / - ) BUTTONS Used to be turned on. And bright when a projector is also used to an end. (P41) WARNING TEMP. They are also used to execute item selected. BUTTON Used to operate AUTO PC Adjustment function...(P29, 34) Used to pan image in ON-SCREEN MENU. And it flashes green in Power Management mode. (P38) LAMP INDICATOR Becomes dim when a projector is ready to select an item or adjust value in DIGITAL ZOOM +/- It is in DIGITAL ZOOM mode. (P31) 18 LAMP REPLACE INDICATOR Turns to...
Owners Manual
Page 19
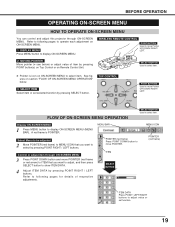
BEFORE OPERATION OPERATING ON-SCREEN MENU HOW TO OPERATE ON-SCREEN MENU You can control and adjust this projector through ON-SCREEN MENU 3 Press POINT DOWN button and move POINTER. SELECT BUTTON Used to select item. ✽ Pointer is POINTER. A red frame is icon ...
BEFORE OPERATION OPERATING ON-SCREEN MENU HOW TO OPERATE ON-SCREEN MENU You can control and adjust this projector through ON-SCREEN MENU 3 Press POINT DOWN button and move POINTER. SELECT BUTTON Used to select item. ✽ Pointer is POINTER. A red frame is icon ...

Owners Manual
Page 20
... P24, 25) IMAGE SELECT MENU Used to select image level among Standard, Cinema and Image 1 ~ 4. (Refer to P34) SCREEN MENU Used to set size of projector or reset Lamp Replace Counter. (Refer to P37,-39) INPUT MENU Used to select input source (Input 1, Input 2 or Input 3). (Refer to P24) PC ADJUST...
... P24, 25) IMAGE SELECT MENU Used to select image level among Standard, Cinema and Image 1 ~ 4. (Refer to P34) SCREEN MENU Used to set size of projector or reset Lamp Replace Counter. (Refer to P37,-39) INPUT MENU Used to select input source (Input 1, Input 2 or Input 3). (Refer to P24) PC ADJUST...

Owners Manual
Page 21
... Input position and Lamp mode status Input 1 30 Preparation Display disappears after 30 seconds. Press POWER ON-OFF button to turn a projector off projector. Indicator should still continue to ON. LAMP Indicator lights RED, and READY Indicator lights GREEN. LAMP Indicator dims, and Cooling Fans ...start " function is ON, this projector is ON, projector detects signal interruption and turns off ?" appears on a screen. 2 Press POWER ON-OFF button again to operate. LAMP Indicator lights...
... Input position and Lamp mode status Input 1 30 Preparation Display disappears after 30 seconds. Press POWER ON-OFF button to turn a projector off projector. Indicator should still continue to ON. LAMP Indicator lights RED, and READY Indicator lights GREEN. LAMP Indicator dims, and Cooling Fans ...start " function is ON, this projector is ON, projector detects signal interruption and turns off ?" appears on a screen. 2 Press POWER ON-OFF button again to operate. LAMP Indicator lights...
Owners Manual
Page 24
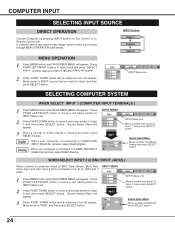
If projector cannot reproduce proper image, select correct input source through MENU OPERATION (see below). Move arrow to INPUT source that you want to Input 1 and then ...
If projector cannot reproduce proper image, select correct input source through MENU OPERATION (see below). Move arrow to INPUT source that you want to Input 1 and then ...

Owners Manual
Page 25
... (P25). Custom Mode (1~5) set , and then press SELECT button. This Auto PC Adjustment can be also executed by selecting Mode in this projector, Auto PC Adjustment function operates to set in PC ADJUST Menu. (P26, 27) PC ADJUSTMENT AUTO PC ADJUSTMENT Auto PC Adjustment function is ... to TROUBLESHOOTING on page 42.) PC SYSTEM MENU PC SYSTEM Menu icon Displays system being selected. COMPUTER INPUT AUTOMATIC MULTI-SCAN SYSTEM This projector automatically tunes to most different types of computers based on VGA, SVGA, XGA or SXGA (refer to AUTO PC Adj. SELECT COMPUTER ...
... (P25). Custom Mode (1~5) set , and then press SELECT button. This Auto PC Adjustment can be also executed by selecting Mode in this projector, Auto PC Adjustment function operates to set in PC ADJUST Menu. (P26, 27) PC ADJUSTMENT AUTO PC ADJUSTMENT Auto PC Adjustment function is ... to TROUBLESHOOTING on page 42.) PC SYSTEM MENU PC SYSTEM Menu icon Displays system being selected. COMPUTER INPUT AUTOMATIC MULTI-SCAN SYSTEM This projector automatically tunes to most different types of computers based on VGA, SVGA, XGA or SXGA (refer to AUTO PC Adj. SELECT COMPUTER ...
Owners Manual
Page 26
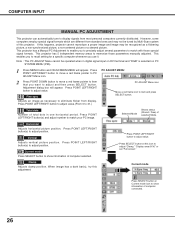
... value. Current mode Press SELECT button to show information of this adjustment. Current mode Press SELECT button at this happens, projector cannot reproduce a proper image and image may not be tuned by Multi-Scan system of computer connected. 26 However, some...area (H/V)" or set "Full screen." Horizontal Adjusts horizontal picture position. Clamp Adjusts clamp position. COMPUTER INPUT MANUAL PC ADJUSTMENT This projector can automatically tune to display signals from standard ones and may be recognized as necessary to eliminate flicker from display. Press POINT...
... value. Current mode Press SELECT button to show information of this adjustment. Current mode Press SELECT button at this happens, projector cannot reproduce a proper image and image may not be tuned by Multi-Scan system of computer connected. 26 However, some...area (H/V)" or set "Full screen." Horizontal Adjusts horizontal picture position. Clamp Adjusts clamp position. COMPUTER INPUT MANUAL PC ADJUSTMENT This projector can automatically tune to display signals from standard ones and may be recognized as necessary to eliminate flicker from display. Press POINT...


