User Manual
Page 7
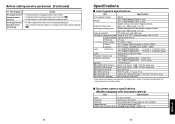
... remote control 16 Names of each part on the document camera (models with a document camera 17 Preparing and using the remote control 18 Placement ...19 Connection ...21 Operations Turning the power on and off 22 Basic operations 24 Using handy features 26 Using auto setting (Auto setting 26 Correcting the keystone...
... remote control 16 Names of each part on the document camera (models with a document camera 17 Preparing and using the remote control 18 Placement ...19 Connection ...21 Operations Turning the power on and off 22 Basic operations 24 Using handy features 26 Using auto setting (Auto setting 26 Correcting the keystone...
User Manual
Page 8
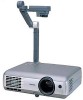
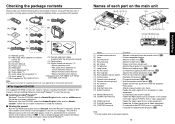
... VIDEO S-VIDEO CONTROL Name : Function (1) Infrared remote sensor : Senses commands from a computer or the compo- p.16 (12) Camera input terminal* : Connect the camera. nent video signal (Y/PB/PR) from a video equipment. (20) VIDEO terminal : Feeds the video signal from a video equipment. (21)...set (*2) • Mouse remote control • R03 (SIZE AAA) batteries for TLP-S70,TLP-S71. here. (17) AUDIO terminal : Feeds the audio signal from a computer or video equipment. (18) MONITOR terminal : Connected to view that has grown hot inside the projector. (15) Speaker : Plays ...
... VIDEO S-VIDEO CONTROL Name : Function (1) Infrared remote sensor : Senses commands from a computer or the compo- p.16 (12) Camera input terminal* : Connect the camera. nent video signal (Y/PB/PR) from a video equipment. (20) VIDEO terminal : Feeds the video signal from a video equipment. (21)...set (*2) • Mouse remote control • R03 (SIZE AAA) batteries for TLP-S70,TLP-S71. here. (17) AUDIO terminal : Feeds the audio signal from a computer or video equipment. (18) MONITOR terminal : Connected to view that has grown hot inside the projector. (15) Speaker : Plays ...
User Manual
Page 9
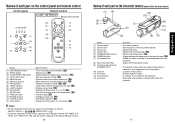
... high. p.28 : Pauses image. p.30 : Displays the information on or off. T61M, TLP-T70M, TLP-T71M, see the Owner's Manual of the Mouse Remote Control. 16 Names of each part on the document camera (models with the projector's stay. : Connected to the accessory camera cable when a camera is used separated from the projector...
... high. p.28 : Pauses image. p.30 : Displays the information on or off. T61M, TLP-T70M, TLP-T71M, see the Owner's Manual of the Mouse Remote Control. 16 Names of each part on the document camera (models with the projector's stay. : Connected to the accessory camera cable when a camera is used separated from the projector...
User Manual
Page 11
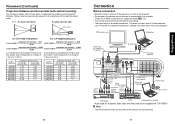
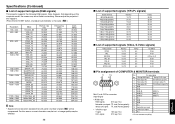
..., and corresponds to a range of computer cannot be used with all of both devices before connecting. • The figure below to determine the screen size and projection distance. (Screen sizes are not supplied with TLP-S70/S71. screen size (cm) 40 (102) 60 (152) 80 (203) 100 ...min) 1.26 1.52 1.91 2.30 2.56 3.08 3.21 3.86 4.84 5.82 6.47 7.77 8.10 9.73 9.73 - 20 Connection Before connection • Read the owner's manual of the device to connect to the projector. • Some types of 1.45 m to 11.29 m. 1.26 m to 9.73 m. Placement (Continued) Projection Distance ...
..., and corresponds to a range of computer cannot be used with all of both devices before connecting. • The figure below to determine the screen size and projection distance. (Screen sizes are not supplied with TLP-S70/S71. screen size (cm) 40 (102) 60 (152) 80 (203) 100 ...min) 1.26 1.52 1.91 2.30 2.56 3.08 3.21 3.86 4.84 5.82 6.47 7.77 8.10 9.73 9.73 - 20 Connection Before connection • Read the owner's manual of the device to connect to the projector. • Some types of 1.45 m to 11.29 m. 1.26 m to 9.73 m. Placement (Continued) Projection Distance ...
User Manual
Page 12
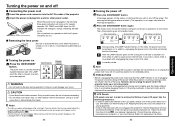
... screen disappears, the Language menu is displayed p.24 . 22 s Turning the power off 1 Press the ON/STANDBY button. Operations Turning the power on and off s Connecting the power cord 1 Insert the power cord connector into the AC IN socket of the projector. 2 Insert the power cord plug into a wall or other...
... screen disappears, the Language menu is displayed p.24 . 22 s Turning the power off 1 Press the ON/STANDBY button. Operations Turning the power on and off s Connecting the power cord 1 Insert the power cord connector into the AC IN socket of the projector. 2 Insert the power cord plug into a wall or other...

User Manual
Page 13
...Turn on the next time, the Language and Lamp power menus do not light) or bright spots (pixels that English has been selected. 3 Place connected device(s) in operating status. Computer Y/PB/PR Video S-video When a camera is being input from the Reset menu p.33 , the Language and Lamp...depends on how to adjust the focus. 7 Adjusting the volume with the buttons The speaker volume can be adjusted when an audio signal is connected with the document camera model: Computer Y/PB/PR Video S-video Camera 24 5 Projector placement angle adjustments The placement angle and the height ...
...Turn on the next time, the Language and Lamp power menus do not light) or bright spots (pixels that English has been selected. 3 Place connected device(s) in operating status. Computer Y/PB/PR Video S-video When a camera is being input from the Reset menu p.33 , the Language and Lamp...depends on how to adjust the focus. 7 Adjusting the volume with the buttons The speaker volume can be adjusted when an audio signal is connected with the document camera model: Computer Y/PB/PR Video S-video Camera 24 5 Projector placement angle adjustments The placement angle and the height ...
User Manual
Page 18
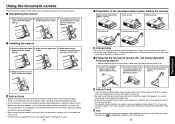
...protruded, connector may be damaged. • When mounting the camera, be sure to slide the document camera until it clicks. 4) Slide the connect lever in the direction of an arrow. Operations PRECAUTIONS • Before mounting or dismounting the document camera, disconnect the power plug. • Place...; Do not jolt or force the camera head or camera arm. s Uninstalling the camera 1) Place the folded document 2) Slide the connect lever in camera with the bottom marks. If you attempt to mount the camera with the connector being separated from the projector) • ...
...protruded, connector may be damaged. • When mounting the camera, be sure to slide the document camera until it clicks. 4) Slide the connect lever in the direction of an arrow. Operations PRECAUTIONS • Before mounting or dismounting the document camera, disconnect the power plug. • Place...; Do not jolt or force the camera head or camera arm. s Uninstalling the camera 1) Place the folded document 2) Slide the connect lever in camera with the bottom marks. If you attempt to mount the camera with the connector being separated from the projector) • ...
User Manual
Page 22
...Happens Check No power • Is the power cord plugged in . p.24 • Is the mute function on ? p.25 • Are the connections set up correctly? p.26 p.32 Image is not properly attached. • Unplug the power cord, and reattach the lamp cover. p.32 • Is... and contact your dealer. ❈ The icon will appear before the power goes out. ❈ After approx. p.21 • Are all the connected devices functioning properly? Picture not displayed correctly • Is the input signal supported by the projector? p.24 • Is there something goes wrong. ...
...Happens Check No power • Is the power cord plugged in . p.24 • Is the mute function on ? p.25 • Are the connections set up correctly? p.26 p.32 Image is not properly attached. • Unplug the power cord, and reattach the lamp cover. p.32 • Is... and contact your dealer. ❈ The icon will appear before the power goes out. ❈ After approx. p.21 • Are all the connected devices functioning properly? Picture not displayed correctly • Is the input signal supported by the projector? p.24 • Is there something goes wrong. ...
User Manual
Page 23
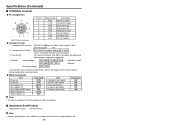
... 75 Ω AUDIO terminal 3.5mm dia. p.37 • Is the location of general specifications Item Specification Consumption Power 265 W Weight TLP-T70M/T60M/S70/S40: 2.2 kg TLP-T71M/T61M/S71/S41: 2.7kg Models without document imaging camera: External Dimensions 303 × 84 × 206 mm (W × ...(adjusted through distance from subject) 1/4.2 type honeycomb CCD 629,856 pixels (648H × 486V × 2) 45 p.32 44 Connection terminal Others Specifications s List of the object being focused too dark? • Is there impact from the document camera are flickering Check...
... 75 Ω AUDIO terminal 3.5mm dia. p.37 • Is the location of general specifications Item Specification Consumption Power 265 W Weight TLP-T70M/T60M/S70/S40: 2.2 kg TLP-T71M/T61M/S71/S41: 2.7kg Models without document imaging camera: External Dimensions 303 × 84 × 206 mm (W × ...(adjusted through distance from subject) 1/4.2 type honeycomb CCD 629,856 pixels (648H × 486V × 2) 45 p.32 44 Connection terminal Others Specifications s List of the object being focused too dark? • Is there impact from the document camera are flickering Check...
User Manual
Page 24
...) ∗ ∗ GND (PR) GND (Y) 8 GND (B) 9 N.C 10 GND 11 GND 12 N.C 13 Horizontal sync signal 14 Vertical sync signal 15 N.C GND (PB ∗ Do not connect anything. 47 Others Specifications (Continued) s List of pixels p.45 will be affected. 46 s List of supported signals (Y/PB/PR signals) Signal format 480i(525i)@60Hz...
...) ∗ ∗ GND (PR) GND (Y) 8 GND (B) 9 N.C 10 GND 11 GND 12 N.C 13 Horizontal sync signal 14 Vertical sync signal 15 N.C GND (PB ∗ Do not connect anything. 47 Others Specifications (Continued) s List of pixels p.45 will be affected. 46 s List of supported signals (Y/PB/PR signals) Signal format 480i(525i)@60Hz...
User Manual
Page 25
...-compliant all-uppercase alphanumeric characters supported. 4 Replies Acknowledge ACK (06h) CR (0Dh) Data ... Aborted No acknowledge NAK (15h) If commands are to send No connection Sending data No connection RS-232C, 9600bps, No Parity, Data Length: 8 bits; s Separately Sold Product Replacement Lamp Model TLPLV2 Note • Design, specifications, etc. q Main Commands Item...
...-compliant all-uppercase alphanumeric characters supported. 4 Replies Acknowledge ACK (06h) CR (0Dh) Data ... Aborted No acknowledge NAK (15h) If commands are to send No connection Sending data No connection RS-232C, 9600bps, No Parity, Data Length: 8 bits; s Separately Sold Product Replacement Lamp Model TLPLV2 Note • Design, specifications, etc. q Main Commands Item...


