
Owners Manual
Page 1
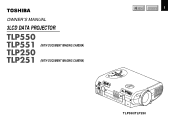
Before use OWNER'S MANUAL 3LCD DATA PROJECTOR TLP550 TLP551 TLP250 TLP251 (WITH DOCUMENT IMAGING CAMERA) (WITH DOCUMENT IMAGING CAMERA) MENU CONTENTS 1 TLP550/TLP250
Before use OWNER'S MANUAL 3LCD DATA PROJECTOR TLP550 TLP551 TLP250 TLP251 (WITH DOCUMENT IMAGING CAMERA) (WITH DOCUMENT IMAGING CAMERA) MENU CONTENTS 1 TLP550/TLP250
Owners Manual
Page 3
...Before use this information for a long time. Avoid Volatile Liquid Do not use volatile liquids, such as it from the use of your LCD projector. Retain this unit. • Toshiba Corporation accepts no liability whatsoever for at the bottom of or the inability to ship your LCD... projector. They will come in handy if you ever have to use Serial No. IMPORTANT PRECAUTIONS Save Original Packing Materials The original shipping carton ...
...Before use this information for a long time. Avoid Volatile Liquid Do not use volatile liquids, such as it from the use of your LCD projector. Retain this unit. • Toshiba Corporation accepts no liability whatsoever for at the bottom of or the inability to ship your LCD... projector. They will come in handy if you ever have to use Serial No. IMPORTANT PRECAUTIONS Save Original Packing Materials The original shipping carton ...
Owners Manual
Page 7
... broken pieces of other controls may expose you to dangerous voltage or other hazards. (Replacement of the lamp rupturing, thoroughly clean the area around the projector and discard any service or repairs to this product from the wall outlet and refer servicing to service this indicates a need for service. 17. Adjust...
... broken pieces of other controls may expose you to dangerous voltage or other hazards. (Replacement of the lamp rupturing, thoroughly clean the area around the projector and discard any service or repairs to this product from the wall outlet and refer servicing to service this indicates a need for service. 17. Adjust...
Owners Manual
Page 8
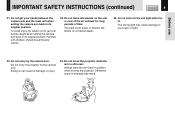
.... Do not leave documents on a thermal paper. 25. Doing so can result in position when moving the projector. Do not look into the arm light while it is still erect. Do not move the projector while the arm is lit. Do not get your hands caught when setting the camera arm back... to your hands between the camera arm and the main unit when setting the camera arm back in its original position. Do not carry the projector by the camera arm. Before use IMPORTANT SAFETY INSTRUCTIONS (continued) CONTENTS 8 21. Always store the arm back in damage or injury. 24. To avoid injury...
.... Do not leave documents on a thermal paper. 25. Doing so can result in position when moving the projector. Do not look into the arm light while it is still erect. Do not move the projector while the arm is lit. Do not get your hands caught when setting the camera arm back... to your hands between the camera arm and the main unit when setting the camera arm back in its original position. Do not carry the projector by the camera arm. Before use IMPORTANT SAFETY INSTRUCTIONS (continued) CONTENTS 8 21. Always store the arm back in damage or injury. 24. To avoid injury...
Owners Manual
Page 10
...Lamp replacement 64 Others Before calling service personal 66 Pin assignment of COMPUTER connector 68 Applicable signal 69 Controlling the projector by using RS-232C 71 Specifications 76 Before use SAFETY PRECAUTIONS 2 IMPORTANT PRECAUTIONS 3 IMPORTANT SAFETY INSTRUCTIONS 4 Power...operation 16 Installation and connections Floor-mounted projector placement 17 Lens shift function 20 Projector placement angle adjustment (Foot adjuster) .. 21 Ceiling-mounted projector placement 22 Connecting a computer 23 Connecting video equipment 24 Projector operation control by a computer 26 ...
...Lamp replacement 64 Others Before calling service personal 66 Pin assignment of COMPUTER connector 68 Applicable signal 69 Controlling the projector by using RS-232C 71 Specifications 76 Before use SAFETY PRECAUTIONS 2 IMPORTANT PRECAUTIONS 3 IMPORTANT SAFETY INSTRUCTIONS 4 Power...operation 16 Installation and connections Floor-mounted projector placement 17 Lens shift function 20 Projector placement angle adjustment (Foot adjuster) .. 21 Ceiling-mounted projector placement 22 Connecting a computer 23 Connecting video equipment 24 Projector operation control by a computer 26 ...
Owners Manual
Page 11
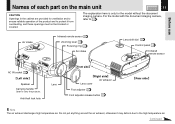
... the model without the document imaging camera. For the model with the document imaging camera, refer to protect it may deform due to carry the projector. Air intake Infrared remote sensor 16 Zooming lever 30 Focusing ring 30 Air intake Lens shift dial 20 Control panel 12 Infrared remote sensor AC...
... the model without the document imaging camera. For the model with the document imaging camera, refer to protect it may deform due to carry the projector. Air intake Infrared remote sensor 16 Zooming lever 30 Focusing ring 30 Air intake Lens shift dial 20 Control panel 12 Infrared remote sensor AC...
Owners Manual
Page 12
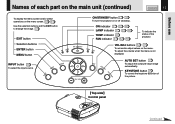
... to enlarge the image. 37 EXIT button Selection buttons ENTER button MENU button ON LAMP ON / STANDBY ON/STANDBY button 27 32 To turn the projector on the menu. INPUT MENU ENTER VOL / ADJ EXIT AUTO SET AUTO SET button 33 To adjust the computer input image automatically. Top side Control...
... to enlarge the image. 37 EXIT button Selection buttons ENTER button MENU button ON LAMP ON / STANDBY ON/STANDBY button 27 32 To turn the projector on the menu. INPUT MENU ENTER VOL / ADJ EXIT AUTO SET AUTO SET button 33 To adjust the computer input image automatically. Top side Control...
Owners Manual
Page 13
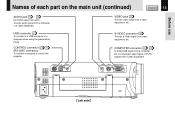
S-VIDEO connector 24 To enter S-Video signal from a video equipment. USB connector 40 To connect to control the projector. CONTROL connector 26 71 (RS-232C connector) To connect a computer to a USB connector of each part on the main unit (continued) CONTENTS 13 AUDIO jack ...
S-VIDEO connector 24 To enter S-Video signal from a video equipment. USB connector 40 To connect to control the projector. CONTROL connector 26 71 (RS-232C connector) To connect a computer to a USB connector of each part on the main unit (continued) CONTENTS 13 AUDIO jack ...
Owners Manual
Page 14
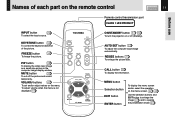
... ON / STANDBY AUTO SET FREEZE MUTE PIP CALL RESIZE MENU VOL / ADJ ENTER CT-90106 EXIT / P.MODE ON/STANDBY button 27 32 To turn the projector on the remote control CONTENTS 14 Before use Remote control transmission part CLASS 1 LED PRODUCT INPUT button 29 To select the input source. Names of...
... ON / STANDBY AUTO SET FREEZE MUTE PIP CALL RESIZE MENU VOL / ADJ ENTER CT-90106 EXIT / P.MODE ON/STANDBY button 27 32 To turn the projector on the remote control CONTENTS 14 Before use Remote control transmission part CLASS 1 LED PRODUCT INPUT button 29 To select the input source. Names of...
Owners Manual
Page 16
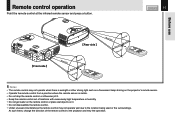
...on it. • Do not disassemble the remote control. • Under unusual circumstances the remote control may not operate well due to the projector and retry the operation. Remote control operation Point the remote control at the infrared remote sensor and press a button. At such times, change ...the direction of locations with excessively high temperature or humidity. • Do not get water on the remote control or place wet objects on the projector's remote sensor. • Operate the remote control from a position where the remote sensor is visible. • Do not drop the remote ...
...on it. • Do not disassemble the remote control. • Under unusual circumstances the remote control may not operate well due to the projector and retry the operation. Remote control operation Point the remote control at the infrared remote sensor and press a button. At such times, change ...the direction of locations with excessively high temperature or humidity. • Do not get water on the remote control or place wet objects on the projector's remote sensor. • Operate the remote control from a position where the remote sensor is visible. • Do not drop the remote ...
Owners Manual
Page 17
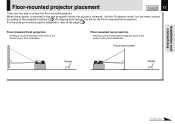
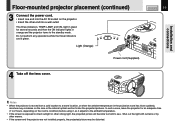
Set the "Projection mode" (on the front of the screen from factory, it is reversed. When the projector is mounted in the rear projection mode, the picture is set for the Floor-mounted front projection. Floor-mounted rear ...picture projected on the menu screen) according to the projection method. 50 At shipping from a floor installation. For the ceiling-mounted projector placement, refer to place the floor-mounted projector. Translucent screen Viewer CONTROL USB AUDIO VIDEO S-VIDEO COMPUTER ( Y/PB/PR ) Viewer Continued Installation and connections Floor-mounted...
Set the "Projection mode" (on the front of the screen from factory, it is reversed. When the projector is mounted in the rear projection mode, the picture is set for the Floor-mounted front projection. Floor-mounted rear ...picture projected on the menu screen) according to the projection method. 50 At shipping from a floor installation. For the ceiling-mounted projector placement, refer to place the floor-mounted projector. Translucent screen Viewer CONTROL USB AUDIO VIDEO S-VIDEO COMPUTER ( Y/PB/PR ) Viewer Continued Installation and connections Floor-mounted...
Owners Manual
Page 18
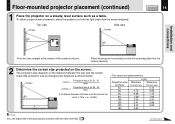
... lens and the screen. Adjust the projection size by changing the distances as a table. To obtain proper screen projection, place the projector so that the projecting light hits the screen squarely. 2 Determine the screen size projected on the distance between the lens and the ... 1.59 1.92 2.00 2.41 2.41 2.89 3.02 3.63 3.63 - The projection size depends on the screen. Floor-mounted projector placement (continued) 1 Place the projector on a steady, level surface such as shown below. Note You can adjust the vertical projection position with the lens shift dial. 20...
... lens and the screen. Adjust the projection size by changing the distances as a table. To obtain proper screen projection, place the projector so that the projecting light hits the screen squarely. 2 Determine the screen size projected on the distance between the lens and the ... 1.59 1.92 2.00 2.41 2.41 2.89 3.02 3.63 3.63 - The projection size depends on the screen. Floor-mounted projector placement (continued) 1 Place the projector on a steady, level surface such as shown below. Note You can adjust the vertical projection position with the lens shift dial. 20...
Owners Manual
Page 19
...section to see. Shut out the light with curtains or by other means. • If the screen and the projector are lit green. In such a case, leave the projector for several seconds and then the ON indicator lights in the projection room has risen suddenly, moisture may be distorted..... • If the screen is moved from a cold location to a warm location, or when the ambient temperature in orange and the projector turns to the standby mode. Notes • When the projector is exposed to direct sunlight or other end into a wall outlet. Installation and connections Floor-mounted...
...section to see. Shut out the light with curtains or by other means. • If the screen and the projector are lit green. In such a case, leave the projector for several seconds and then the ON indicator lights in the projection room has risen suddenly, moisture may be distorted..... • If the screen is moved from a cold location to a warm location, or when the ambient temperature in orange and the projector turns to the standby mode. Notes • When the projector is exposed to direct sunlight or other end into a wall outlet. Installation and connections Floor-mounted...
Owners Manual
Page 20
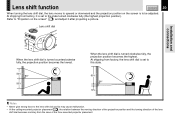
... projection position on the screen" 27 , and adjust it is set to this may cause malfunction. • At the ceiling-mounted projector placement 22 , the relation between the moving direction of the projection position and the turning direction of the lens shift dial becomes contrary...Projection on the screen is turned clockwise fully, the projection position becomes the highest. At shipping from the case of the floor-mounted projector placement. Refer to the state turned clockwise fully (the highest projection position). Lens shift dial Installation and connections When the lens shift ...
... projection position on the screen" 27 , and adjust it is set to this may cause malfunction. • At the ceiling-mounted projector placement 22 , the relation between the moving direction of the projection position and the turning direction of the lens shift dial becomes contrary...Projection on the screen is turned clockwise fully, the projection position becomes the highest. At shipping from the case of the floor-mounted projector placement. Refer to the state turned clockwise fully (the highest projection position). Lens shift dial Installation and connections When the lens shift ...
Owners Manual
Page 21
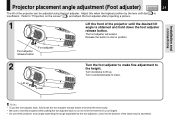
.... Release the button to lower. Refer to "Projection on your fingers. • Do not tilt the projector at an angle exceeding the range adjustable by the lens shift dial 20 is obtained and hold the projector when putting the foot adjuster back so as not to the height. Turn clockwise to lift... make fine adjustment to let the front fall on the screen" 27 , and adjust the foot adjuster after projecting a picture. 1 Lift the front of the projector until the desired tilt angle is insufficient. Turn counterclockwise to lock in position. Installation and connections...
.... Release the button to lower. Refer to "Projection on your fingers. • Do not tilt the projector at an angle exceeding the range adjustable by the lens shift dial 20 is obtained and hold the projector when putting the foot adjuster back so as not to the height. Turn clockwise to lift... make fine adjustment to let the front fall on the screen" 27 , and adjust the foot adjuster after projecting a picture. 1 Lift the front of the projector until the desired tilt angle is insufficient. Turn counterclockwise to lock in position. Installation and connections...
Owners Manual
Page 22
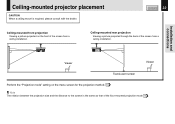
... VIDEO S-VIDEO COMPUTER ( Y/PB/PR ) Viewer Viewer Translucent screen Perform the "Projection mode" setting on the front of the screen from a ceiling installation. Ceiling-mounted projector placement CAUTION When a ceiling mount is the same as that of the floor-mounted projection mode 18 . CONTENTS 22 Ceiling-mounted front projection Viewing a picture...
... VIDEO S-VIDEO COMPUTER ( Y/PB/PR ) Viewer Viewer Translucent screen Perform the "Projection mode" setting on the front of the screen from a ceiling installation. Ceiling-mounted projector placement CAUTION When a ceiling mount is the same as that of the floor-mounted projection mode 18 . CONTENTS 22 Ceiling-mounted front projection Viewing a picture...
Owners Manual
Page 23
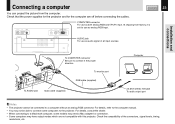
... port RGB cable (supplied) To AUDIO jack Audio cable (supplied) Computer ø3.5mm stereo mini-jack To audio output port Notes • The projector cannot be able to connect some models may not be connected to the computer manual. • You may need a Mac adapter for the computer ...are not compatible with this projector. Connecting a computer You can project the picture from factory, it is set for use as analog RGB input. For details, refer to a computer...
... port RGB cable (supplied) To AUDIO jack Audio cable (supplied) Computer ø3.5mm stereo mini-jack To audio output port Notes • The projector cannot be able to connect some models may not be connected to the computer manual. • You may need a Mac adapter for the computer ...are not compatible with this projector. Connecting a computer You can project the picture from factory, it is set for use as analog RGB input. For details, refer to a computer...
Owners Manual
Page 24
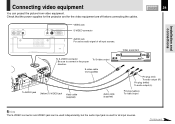
... all input sources. Video equipment CONTENTS 24 To S-VIDEO connector Be sure to connect in the proper direction. Check that the power supplies for the projector and for all input sources. Installation and connections Connecting video equipment You can be used independently, but the audio input jack is used for the...
... all input sources. Video equipment CONTENTS 24 To S-VIDEO connector Be sure to connect in the proper direction. Check that the power supplies for the projector and for all input sources. Installation and connections Connecting video equipment You can be used independently, but the audio input jack is used for the...
Owners Manual
Page 25
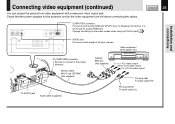
... project the picture from factory, it is set for the video equipment are off before connecting the cables. Check that the power supplies for the projector and for use as audio signal of all input sources.
... project the picture from factory, it is set for the video equipment are off before connecting the cables. Check that the power supplies for the projector and for use as audio signal of all input sources.
Owners Manual
Page 26
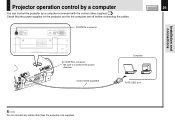
Installation and connections Projector operation control by a computer You can control the projector by a computer connected with the control cable supplied. 71 Check that the power supplies for the projector and for the computer are off before connecting the cables. CONTROL USB AUDIO VIDEO S-VIDEO COMPUTER ( Y/PB/PR ) CONTROL connector CONTENTS 26 To CONTROL connector Be sure to connect in the proper direction. Control cable (supplied) Computer To RS-232C port Note Do not connect any cable other than the exclusive one supplied.
Installation and connections Projector operation control by a computer You can control the projector by a computer connected with the control cable supplied. 71 Check that the power supplies for the projector and for the computer are off before connecting the cables. CONTROL USB AUDIO VIDEO S-VIDEO COMPUTER ( Y/PB/PR ) CONTROL connector CONTENTS 26 To CONTROL connector Be sure to connect in the proper direction. Control cable (supplied) Computer To RS-232C port Note Do not connect any cable other than the exclusive one supplied.


