

User Manual
Page 20
... power 3-6 Shut Down mode (Boot mode 3-6 Sleep Mode 3-6 Hibernation Mode 3-8 Restarting the computer 3-9 System Recovery Options 3-10 System Recovery Options 3-10 Create Optical Recovery Discs 3-10 Restoring the preinstalled software from the Recovery HDD . . . . .3-11 Restoring the preinstalled software from Recovery Media 3-12 Chapter 4 Operating Basics Using the TouchPad 4-1 Using the FingerPrint Reader (depends on...
... power 3-6 Shut Down mode (Boot mode 3-6 Sleep Mode 3-6 Hibernation Mode 3-8 Restarting the computer 3-9 System Recovery Options 3-10 System Recovery Options 3-10 Create Optical Recovery Discs 3-10 Restoring the preinstalled software from the Recovery HDD . . . . .3-11 Restoring the preinstalled software from Recovery Media 3-12 Chapter 4 Operating Basics Using the TouchPad 4-1 Using the FingerPrint Reader (depends on...

User Manual
Page 23
... PC Card and Express Card 8-2 Inserting a PC card and Express Card 8-2 Removing a PC Card or Express Card 8-3 SD/SDHC/MMC/MS/MS Pro/xD Memory cards 8-4 Installing a memory card 8-5 Removing a memory card 8-5 Memory card care 8-6 Memory expansion 8-7 Installing a memory module 8-7 Removing ...up 9-3 Self test 9-4 Power 9-4 Disposing of PC and PC batteries 9-6 Real Time Clock 9-7 Keyboard 9-7 LCD panel 9-8 Hard disk drive 9-8 Recovery Discs 9-9 DVD Super Multi drive (Supporting DVD±R Double Layer 9-9 Pointing device 9-10 USB 9-12 Memory expansion 9-12 Sound system 9-13 ...
... PC Card and Express Card 8-2 Inserting a PC card and Express Card 8-2 Removing a PC Card or Express Card 8-3 SD/SDHC/MMC/MS/MS Pro/xD Memory cards 8-4 Installing a memory card 8-5 Removing a memory card 8-5 Memory card care 8-6 Memory expansion 8-7 Installing a memory module 8-7 Removing ...up 9-3 Self test 9-4 Power 9-4 Disposing of PC and PC batteries 9-6 Real Time Clock 9-7 Keyboard 9-7 LCD panel 9-8 Hard disk drive 9-8 Recovery Discs 9-9 DVD Super Multi drive (Supporting DVD±R Double Layer 9-9 Pointing device 9-10 USB 9-12 Memory expansion 9-12 Sound system 9-13 ...

User Manual
Page 30
...; for TOSHIBA ■ Online Manual ■ Display Driver ■ TouchPad Driver ■ Sound Driver ■ Miscellaneous drivers (depending on the model you purchased: Modem, Wireless LAN) Other software may be preinstalled dependant on the model purchased. ■ Discs ■ Windows Anytime Upgrade DVD (Is included with some models) Documentation ■ Satellite U300 / Satellite Pro U300 Series...
...; for TOSHIBA ■ Online Manual ■ Display Driver ■ TouchPad Driver ■ Sound Driver ■ Miscellaneous drivers (depending on the model you purchased: Modem, Wireless LAN) Other software may be preinstalled dependant on the model purchased. ■ Discs ■ Windows Anytime Upgrade DVD (Is included with some models) Documentation ■ Satellite U300 / Satellite Pro U300 Series...

User Manual
Page 55
TOSHIBA Satellite U300 / Satellite Pro U300 / PORTEGE M600 / TECRA M8 Series Chapter 3 Getting Started This chapter provides basic information to read the Safety Instruction Manual. User's Manual 3-1 This guide, which is ...; Windows Vista™ setup ■ Turning off the power ■ Restarting the computer ■ System Recovery Options ■ Create Optical Recovery Discs ■ Restoring the preinstalled Software from the Recovery HDD ■ Restoring the Preinstalled Software from Recovery Media All users should be sure to get you started using your computer. It covers the...
TOSHIBA Satellite U300 / Satellite Pro U300 / PORTEGE M600 / TECRA M8 Series Chapter 3 Getting Started This chapter provides basic information to read the Safety Instruction Manual. User's Manual 3-1 This guide, which is ...; Windows Vista™ setup ■ Turning off the power ■ Restarting the computer ■ System Recovery Options ■ Create Optical Recovery Discs ■ Restoring the preinstalled Software from the Recovery HDD ■ Restoring the Preinstalled Software from Recovery Media All users should be sure to get you started using your computer. It covers the...
User Manual
Page 64
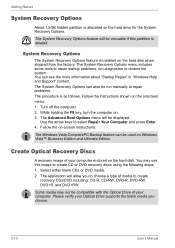
...to repair startup problems, run manually to repair problems. The procedure is as follows. Follow the instructions shown on . 3. Use the arrow keys to create recovery CDs/DVD including: CD-R, CD-RW, DVD-R, DVD-RW, DVD+R and DVD+RW. Follow the on the hard disk. Please verify your computer. ...Getting Started System Recovery Options About 1.5GB hidden partition is installed on the hard disk when shipped from the factory. The Windows Vista CompletePC Backup feature can be displayed...
...to repair startup problems, run manually to repair problems. The procedure is as follows. Follow the instructions shown on . 3. Use the arrow keys to create recovery CDs/DVD including: CD-R, CD-RW, DVD-R, DVD-RW, DVD+R and DVD+RW. Follow the on the hard disk. Please verify your computer. ...Getting Started System Recovery Options About 1.5GB hidden partition is installed on the hard disk when shipped from the factory. The Windows Vista CompletePC Backup feature can be displayed...

User Manual
Page 65
... application from the hard disk drive. Double Click the Recovery Disc Creator icon on your computer. 2. Getting Started 3. After TOSHIBA Recovery Disc Creator starts, select the type of media and the title you are using as the "Disc Set" on TOSHIBA Recovery Disc Creator If your Optical Drive of the Optical Drive.... 5. Restoring the preinstalled software from the Recovery HDD Part of the space on the hard disk drive is reserved as the "Disc Set...
... application from the hard disk drive. Double Click the Recovery Disc Creator icon on your computer. 2. Getting Started 3. After TOSHIBA Recovery Disc Creator starts, select the type of media and the title you are using as the "Disc Set" on TOSHIBA Recovery Disc Creator If your Optical Drive of the Optical Drive.... 5. Restoring the preinstalled software from the Recovery HDD Part of the space on the hard disk drive is reserved as the "Disc Set...
User Manual
Page 66
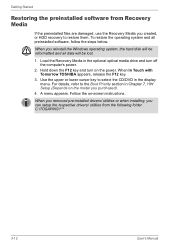
... system, the hard disk will be reformatted and all preinstalled software, follow the steps below. When you created, or HDD recovery to restore them. When In Touch with Tomorrow TOSHIBA appears, release the F12 key. 3. For details, refer to select the CD/DVD in the optional optical media drive and... turn on the power. Load the Recovery Media in the display menu. Hold down the F12 key and turn off the computer's power....
... system, the hard disk will be reformatted and all preinstalled software, follow the steps below. When you created, or HDD recovery to restore them. When In Touch with Tomorrow TOSHIBA appears, release the F12 key. 3. For details, refer to select the CD/DVD in the optional optical media drive and... turn on the power. Load the Recovery Media in the display menu. Hold down the F12 key and turn off the computer's power....

User Manual
Page 141
...; Sound system ■ Real Time Clock ■ Monitor ■ Keyboard ■ Modem ■ LCD panel ■ LAN ■ Hard disk drive ■ Wireless LAN ■ Recovery Discs ■ FingerPrint Sensor ■ DVD Super Multi drive ■ PC/Express Card ■ Pointing device System start-up When the computer does not start...
...; Sound system ■ Real Time Clock ■ Monitor ■ Keyboard ■ Modem ■ LCD panel ■ LAN ■ Hard disk drive ■ Wireless LAN ■ Recovery Discs ■ FingerPrint Sensor ■ DVD Super Multi drive ■ PC/Express Card ■ Pointing device System start-up When the computer does not start...

User Manual
Page 145
... can be read by your data is not remapping the keyboard. User's Manual 9-7 Troubleshooting ■ Reformatting the media ■ Reinstalling an operating system from the recovery CD-ROM The procedures above delete only the initial part of the data used for file management. This makes the file invisible to Chapter 5, The...
... can be read by your data is not remapping the keyboard. User's Manual 9-7 Troubleshooting ■ Reformatting the media ■ Reinstalling an operating system from the recovery CD-ROM The procedures above delete only the initial part of the data used for file management. This makes the file invisible to Chapter 5, The...
User Manual
Page 147
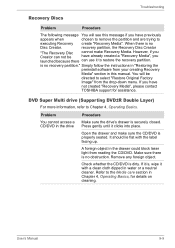
...", you have not created "Recovery Media", please contact TOSHIBA support for details on cleaning. Open the drawer and make Recovery Media. You will see this manual. If you launched because there can not be directed to executing Recovery create "Recovery Media". When there is properly seated. recovery partition, the Recovery Disc Creator "The Recovery Disc cannot make sure...
...", you have not created "Recovery Media", please contact TOSHIBA support for details on cleaning. Open the drawer and make Recovery Media. You will see this manual. If you launched because there can not be directed to executing Recovery create "Recovery Media". When there is properly seated. recovery partition, the Recovery Disc Creator "The Recovery Disc cannot make sure...

Maintenance Manual
Page 71
...and initialize PS/2 mouse Initialize floppy controller (optional) Determine number of day A2h Check key lock A4h Initialize Typematic rate Satellite U300 and Satellite Pro U300 Maintenance Manual (960-Q08) 19 2 Troubleshooting Procedures 64h 66h 67h 68h 69h 6Ah 6Bh 6Ch 6Eh 70h 72h 76h ... area Display external L2 cache size Load custom defaults (optional) Display shadow-area message Display possible high address for UMB recovery Display error messages Check for configuration errors Check for keyboard errors Set up hardware interrupt vectors Initialize coprocessor if present Disable ...
...and initialize PS/2 mouse Initialize floppy controller (optional) Determine number of day A2h Check key lock A4h Initialize Typematic rate Satellite U300 and Satellite Pro U300 Maintenance Manual (960-Q08) 19 2 Troubleshooting Procedures 64h 66h 67h 68h 69h 6Ah 6Bh 6Ch 6Eh 70h 72h 76h ... area Display external L2 cache size Load custom defaults (optional) Display shadow-area message Display possible high address for UMB recovery Display error messages Check for configuration errors Check for keyboard errors Set up hardware interrupt vectors Initialize coprocessor if present Disable ...
Maintenance Manual
Page 73
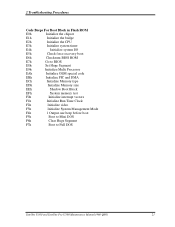
... in Flash ROM E0h Initialize the chipset E1h Initialize the bridge E2h Initialize the CPU E3h Initialize system timer E4h Initialize system I/O E5h Check force recovery boot E6h Checksum BIOS ROM E7h Go to BIOS E8h Set Huge Segment E9h Initialize Multi Processor EAh Initialize OEM special code EBh Initialize PIC... F3h Initialize System Management Mode F4h 1 Output one beep before boot F5h Boot to Mini DOS F6h Clear Huge Segment F7h Boot to Full DOS Satellite U300 and Satellite Pro U300 Maintenance Manual (960-Q08) 21
... in Flash ROM E0h Initialize the chipset E1h Initialize the bridge E2h Initialize the CPU E3h Initialize system timer E4h Initialize system I/O E5h Check force recovery boot E6h Checksum BIOS ROM E7h Go to BIOS E8h Set Huge Segment E9h Initialize Multi Processor EAh Initialize OEM special code EBh Initialize PIC... F3h Initialize System Management Mode F4h 1 Output one beep before boot F5h Boot to Mini DOS F6h Clear Huge Segment F7h Boot to Full DOS Satellite U300 and Satellite Pro U300 Maintenance Manual (960-Q08) 21


