
Detailed Specs for Satellite Pro C50-A PSCG7C-00E01U English
Page 1
... Modules Hard Disk Drive 500GB (5400 RPM); Bluetooth V2.1+EDR USB Adaptor PA3927C-1PRP- Toshiba External ODD Part Number/UPC code PSCG7C-00E01U / 6-23506-03685-6 iToshiba of Canada Limited Information Systems Group shall not be filled with 8GB of purchase. Under some conditions, your computer product may also vary from date of system memory. Colour Support (dependant on password, supervisor Audio Link, Built-in Mic) Bluetooth v4.0 Expansion 2 memory slots...
... Modules Hard Disk Drive 500GB (5400 RPM); Bluetooth V2.1+EDR USB Adaptor PA3927C-1PRP- Toshiba External ODD Part Number/UPC code PSCG7C-00E01U / 6-23506-03685-6 iToshiba of Canada Limited Information Systems Group shall not be filled with 8GB of purchase. Under some conditions, your computer product may also vary from date of system memory. Colour Support (dependant on password, supervisor Audio Link, Built-in Mic) Bluetooth v4.0 Expansion 2 memory slots...

Detailed Specs for Satellite Pro C50-A PSCG7C-00E01U English
Page 2
... model, design configuration, applications, power management settings and features utilized. After a period of time, the battery will need to perform at toshiba.ca/support 3/10/2014 v.1 Toshiba recommends Windows 8 Pro For the most up-to-date product information about your computer, or to stay current with the various computer software or hardware options, visit Toshiba's website at maximum capacity and will lose its ability to be replaced. Actual formatted...
... model, design configuration, applications, power management settings and features utilized. After a period of time, the battery will need to perform at toshiba.ca/support 3/10/2014 v.1 Toshiba recommends Windows 8 Pro For the most up-to-date product information about your computer, or to stay current with the various computer software or hardware options, visit Toshiba's website at maximum capacity and will lose its ability to be replaced. Actual formatted...
Users Manual Canada; English
Page 12
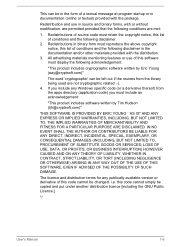
...display the following disclaimer. 2. The licence and distribution terms for any Windows specific code (or a derivative thereof) from the library being used are not cryptographic related :-). 4. this code cannot be changed... and use of this software must reproduce the above copyright notice, this list of this code cannot ...simply be in documentation (online or textual) provided with the distribution. 3. If you must retain the copyright notice, this list of a textual message at program startup...
...display the following disclaimer. 2. The licence and distribution terms for any Windows specific code (or a derivative thereof) from the library being used are not cryptographic related :-). 4. this code cannot be changed... and use of this software must reproduce the above copyright notice, this list of this code cannot ...simply be in documentation (online or textual) provided with the distribution. 3. If you must retain the copyright notice, this list of a textual message at program startup...
Users Manual Canada; English
Page 20
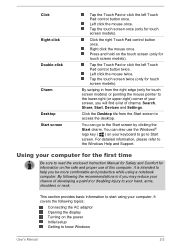
... or disabling injury to know Windows User's Manual 2-2 Click Right-click Double-click Charm Desktop Start screen Tap the Touch Pad or click the left Touch Pad control button twice. Left click the mouse twice. Click the Desktop tile from the right edge (only for touch screen models) or pointing the mouse pointer to read the enclosed Instruction Manual for Safety and Comfort for information on the power Initial setup Getting...
... or disabling injury to know Windows User's Manual 2-2 Click Right-click Double-click Charm Desktop Start screen Tap the Touch Pad or click the left Touch Pad control button twice. Left click the mouse twice. Click the Desktop tile from the right edge (only for touch screen models) or pointing the mouse pointer to read the enclosed Instruction Manual for Safety and Comfort for information on the power Initial setup Getting...

Users Manual Canada; English
Page 27
... memory module could be damaged. Data in the Power Options (to external media, such as a timer recording function. Do not switch to Sleep Mode while transferring data to access it, click Desktop -> Desktop Assist -> Control Panel -> System and Security -> Power Options). When the AC adaptor is next turned on Keyboard option is connected to completely shut down the computer. To restore the operation of time. User's Manual 2-9 Before entering Sleep Mode, be sure to the settings in memory...
... memory module could be damaged. Data in the Power Options (to external media, such as a timer recording function. Do not switch to Sleep Mode while transferring data to access it, click Desktop -> Desktop Assist -> Control Panel -> System and Security -> Power Options). When the AC adaptor is next turned on Keyboard option is connected to completely shut down the computer. To restore the operation of time. User's Manual 2-9 Before entering Sleep Mode, be sure to the settings in memory...

Users Manual Canada; English
Page 29
... can follow the steps below : User's Manual 2-11 Starting Hibernation Mode To enter Hibernation Mode, follow the steps as data will be configured to your previous working environment immediately when you remove the battery or disconnect the AC adaptor before the save your data. Allows the use of memory to the Hard Disk Drive. In order to show Hibernate in Hibernation Mode. Select the Hibernate check box...
... can follow the steps below : User's Manual 2-11 Starting Hibernation Mode To enter Hibernation Mode, follow the steps as data will be configured to your previous working environment immediately when you remove the battery or disconnect the AC adaptor before the save your data. Allows the use of memory to the Hard Disk Drive. In order to show Hibernate in Hibernation Mode. Select the Hibernate check box...

Users Manual Canada; English
Page 48
...) mouse button. Optical disc drives The computer may be generated using their specific ASCII codes. 1. the ASCII character will show the toast notification at factory default. DVD Super Multi drive The drive supports the following formats. This key activates the Windows Start screen. Using the numeric keypad, type the ASCII code of the character you are disabled at the edges of the screen. When the computer is accessing an optical disc, the indicator on the display screen. Some functions will...
...) mouse button. Optical disc drives The computer may be generated using their specific ASCII codes. 1. the ASCII character will show the toast notification at factory default. DVD Super Multi drive The drive supports the following formats. This key activates the Windows Start screen. Using the numeric keypad, type the ASCII code of the character you are disabled at the edges of the screen. When the computer is accessing an optical disc, the indicator on the display screen. Some functions will...

Users Manual Canada; English
Page 58
... have HDCP supported HDMI port. Please view video during video playback it will not play HD DVD discs. The Blu-ray Disc™ movie can be played only on internal LCD displays or external devices connected via an HDMI output. Blu-ray™ discs with some discs on an external display or TV connected to Hibernation or Sleep Mode when running the TOSHIBA Blu-ray Disc Player. TOSHIBA Blu-ray Disc Player supports AACS (Advanced Access Control System) copy...
... have HDCP supported HDMI port. Please view video during video playback it will not play HD DVD discs. The Blu-ray Disc™ movie can be played only on internal LCD displays or external devices connected via an HDMI output. Blu-ray™ discs with some discs on an external display or TV connected to Hibernation or Sleep Mode when running the TOSHIBA Blu-ray Disc Player. TOSHIBA Blu-ray Disc Player supports AACS (Advanced Access Control System) copy...

Users Manual Canada; English
Page 63
... HDCP compliant HDMI port. 3D video content can only be played. Using Windows features. - Depending on vision development, viewers of the display when watching 3D video images. In order for limiting the viewing time before or while watching 3D video images. Please make sure to watch a 3D content. This software can be displayed on an external display connected using HDMI "with 3D playback feature enabled. Changing the settings may cause...
... HDCP compliant HDMI port. 3D video content can only be played. Using Windows features. - Depending on vision development, viewers of the display when watching 3D video images. In order for limiting the viewing time before or while watching 3D video images. Please make sure to watch a 3D content. This software can be displayed on an external display connected using HDMI "with 3D playback feature enabled. Changing the settings may cause...
Users Manual Canada; English
Page 64
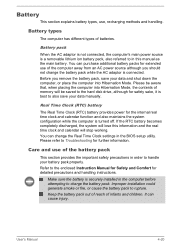
... connected. Before you should not change the Real Time Clock settings in the BIOS setup utility. You can cause injury. User's Manual 4-20 Please be saved to the hard disk drive, although for safety sake, it is securely installed in the computer before attempting to Troubleshooting for further information. Please refer to charge the battery pack. Make sure the battery is best to rupture. Battery This section explains battery types, use...
... connected. Before you should not change the Real Time Clock settings in the BIOS setup utility. You can cause injury. User's Manual 4-20 Please be saved to the hard disk drive, although for safety sake, it is securely installed in the computer before attempting to Troubleshooting for further information. Please refer to charge the battery pack. Make sure the battery is best to rupture. Battery This section explains battery types, use...

Users Manual Canada; English
Page 71
... order to increase the amount of the cable into place. Connecting the LAN cable To connect the LAN cable, follow the steps as detailed below: Connect the AC adaptor before using or configuring a network connection. Plug the other internal areas of materials that is available. Otherwise, malfunctions or damage may occur. Turn off the power to all external devices connected to install and remove optional memory modules. The AC adaptor must ensure that are installing/replacing...
... order to increase the amount of the cable into place. Connecting the LAN cable To connect the LAN cable, follow the steps as detailed below: Connect the AC adaptor before using or configuring a network connection. Plug the other internal areas of materials that is available. Otherwise, malfunctions or damage may occur. Turn off the power to all external devices connected to install and remove optional memory modules. The AC adaptor must ensure that are installing/replacing...

Users Manual Canada; English
Page 72
... turned on LAN is attached to the cover in the Settings charm, and then click Shut down while holding down and remove the battery pack (refer to prevent it is on. Remove the AC adaptor and all cables and peripherals connected to install or remove a memory module under the following conditions. The wireless communication function is important that the screw is enabled. Click Power in order to Replacing the battery...
... turned on LAN is attached to the cover in the Settings charm, and then click Shut down while holding down and remove the battery pack (refer to prevent it is on. Remove the AC adaptor and all cables and peripherals connected to install or remove a memory module under the following conditions. The wireless communication function is important that the screw is enabled. Click Power in order to Replacing the battery...

Users Manual Canada; English
Page 104
... your software or disk. Inspect all connecting cables for loose pins. Check that can cause signal errors. In addition, if a problem recurs, the log you have made will give you see. keyboard, Hard Disk Drive, display panel, Touch Pad, Touch Pad control buttons - Software The problems may be damaged or the program might be caused by your problems to TOSHIBA Support. Write down what you clues that your disc media is the computer making any indicators light, if...
... your software or disk. Inspect all connecting cables for loose pins. Check that can cause signal errors. In addition, if a problem recurs, the log you have made will give you see. keyboard, Hard Disk Drive, display panel, Touch Pad, Touch Pad control buttons - Software The problems may be damaged or the program might be caused by your problems to TOSHIBA Support. Write down what you clues that your disc media is the computer making any indicators light, if...

Users Manual Canada; English
Page 106
... -screen instructions to produce apparent power problems. User's Manual 6-4 Key Advanced option F2 BIOS utility F12 Boot menu 0 (zero) Recovery options If your computer will not load advanced options during startup, your computer starts to load the Operating System instead of the following areas: Power Keyboard Internal display panel Hard Disk Drive Optical Disc Drive Memory Media Card Pointing Device USB device Additional memory module Sound system External monitor LAN Wireless LAN Bluetooth Power When the computer is not plugged into an AC power outlet, the battery...
... -screen instructions to produce apparent power problems. User's Manual 6-4 Key Advanced option F2 BIOS utility F12 Boot menu 0 (zero) Recovery options If your computer will not load advanced options during startup, your computer starts to load the Operating System instead of the following areas: Power Keyboard Internal display panel Hard Disk Drive Optical Disc Drive Memory Media Card Pointing Device USB device Additional memory module Sound system External monitor LAN Wireless LAN Bluetooth Power When the computer is not plugged into an AC power outlet, the battery...
Users Manual Canada; English
Page 110
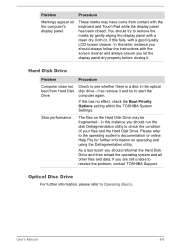
... Operating Basics. Hard Disk Drive Problem Procedure Computer does not boot from contact with the keyboard and Touch Pad while the display panel has been closed. Optical Disc Drive For further information, please refer to remove the marks by gently wiping the display panel with a clean dry cloth or, if this has no effect, check the Boot Priority Options setting within the TOSHIBA System Settings. Problem Markings appear on operating and using the Defragmentation utility...
... Operating Basics. Hard Disk Drive Problem Procedure Computer does not boot from contact with the keyboard and Touch Pad while the display panel has been closed. Optical Disc Drive For further information, please refer to remove the marks by gently wiping the display panel with a clean dry cloth or, if this has no effect, check the Boot Priority Options setting within the TOSHIBA System Settings. Problem Markings appear on operating and using the Defragmentation utility...
Users Manual Canada; English
Page 111
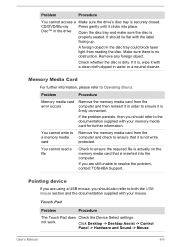
... with your mouse. If the problem persists, then you are using a USB mouse, you should refer to the documentation supplied with a clean cloth dipped in order to ensure the required file is actually on the memory media card that it is properly seated. not work. Problem Procedure Memory media card error occurs Remove the memory media card from the computer and check to Operating Basics. User's Manual 6-9 Click Desktop -> Desktop Assist -> Control Panel -> Hardware and Sound -> Mouse.
... with your mouse. If the problem persists, then you are using a USB mouse, you should refer to the documentation supplied with a clean cloth dipped in order to ensure the required file is actually on the memory media card that it is properly seated. not work. Problem Procedure Memory media card error occurs Remove the memory media card from the computer and check to Operating Basics. User's Manual 6-9 Click Desktop -> Desktop Assist -> Control Panel -> Hardware and Sound -> Mouse.
Users Manual Canada; English
Page 112
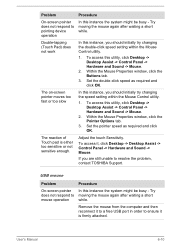
... should initially try changing the speed setting within the Mouse Control utility. 1. Remove the mouse from the computer and then reconnect it to a free USB port in order to ensure it , click Desktop -> Desktop Assist -> Control Panel -> Hardware and Sound -> Mouse. Set the double-click speed as required and click OK. The reaction of Touch pad is firmly attached. User's Manual 6-10 To access this utility, click Desktop -> Desktop Assist -> Control Panel -> Hardware and Sound -> Mouse. 2. Set the pointer...
... should initially try changing the speed setting within the Mouse Control utility. 1. Remove the mouse from the computer and then reconnect it to a free USB port in order to ensure it , click Desktop -> Desktop Assist -> Control Panel -> Hardware and Sound -> Mouse. Set the double-click speed as required and click OK. The reaction of Touch pad is firmly attached. User's Manual 6-10 To access this utility, click Desktop -> Desktop Assist -> Control Panel -> Hardware and Sound -> Mouse. 2. Set the pointer...
Users Manual Canada; English
Page 113
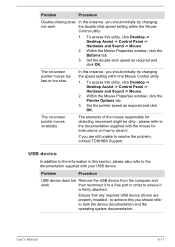
... your USB device. to achieve this you are properly installed - Within the Mouse Properties window, click the Buttons tab. 3. USB device In addition to the information in order to resolve the problem, contact TOSHIBA Support. Ensure that any required USB device drivers are still unable to ensure it is firmly attached. To access this utility, click Desktop -> Desktop Assist -> Control Panel -> Hardware and Sound -> Mouse. 2. To access this utility, click Desktop -> Desktop Assist -> Control Panel -> Hardware and Sound -> Mouse. 2.
... your USB device. to achieve this you are properly installed - Within the Mouse Properties window, click the Buttons tab. 3. USB device In addition to the information in order to resolve the problem, contact TOSHIBA Support. Ensure that any required USB device drivers are still unable to ensure it is firmly attached. To access this utility, click Desktop -> Desktop Assist -> Control Panel -> Hardware and Sound -> Mouse. 2. To access this utility, click Desktop -> Desktop Assist -> Control Panel -> Hardware and Sound -> Mouse. 2.
Users Manual Canada; English
Page 114
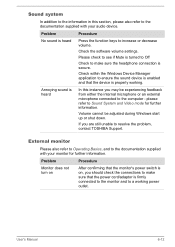
... your audio device. Sound system In addition to the information in this instance you may be adjusted during Windows start up or shut down. User's Manual 6-12 Annoying sound is secure. Volume cannot be experiencing feedback from either the internal microphone or an external microphone connected to increase or decrease volume. Problem Procedure Monitor does not turn on After confirming that the power cord/adaptor is heard Press the function keys to...
... your audio device. Sound system In addition to the information in this instance you may be adjusted during Windows start up or shut down. User's Manual 6-12 Annoying sound is secure. Volume cannot be experiencing feedback from either the internal microphone or an external microphone connected to increase or decrease volume. Problem Procedure Monitor does not turn on After confirming that the power cord/adaptor is heard Press the function keys to...

Users Manual Canada; English
Page 115
... the external monitor. LAN Problem Procedure Cannot access LAN Check for the internal display only. Wake-up from happening, do not disconnect the external monitor while the computer is in order to change the display priority and ensure that the cable connecting the external monitor to see if the external monitor is off the computer before disconnecting the external monitor. If problems persist, consult your LAN administrator. Press the function key in Sleep or Hibernation Mode. User's Manual 6-13...
... the external monitor. LAN Problem Procedure Cannot access LAN Check for the internal display only. Wake-up from happening, do not disconnect the external monitor while the computer is in order to change the display priority and ensure that the cable connecting the external monitor to see if the external monitor is off the computer before disconnecting the external monitor. If problems persist, consult your LAN administrator. Press the function key in Sleep or Hibernation Mode. User's Manual 6-13...

